Fescar has been released for a while, and distributed transactions have always been a highly focused area in the industry. Fescar received nearly 5000 stars within a month of its release, indicating its popularity. Of course, before Fescar, there were already relatively mature open-source distributed transaction solutions, such as the 2PC non-intrusive transaction of LCN, which has now evolved to version 5.0 and supports TCX transactions similar to Fescar's transaction model. Other implementations of TCC transactions include hmily and tcc-transaction. In the current era of microservice architecture, and given Alibaba's extensive background in open source, the release of Fescar has undoubtedly sparked a new wave of research into distributed transactions. Fescar originated from Alibaba Cloud's commercial distributed transaction service GTS, a model that has undergone rigorous testing in online environments. The TXC distributed transaction model of Fescar is similar to the traditional XA transaction model, with the main difference being the positioning of the resource manager—one at the application layer and the other at the database layer. The author believes that Fescar's TXC model implementation is of significant research value, so today we will thoroughly explore the Fescar project's code. This article is lengthy and will take about 30-60 minutes to read and understand.
Project Address
Fescar: https://github.com/alibaba/fescar
The code discussed in this blog post is from the 0.1.2-SNAPSHOT version of Fescar. As Fescar evolves, the project structure and module implementations might change significantly.
Fescar's TXC Model

The above image is an official schematic of the TXC model created by Fescar. The quality of visuals produced by large companies is indeed impressive. From the schematic, we can see the overall implementation of TXC. TXC is implemented through three components, as depicted in the three dark yellow sections in the image, with the following roles:
- TM: Global Transaction Manager, which starts the Fescar distributed transaction on the server side and sends the global transaction to the TC (Transaction Coordinator) for management.
- TC: Transaction Coordinator, which controls the global transaction's commit or rollback. This component requires independent deployment and maintenance, currently only supporting a single-machine version. Future iterations plan to include a clustered version.
- RM: Resource Manager, mainly responsible for reporting branch transactions and managing local transactions.
A brief description of its implementation process: The initiating service starts a global transaction and registers it with the TC. When calling a cooperating service, the branch transaction of the cooperating service completes the first phase of transaction commit or rollback and generates an undo_log for transaction rollback, then registers the current cooperating service with the TC and reports its transaction status, merging it into the global transaction of the same business. If no issues arise, it proceeds to the next cooperating service call. If any branch transaction of the cooperating service rolls back, it will notify the TC, which then notifies all branch transactions of the global transaction that have completed the first phase to roll back. If all branch transactions proceed normally, it will notify the TC when returning to the global transaction initiator, and the TC will notify all branches of the global transaction to delete the rollback logs. To solve write isolation and degree isolation issues during this process, global locks managed by the TC will be involved.
The goal of this blog post is to delve into the code details and explore how its basic ideas are implemented. We will first outline the role of each module from the project's structure, then investigate the entire distributed transaction implementation process using the official examples.
Project Structure Analysis
After pulling the project and opening it with an IDE, the directory structure is as follows. Let's take a look at the implementation of each module:

- common: Common components, providing commonly used utility classes, static variables, extension mechanism class loaders, and defining global exceptions, etc.
- config: Configuration loading and parsing module, providing basic interfaces for configuration. Currently, only file configuration is implemented, with plans for implementations of configuration centers like Nacos.
- core: The core module mainly encapsulating RPC-related content for communication between TM, RM, and TC.
- dubbo: The Dubbo module mainly adapts the Dubbo communication framework, using Dubbo's filter mechanism to pass global transaction information to branches.
- examples: A simple example module that we will explore to understand the implementation.
- rm-datasource: The resource management module, a core module that proxies some JDBC classes to parse SQL, generate rollback logs, and coordinate local transactions. Personally, I think naming this module "core" would be more appropriate.
- server: The TC component, mainly coordinating and managing global transactions, responsible for committing or rolling back global transactions, and maintaining global locks.
- spring: The module integrated with Spring, mainly consisting of AOP logic, serving as the entry point for the entire distributed transaction, and the breakthrough point for studying Fescar.
- tm: The global transaction management module, managing the boundaries of global transactions, and controlling the initiation and rollback points of global transactions.
Viewing the Effects through the [examples] Module
First, start the TC (Server) module, and start the main method directly. The default server port is 8091.
Second, go to the examples module and configure the configuration files for the order, business, account, and storage services, mainly the MySQL data source and Zookeeper connection address. Note that the default Dubbo Zookeeper registry dependency is missing, and starting it will throw a class not found exception. Add the following dependency:
<dependency>
    <groupId>com.101tec</groupId>
    <artifactId>zkclient</artifactId>
    <version>0.10</version>
    <exclusions>
        <exclusion>
            <artifactId>slf4j-log4j12</artifactId>
            <groupId>org.slf4j</groupId>
        </exclusion>
    </exclusions>
</dependency>
Third, place a breakpoint at the simulated exception in BusinessServiceImpl. Start OrderServiceImpl, StorageServiceImpl, AccountServiceImpl, and BusinessServiceImpl services one by one. After hitting the breakpoint, check the account_tbl table in the database; the amount has been reduced by 400 yuan, to 599 yuan. Then, release the breakpoint to trigger the simulated exception in the BusinessServiceImpl module. The global transaction rolls back, and the account_tbl table amount returns to 999 yuan.
As shown above, we have experienced the control capability of Fescar transactions. Next, let's look at how it controls transactions in detail.
Analysis of Fescar Transaction Process
First, Analyze the Configuration File
This is a golden rule: to integrate any technology or framework, the configuration file is definitely a breakthrough point. From the above example, we learned that the configuration file in the example module configured an instance of a global transaction scanner, as follows:
<bean class="com.alibaba.fescar.spring.annotation.GlobalTransactionScanner">
    <constructor-arg value="dubbo-demo-app"/>
    <constructor-arg value="my_test_tx_group"/>
</bean>
This instance scans all instances when the project starts. The specific implementation can be found in the [spring] module, and methods marked with the @GlobalTransactional annotation are woven into the logic of GlobalTransactionalInterceptor's invoke method. When the application starts, instances of TM (TmRpcClient) and RM (RmRpcClient) are initialized, connecting the service with the TC (Transaction Coordinator). Going further involves the TransactionalTemplate class in the TM module.
[TM] Module Starts Global Transactions
The opening, committing, and rolling back of global transactions are encapsulated in the TransactionalTemplate. The code is as follows:
public Object execute(TransactionalExecutor business) throws TransactionalExecutor.ExecutionException {
    // 1. get or create a transaction
    GlobalTransaction tx = GlobalTransactionContext.getCurrentOrCreate();
    // 2. begin transaction
    try {
        tx.begin(business.timeout(), business.name());
    } catch (TransactionException txe) {
        throw new TransactionalExecutor.ExecutionException(tx, txe,
            TransactionalExecutor.Code.BeginFailure);
    }
    Object rs = null;
    try {
        // Do Your Business
        rs = business.execute();
    } catch (Throwable ex) {
        // 3. any business exception, rollback.
        try {
            tx.rollback();
            // 3.1 Successfully rolled back
            throw new TransactionalExecutor.ExecutionException(tx, TransactionalExecutor.Code.RollbackDone, ex);
        } catch (TransactionException txe) {
            // 3.2 Failed to rollback
            throw new TransactionalExecutor.ExecutionException(tx, txe,
                TransactionalExecutor.Code.RollbackFailure, ex);
        }
    }
    // 4. everything is fine, commit.
    try {
        tx.commit();
    } catch (TransactionException txe) {
        // 4.1 Failed to commit
        throw new TransactionalExecutor.ExecutionException(tx, txe,
            TransactionalExecutor.Code.CommitFailure);
    }
    return rs;
}
The more detailed implementation in the [TM] module is divided into two classes, as follows:
DefaultGlobalTransaction: Responsible for the specific actions of starting, committing, and rolling back global transactions.
DefaultTransactionManager: Responsible for using TmRpcClient to send commands to the TC control center, such as starting a global transaction (GlobalBeginRequest), committing (GlobalCommitRequest), rolling back (GlobalRollbackRequest), and querying status (GlobalStatusRequest).
The above are the core contents of the TM module. After the TM module completes the global transaction start, we then look at how the global transaction ID, xid, is passed and how the RM component intervenes.
Passing Global Transaction xid with [dubbo]
First is the transmission of xid. Currently, the transmission in a microservice architecture implemented with the Dubbo framework has been realized. It is also easy to implement for others like Spring Cloud and Motan. By using the filter mechanism that general RPC communication frameworks have, xid is passed from the initiating node of the global transaction to the service's subordinate nodes. After being received by the subordinate nodes, it is bound to the current thread context environment to determine whether to join the global transaction when the branch transaction executes SQL. Fescar's implementation can be seen in the [dubbo] module as follows:
@Activate(group = { Constants.PROVIDER, Constants.CONSUMER }, order = 100)
public class TransactionPropagationFilter implements Filter {

    private static final Logger LOGGER = LoggerFactory.getLogger(TransactionPropagationFilter.class);

    @Override
    public Result invoke(Invoker<?> invoker, Invocation invocation) throws RpcException {
        String xid = RootContext.getXID();
        String rpcXid = RpcContext.getContext().getAttachment(RootContext.KEY_XID);
        if (LOGGER.isDebugEnabled()) {
            LOGGER.debug("xid in RootContext\[" + xid + "\] xid in RpcContext\[" + rpcXid + "\]");
        }
        boolean bind = false;
        if (xid != null) {
            RpcContext.getContext().setAttachment(RootContext.KEY_XID, xid);
        } else {
            if (rpcXid != null) {
                RootContext.bind(rpcXid);
                bind = true;
                if (LOGGER.isDebugEnabled()) {
                    LOGGER.debug("bind\[" + rpcXid + "\] to RootContext");
                }
            }
        }
        try {
            return invoker.invoke(invocation);

        } finally {
            if (bind) {
                String unbindXid = RootContext.unbind();
                if (LOGGER.isDebugEnabled()) {
                    LOGGER.debug("unbind\[" + unbindXid + "\] from RootContext");
                }
                if (!rpcXid.equalsIgnoreCase(unbindXid)) {
                    LOGGER.warn("xid in change during RPC from " + rpcXid + " to " + unbindXid);
                    if (unbindXid != null) {
                        RootContext.bind(unbindXid);
                        LOGGER.warn("bind \[" + unbindXid + "\] back to RootContext");
                    }
                }
            }
        }
    }
}
When rpcXid is not null, it is added to the ContextCore of RootContext. Let's delve into this a bit. ContextCore is an extensible interface, and the default implementation is ThreadLocalContextCore, which maintains the current xid based on ThreadLocal. Fescar provides an extensible mechanism implemented in the [common] module. Through a custom class loader, EnhancedServiceLoader, it loads the service classes that need to be extended. By adding the @LoadLevel annotation with a high order attribute to the extension class, the purpose of extension implementation can be achieved.
Intervention of Local Resource Management in the [RM] Module
Fescar implements proxy classes for local transaction-related interfaces through a proxy mechanism, such as DataSourceProxy, ConnectionProxy, and StatementProxy. This can be seen in the configuration file, indicating that to use Fescar distributed transactions, the proxy data source provided by Fescar must be configured. For example:

After configuring the proxy data source, starting from DataSourceProxy, we can freely control all local operations on the database. From the xid transmission above, we know that the xid is saved in RootContext. Now, look at the following code to see it clearly:
First, look at a piece of code from StatementProxy:

Then, look at the code in ExecuteTemplate:

Similar to the transaction management template class TransactionalTemplate in the [TM] module, the crucial logic proxy here is encapsulated in the ExecuteTemplate template class. By overriding Statement with StatementProxy implementation, the execute logic of ExecuteTemplate is called when the original JDBC executeUpdate method is executed. Before the SQL is actually executed, it checks whether the current context in RootContext contains xid, i.e., whether it is a global distributed transaction. If not, the local transaction is used directly. If it is, RM adds some distributed transaction-related logic. Fescar has encapsulated five different executors to handle different types of SQL, namely UpdateExecutor, DeleteExecutor, InsertExecutor, SelectForUpdateExecutor, and PlainExecutor. The structure is as follows:
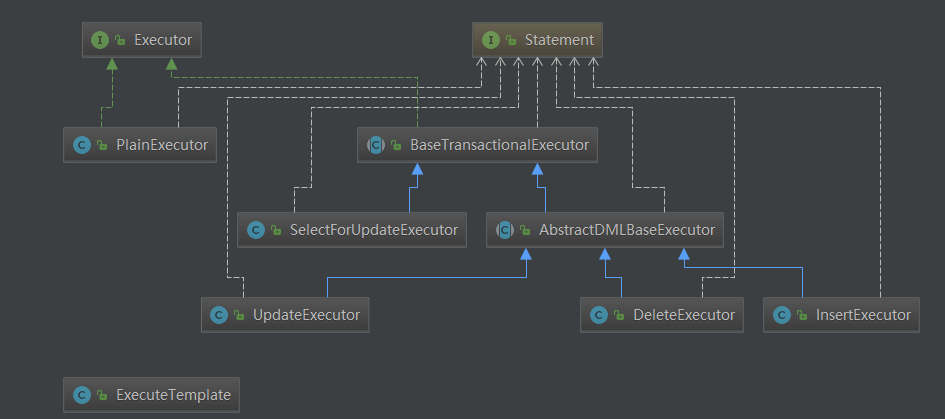
PlainExecutor:
The native JDBC interface implementation, without any processing, is used for ordinary select queries in global transactions.
UpdateExecutor, DeleteExecutor, InsertExecutor:
The three DML (Data Manipulation Language) executors for updating, deleting, and inserting, mainly analyze the SQL statements before and after execution and implement the following two abstract interface methods:
protected abstract TableRecords beforeImage() throws SQLException;

protected abstract TableRecords afterImage(TableRecords beforeImage) throws SQLException;
During this process, the undo_log for rollback operation is generated by analyzing the SQL, and the log is currently saved in MySQL, sharing the same transaction with the business SQL operation. The table structure is as follows:
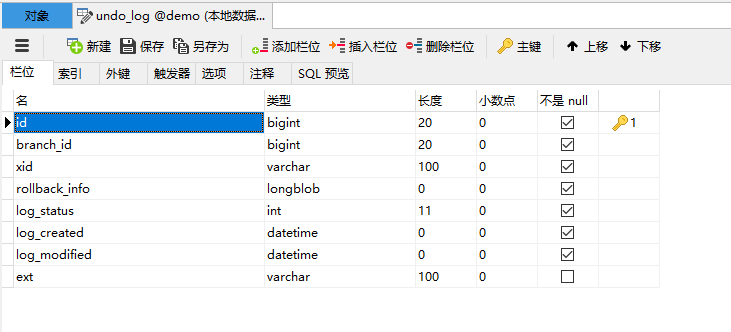
The rollback_info column contains the detailed information of the undo_log, which is of type longblob. The structure is as follows:
{
    "branchId":3958194,
    "sqlUndoLogs":[
        {
            "afterImage":{
                "rows":[
                    {
                        "fields":[
                            {
                                "keyType":"PrimaryKey",
                                "name":"ID",
                                "type":4,
                                "value":10
                            },
                            {
                                "keyType":"NULL",
                                "name":"COUNT",
                                "type":4,
                                "value":98
                            }
                        ]
                    }
                ],
                "tableName":"storage_tbl"
            },
            "beforeImage":{
                "rows":[
                    {
                        "fields":[
                            {
                                "keyType":"PrimaryKey",
                                "name":"ID",
                                "type":4,
                                "value":10
                            },
                            {
                                "keyType":"NULL",
                                "name":"COUNT",
                                "type":4,
                                "value":100
                            }
                        ]
                    }
                ],
                "tableName":"storage_tbl"
            },
            "sqlType":"UPDATE",
            "tableName":"storage_tbl"
        }
    ],
    "xid":"192.168.7.77:8091:3958193"
}
Here is an example of an update operation. The undo_log records very detailed information. It associates the branch ID with the global transaction xid, records the table name, the operation field names, and the records before and after the SQL execution. For instance, this record shows table name = storage_tbl, before SQL execution ID = 10, count = 100, after SQL execution ID = 10, count = 98. If the entire global transaction fails and needs to be rolled back, it can generate the following rollback SQL statement:
update storage_tbl set count = 100 where id = 10;
SelectForUpdateExecutor:
In Fescar's AT mode, the default isolation level above the local transaction is read uncommitted. However, through the SelectForUpdateExecutor, it can support the read committed isolation level. The code is as follows:
@Override
public Object doExecute(Object... args) throws Throwable {
    SQLSelectRecognizer recognizer = (SQLSelectRecognizer) sqlRecognizer;

    Connection conn = statementProxy.getConnection();
    ResultSet rs = null;
    Savepoint sp = null;
    LockRetryController lockRetryController = new LockRetryController();
    boolean originalAutoCommit = conn.getAutoCommit();

    StringBuffer selectSQLAppender = new StringBuffer("SELECT ");
    selectSQLAppender.append(getTableMeta().getPkName());
    selectSQLAppender.append(" FROM " + getTableMeta().getTableName());
    String whereCondition = null;
    ArrayList<Object> paramAppender = new ArrayList<>();
    if (statementProxy instanceof ParametersHolder) {
        whereCondition = recognizer.getWhereCondition((ParametersHolder) statementProxy, paramAppender);
    } else {
        whereCondition = recognizer.getWhereCondition();
    }
    if (!StringUtils.isEmpty(whereCondition)) {
        selectSQLAppender.append(" WHERE " + whereCondition);
    }
    selectSQLAppender.append(" FOR UPDATE");
    String selectPKSQL = selectSQLAppender.toString();

    try {
        if (originalAutoCommit) {
            conn.setAutoCommit(false);
        }
        sp = conn.setSavepoint();
        rs = statementCallback.execute(statementProxy.getTargetStatement(), args);

        while (true) {
            // Try to get global lock of those rows selected
            Statement stPK = null;
            PreparedStatement pstPK = null;
            ResultSet rsPK = null;
            try {
                if (paramAppender.isEmpty()) {
                    stPK = statementProxy.getConnection().createStatement();
                    rsPK = stPK.executeQuery(selectPKSQL);
                } else {
                    pstPK = statementProxy.getConnection().prepareStatement(selectPKSQL);
                    for (int i = 0; i < paramAppender.size(); i++) {
                        pstPK.setObject(i + 1, paramAppender.get(i));
                    }
                    rsPK = pstPK.executeQuery();
                }

                TableRecords selectPKRows = TableRecords.buildRecords(getTableMeta(), rsPK);
                statementProxy.getConnectionProxy().checkLock(selectPKRows);
                break;

            } catch (LockConflictException lce) {
                conn.rollback(sp);
                lockRetryController.sleep(lce);

            } finally {
                if (rsPK != null) {
                    rsPK.close();
                }
                if (stPK != null) {
                    stPK.close();
                }
                if (pstPK != null) {
                    pstPK.close();
                }
            }
        }

    } finally {
        if (sp != null) {
            conn.releaseSavepoint(sp);
        }
        if (originalAutoCommit) {
            conn.setAutoCommit(true);
        }
    }
    return rs;
}
The key code is as follows:
TableRecords selectPKRows = TableRecords.buildRecords(getTableMeta(), rsPK);
statementProxy.getConnectionProxy().checkLock(selectPKRows);
By operating on the selectPKRows table records, lockKeys are obtained, and then it checks with the TC controller to see if they are globally locked. If they are locked, it retries until the lock is released and then returns the query result.
Registration and Reporting of Branch Transactions
Before the local transaction is committed, Fescar registers and reports information related to the branch transaction. This can be seen in the commit part of the ConnectionProxy class code:
@Override
public void commit() throws SQLException {
    if (context.inGlobalTransaction()) {
        try {
            register();
        } catch (TransactionException e) {
            recognizeLockKeyConflictException(e);
        }

        try {
            if (context.hasUndoLog()) {
                UndoLogManager.flushUndoLogs(this);
            }
            targetConnection.commit();
        } catch (Throwable ex) {
            report(false);
            if (ex instanceof SQLException) {
                throw (SQLException) ex;
            } else {
                throw new SQLException(ex);
            }
        }
        report(true);
        context.reset();

    } else {
        targetConnection.commit();
    }
}
From this code, we can see that it first checks whether it is a global transaction. If it is not, it commits directly. If it is, it first registers the branch transaction with the TC controller. For write isolation, it involves obtaining global locks on the TC side. Then, it saves the undo_log used for rollback operations and finally commits the local transaction. Lastly, it reports the transaction status to the TC controller. At this point, the first phase of the local transaction is complete.
Coordinating the Global Transaction with the [server] Module
For the server module, we can focus on the DefaultCoordinator class. This is the default implementation of the AbstractTCInboundHandler controller handler. It mainly implements interfaces for starting, committing, rolling back, querying the status of global transactions, registering branch transactions, reporting, and checking locks, such as:

Returning to the TransactionalTemplate at the beginning, if the entire distributed transaction fails and needs to be rolled back, TM first initiates a rollback instruction to TC. After TC receives it and parses the request, it is routed to the doGlobalRollback method of the default controller class. The code executed on the TC controller side is as follows:
@Override
public void doGlobalRollback(GlobalSession globalSession, boolean retrying) throws TransactionException {
    for (BranchSession branchSession : globalSession.getReverseSortedBranches()) {
        BranchStatus currentBranchStatus = branchSession.getStatus();
        if (currentBranchStatus == BranchStatus.PhaseOne_Failed) {
            continue;
        }
        try {
            BranchStatus branchStatus = resourceManagerInbound.branchRollback(XID.generateXID(branchSession.getTransactionId()), branchSession.getBranchId(),
                    branchSession.getResourceId(), branchSession.getApplicationData());

            switch (branchStatus) {
                case PhaseTwo_Rollbacked:
                    globalSession.removeBranch(branchSession);
                    LOGGER.error("Successfully rolled back branch " + branchSession);
                    continue;
                case PhaseTwo\_RollbackFailed\_Unretryable:
                    GlobalStatus currentStatus = globalSession.getStatus();
                    if (currentStatus.name().startsWith("Timeout")) {
                        globalSession.changeStatus(GlobalStatus.TimeoutRollbackFailed);
                    } else {
                        globalSession.changeStatus(GlobalStatus.RollbackFailed);
                    }
                    globalSession.end();
                    LOGGER.error("Failed to rollback global\[" + globalSession.getTransactionId() + "\] since branch\[" + branchSession.getBranchId() + "\] rollback failed");
                    return;
                default:
                    LOGGER.info("Failed to rollback branch " + branchSession);
                    if (!retrying) {
                        queueToRetryRollback(globalSession);
                    }
                    return;

            }
        } catch (Exception ex) {
            LOGGER.info("Exception rollbacking branch " + branchSession, ex);
            if (!retrying) {
                queueToRetryRollback(globalSession);
                if (ex instanceof TransactionException) {
                    throw (TransactionException) ex;
                } else {
                    throw new TransactionException(ex);
                }
            }

        }

    }
    GlobalStatus currentStatus = globalSession.getStatus();
    if (currentStatus.name().startsWith("Timeout")) {
        globalSession.changeStatus(GlobalStatus.TimeoutRollbacked);
    } else {
        globalSession.changeStatus(GlobalStatus.Rollbacked);
    }
    globalSession.end();
}
As seen from the above code, during rollback, each branch transaction is iterated from the global transaction session, and then each branch transaction is notified to rollback. When the branch service receives the request, it is first routed to the doBranchRollback method in RMHandlerAT, and then the branchRollback method in RM is called. The code is as follows:
@Override
public BranchStatus branchRollback(String xid, long branchId, String resourceId, String applicationData) throws TransactionException {
    DataSourceProxy dataSourceProxy = get(resourceId);
    if (dataSourceProxy == null) {
        throw new ShouldNeverHappenException();
    }
    try {
        UndoLogManager.undo(dataSourceProxy, xid, branchId);
    } catch (TransactionException te) {
        if (te.getCode() == TransactionExceptionCode.BranchRollbackFailed_Unretriable) {
            return BranchStatus.PhaseTwo_RollbackFailed_Unretryable;
        } else {
            return BranchStatus.PhaseTwo_RollbackFailed_Retryable;
        }
    }
    return BranchStatus.PhaseTwo_Rollbacked;
}
On the RM branch transaction side, the UndoLogManager's undo method is ultimately executed. It retrieves the rollback log from the database using xid and branchId to complete the data rollback operation. The entire process is completed synchronously. If the global transaction is successful, TC will have a similar coordination process as mentioned above, but it will be asynchronous, clearing the undo_log related to the global transaction. At this point, the two-phase commit or rollback is completed, thus achieving complete control of the global transaction.
Conclusion
If you've made it this far, thank you very much for patiently taking the time to learn amidst your busy schedule. I believe the time spent was worthwhile. By thoroughly reading and understanding this article, you likely have a comprehensive understanding of the main flow of Fescar's implementation. This article took approximately one person-day from conception to completion. During this process, I also gained a deeper understanding of Fescar's implementation. Due to space constraints, I did not delve into every detail of the implementation, such as how SQL parsing is done, but instead focused on the key points of the implementation process of Fescar's TXC model. This article has been proofread, but due to personal knowledge limitations and finite energy, errors or misunderstandings may inevitably occur. Corrections are welcome.
About the Author:
Chen Kailing joined Kaijing Technology in May 2016. Formerly a senior developer and project manager, currently the head of the Architecture & Operations Department of Kaijing Technology's R&D Center. PMP project management certification, Alibaba Cloud MVP. Enthusiastic about open source, having open-sourced several popular projects. Passionate about sharing technical insights, and author of the independent blog KL Blog (http://www.kailing.pub).