· 22 min read

Preface

In distributed systems, distributed transactions are a problem that must be solved. Currently, the most commonly used solution is eventual consistency. Since Alibaba open-sourced Fescar (renamed Seata in early April) earlier this year, the project has received great attention, currently nearing 8000 stars. Seata aims to solve the problem of distributed transactions in the microservices field with high performance and zero intrusion. It is currently undergoing rapid iteration, with a near-term goal of producing a production-ready MySQL version. For a comprehensive introduction to Seata, you can check the official WIKI for more detailed information.

This article is mainly based on the structure of spring cloud+spring jpa+spring cloud alibaba fescar+mysql+seata, building a distributed system demo, and analyzing and explaining its working process and principles from the perspective of the client (RM, TM) through seata's debug logs and source code. The code in the article is based on fescar-0.4.1. Since the project was just renamed to seata not long ago, some package names, class names, and jar package names are still named fescar, so the term fescar is still used in the following text. Sample project: https://github.com/fescar-group/fescar-samples/tree/master/springcloud-jpa-seata

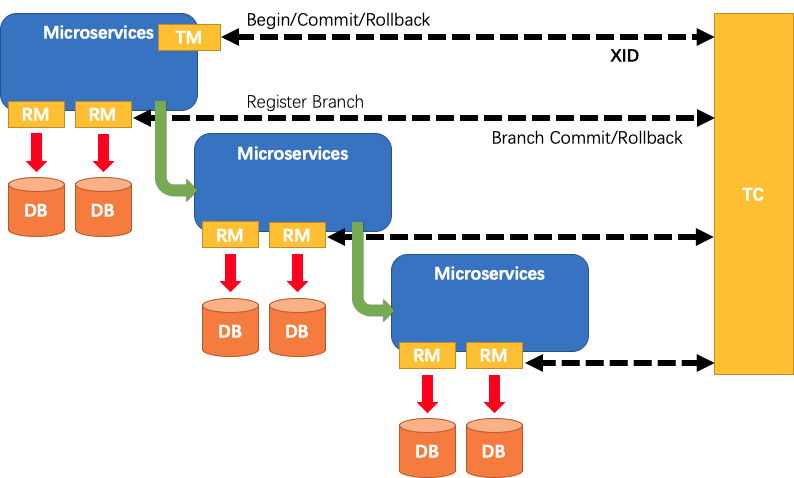
  • XID: The unique identifier of a global transaction, composed of ip:port:sequence
  • Transaction Coordinator (TC): Maintains the running state of global transactions, responsible for coordinating and driving the commit or rollback of global transactions
  • Transaction Manager (TM): Controls the boundary of global transactions, responsible for starting a global transaction and finally initiating the decision of global commit or rollback
  • Resource Manager (RM): Controls branch transactions, responsible for branch registration, status reporting, and receiving instructions from the transaction coordinator to drive the commit and rollback of branch (local) transactions

Distributed Framework Support

Fescar uses XID to represent a distributed transaction. XID needs to be transmitted in the systems involved in a distributed transaction request, to send the processing status of branch transactions to the feacar-server, and to receive commit and rollback instructions from the feacar-server. Fescar officially supports all versions of the dubbo protocol, and the community also provides corresponding implementations for spring cloud (spring-boot) distributed projects.

<dependency>
<groupId>org.springframework.cloud</groupId>
<artifactId>spring-cloud-alibaba-fescar</artifactId>
<version>2.1.0.BUILD-SNAPSHOT</version>
</dependency>

This component implements the XID transmission function based on RestTemplate and Feign communication.

Business Logic

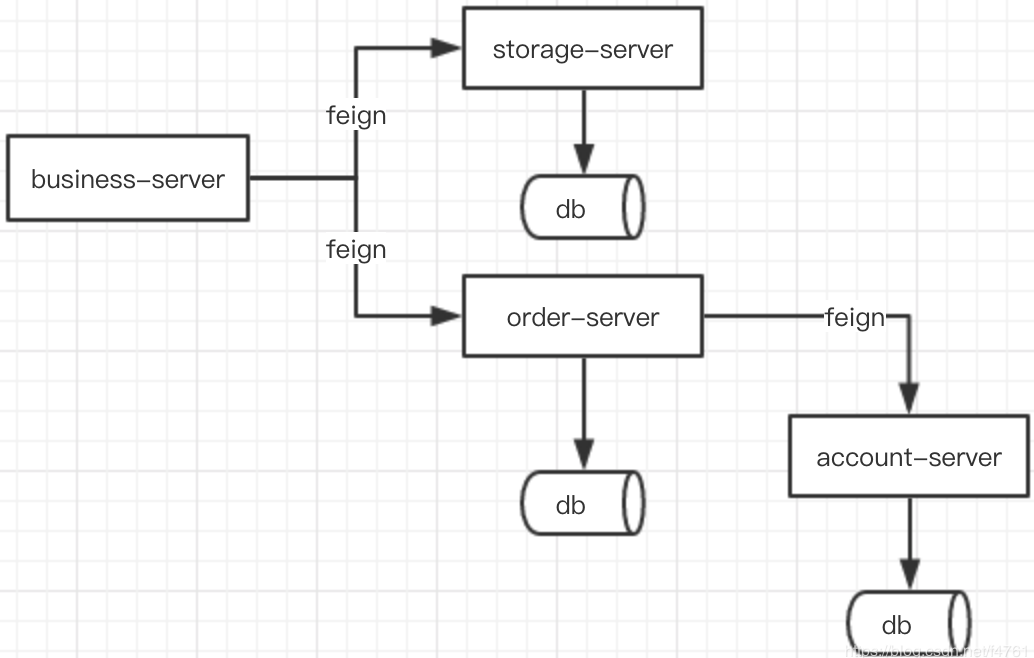
The business logic is the classic process of placing an order, deducting the balance, and reducing inventory. According to the module division, it is divided into three independent services, each connected to the corresponding database:

  • Order: order-server
  • Account: account-server
  • Inventory: storage-server

There is also a business system that initiates distributed transactions:

  • Business: business-server

The project structure is as shown in the figure below: Insert image description here

Normal Business

  1. The business initiates a purchase request
  2. Storage deducts inventory
  3. Order creates an order
  4. Account deducts balance

Abnormal Business

  1. The business initiates a purchase request
  2. Storage deducts inventory
  3. Order creates an order
  4. Account deduct balance exception

In the normal process, the data of steps 2, 3, and 4 is normally updated globally commit. In the abnormal process, the data is globally rolled back due to the exception error in step 4.

Configuration Files

The configuration entry file for fescar is registry.conf. Check the code ConfigurationFactory to find that currently, the configuration file name can only be registry.conf and cannot be specified otherwise.

private static final String REGISTRY_CONF = "registry.conf";
public static final Configuration FILE_INSTANCE = new FileConfiguration(REGISTRY_CONF);

In registry, you can specify the specific configuration form, the default is to use the file type. In file.conf, there are 3 parts of the configuration content:

  1. transport The transport part configuration corresponds to the NettyServerConfig class, used to define Netty-related parameters. TM and RM communicate with fescar-server using Netty.

  2. service

service {
#vgroup->rgroup
vgroup_mapping.my_test_tx_group = "default"
#Configure the address for the Client to connect to TC
default.grouplist = "127.0.0.1:8091"
#degrade current not support
enableDegrade = false
#disable
Whether to enable seata distributed transaction
disableGlobalTransaction = false
}
  1. client
client {
#RM receives the upper limit of buffer after TC's commit notification
async.commit.buffer.limit = 10000
lock {
retry.internal = 10
retry.times = 30
}
}

Data Source Proxy

In addition to the previous configuration files, fescar in AT mode has a bit of code volume, which is for the proxy of the data source, and currently can only be based on the proxy of DruidDataSource. Note: In the latest release of version 0.4.2, it has supported any data source type.

@Bean
@ConfigurationProperties(prefix = "spring.datasource")
public DruidDataSource druidDataSource() {
DruidDataSource druidDataSource = new DruidDataSource();
return druidDataSource;
}
@Primary
@Bean("dataSource")
public DataSourceProxy dataSource(DruidDataSource druidDataSource) {
return new DataSourceProxy(druidDataSource);
}

The purpose of using DataSourceProxy is to introduce ConnectionProxy. One aspect of fescar's non-intrusiveness is reflected in the implementation of ConnectionProxy. The cut-in point for branch transactions to join global transactions is at the local transaction's commit stage. This design ensures that business data and undo_log are in a local transaction. The undo_log table needs to be created in the business library, and fescar depends on this table to record the status of each branch transaction and the rollback data of the second stage. There is no need to worry about the table's data volume becoming a single point problem. In the case of a global transaction commit, the transaction's corresponding undo_log will be asynchronously deleted.

CREATE TABLE `undo_log` (
`id` bigint(20) NOT NULL AUTO_INCREMENT,
`branch_id` bigint(20) NOT NULL,
`xid` varchar(100) NOT NULL,
`rollback_info` longblob NOT NULL,
`log_status` int(11) NOT NULL,
`log_created` datetime NOT NULL,
`log_modified` datetime NOT NULL,
`ext` varchar(100) DEFAULT NULL,
PRIMARY KEY (`id`),
UNIQUE KEY `ux_undo_log` (`xid`, `branch_id`)
) ENGINE=InnoDB AUTO_INCREMENT=1 DEFAULT CHARSET=utf8;

Start Server

Go to https://github.com/apache/incubator-seata/releases to download the fescar-server version corresponding to the Client version to avoid protocol inconsistencies caused by different versions. Enter the bin directory after decompression and execute

./fescar-server.sh 8091 ../data

If the startup is successful, the following output will be shown

2019-04-09 20:27:24.637 INFO [main] c.a.fescar.core.rpc.netty.AbstractRpcRemotingServer.start:152 -Server started ...

Start Client

The loading entry class of fescar is located in GlobalTransactionAutoConfiguration, which can be automatically loaded for spring boot-based projects, and of course, it can also be instantiated by other means.

@Configuration
@EnableConfigurationProperties({FescarProperties.class})
public class GlobalTransactionAutoConfiguration {
private final ApplicationContext applicationContext;
private final FescarProperties fescarProperties;
public GlobalTransactionAutoConfiguration(ApplicationContext applicationContext, FescarProperties fescarProperties) {


this.applicationContext = applicationContext;
this.fescarProperties = fescarProperties;
}
/**
* Instantiate GlobalTransactionScanner
* scanner is the initialization initiator for the client
*/
@Bean
public GlobalTransactionScanner globalTransactionScanner() {
String applicationName = this.applicationContext.getEnvironment().getProperty("spring.application.name");
String txServiceGroup = this.fescarProperties.getTxServiceGroup();
if (StringUtils.isEmpty(txServiceGroup)) {
txServiceGroup = applicationName + "-fescar-service-group";
this.fescarProperties.setTxServiceGroup(txServiceGroup);
}
return new GlobalTransactionScanner(applicationName, txServiceGroup);
}
}

You can see that it supports a configuration item FescarProperties, used to configure the transaction group name

spring.cloud.alibaba.fescar.tx-service-group=my_test_tx_group

If the service group is not specified, the default name generated is spring.application.name + "-fescar-service-group". Therefore, if spring.application.name is not specified, it will report an error when starting.

@ConfigurationProperties("spring.cloud.alibaba.fescar")
public class FescarProperties {
private String txServiceGroup;
public FescarProperties() {}
public String getTxServiceGroup() {
return this.txServiceGroup;
}
public void setTxServiceGroup(String txServiceGroup) {
this.txServiceGroup = txServiceGroup;
}
}

After obtaining the applicationId and txServiceGroup, create a GlobalTransactionScanner object, mainly seeing the initClient method in the class.

private void initClient() {
if (StringUtils.isNullOrEmpty(applicationId) || StringUtils.isNullOrEmpty(txServiceGroup)) {
throw new IllegalArgumentException("applicationId: " + applicationId + " txServiceGroup: " + txServiceGroup);
}
// init TM
TMClient.init(applicationId, txServiceGroup);
// init RM
RMClient.init(applicationId, txServiceGroup);
}

In the method, you can see that TMClient and RMClient are initialized. For a service, it can be both TM and RM roles. When it is TM or RM depends on whether the @GlobalTransactional annotation is marked in a global transaction. The result of the Client creation is a Netty connection with TC, so you can see two Netty Channels in the startup log, indicating that the transactionRole is TMROLE and RMROLE.

2019-04-09 13:42:57.417 INFO 93715 --- [imeoutChecker_1] c.a.f.c.rpc.netty.NettyPoolableFactory : NettyPool create channel to {"address":"127.0.0.1:8091", "message":{"applicationId":"business-service", "byteBuffer":{"char":"\u0000","direct":false,"double":0.0,"float":0.0,"int":0,"long":0,"readOnly":false,"short":0},"transactionServiceGroup":"my_test_tx_group","typeCode":101,"version":"0.4.1"},"transactionRole":"TMROLE"}
2019-04-09 13:42:57.505 INFO 93715 --- [imeoutChecker_1] c.a.f.c.rpc.netty.NettyPoolableFactory : NettyPool create channel to {"address":"127.0.0.1:8091", "message":{"applicationId":"business-service", "byteBuffer":{"char":"\u0000","direct":false,"double":0.0,"float":0.0,"int":0,"long":0,"readOnly":false,"short":0},"transactionServiceGroup":"my_test_tx_group","typeCode":103,"version":"0.4.1"},"transactionRole":"RMROLE"}
2019-04-09 13:42:57.629 DEBUG 93715 --- [lector_TMROLE_1] c.a.f.c.rpc.netty.MessageCodecHandler : Send:RegisterTMRequest{applicationId='business-service', transactionServiceGroup='my_test_tx_group'}
2019-04-09 13:42:57.629 DEBUG 93715 --- [lector_RMROLE_1] c.a.f.c.rpc.netty.MessageCodecHandler : Send:RegisterRMRequest{resourceIds='null', applicationId='business-service', transactionServiceGroup='my_test_tx_group'}
2019-04-09 13:42:57.699 DEBUG 93715 --- [lector_RMROLE_1] c.a.f.c.rpc.netty.MessageCodecHandler : Receive:version=0.4.1,extraData=null,identified=true,resultCode=null,msg=null,messageId:1
2019-04-09 13:42:57.699 DEBUG 93715 --- [lector_TMROLE_1] c.a.f.c.rpc.netty.MessageCodecHandler : Receive:version=0.4.1,extraData=null,identified=true,resultCode=null,msg=null,messageId:2
2019-04-09 13:42:57.701 DEBUG 93715 --- [lector_RMROLE_1] c.a.f.c.rpc.netty.AbstractRpcRemoting : com.alibaba.fescar.core.rpc.netty.RmRpcClient@3b06d101 msgId:1 future :com.alibaba.fescar.core.protocol.MessageFuture@28bb1abd body:version=0.4.1,extraData=null,identified=true,resultCode=null,msg=null
2019-04-09 13:42:57.701 DEBUG 93715 --- [lector_TMROLE_1] c.a.f.c.rpc.netty.AbstractRpcRemoting : com.alibaba.fescar.core.rpc.netty.TmRpcClient@65fc3fb7 msgId:2 future :com.alibaba.fescar.core.protocol.MessageFuture@9a1e3df body:version=0.4.1,extraData=null,identified=true,resultCode=null,msg=null
2019-04-09 13:42:57.710 INFO 93715 --- [imeoutChecker_1] c.a.fescar.core.rpc.netty.RmRpcClient : register RM success. server version:0.4.1 channel:[id: 0xe6468995 L:/127.0.0.1:57397 - R:/127.0.0.1:8091]
2019-04-09 13:42:57.710 INFO 93715 --- [imeoutChecker_1] c.a.f.c.rpc.netty.NettyPoolableFactory : register success cost 114 ms version:0.4.1 role:TMROLE channel:[id: 0xd22fe0c5 L:/127.0.0.1:57398 - R:/127.0.0.1:8091]
2019-04-09 13:42:57.711 INFO 93715 --- [imeoutChecker_1] c.a.f.c.rpc.netty.NettyPoolableFactory : register success cost 125 ms version:0.4.1 role:RMROLE channel:[id: 0xe6468995 L:/127.0.0.1:57397 - R:/127.0.0.1:8091]

The log shows

  1. Create Netty connection
  2. Send registration request
  3. Receive response result
  4. RmRpcClient, TmRpcClient successfully instantiated

TM Process Flow

In this example, the TM role is business-service. The purchase method of BusinessService is marked with the @GlobalTransactional annotation.

@Service
public class BusinessService {
@Autowired
private StorageFeignClient storageFeignClient;
@Autowired
private OrderFeignClient orderFeignClient;
@GlobalTransactional
public void purchase(String userId, String commodityCode, int orderCount) {
storageFeignClient.deduct(commodityCode, orderCount);
orderFeignClient.create(userId, commodityCode, orderCount);
}
}

After the method is called, a global transaction will be created. First, pay attention to the function of the @GlobalTransactional annotation, which is intercepted and processed in the GlobalTransactionalInterceptor.

/**
* AOP intercepts method calls
*/
@Override
public Object invoke(final MethodInvocation methodInvocation) throws Throwable {
Class<?> targetClass = (methodInvocation.getThis() != null ? AopUtils.getTargetClass(methodInvocation.getThis()) : null);
Method specificMethod = ClassUtils.getMostSpecificMethod(methodInvocation.getMethod(), targetClass);
final Method method = BridgeMethodResolver.findBridgedMethod(specificMethod);
// Get the GlobalTransactional annotation of the method
final GlobalTransactional globalTransactionalAnnotation = getAnnotation(method, GlobalTransactional.class);
final GlobalLock globalLockAnnotation = getAnnotation(method, GlobalLock.class);
// If the method has the GlobalTransactional annotation, intercept the corresponding method processing
if (globalTransactionalAnnotation != null) {
return handleGlobalTransaction(methodInvocation, globalTransactionalAnnotation);
} else if (globalLockAnnotation != null) {
return handleGlobalLock(methodInvocation);
} else {
return methodInvocation.proceed();
}
}

The handleGlobalTransaction method calls the execute method of the [TransactionalTemplate](https://github.com/apache/incubator-seata/blob/develop/tm/src/main/java

/com/alibaba/fescar/tm/api/TransactionalTemplate.java). As the class name suggests, this is a standard template method that defines the standard steps for TM to handle global transactions. The comments are already quite clear.

public Object execute(TransactionalExecutor business) throws TransactionalExecutor.ExecutionException {
// 1. get or create a transaction
GlobalTransaction tx = GlobalTransactionContext.getCurrentOrCreate();
try {
// 2. begin transaction
try {
triggerBeforeBegin();
tx.begin(business.timeout(), business.name());
triggerAfterBegin();
} catch (TransactionException txe) {
throw new TransactionalExecutor.ExecutionException(tx, txe, TransactionalExecutor.Code.BeginFailure);
}
Object rs = null;
try {
// Do Your Business
rs = business.execute();
} catch (Throwable ex) {
// 3. any business exception rollback.
try {
triggerBeforeRollback();
tx.rollback();
triggerAfterRollback();
// 3.1 Successfully rolled back
throw new TransactionalExecutor.ExecutionException(tx, TransactionalExecutor.Code.RollbackDone, ex);
} catch (TransactionException txe) {
// 3.2 Failed to rollback
throw new TransactionalExecutor.ExecutionException(tx, txe, TransactionalExecutor.Code.RollbackFailure, ex);
}
}
// 4. everything is fine commit.
try {
triggerBeforeCommit();
tx.commit();
triggerAfterCommit();
} catch (TransactionException txe) {
// 4.1 Failed to commit
throw new TransactionalExecutor.ExecutionException(tx, txe, TransactionalExecutor.Code.CommitFailure);
}
return rs;
} finally {
// 5. clear
triggerAfterCompletion();
cleanUp();
}
}

The begin method of DefaultGlobalTransaction is called to start a global transaction.

public void begin(int timeout, String name) throws TransactionException {
if (role != GlobalTransactionRole.Launcher) {
check();
if (LOGGER.isDebugEnabled()) {
LOGGER.debug("Ignore Begin(): just involved in global transaction [" + xid + "]");
}
return;
}
if (xid != null) {
throw new IllegalStateException();
}
if (RootContext.getXID() != null) {
throw new IllegalStateException();
}
// Specific method to start the transaction, get the XID returned by TC
xid = transactionManager.begin(null, null, name, timeout);
status = GlobalStatus.Begin;
RootContext.bind(xid);
if (LOGGER.isDebugEnabled()) {
LOGGER.debug("Begin a NEW global transaction [" + xid + "]");
}
}

At the beginning of the method, if (role != GlobalTransactionRole.Launcher) checks the role to determine whether the current role is the initiator (Launcher) or the participant (Participant) of the global transaction. If the @GlobalTransactional annotation is also added to the downstream system methods in a distributed transaction, its role is Participant, and the subsequent begin will be ignored and directly returned. The determination of whether it is a Launcher or Participant is based on whether the current context already has an XID. The one without an XID is the Launcher, and the one with an XID is the Participant. Therefore, the creation of a global transaction can only be executed by the Launcher, and only one Launcher exists in a distributed transaction.

The DefaultTransactionManager is responsible for TM and TC communication, sending begin, commit, rollback instructions.

@Override
public String begin(String applicationId, String transactionServiceGroup, String name, int timeout) throws TransactionException {
GlobalBeginRequest request = new GlobalBeginRequest();
request.setTransactionName(name);
request.setTimeout(timeout);
GlobalBeginResponse response = (GlobalBeginResponse) syncCall(request);
return response.getXid();
}

At this point, the XID returned by fescar-server indicates that a global transaction has been successfully created. The log also reflects the above process.

2019-04-09 13:46:57.417 DEBUG 31326 --- [nio-8084-exec-1] c.a.f.c.rpc.netty.AbstractRpcRemoting : offer message: timeout=60000, transactionName=purchase(java.lang.String, java.lang.String, int)
2019-04-09 13:46:57.417 DEBUG 31326 --- [geSend_TMROLE_1] c.a.f.c.rpc.netty.AbstractRpcRemoting : write message:FescarMergeMessage, timeout=60000, transactionName=purchase(java.lang.String, java.lang.String, int) channel:[id: 0xa148545e L:/127.0.0.1:56120 - R:/127.0.0.1:8091] active?true, writable?true, isopen?true
2019-04-09 13:46:57.418 DEBUG 31326 --- [lector_TMROLE_1] c.a.f.c.rpc.netty.MessageCodecHandler : Send:FescarMergeMessage, timeout=60000, transactionName=purchase(java.lang.String, java.lang.String, int)
2019-04-09 13:46:57.421 DEBUG 31326 --- [lector_TMROLE_1] c.a.f.c.rpc.netty.MessageCodecHandler : Receive:MergeResultMessage, com.alibaba.fescar.core.protocol.transaction.GlobalBeginResponse@2dc480dc, messageId:1
2019-04-09 13:46:57.421 DEBUG 31326 --- [nio-8084-exec-1] c.a.fescar.core.context.RootContext : bind 192.168.224.93:8091:2008502699
2019-04-09 13:46:57.421 DEBUG 31326 --- [nio-8084-exec-1] c.a.f.tm.api.DefaultGlobalTransaction : Begin a NEW global transaction [192.168.224.93:8091:2008502699]

After the global transaction is created, business.execute() is executed, which is the business code storageFeignClient.deduct(commodityCode, orderCount) that enters the RM processing flow. The business logic here is to call the inventory service's deduct inventory interface.

RM Processing Flow

@GetMapping(path = "/deduct")
public Boolean deduct(String commodityCode, Integer count) {
storageService.deduct(commodityCode, count);
return true;
}
@Transactional
public void deduct(String commodityCode, int count) {
Storage storage = storageDAO.findByCommodityCode(commodityCode);
storage.setCount(storage.getCount() - count);
storageDAO.save(storage);
}

The interface and service method of storage do not appear to have fescar-related code and annotations, reflecting fescar's non-intrusiveness. How does it join this global transaction? The answer is in the ConnectionProxy, which is why the DataSourceProxy must be used. Through DataSourceProxy, fescar can register branch transactions and send RM's processing results to TC at the cut-in point of local transaction submission in business code. Since the local transaction submission of business code is implemented by the proxy of ConnectionProxy, the commit method of ConnectionProxy is actually executed during local transaction submission.

public void commit() throws SQLException {
// If it is a global transaction, perform global transaction submission
// Determine if it is a global transaction, just check if there is an XID in the current context
if (context.inGlobalTransaction()) {
processGlobalTransactionCommit();
} else if (context.isGlobalLockRequire()) {
processLocalCommitWithGlobalLocks();
} else {
targetConnection.commit();
}
}

private void processGlobalTransactionCommit() throws SQLException {
try {
// First register RM with TC and get the branchId assigned by TC
register();
} catch (TransactionException e) {
recognizeLockKeyConflictException(e);
}
try {
if (context.hasUndoLog()) {
// Write undo log
UndoLogManager.flushUndoLogs(this);
}
// Commit local transaction, write undo_log and business data in a local transaction
targetConnection.commit();
} catch (Throwable ex) {
// Notify TC that RM's transaction processing failed
report(false);
if (ex instanceof SQLException) {
throw new SQLException(ex);
}
}
// Notify TC that RM's transaction processing succeeded
report(true);
context.reset();
}

private void register() throws TransactionException {
// Register RM, build request to send registration instructions to TC via netty
Long branchId = DefaultResourceManager.get().branchRegister(BranchType.AT, getDataSourceProxy().getResourceId(), null, context.getXid(), null, context.buildLockKeys());
// Save the returned branchId in the context
context.setBranchId(branchId);
}

Verify the above process through logs.

2019-04-09 21:57:48.341 DEBUG 38933 --- [nio-8081-exec-1] o.s.c.a.f.web.FescarHandlerInterceptor : xid in Root

Context null xid in RpcContext 192.168.0.2:8091:2008546211
2019-04-09 21:57:48.341 DEBUG 38933 --- [nio-8081-exec-1] c.a.fescar.core.context.RootContext : bind 192.168.0.2:8091:2008546211
2019-04-09 21:57:48.341 DEBUG 38933 --- [nio-8081-exec-1] o.s.c.a.f.web.FescarHandlerInterceptor : bind 192.168.0.2:8091:2008546211 to RootContext
2019-04-09 21:57:48.386 INFO 38933 --- [nio-8081-exec-1] o.h.h.i.QueryTranslatorFactoryInitiator : HHH000397: Using ASTQueryTranslatorFactory
Hibernate: select storage0_.id as id1_0_, storage0_.commodity_code as commodit2_0_, storage0_.count as count3_0_ from storage_tbl storage0_ where storage0_.commodity_code=?
Hibernate: update storage_tbl set count=? where id=?
2019-04-09 21:57:48.673 INFO 38933 --- [nio-8081-exec-1] c.a.fescar.core.rpc.netty.RmRpcClient : will connect to 192.168.0.2:8091
2019-04-09 21:57:48.673 INFO 38933 --- [nio-8081-exec-1] c.a.fescar.core.rpc.netty.RmRpcClient : RM will register :jdbc:mysql://127.0.0.1:3306/db_storage?useSSL=false
2019-04-09 21:57:48.673 INFO 38933 --- [nio-8081-exec-1] c.a.f.c.rpc.netty.NettyPoolableFactory : NettyPool create channel to {"address":"192.168.0.2:8091", "message":{"applicationId":"storage-service", "byteBuffer":{"char":"\u0000","direct":false,"double":0.0,"float":0.0,"int":0,"long":0,"readOnly":false,"short":0},"resourceIds":"jdbc:mysql://127.0.0.1:3306/db_storage?useSSL=false","transactionServiceGroup":"hello-service-fescar-service-group","typeCode":103,"version":"0.4.0"},"transactionRole":"RMROLE"}
2019-04-09 21:57:48.677 DEBUG 38933 --- [lector_RMROLE_1] c.a.f.c.rpc.netty.MessageCodecHandler : Send:RegisterRMRequest{resourceIds='jdbc:mysql://127.0.0.1:3306/db_storage?useSSL=false', applicationId='storage-service', transactionServiceGroup='hello-service-fescar-service-group'}
2019-04-09 21:57:48.680 DEBUG 38933 --- [lector_RMROLE_1] c.a.f.c.rpc.netty.MessageCodecHandler : Receive:version=0.4.1,extraData=null,identified=true,resultCode=null,msg=null,messageId:9
2019-04-09 21:57:48.680 DEBUG 38933 --- [lector_RMROLE_1] c.a.f.c.rpc.netty.AbstractRpcRemoting : com.alibaba.fescar.core.rpc.netty.RmRpcClient@7d61f5d4 msgId:9 future :com.alibaba.fescar.core.protocol.MessageFuture@186cd3e0 body:version=0.4.1,extraData=null,identified=true,resultCode=null,msg=null
2019-04-09 21:57:48.680 INFO 38933 --- [nio-8081-exec-1] c.a.fescar.core.rpc.netty.RmRpcClient : register RM success. server version:0.4.1 channel:[id: 0xd40718e3 L:/192.168.0.2:62607 - R:/192.168.0.2:8091]
2019-04-09 21:57:48.680 INFO 38933 --- [nio-8081-exec-1] c.a.f.c.rpc.netty.NettyPoolableFactory : register success cost 3 ms version:0.4.1 role:RMROLE channel:[id: 0xd40718e3 L:/192.168.0.2:62607 - R:/192.168.0.2:8091]
2019-04-09 21:57:48.680 DEBUG 38933 --- [nio-8081-exec-1] c.a.f.c.rpc.netty.AbstractRpcRemoting : offer message: transactionId=2008546211, branchType=AT, resourceId=jdbc:mysql://127.0.0.1:3306/db_storage?useSSL=false, lockKey=storage_tbl:1
2019-04-09 21:57:48.681 DEBUG 38933 --- [geSend_RMROLE_1] c.a.f.c.rpc.netty.AbstractRpcRemoting : write message:FescarMergeMessage, transactionId=2008546211, branchType=AT, resourceId=jdbc:mysql://127.0.0.1:3306/db_storage?useSSL=false, lockKey=storage_tbl:1 channel:[id: 0xd40718e3 L:/192.168.0.2:62607 - R:/192.168.0.2:8091] active?true, writable?true, isopen?true
2019-04-09 21:57:48.681 DEBUG 38933 --- [lector_RMROLE_1] c.a.f.c.rpc.netty.MessageCodecHandler : Send:FescarMergeMessage, transactionId=2008546211, branchType=AT, resourceId=jdbc:mysql://127.0.0.1:3306/db_storage?useSSL=false, lockKey=storage_tbl:1
2019-04-09 21:57:48.687 DEBUG 38933 --- [lector_RMROLE_1] c.a.f.c.rpc.netty.MessageCodecHandler : Receive:MergeResultMessage, BranchRegisterResponse: transactionId=2008546211, branchId=2008546212, result code=Success, getMsg=null, messageId:11
2019-04-09 21:57:48.702 DEBUG 38933 --- [nio-8081-exec-1] c.a.f.rm.datasource.undo.UndoLogManager : Flushing UNDO LOG: {"branchId":2008546212, "sqlUndoLogs":[{"afterImage":{"rows":[{"fields":[{"keyType":"PrimaryKey","name":"id","type":4,"value":1},{"keyType":"NULL","name":"count","type":4,"value":993}]}],"tableName":"storage_tbl"},"beforeImage":{"rows":[{"fields":[{"keyType":"PrimaryKey","name":"id","type":4,"value":1},{"keyType":"NULL","name":"count","type":4,"value":994}]}],"tableName":"storage_tbl"},"sqlType":"UPDATE","tableName":"storage_tbl"}],"xid":"192.168.0.2:8091:2008546211"}
2019-04-09 21:57:48.755 DEBUG 38933 --- [nio-8081-exec-1] c.a.f.c.rpc.netty.AbstractRpcRemoting : offer message: transactionId=2008546211, branchId=2008546212, resourceId=null, status=PhaseOne_Done, applicationData=null
2019-04-09 21:57:48.755 DEBUG 38933 --- [geSend_RMROLE_1] c.a.f.c.rpc.netty.AbstractRpcRemoting : write message:FescarMergeMessage, transactionId=2008546211, branchId=2008546212, resourceId=null, status=PhaseOne_Done, applicationData=null channel:[id: 0xd40718e3 L:/192.168.0.2:62607 - R:/192.168.0.2:8091] active?true, writable?true, isopen?true
2019-04-09 21:57:48.756 DEBUG 38933 --- [lector_RMROLE_1] c.a.f.c.rpc.netty.MessageCodecHandler : Send:FescarMergeMessage, transactionId=2008546211, branchId=2008546212, resourceId=null, status=PhaseOne_Done, applicationData=null
2019-04-09 21:57:48.758 DEBUG 38933 --- [lector_RMROLE_1] c.a.f.c.rpc.netty.MessageCodecHandler : Receive:MergeResultMessage, com.alibaba.fescar.core.protocol.transaction.BranchReportResponse@582a08cf, messageId:13
2019-04-09 21:57:48.799 DEBUG 38933 --- [nio-8081-exec-1] c.a.fescar.core.context.RootContext : unbind 192.168.0.2:8091:2008546211
2019-04-09 21:57:48.799 DEBUG 38933 --- [nio-8081-exec-1] o.s.c.a.f.web.FescarHandlerInterceptor : unbind 192.168.0.2:8091:2008546211 from RootContext
  1. Get the XID passed from business-service
  2. Bind X

ID to the current context 3. Execute business logic SQL 4. Create a Netty connection to TC 5. Send branch transaction information to TC 6. Get the branchId returned by TC 7. Record Undo Log data 8. Send the processing result of PhaseOne stage to TC 9. Unbind XID from the current context

Steps 1 and 9 are completed in the FescarHandlerInterceptor, which is not part of fescar, but implemented in spring-cloud-alibaba-fescar. It realizes the bind and unbind of xid to the current request context during feign and rest communication.

Here, RM completes the work of the PhaseOne stage, then look at the processing logic of the PhaseTwo stage.

Transaction Commit

After each branch transaction is completed, TC summarizes the reported results of each RM and sends commit or rollback instructions to each RM.

2019-04-09 21:57:49.813 DEBUG 38933 --- [lector_RMROLE_1] c.a.f.c.rpc.netty.MessageCodecHandler : Receive:xid=192.168.0.2:8091:2008546211, branchId=2008546212, branchType=AT, resourceId=jdbc:mysql://127.0.0.1:3306/db_storage?useSSL=false, applicationData=null, messageId:1
2019-04-09 21:57:49.813 DEBUG 38933 --- [lector_RMROLE_1] c.a.f.c.rpc.netty.AbstractRpcRemoting : com.alibaba.fescar.core.rpc.netty.RmRpcClient@7d61f5d4 msgId:1 body:xid=192.168.0.2:8091:2008546211, branchId=2008546212, branchType=AT, resourceId=jdbc:mysql://127.0.0.1:3306/db_storage?useSSL=false, applicationData=null
2019-04-09 21:57:49.814 INFO 38933 --- [atch_RMROLE_1_8] c.a.f.core.rpc.netty.RmMessageListener : onMessage:xid=192.168.0.2:8091:2008546211, branchId=2008546212, branchType=AT, resourceId=jdbc:mysql://127.0.0.1:3306/db_storage?useSSL=false, applicationData=null
2019-04-09 21:57:49.816 INFO 38933 --- [atch_RMROLE_1_8] com.alibaba.fescar.rm.AbstractRMHandler : Branch committing: 192.168.0.2:8091:2008546211, 2008546212, jdbc:mysql://127.0.0.1:3306/db_storage?useSSL=false, null
2019-04-09 21:57:49.816 INFO 38933 --- [atch_RMROLE_1_8] com.alibaba.fescar.rm.AbstractRMHandler : Branch commit result: PhaseTwo_Committed
2019-04-09 21:57:49.817 INFO 38933 --- [atch_RMROLE_1_8] c.a.fescar.core.rpc.netty.RmRpcClient : RmRpcClient sendResponse branchStatus=PhaseTwo_Committed, result code=Success, getMsg=null
2019-04-09 21:57:49.817 DEBUG 38933 --- [atch_RMROLE_1_8] c.a.f.c.rpc.netty.AbstractRpcRemoting : send response:branchStatus=PhaseTwo_Committed, result code=Success, getMsg=null channel:[id: 0xd40718e3 L:/192.168.0.2:62607 - R:/192.168.0.2:8091]
2019-04-09 21:57:49.817 DEBUG 38933 --- [lector_RMROLE_1] c.a.f.c.rpc.netty.MessageCodecHandler : Send:branchStatus=PhaseTwo_Committed, result code=Success, getMsg=null

The log shows

  1. RM receives the commit notice of XID=192.168.0.2:8091:2008546211, branchId=2008546212
  2. Execute the commit action
  3. Send the commit result to TC, branchStatus is PhaseTwo_Committed

Specifically, see the execution process of the second stage commit in the doBranchCommit method of the AbstractRMHandler class.

/**
* Get the key parameters such as xid and branchId notified
* Then call the RM's branchCommit
*/
protected void doBranchCommit(BranchCommitRequest request, BranchCommitResponse response) throws TransactionException {
String xid = request.getXid();
long branchId = request.getBranchId();
String resourceId = request.getResourceId();
String applicationData = request.getApplicationData();
LOGGER.info("Branch committing: " + xid + " " + branchId + " " + resourceId + " " + applicationData);
BranchStatus status = getResourceManager().branchCommit(request.getBranchType(), xid, branchId, resourceId, applicationData);
response.setBranchStatus(status);
LOGGER.info("Branch commit result: " + status);
}

Eventually, the branchCommit request will be called to the branchCommit method of AsyncWorker. AsyncWorker's processing method is a key part of fescar's architecture. Since most transactions will be committed normally, they end in the PhaseOne stage. This way, locks can be released as quickly as possible. After receiving the commit instruction in the PhaseTwo stage, the asynchronous processing can be done. This excludes the time consumption of the PhaseTwo stage from a distributed transaction.

private static final List<Phase2Context> ASYNC_COMMIT_BUFFER = Collections.synchronizedList(new ArrayList<Phase2Context>());

/**
* Add the XID to be committed to the list
*/
@Override
public BranchStatus branchCommit(BranchType branchType, String xid, long branchId, String resourceId, String applicationData) throws TransactionException {
if (ASYNC_COMMIT_BUFFER.size() < ASYNC_COMMIT_BUFFER_LIMIT) {
ASYNC_COMMIT_BUFFER.add(new Phase2Context(branchType, xid, branchId, resourceId, applicationData));
} else {
LOGGER.warn("Async commit buffer is FULL. Rejected branch [" + branchId + "/" + xid + "] will be handled by housekeeping later.");
}
return BranchStatus.PhaseTwo_Committed;
}

/**
* Consume the XIDs in ASYNC_COMMIT_BUFFER through scheduled tasks
*/
public synchronized void init() {
LOGGER.info("Async Commit Buffer Limit: " + ASYNC_COMMIT_BUFFER_LIMIT);
timerExecutor = new ScheduledThreadPoolExecutor(1, new NamedThreadFactory("AsyncWorker", 1, true));
timerExecutor.scheduleAtFixedRate(new Runnable() {
@Override
public void run() {
try {
doBranchCommits();
} catch (Throwable e) {
LOGGER.info("Failed at async committing ... " + e.getMessage());
}
}
}, 10, 1000 * 1, TimeUnit.MILLISECONDS);
}

private void doBranchCommits() {
if (ASYNC_COMMIT_BUFFER.size() == 0) {
return;
}
Map<String, List<Phase2Context>> mappedContexts = new HashMap<>();
Iterator<Phase2Context> iterator = ASYNC_COMMIT_BUFFER.iterator();
// In a timed loop, take out all pending data in ASYNC_COMMIT_BUFFER
// Group the data to be committed with resourceId as the key. The resourceId is the database connection URL
// This can be seen in the previous log, the purpose is to cover the multiple data sources created by the application
while (iterator.hasNext()) {
Phase2Context commitContext = iterator.next();
List<Phase2Context> contextsGroupedByResourceId = mappedContexts.get(commitContext.resourceId);
if (contextsGroupedByResourceId == null) {
contextsGroupedByResourceId = new ArrayList<>();
mappedContexts.put(commitContext.resourceId, contextsGroupedByResourceId);
}
contextsGroupedByResourceId.add(commitContext);
iterator.remove();
}
for (Map.Entry<String, List<Phase2Context>> entry : mappedContexts.entrySet()) {
Connection conn = null;
try {
try {
// Get the data source and connection based on resourceId
DataSourceProxy dataSourceProxy = DataSourceManager.get().get(entry.getKey());
conn = dataSourceProxy.getPlainConnection();
} catch (SQLException sqle) {
LOGGER.warn("Failed to get connection for async committing on " + entry.getKey(), sqle);
continue;
}
List<Phase2Context> contextsGroupedByResourceId = entry.getValue();
for (Phase2Context commitContext : contextsGroupedByResourceId) {
try {
// Perform undolog processing, that is, delete the records corresponding to xid and branchId
UndoLogManager.deleteUndoLog(commitContext.xid, commitContext.branchId, conn);
} catch

(Exception ex) {
LOGGER.warn("Failed to delete undo log [" + commitContext.branchId + "/" + commitContext.xid + "]", ex);
}
}
} finally {
if (conn != null) {
try {
conn.close();
} catch (SQLException closeEx) {
LOGGER.warn("Failed to close JDBC resource while deleting undo_log ", closeEx);
}
}
}
}
}

So for the commit action, RM only needs to delete the undo_log corresponding to xid and branchId.

Transaction Rollback

There are two scenarios for triggering rollback:

  1. Branch transaction processing exception, that is the case of report(false) in the ConnectionProxy
  2. TM catches the exceptions thrown from the downstream system, that is the exception caught by the method marked with the @GlobalTransactional annotation in the initiated global transaction. In the previous template method execute of the TransactionalTemplate, the call to business.execute() was caught. After the catch, it will call rollback, and TM will notify TC that the corresponding XID needs to roll back the transaction.
public void rollback() throws TransactionException {
// Only the Launcher can initiate this rollback
if (role == GlobalTransactionRole.Participant) {
// Participant has no responsibility of committing
if (LOGGER.isDebugEnabled()) {
LOGGER.debug("Ignore Rollback(): just involved in global transaction [" + xid + "]");
}
return;
}
if (xid == null) {
throw new IllegalStateException();
}
status = transactionManager.rollback(xid);
if (RootContext.getXID() != null) {
if (xid.equals(RootContext.getXID())) {
RootContext.unbind();
}
}
}

TC summarizes and sends rollback instructions to the participants. RM receives the rollback notice in the doBranchRollback method of the AbstractRMHandler class.

protected void doBranchRollback(BranchRollbackRequest request, BranchRollbackResponse response) throws TransactionException {
String xid = request.getXid();
long branchId = request.getBranchId();
String resourceId = request.getResourceId();
String applicationData = request.getApplicationData();
LOGGER.info("Branch rolling back: " + xid + " " + branchId + " " + resourceId);
BranchStatus status = getResourceManager().branchRollback(request.getBranchType(), xid, branchId, resourceId, applicationData);
response.setBranchStatus(status);
LOGGER.info("Branch rollback result: " + status);
}

Then the rollback request is passed to the branchRollback method of the DataSourceManager class.

public BranchStatus branchRollback(BranchType branchType, String xid, long branchId, String resourceId, String applicationData) throws TransactionException {
// Get the corresponding data source based on resourceId
DataSourceProxy dataSourceProxy = get(resourceId);
if (dataSourceProxy == null) {
throw new ShouldNeverHappenException();
}
try {
UndoLogManager.undo(dataSourceProxy, xid, branchId);
} catch (TransactionException te) {
if (te.getCode() == TransactionExceptionCode.BranchRollbackFailed_Unretriable) {
return BranchStatus.PhaseTwo_RollbackFailed_Unretryable;
} else {
return BranchStatus.PhaseTwo_RollbackFailed_Retryable;
}
}
return BranchStatus.PhaseTwo_Rollbacked;
}

Ultimately, the undo method of the UndoLogManager is executed. Since it is pure JDBC operation, the code is relatively long and will not be posted here. You can view the source code on GitHub via the link. Briefly describe the undo process:

  1. Find the undo_log submitted in the PhaseOne stage based on xid and branchId.
  2. If found, generate the playback SQL based on the data recorded in the undo_log and execute it, that is, restore the data modified in the PhaseOne stage.
  3. After step 2 is completed, delete the corresponding undo_log data.
  4. If no corresponding undo_log is found in step 1, insert a new undo_log with the status GlobalFinished. The reason it is not found may be that the local transaction in the PhaseOne stage encountered an exception, resulting in no normal write-in. Because xid and branchId are unique indexes, the insertion in step 4 can prevent successful write-in after recovery in the PhaseOne stage. In this way, the business data will not be successfully submitted, achieving the effect of final rollback.

Summary

Combining distributed business scenarios with local, this article analyzes the main processing flow of the fescar client side and analyzes the main source code for the TM and RM roles, hoping to help you understand the working principles of fescar. With the rapid iteration of fescar and the planning of future Roadmaps, it is believed that fescar can become a benchmark solution for open-source distributed transactions in time.

· 21 min read

Not long ago, I wrote an analysis of the distributed transaction middleware Fescar. Shortly after, the Fescar team rebranded it as Seata (Simple Extensible Autonomous Transaction Architecture), whereas the previous Fescar's English full name was Fast & Easy Commit And Rollback. It can be seen that Fescar was more limited to Commit and Rollback based on its name, while the new brand name Seata aims to create a one-stop distributed transaction solution. With the name change, I am more confident about its future development.

Here, let's briefly recall the overall process model of Seata:
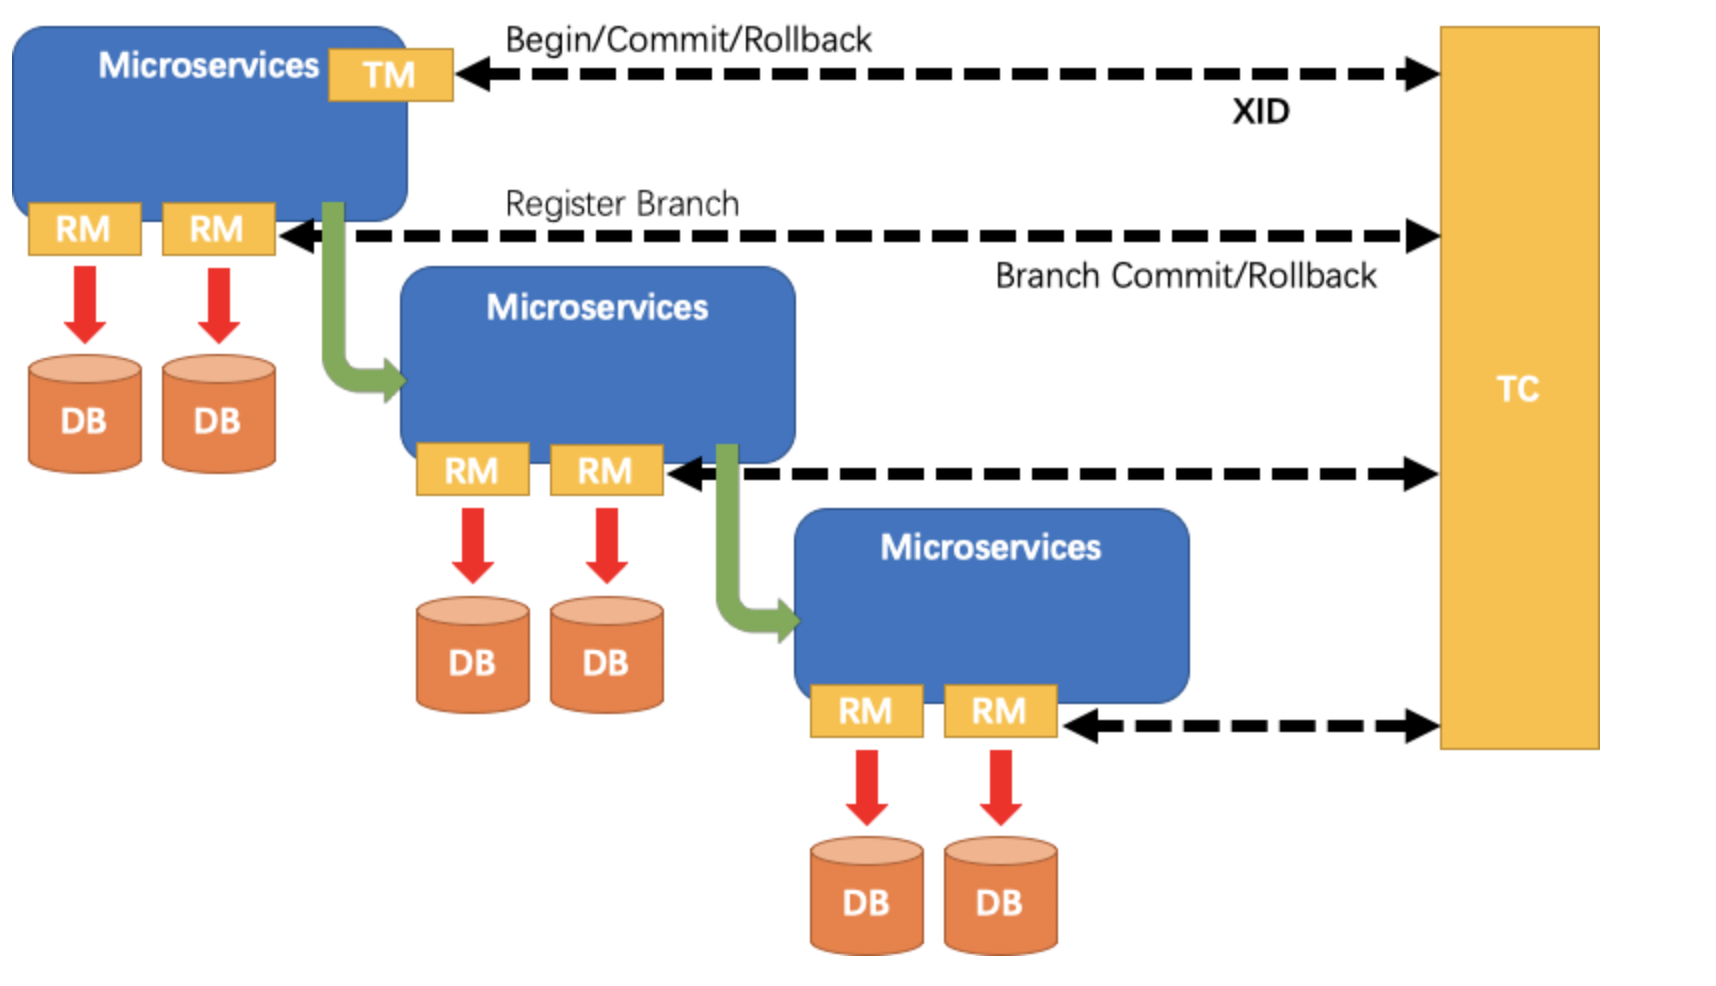
Seata Process Model

  • TM: Transaction initiator. Used to inform TC about the start, commit, and rollback of global transactions.
  • RM: Specific transaction resource. Each RM is registered as a branch transaction in TC.
  • TC: Transaction coordinator. Also known as Fescar-server, used to receive registration, commit, and rollback of transactions.

In previous articles, I provided a general introduction to the roles, and in this article, I will focus on the core role TC, which is the transaction coordinator.

2. Transaction Coordinator

Why has the emphasis been placed on TC as the core role? Because TC, like God, manages the RM and TM of countless beings in the cloud. If TC fails to function properly, even minor issues with RM and TM will lead to chaos. Therefore, to understand Seata, one must understand its TC.

So, what capabilities should an excellent transaction coordinator possess? I think it should have the following:

  • Correct coordination: It should be able to properly coordinate what RM and TM should do next, what to do if something goes wrong, and what to do if everything goes right.
  • High availability: The transaction coordinator is crucial in distributed transactions. If it cannot ensure high availability, it serves no purpose.
  • High performance: The performance of the transaction coordinator must be high. If there are performance bottlenecks, it will frequently encounter timeouts, leading to frequent rollbacks.
  • High scalability: This characteristic belongs to the code level. If it is an excellent framework, it needs to provide many customizable extensions for users, such as service registration/discovery, reading configuration, etc.

Next, I will explain how Seata achieves the above four points.

2.1 Seata-Server Design
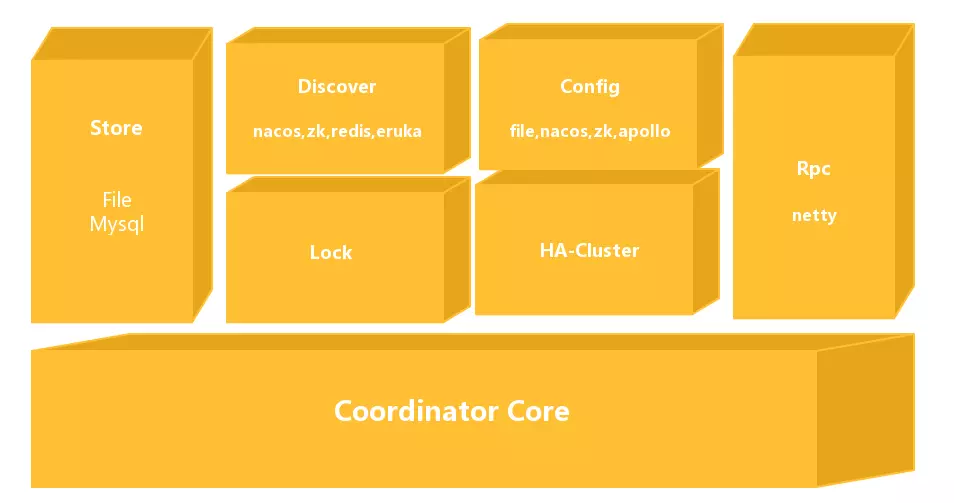
Seata-Server Design

The overall module diagram of Seata-Server is shown above:

  • Coordinator Core: At the bottom is the core code of the transaction coordinator, mainly used to handle transaction coordination logic, such as whether to commit, rollback, etc.
  • Store: Storage module used to persist data to prevent data loss during restarts or crashes.
  • Discovery: Service registration/discovery module used to expose server addresses to clients.
  • Config: Used to store and retrieve server configurations.
  • Lock: Lock module used to provide global locking functionality to Seata.
  • RPC: Used for communication with other endpoints.
  • HA-Cluster: High availability cluster, currently not open-source, provides reliable high availability services to Seata, expected to be open-sourced in version 0.6.

2.2 Discovery

First, let's talk about the basic Discovery module, also known as the service registration/discovery module. After starting Seata-Sever, we need to expose our address to other users, which is the responsibility of this module.
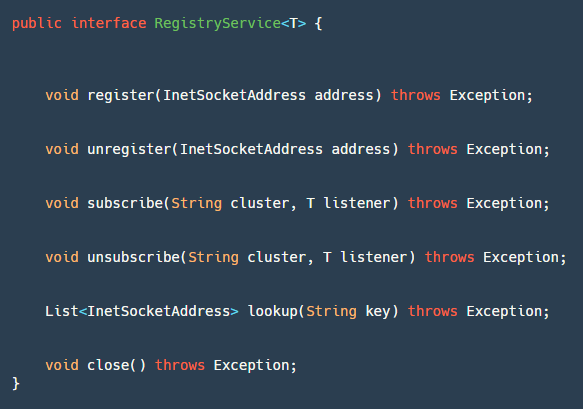
Discovery Module

This module has a core interface RegistryService, as shown in the image above:

  • register: Used by the server to register the service.
  • unregister: Used by the server, typically called in JVM shutdown hooks.
  • subscribe: Used by clients to register event listeners to listen for address changes.
  • unsubscribe: Used by clients to cancel event listeners.
  • lookup: Used by clients to retrieve service address lists based on keys.
  • close: Used to close the Registry resource.

If you need to add your own service registration/discovery, just implement this interface. So far, with the continuous development and promotion in the community, there are already five service registration/discovery implementations, including redis, zk, nacos, eruka, and consul. Below is a brief introduction to the Nacos implementation:

2.2.1 register Interface:

Register Interface

Step 1: Validate the address. Step 2: Get the Naming instance of Nacos and register the address with the service name serverAddr (fixed service name) on the corresponding cluster group (configured in registry.conf).

The unregister interface is similar, and I won't go into detail here.

2.2.2 lookup Interface:
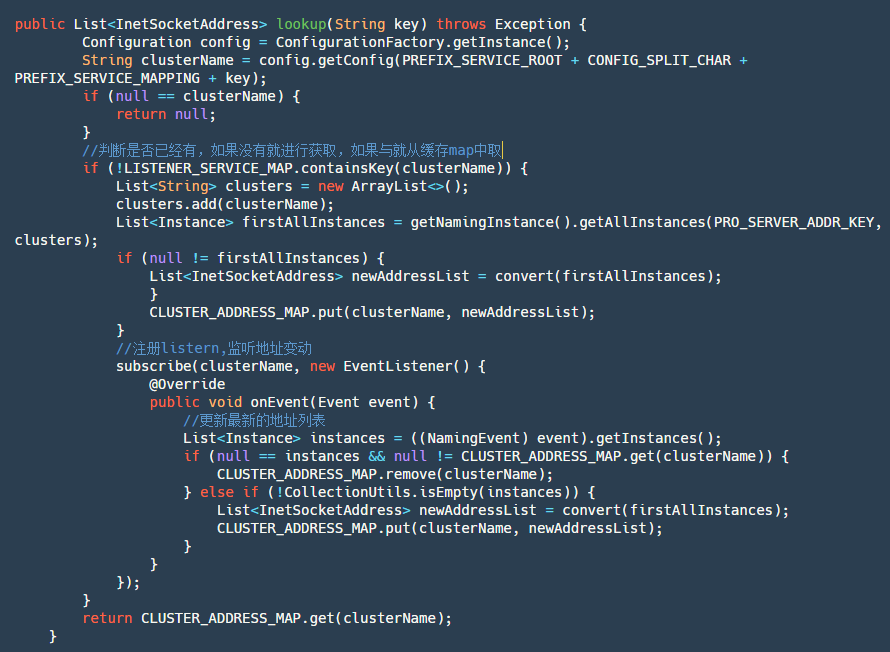
Lookup Interface

Step 1: Get the current cluster name. Step 2: Check if the service corresponding to the current cluster name has been subscribed. If yes, directly retrieve the subscribed data from the map.

Step 3: If not subscribed, actively query the service instance list once, then add subscription and store the data returned by subscription in the map. After that, retrieve the latest data directly from the map.

2.2.3 subscribe Interface:

Subscribe Interface

This interface is relatively simple, divided into two steps: Step 1: Add the cluster -> listener to be subscribed to the map. Since Nacos does not provide a single machine already subscribed list, it needs to be implemented by itself. Step 2: Subscribe using the Nacos API.

2.3 Config

The configuration module is also a relatively basic and simple module. We need to configure some common parameters such as the number of select and work threads for Netty, the maximum allowed session, etc. Of course, these parameters in Seata have their own default settings.

Similarly, Seata also provides an interface Configuration for customizing where we need to obtain configurations:
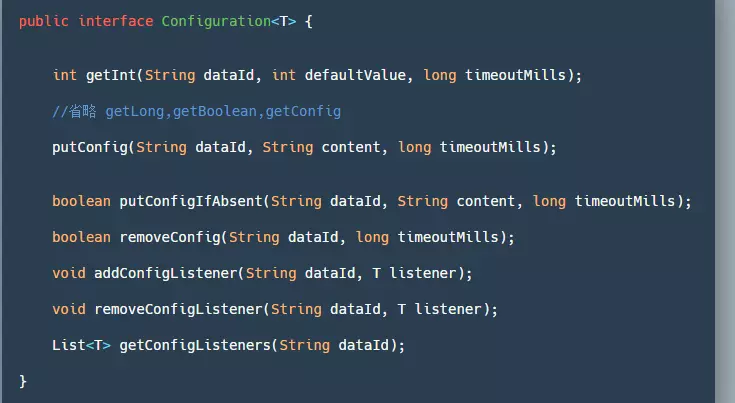
Config Interface

  • getInt/Long/Boolean/getConfig(): Retrieves the corresponding value based on the dataId. If the configuration cannot be read, an exception occurs, or a timeout occurs, it returns the default value specified in the parameters.
  • putConfig: Used to add configuration.
  • removeConfig: Deletes a configuration.
  • add/remove/get ConfigListener: Add/remove/get configuration listeners, usually used to listen for configuration changes.

Currently, there are four ways to obtain Config: File (file-based), Nacos, Apollo, and ZK (not recommended). In Seata, you first need to configure registry.conf to specify the config.type. Implementing Config is relatively simple, and I won't delve into it here.

2.4 Store

The implementation of the storage layer is crucial for Seata's performance and reliability. If the storage layer is not implemented well, data being processed by TC in distributed transactions may be lost in the event of a crash. Since distributed transactions cannot tolerate data loss, if the storage layer is implemented well but has significant performance issues, RM may experience frequent rollbacks, making it unable to cope with high-concurrency scenarios.

In Seata, file storage is provided as the default method for storing data. Here, we define the data to be stored as sessions. Sessions created by the TM are referred to as GlobalSessions, while those created by RMs are called BranchSessions. A GlobalSession can have multiple BranchSessions. Our objective is to store all these sessions.

the code of FileTransactionStoreManager:

The code snippet above can be broken down into the following steps:

  • Step 1: Generate a TransactionWriteFuture.
  • Step 2: Put this futureRequest into a LinkedBlockingQueue. Why do we need to put all the data into a queue? Well, in fact, we could also use locks for this purpose. In another Alibaba open-source project, RocketMQ, locks are used. Whether it's a queue or a lock, their purpose is to ensure single-threaded writing. But why is that necessary? Some might explain that it's to ensure sequential writing, which would improve speed. However, this understanding is incorrect. The write method of our FileChannel is thread-safe and already ensures sequential writing. Ensuring single-threaded writing is actually to make our write logic single-threaded. This is because there may be logic such as when a file is full or when records are written to specific positions. Of course, this logic could be actively locked, but to achieve simplicity and convenience, it's most appropriate to queue the entire write logic for processing.
  • Step 3: Call future.get to wait for the completion notification of our write logic.

Once we submit the data to the queue, the next step is to consume it. The code is as follows:

Write Data File

Here, a WriteDataFileRunnable() is submitted to our thread pool, and the run() method of this Runnable is as follows:
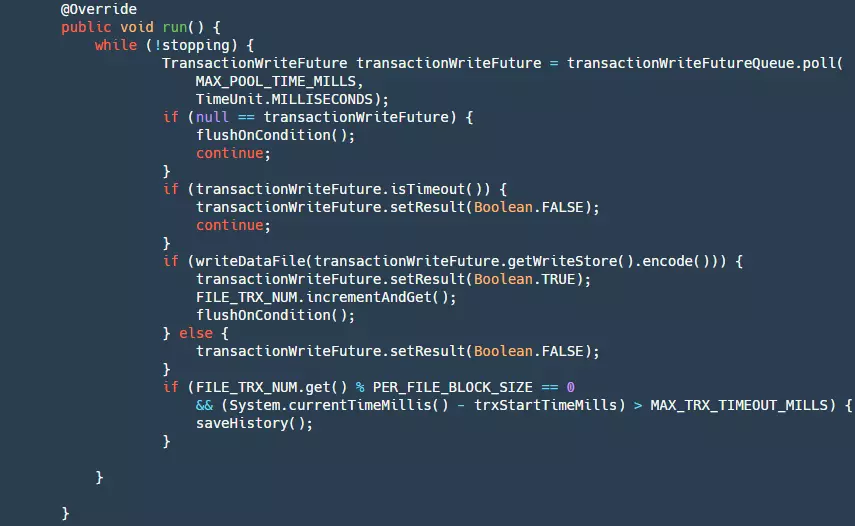
Store Run

It can be broken down into the following steps:

  • Step 1: Check if stopping is true. If so, return null.
  • Step 2: Get data from our queue.
  • Step 3: Check if the future has timed out. If so, set the result to false. At this point, our producer's get() method will unblock.
  • Step 4: Write our data to the file. At this point, the data is still in the pageCache layer and has not been flushed to the disk yet. If the write is successful, flush it based on certain conditions.
  • Step 5: When the number of writes reaches a certain threshold, or when the writing time exceeds a certain limit, the current file needs to be saved as a historical file, the old historical files need to be deleted, and a new file needs to be created. This step is to prevent unlimited growth of our files, which would waste disk resources.

In our writeDataFile method, we have the following code:
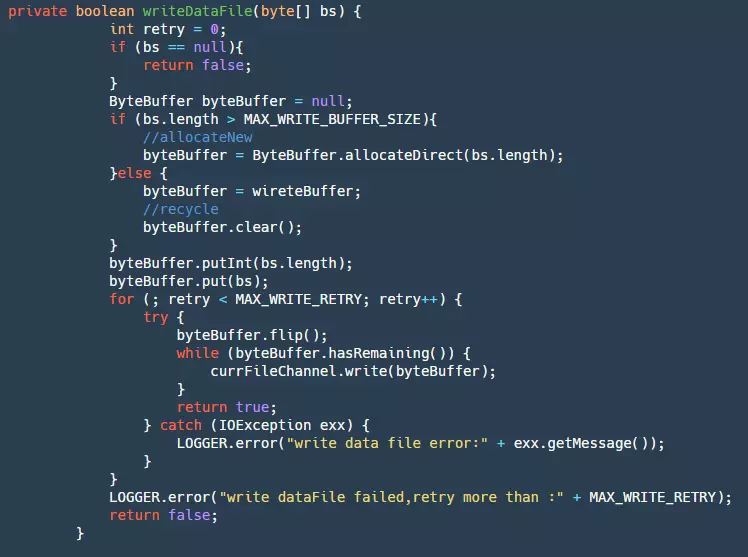
Write Data File

  • Step 1: First, get our ByteBuffer. If it exceeds the maximum loop BufferSize, create a new one directly; otherwise, use our cached Buffer. This step can greatly reduce garbage collection.
  • Step 2: Add the data to the ByteBuffer.
  • Step 3: Finally, write the ByteBuffer to our fileChannel. This will be retried three times. At this point, the data is still in the pageCache layer and is affected by two factors: the OS has its own flushing strategy, but this business program cannot control it. To prevent events such as crashes from causing a large amount of data loss, the business itself needs to control the flush. Below is the flush code:

Flush

Here, the flush condition is based on writing a certain number of data or exceeding a certain time. This also presents a small issue: in the event of a power failure, there may still be data in the pageCache that has not been flushed to disk, resulting in a small amount of data loss. Currently, synchronous mode is not supported, which means that each piece of data needs to be flushed, ensuring that each message is written to disk. However, this would greatly affect performance. Of course, there will be continuous evolution and support for this in the future.

Our store's core process mainly consists of the above methods, but there are also some other processes such as session reconstruction, which are relatively simple and readers can read them on their own.

2.5 Lock

As we know, the isolation level in databases is mainly implemented through locks. Similarly, in the distributed transaction framework Seata, achieving isolation levels also requires locks. Generally, there are four isolation levels in databases: Read Uncommitted, Read Committed, Repeatable Read, and Serializable. In Seata, it can ensure that the isolation level is Read Committed but provides means to achieve Read Committed isolation.

The Lock module is the core module of Seata for implementing isolation levels. In the Lock module, an interface is provided for managing our locks: Lock Manager
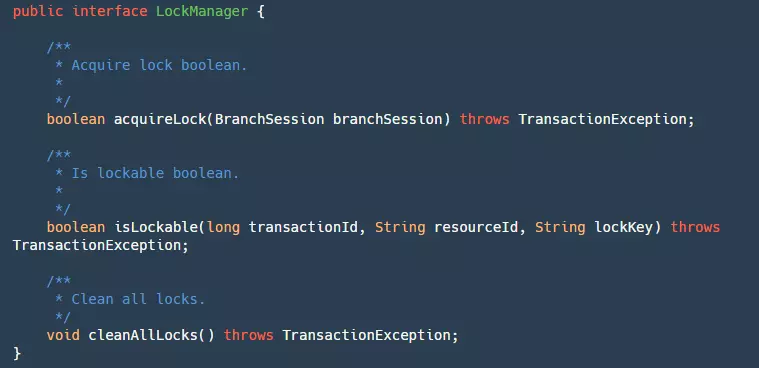
It has three methods:

  • acquireLock: Used to lock our BranchSession. Although a branch transaction Session is passed here, it is actually locking the resources of the branch transaction. Returns true upon successful locking.
  • isLockable: Queries whether the transaction ID, resource ID, and locked key are already locked.
  • cleanAllLocks: Clears all locks.

For locks, we can implement them locally or use Redis or MySQL to help us implement them. The official default provides local global lock implementation: Default Lock

In the local lock implementation, there are two constants to pay attention to:

  • BUCKET_PER_TABLE: Defines how many buckets each table has, aiming to reduce competition when locking the same table later.
  • LOCK_MAP: This map seems very complex from its definition, with many layers of Maps nested inside and outside. Here's a table to explain it specifically:
LayerKeyValue
1-LOCK_MAPresourceId (jdbcUrl)dbLockMap
2- dbLockMaptableName (table name)tableLockMap
3- tableLockMapPK.hashcode%Bucket (hashcode%bucket of the primary key value)bucketLockMap
4- bucketLockMapPKtransactionId

It can be seen that the actual locking occurs in the bucketLockMap. The specific locking method here is relatively simple and will not be detailed. The main process is to gradually find the bucketLockMap and then insert the current transactionId. If this primary key currently has a TransactionId, then it checks if it is itself; if not, the locking fails.

2.6 RPC

One of the key factors in ensuring Seata's high performance is the use of Netty as the RPC framework, with the default configuration of the thread model as shown in the diagram below:
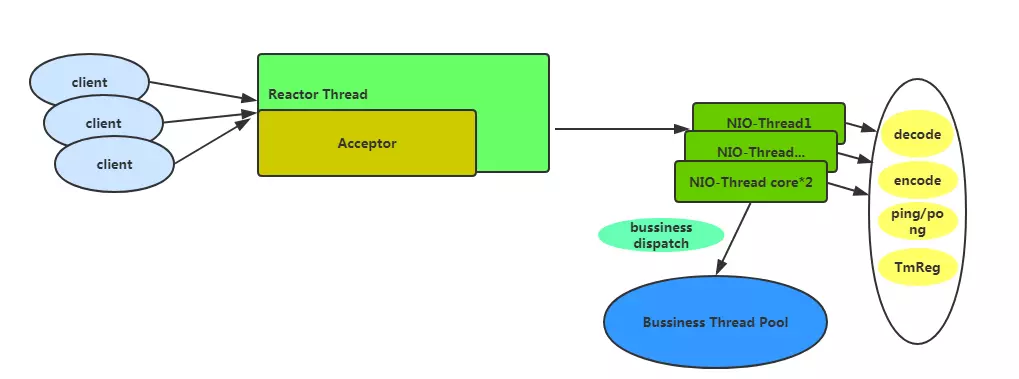
Reactor

If the default basic configuration is adopted, there will be one Acceptor thread for handling client connections and a number of NIO-Threads equal to cpu*2. In these threads, heavy business operations are not performed. They only handle relatively fast tasks such as encoding and decoding, heartbeats, and TM registration. Time-consuming business operations are delegated to the business thread pool. By default, the business thread pool is configured with a minimum of 100 threads and a maximum of 500.

Seata currently allows for configuration of transport layer settings, as shown in the following diagram. Users can optimize Netty transport layer settings according to their needs, and the configuration takes effect when loaded for the first time.
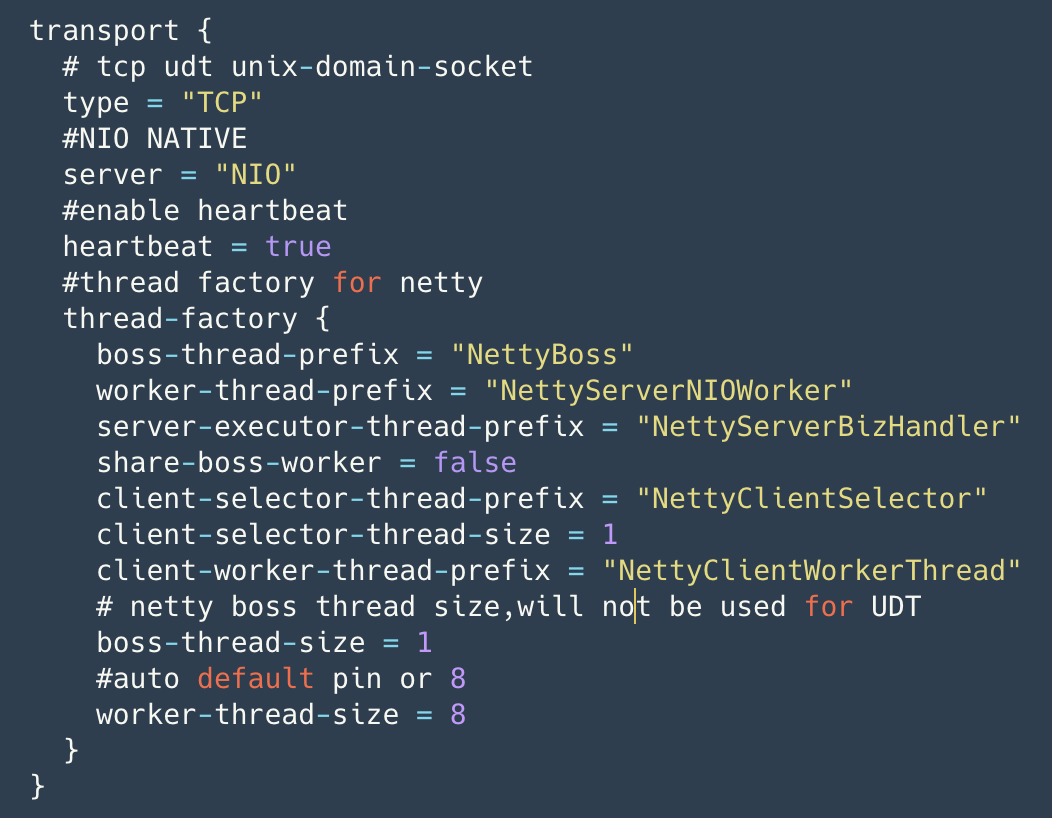
Transport

It's worth mentioning Seata's heartbeat mechanism, which is implemented using Netty's IdleStateHandler, as shown below:

Idle State Handler

On the server side, there is no maximum idle time set for writing, and for reading, the maximum idle time is set to 15 seconds (the client's default write idle time is 5 seconds, sending ping messages). If it exceeds 15 seconds, the connection will be disconnected, and resources will be closed.
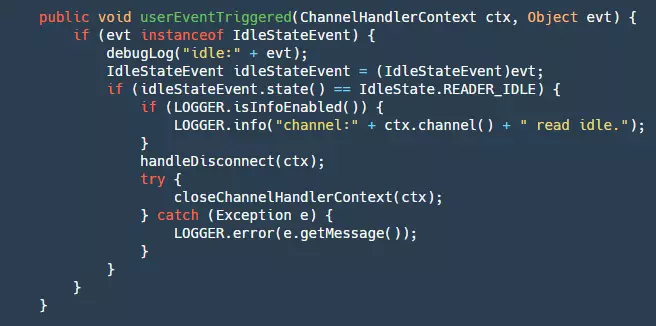
User Event Triggered

  • Step 1: Check if it is a read idle detection event.
  • Step 2: If it is, disconnect the connection and close the resources.

Additionally, Seata has implemented features such as memory pools, batch merging of small packets by the client for sending, and Netty connection pools (reducing the service unavailable time when creating connections), one of which is batch merging of small packets.
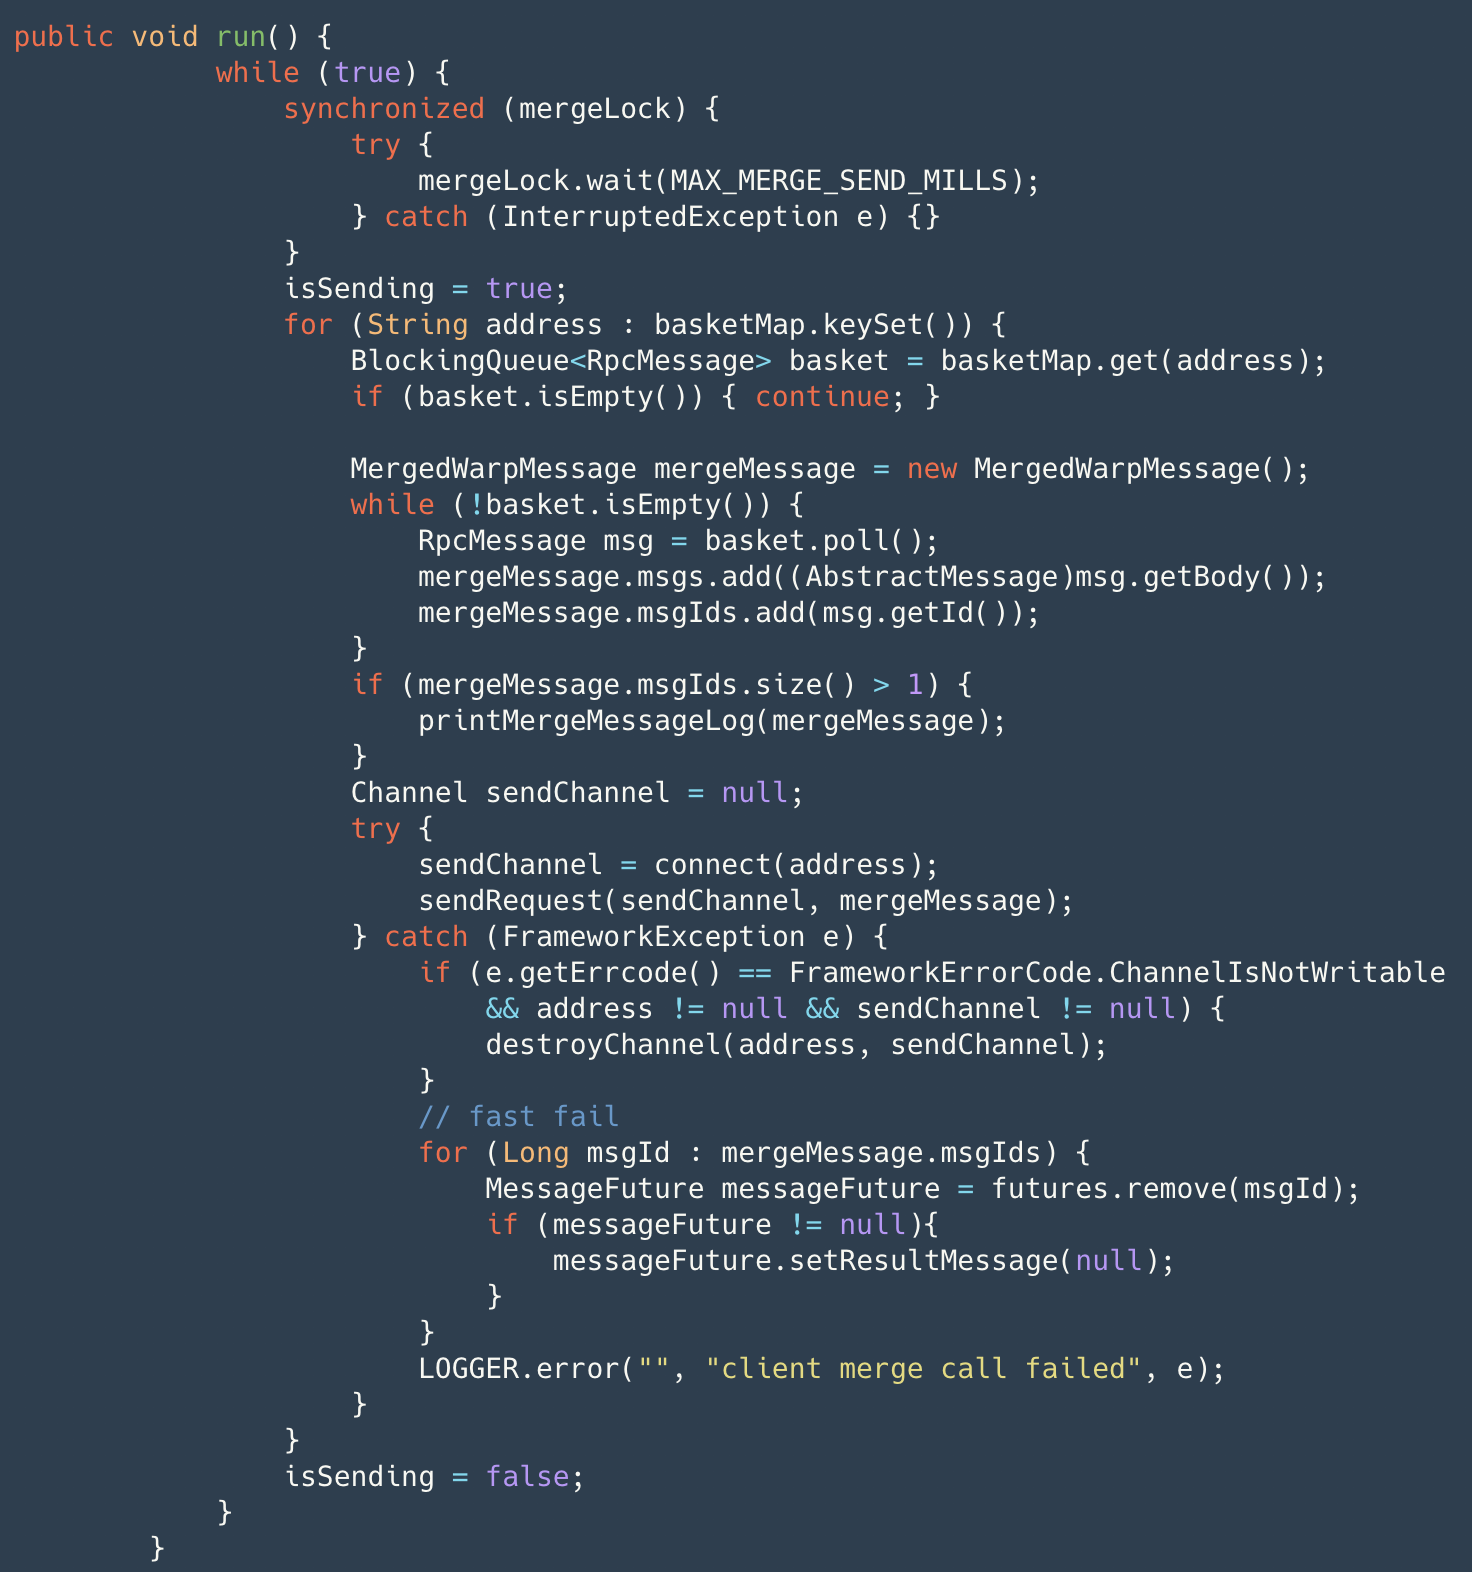
The client's message sending process does not directly send messages. Instead, it wraps the message into an RpcMessage through AbstractRpcRemoting#sendAsyncRequest and stores it in the basket, then wakes up the merge sending thread. The merge sending thread, through a while true loop, waits for a maximum of 1ms to retrieve messages from the basket and wraps them into merge messages for actual sending. If an exception occurs in the channel during this process, it will quickly fail and return the result through fail-fast. Before sending the merge message, it is marked in the map. Upon receiving the results, batch confirmation is performed (AbstractRpcRemotingClient#channelRead), and then dispatched to messageListener and handler for processing. Additionally, timerExecutor periodically checks for timeouts in sent messages, marking them as failed if they exceed the timeout. Specific details of the message protocol design will be provided in subsequent articles, so stay tuned.

Seata's Netty Client consists of TMClient and RMClient, distinguished by their transactional roles. Both inherit from AbstractRpcRemotingClient, which implements RemotingService (service start and stop), RegisterMsgListener (Netty connection pool connection creation callback), and ClientMessageSender (message sending), further inheriting from AbstractRpcRemoting (the top-level message sending and processing template for Client and Server).

The class diagram for RMClient is depicted below: RMClient Class Diagram
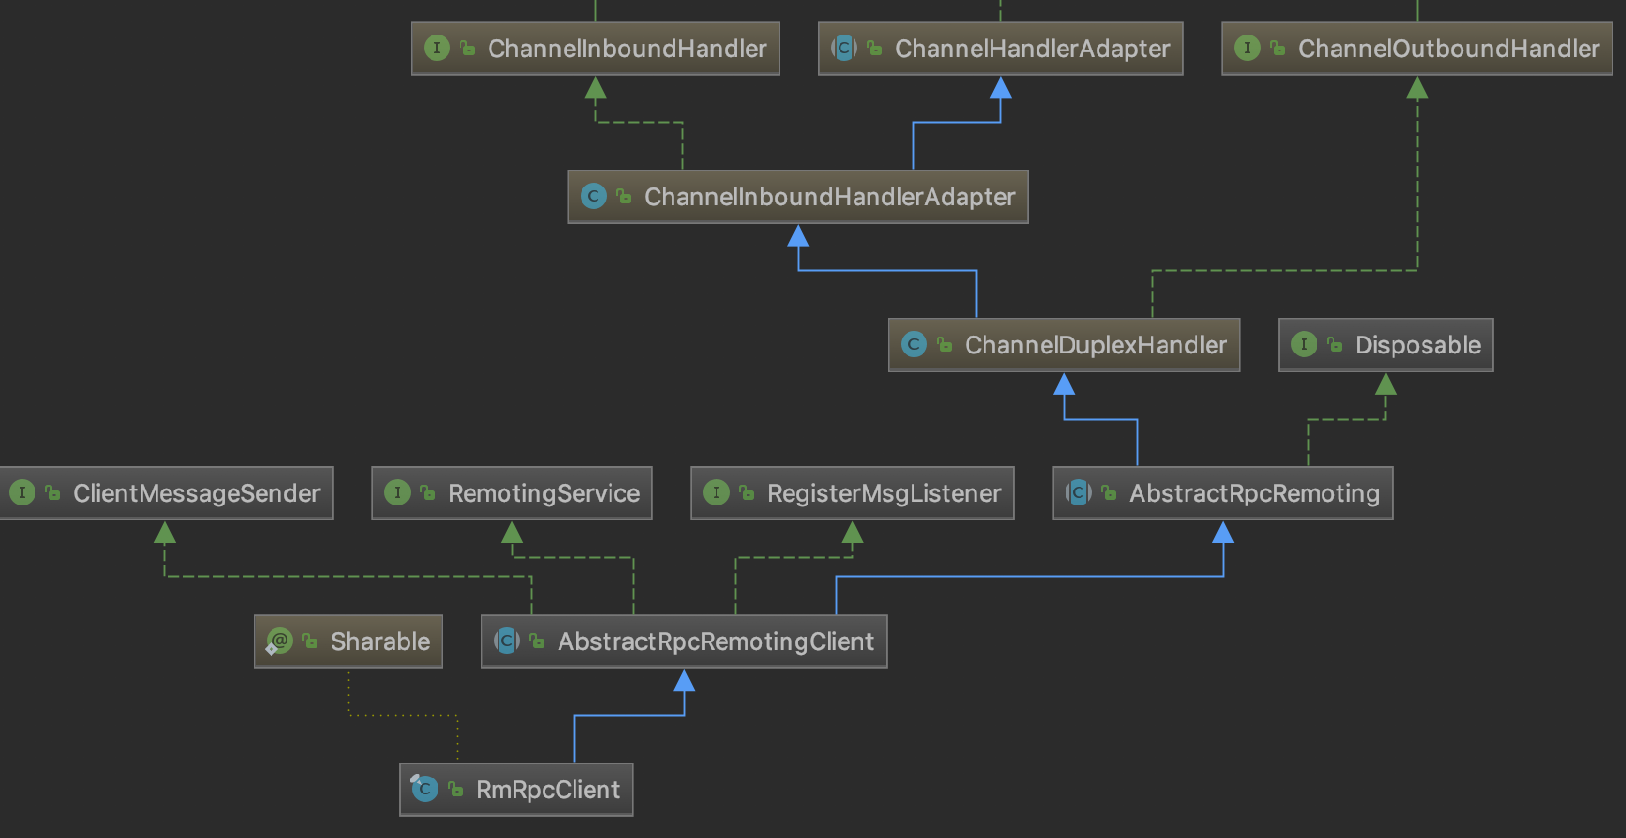
TMClient and RMClient interact with channel connections based on their respective poolConfig and NettyPoolableFactory, which implements KeyedPoolableObjectFactory<NettyPoolKey, Channel>. The channel connection pool locates each connection pool based on the role key+IP, and manages channels uniformly. During the sending process, TMClient and RMClient each use only one long-lived connection per IP. However, if a connection becomes unavailable, it is quickly retrieved from the connection pool, reducing service downtime.

2.7 HA-Cluster

Currently, the official HA-Cluster design has not been publicly disclosed. However, based on some hints from other middleware and the official channels, HA-Cluster could be designed as follows: HA-Cluster Design
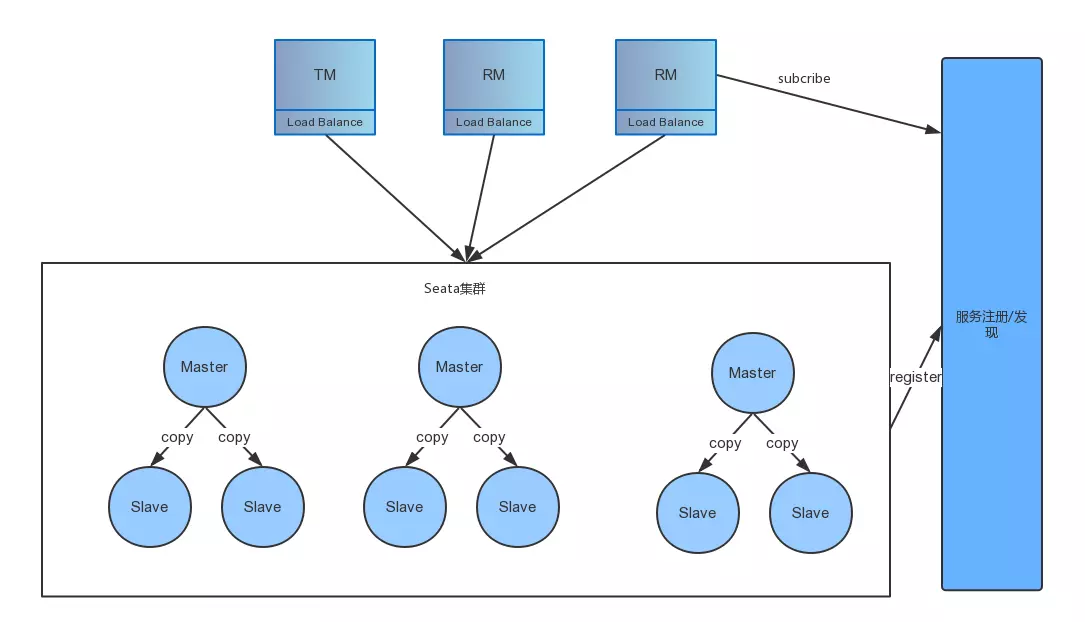
The specific process is as follows:

Step 1: When clients publish information, they ensure that the same transaction with the same transaction ID is handled on the same master. This is achieved by horizontally scaling multiple masters to provide concurrent processing performance.

Step 2: On the server side, each master has multiple slaves. Data in the master is nearly real-time synchronized to the slaves, ensuring that when the master crashes, other slaves can take over.

However, all of the above is speculation, and the actual design and implementation will have to wait until version 0.5. Currently, there is a Go version of Seata-Server donated to Seata (still in progress), which implements replica consistency through Raft. However, other details are not clear.

2.8 Metrics

This module has not yet disclosed a specific implementation. However, it may provide a plugin interface for integrating with other third-party metrics. Recently, Apache SkyWalking has been discussing how to integrate with the Seata team.

3. Coordinator Core

We have covered many foundational modules of the Seata server. I believe you now have a general understanding of Seata's implementation. Next, I will explain how the transaction coordinator's specific logic is implemented, providing you with a deeper understanding of Seata's internal workings.

3.1 Startup Process

The startup method is defined in the Server class's main method, outlining our startup process:
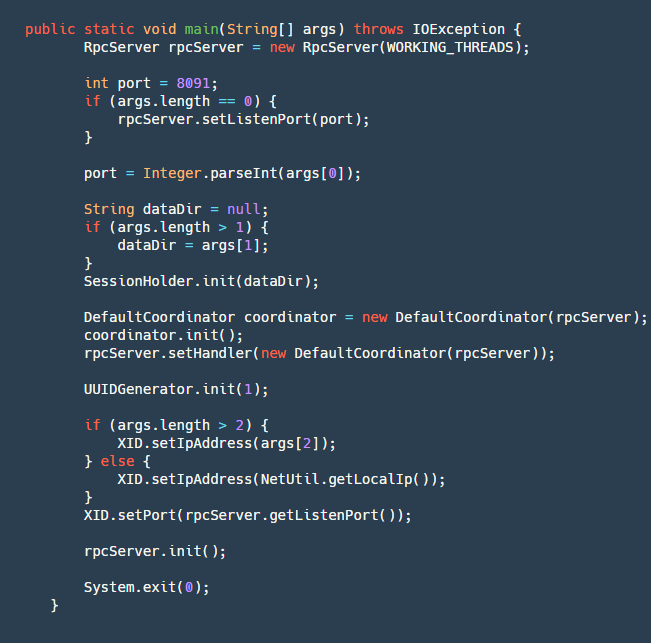
step1: Create an RpcServer, which encapsulates network operations using Netty to implement the server.

step2: Parse the port number, local file address (for recovering incomplete transactions if the server crashes), and IP address (optional, useful for obtaining an external VIP registration service when crossing networks).

step3: Initialize SessionHolder, wherein the crucial step is to recover data from the dataDir folder and rebuild sessions.

step4: Create a Coordinator, the core logic of the transaction coordinator, and initialize it. The initialization process includes creating four scheduled tasks:

  • retryRollbacking: Retry rollback task, used to retry failed rollbacks, executed every 5ms.
  • retryCommitting: Retry commit task, used to retry failed commits, executed every 5ms.
  • asyncCommitting: Asynchronous commit task, used to perform asynchronous commits, executed every 10ms.
  • timeoutCheck: Timeout task check, used to detect timeout tasks and execute timeout logic, executed every 2ms.

step5: Initialize UUIDGenerator, a basic class used for generating various IDs (transactionId, branchId).

step6: Set the local IP and listening port in XID, initialize rpcServer, and wait for client connections.

The startup process is relatively straightforward. Next, I will describe how Seata handles common business logic in distributed transaction frameworks.

3.2 Begin - Start Global Transaction

The starting point of a distributed transaction is always to start a global transaction. Let's see how Seata implements global transactions:

Begin Global Transaction

step1: Create a GloabSession based on the application ID, transaction group, name, and timeout. As mentioned earlier, GloabSession and BranchSession represent different aspects of the transaction.

step2: Add a RootSessionManager to it for listening to some events. Currently, Seata has four types of listeners (it's worth noting that all session managers implement SessionLifecycleListener):

  • ROOT_SESSION_MANAGER: The largest, containing all sessions.
  • ASYNC_COMMITTING_SESSION_MANAGER: Manages sessions that need asynchronous commit.
  • RETRY_COMMITTING_SESSION_MANAGER: Manages sessions for retrying commit.
  • RETRY_ROLLBACKING_SESSION_MANAGER: Manages sessions for retrying rollback. Since this is the beginning of a transaction, other SessionManagers are not needed, so only add RootSessionManager.

step3: Start GloabSession, which changes the state to Begin, records the start time, and calls the onBegin method of RootSessionManager to save the session to the map and write it to the file.

step4: Finally, return the XID. This XID is composed of ip+port+transactionId, which is crucial. When the TM acquires it, it needs to pass this ID to RM. RM uses XID to determine which server to access.

3.3 BranchRegister - Register Branch Transaction

After the global transaction is initiated by TM, the branch transaction of our RM also needs to be registered on top of our global transaction. Here's how it's handled:
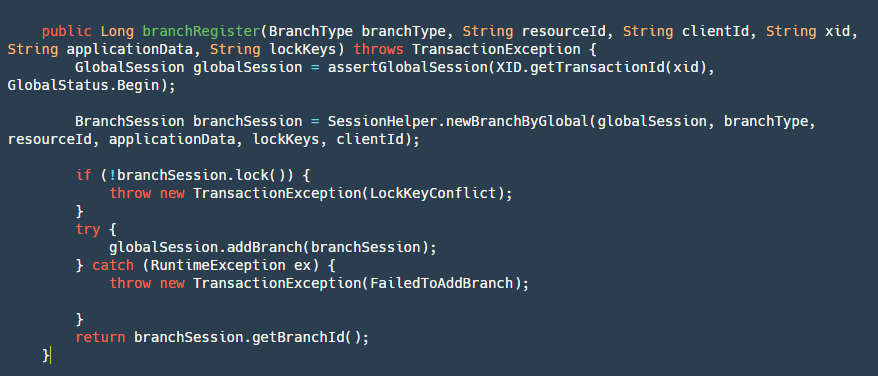
Branch Transaction Registration

step1: Retrieve and validate the global transaction's state based on the transactionId.

step2: Create a new branch transaction, which is our BranchSession.

step3: Lock the branch transaction globally. Here, the logic uses the lock module.

step4: Add the branchSession, mainly by adding it to the globalSession object and writing it to our file.

step5: Return the branchId, which is also important. We will need it later to roll back our transaction or update the status of our branch transaction.

After registering the branch transaction, it is necessary to report whether the local transaction execution of the branch transaction was successful or failed. Currently, the server simply records this information. The purpose of reporting is that even if this branch transaction fails, if the TM insists on committing the global transaction (catches exceptions without throwing), then when traversing to commit the branch transaction, this failed branch transaction does not need to be committed (users can choose to skip it).

3.4 GlobalCommit - Global Commit

When our branch transaction is completed, it's up to our TM - Transaction Manager to decide whether to commit or rollback. If it's a commit, then the following logic will be executed:
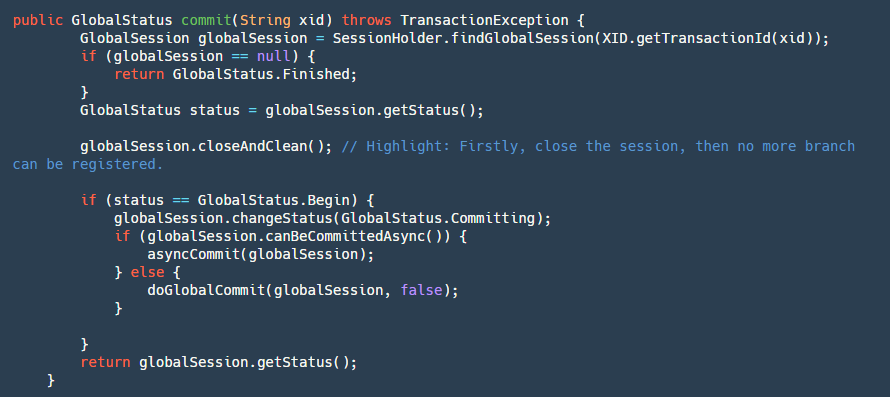
Global Commit

step1: First, find our globalSession. If it's null, it means it has already been committed, so perform idempotent operation and return success.

step2: Close our GloabSession to prevent new branches from coming in (rollback due to timeout in cross-service calls, provider continues execution).

step3: If the status is Begin, it means it hasn't been committed yet, so change its status to Committing, indicating that it's committing.

step4: Determine if it can be asynchronously committed. Currently, only AT mode can be asynchronously committed. In two-phase global commits, undolog is only deleted without strict order. Here, a timer task is used, and the client merges and deletes in batches after receiving it.

step5: If it's an asynchronous commit, directly put it into our ASYNC_COMMITTING_SESSION_MANAGER to let it asynchronously execute step6 in the background. If it's synchronous, then execute step6 directly.

step6: Traverse our BranchSessions for submission. If a branch transaction fails, determine whether to retry based on different conditions. This branchSession can be executed asynchronously, and if it fails, it can continue with the next one because it remains in the manager and won't be deleted until it succeeds. If it's a synchronous commit, it will be put into the retry queue for scheduled retries and will block and submit in sequence.

3.5 GlobalRollback - Global Rollback

If our TM decides to globally rollback, it will follow the logic below:
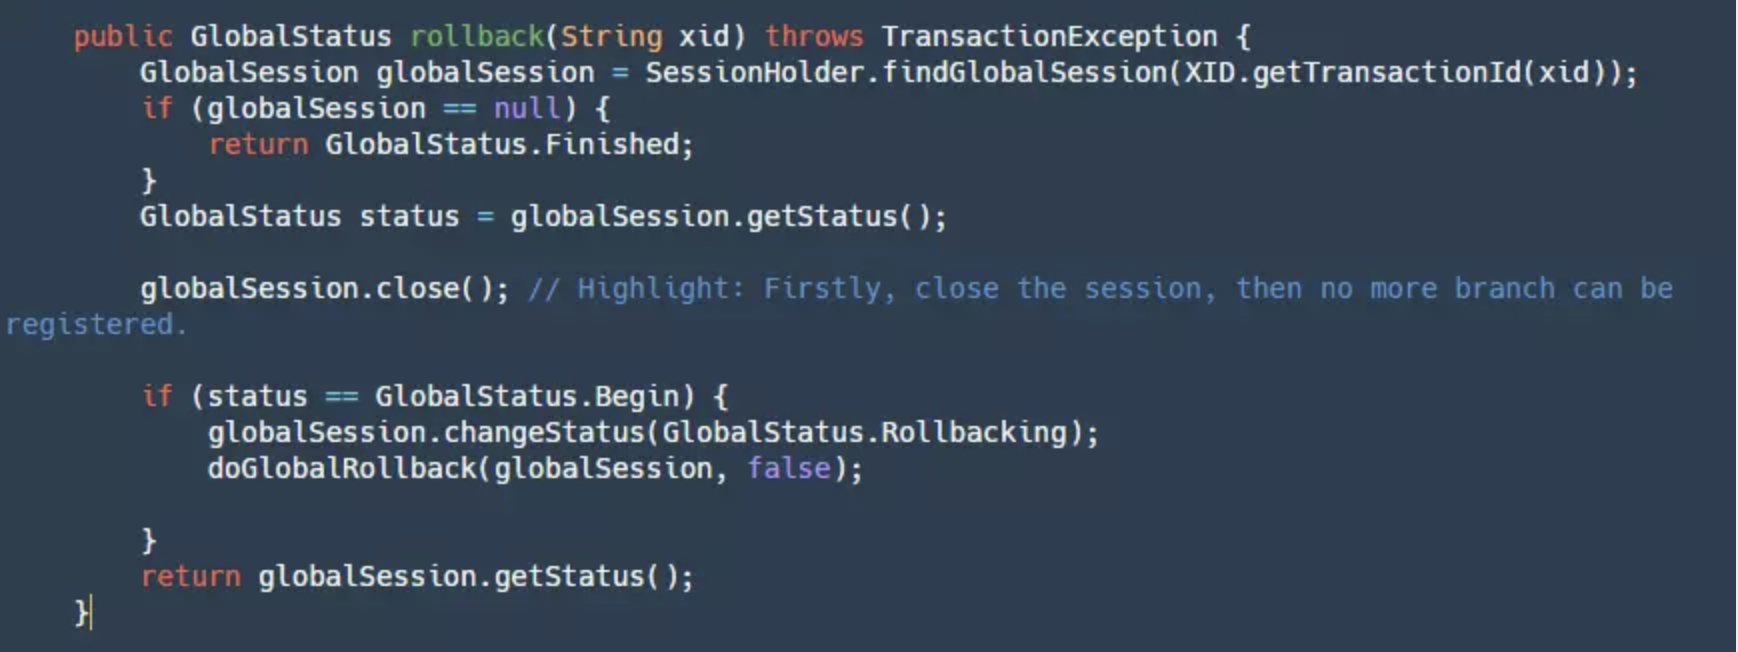
Global Rollback

This logic is basically the same as the commit process but in reverse. I won't delve into it here.

4. Conclusion

Finally, let's summarize how Seata solves the key points of distributed transactions:

  • Correct coordination: Through background scheduled tasks, various retries are performed correctly, and in the future, a monitoring platform may be introduced, possibly allowing manual rollback.
  • High availability: Ensured by HA-Cluster.
  • High performance: Sequential file writing, RPC implemented through Netty, and Seata can be horizontally scaled in the future to improve processing performance.
  • High extensibility: Provides places where users can freely implement, such as configuration, service discovery and registration, global lock, etc.

In conclusion, I hope you can understand the core design principles of Seata-Server from this article. Of course, you can also imagine how you would design a distributed transaction server if you were to implement one yourself.

Seata GitHub Repository: https://github.com/apache/incubator-seata

Article Authors:

Li Zhao, GitHub ID @CoffeeLatte007, author of the public account "咖啡拿铁", Seata community Committer, Java engineer at Yuanfudao, formerly employed at Meituan. Has a strong interest in distributed middleware and distributed systems. Ji Min (Qingming), GitHub ID @slievrly, Seata open source project leader, core R&D member of Alibaba middleware TXC/GTS, has long been engaged in core R&D work of distributed middleware, and has rich technical accumulation in the field of distributed transactions.
· 13 min read

Fescar 0.4.0 version released the TCC model, contributed by the ant gold service team, welcome to try, the end of the article also provides the project follow-up Roadmap, welcome to pay attention.

Preface: Application scenarios based on TCC model


1.png

The TCC distributed transaction model acts directly on the service layer. It is not coupled with the specific service framework, has nothing to do with the underlying RPC protocol, has nothing to do with the underlying storage media, can flexibly choose the locking granularity of the business resources, reduces the resource locking holding time, has good scalability, and can be said to be designed for independently deployed SOA services.

I. TCC model advantages

For TCC distributed transaction model, I think its application in business scenarios, there are two aspects of significance.

1.1 Distributed transaction across services

The splitting of services can also be thought of as horizontal scaling of resources, only in a different direction.

Horizontal extensions may go along two directions:

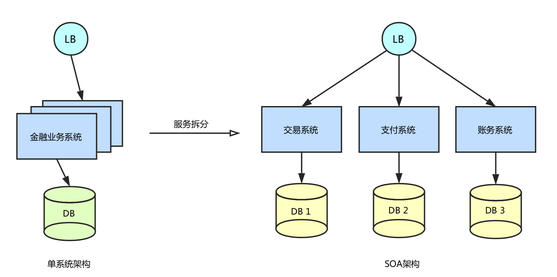
  1. functional scaling, where data is grouped according to function and different functional groups are distributed over multiple different databases, which is effectively servitisation under the SOA architecture.
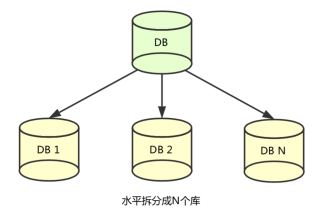
  2. data sharding, which adds a new dimension to horizontal scaling by splitting data across multiple databases within functional groups.

The following figure briefly illustrates the horizontal data scaling strategy:

2.png

Therefore, one of the roles of TCC is to ensure the transaction property of multi-resource access when scaling resources horizontally by function.

1.2 Two-stage splitting

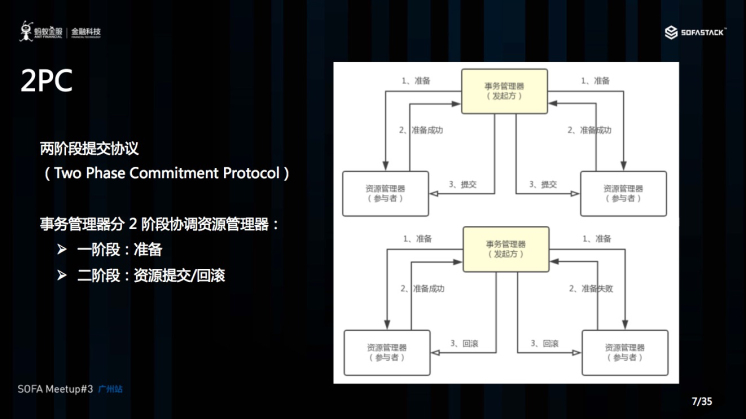
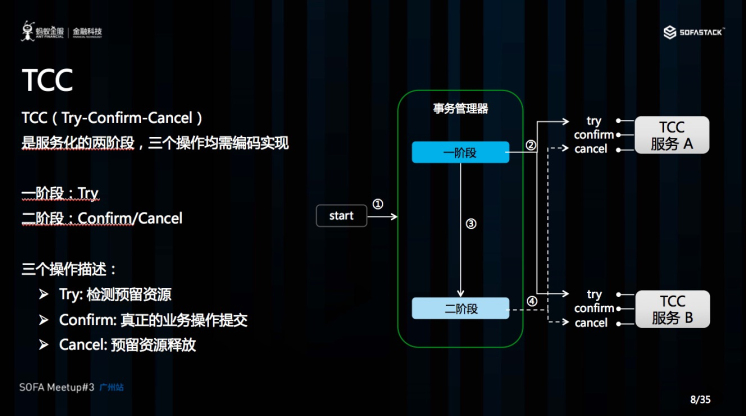
Another effect of TCC is that it splits the two phases into two separate phases that are related by means of resource business locking. The advantage of resource locking is that it does not block other transactions from continuing to use the same resources in the first phase, nor does it affect the correct execution of the second phase of the transaction.

The traditional model of concurrent transactions:
3.png

Concurrent transactions for the TCC model:
4.png

How does this benefit the business? Taking the secured transaction scenario of Alipay, the simplified case involves only two services, the transaction service and the billing service. The transaction service is the main business service, and the accounting service is the slave business service, which provides the Try, Commit, and Cancel interfaces:

  1. The Try interface deducts the user's available funds and transfers them to pre-frozen funds. Pre-frozen funds is the business locking programme, each transaction can only use the pre-frozen funds of this transaction in the second phase, and other concurrent transactions can continue to process the user's available funds after the first phase of execution.
  2. The Commit interface deducts the pre-frozen funds and increases the funds available in the intermediate account (secured transactions do not immediately credit the merchant and require an intermediate account for suspense).

Assuming there is only one intermediary account, every time the Commit interface of the payment service is called, it locks the intermediary account, and there are hotspot performance issues with the intermediary account. However, in the secured transaction scenario, the funds need to be transferred from the intermediate account to the merchant only after seven days, and the intermediate account does not need to be displayed to the public. Therefore, after executing the first stage of the payment service, it can be considered that the payment part of this transaction has been completed and return the result of successful payment to the user and the merchant, and does not need to execute the Commit interface of the second stage of the payment service right away, and wait until the low-frontal period, and then slowly digest it and execute it asynchronously.
5.png

This is the two-phase asynchronisation feature of TCC distributed transaction model, the first phase of execution from the business service is successful, the master business service can be committed to complete, and then the framework asynchronously execute the second phase of each slave business service.

General-purpose TCC solution

The generic TCC solution is the most typical implementation of the TCC distributed transaction model, where all the slave business services need to participate in the decision making of the master business service.
6.png

Applicable scenarios

Since the slave business services are invoked synchronously and their results affect the decisions of the master business service, the generic TCC distributed transaction solution is suitable for businesses with deterministic and short execution times, such as the three most core services of an Internet financial enterprise: transaction, payment, and accounting:
7.png

When a user initiates a transaction, the transaction service is accessed first to create the transaction order; then the transaction service calls the payment service to create the payment order for the transaction and performs the collection action, and finally, the payment service calls the billing service to record the account flow and bookkeeping.

In order to ensure that the three services work together to complete a transaction, either succeed or fail at the same time, you can use a general-purpose TCC solution that puts the three services in a distributed transaction, with the transaction as the master service, the payment as the slave service, and the billing as the nested slave service of the payment service, and the atomicity of the transaction is guaranteed by the TCC model.
8.png

The Try interface of the payment service creates the payment order, opens a nested distributed transaction, and calls the Try interface of the billing service; the billing service freezes the buyer's funds in the Try interface. After the first stage of the call is completed, the transaction is completed, the local transaction is submitted, and the TCC framework completes the second stage of the distributed transaction from the business service.

The second stage of the payment service first calls the Confirm interface of the accounting service to deduct the buyer's frozen funds and increase the seller's available funds. After the call is successful, the payment service modifies the payment order to the completed state and completes the payment.

When both payment and billing service phase 2 are finished, the whole distributed transaction is finished.

Asynchronous guaranteed TCC solution

The direct slave service of the asynchronous assured TCC solution is the reliable messaging service, while the real slave service is decoupled by the messaging service and executed asynchronously as the consumer of the messaging service.
9.png

The Reliable Messaging Service needs to provide three interfaces, Try, Confirm, and Cancel. The Try interface pre-sends, and is only responsible for persistently storing the message data; the Confirm interface confirms the sending, and this is when the actual delivery of the message begins The Confirm interface confirms the delivery, which is when the actual delivery of the message begins; and the Cancel interface cancels the delivery and deletes the message data.

The message data of the message service is stored independently and scaled independently, which reduces the coupling between the business service and the messaging system, and achieves the ultimate consistency of the distributed transaction under the premise that the message service is reliable.

This solution increases the maintenance cost of message service, but since message service implements TCC interface instead of slave business service, slave business service doesn't need any modification and the access cost is very low.

Application scenario

Since consuming messages from a business service is an asynchronous process, the execution time is uncertain, which may lead to an increase in the inconsistency time window. Therefore, the Asynchronous Ensured TCC Distributed Transaction Solution is only applicable to some passive businesses that are less sensitive to the final consistency time (the processing result of the slave business service does not affect the decision of the master business service, and only passively receives the decision result of the master business service). For example, the member registration service and the email sending service:
10.png
 
When a user registers for a membership successfully, an email needs to be sent to the user to tell the user that the registration was successful and to prompt the user to activate the membership. But pay attention to two points:

  1. If the user registration is successful, make sure to send an email to the user;
  2. if the user's registration fails, an email must not be sent to the user.

So again, this requires the membership service and the mail service to ensure atomicity, either both are executed or neither is executed. The difference is that the mail service is only a passive business, it does not affect whether the user can register successfully or not, it only needs to send an email to the user after the user has registered successfully, and the mail service does not need to be involved in the decision making of the activities of the membership service.

For this kind of business scenario, you can use the asynchronous ensured TCC distributed transaction solution, as follows:
11.png
 
 
The reliable messaging service decouples the member and mail services, and the member service and the messaging service comprise the TCC transaction model, which ensures the atomicity of transactions. Then through the reliable feature of the message service, it ensures that the message can definitely be consumed by the mail service, so that the member and the mail service are in the same distributed transaction. At the same time, the mail service will not affect the execution process of the member service, and will only passively receive the request to send mail after the member service is executed successfully.

Compensated TCC solution

Compensated TCC solution is similar in structure to generic TCC solution, and its slave services also need to participate in the decision making of the main business service. However, the difference is that the former slave service only needs to provide Do and Compensate two interfaces, while the latter needs to provide three interfaces.
12.png
 
The Do interface directly executes the real complete business logic, completes the business processing, and the result of the business execution is visible externally; the Compensate operation is used for the business compensation, which offsets or partially offsets the business result of the positive business operation. Compensate operation needs to satisfy idempotency.
Compensate operation is used to offset or partially offset the business results of positive business operations, and the Compensate operation needs to satisfy idempotency.
Compared with the general-purpose solution, Compensate solution does not need to transform the original business logic from the business service, and only needs to add an additional Compensate rollback logic, which is a lesser business transformation. However, it is important to note that the business executes the entire business logic in one phase and cannot achieve effective transaction isolation. When rollback is required, there may be a compensation failure, and additional exception handling mechanisms, such as manual intervention, are also required.

Applicable scenarios

Due to the existence of rollback compensation failure, the compensated TCC distributed transaction solution is only applicable to some of the less concurrent conflict or need to interact with external business, these external business is not a passive business, its execution results will affect the decision of the main business service, such as the ticket booking service of the air ticket agency:
13.png

This air ticket service provides multi-destination air ticket booking service, which can book air tickets for multiple itinerary flights at the same time, e.g., to travel from Beijing to St. Petersburg, it is necessary to take the first journey from Beijing to Moscow, as well as the second journey from Moscow to St. Petersburg.

When a user books a ticket, he/she would definitely want to book tickets for both flights at the same time, and booking only one flight does not make sense for the user. Therefore, such a business service also imposes the atomicity requirement that if the booking for one of the flights fails, the other flight needs to be able to be cancelled.

However, it is extremely difficult to push the airlines to change as they are external to the ticket agents and only provide booking and cancellation interfaces. Therefore, for this type of business service, a compensated TCC distributed transaction solution can be used, as follows:
14.png

The gateway service adds the Compensate interface on top of the original logic, which is responsible for calling the cancellation interface of the corresponding airline.

When the user initiates a ticket booking request, the ticket service first calls the booking interface of each airline through the Do interface of the gateway, and if all flights are booked successfully, the whole distributed transaction is executed successfully; once the booking of tickets for a certain flight fails, the distributed transaction is rolled back, and the Compensate interface of each gateway is called by the TCC transaction framework, which then calls the corresponding airline's The TCC transaction framework calls the Compensate compensation interface of each gateway, which then calls the corresponding airline's cancellation interface. In this way, the atomicity of multi-way ticket booking service can also be guaranteed.

V. Summary

For today's Internet applications, horizontal scaling of resources provides more flexibility and is a relatively easy to implement outward scaling solution, but at the same time, it also significantly increases the complexity and introduces some new challenges, such as data consistency issues between resources.

Horizontal data scaling can be done both by data slicing and by functionality. the TCC model ensures the transactional properties of multi-resource access while scaling resources horizontally by functionality.

TCC model in addition to the role of cross-service distributed transactions this layer , but also has a two-stage division of the function , through the business resource locking , allowing the second stage of asynchronous execution , and asynchronous idea is to solve the hot spot data concurrency performance problems of one of the tools .

Roadmap

Currently, we have released 0.4.0, and we will release 0.5 ~ 1.0 to continue to improve and enrich the functionality of AT and TCC modes, and to solve the problem of high availability of the server side. After 1.0, this open source product will reach the standard of production environment.


image1.png

· 7 min read

Fescar 0.4.0 version released the TCC schema, contributed by the Anthem team, you are welcome to try it out,
Sample address:[https://github.com/fescar-group/fescar-samples/tree/master/tcc](https. //github.com/fescar-group/fescar-samples/tree/master/tcc),
At the end of this article, we also provide the roadmap of the project, welcome to follow.

I. Introduction to TCC

In the Two Phase Commitment Protocol (2PC), the resource manager (RM, resource manager) needs to provide three functions: "prepare", "commit" and "rollback". "Rollback" 3 operations; while the transaction manager (TM, transaction manager) coordinates all resource managers in 2 phases, in the first phase asks all resource managers whether the "preparation" is successful, if all resources are If all resources are "ready" successfully, then perform "commit" operation of all resources in the second phase, otherwise perform "rollback" operation of all resources in the second phase to ensure that the final state of all resources is the same, either all commits or all commits, or the final state of all resources is the same. to ensure that the final state of all resources is the same, either all commit or all rollback.

Resource Manager has many implementations, among which TCC (Try-Confirm-Cancel) is a service-based implementation of Resource Manager; TCC is a relatively mature distributed transaction solution that can be used to solve the data consistency problem of cross-database and cross-service business operations; TCC's Try, Confirm and Cancel methods are implemented by business code. TCC's Try, Confirm, and Cancel methods are all implemented by business code, so TCC can be called a service-based resource manager.

The Try operation of TCC is the first stage, which is responsible for checking and reserving resources; Confirm operation is the second stage, which is the submit operation to execute the real business; Cancel is the second stage, which is the rollback operation, which is the cancellation of the reserved resources to return the resources to the initial state.

As shown in the figure below, after the user implements a TCC service, the TCC service will be one of the resources of the distributed transaction, participating in the whole distributed transaction; the transaction manager coordinates the TCC services in two stages, calling the Try method of all TCC services in the first stage, and executing the Confirm or Cancel method of all TCC services in the second stage; eventually all TCC services are either committed or cancelled; all TCC services are either committed or cancelled. services are either all committed or all rolled back.

image.png

II. TCC Design

When users access TCC, most of the work is focused on how to implement TCC service, after years of TCC application by Anthem, the following main TCC design and implementation of the main matters are summarised below:

1, Business operation is completed in two stages

Before connecting to TCC, business operation can be completed in one step only, but after connecting to TCC, we need to consider how to divide it into 2 phases to complete, put the resource checking and reserving in Try operation in the first phase, and put the execution of real business operation in Confirm operation in the second phase.

Below is an example of how the business model can be designed in two phases. Example scenario: "Account A has a balance of $100, of which $30 needs to be deducted";

Before accessing TCC, the user could write SQL: "update account table set balance = balance - 30 where account = A" to complete the deduction operation in one step.

After connecting to TCC, you need to consider how to split the debit operation into 2 steps:

  • Try operation: checking and reserving resources;

In the deduction scenario, what Try operation has to do is to check whether the balance of A account is enough, and then freeze the $30 to be deducted (reserved resources); no real deduction will happen at this stage.

  • Confirm operation: performs the submission of the real operation;

In the deduction scenario, the Confirm phase takes place when the real deduction occurs, deducting the $30 already frozen in A's account.

  • Cancel operation: whether or not the reserved resource is released;

In a debit scenario, the debit is cancelled and the Cancel operation performs the task of releasing the $30 that was frozen by the Try operation, returning Account A to its initial state.

image.png

2, Concurrency Control

Users should consider concurrency issues when implementing TCC and minimise lock granularity to maximise concurrency in distributed transactions.
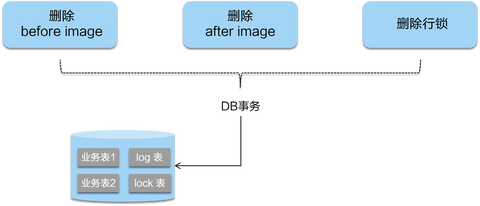
The following is still an example of deducting money from account A. "There is $100 on account A. Transaction T1 has to deduct $30 of it, and transaction T2 also has to deduct $30, and there is concurrency".

In the first phase of the Try operation, distributed transaction T1 and distributed transaction T2 are freezing that part of the funds without interfering with each other; so that in the second phase of the distributed transaction, no matter whether T1 is a commit or a rollback, there will be no impact on T2, so that T1 and T2 are executing in parallel on the same piece of business data.

image.png

3, Allow empty rollback

As shown in the following figure, when the transaction coordinator invokes the first-phase Try operation of the TCC service, there may be a network timeout due to packet loss, and at this time the transaction manager triggers a two-phase rollback to invoke the Cancel operation of the TCC service, which is invoked without a timeout.

The TCC service receives a Cancel request without receiving a Try request, this scenario is called a null rollback; null rollbacks often occur in production environments, and users should allow for null rollbacks when implementing TCC services, i.e., return success when receiving a null rollback.

image.png

4. Anti-suspension control

As shown in the figure below, when the transaction coordinator calls the TCC service's one-phase Try operation, there may be a timeout due to network congestion, at this time, the transaction manager will trigger a two-phase rollback and call the TCC service's Cancel operation, and the Cancel call is not timed out; after this, the one-phase Try packet that is congested in the network is received by the TCC service, and there is a two-phase After this, the first-phase Try packet on the congested network is received by the TCC service, and the second-phase Cancel request is executed before the first-phase Try request, and the TCC service will never receive the second-phase Confirm or Cancel after executing the late Try, resulting in the suspension of the TCC service.

When you implement TCC service, you should allow empty rollback, but refuse to execute Try request after empty rollback to avoid hanging.

image.png

5. Idempotent control

Whether it is network packet retransmission or compensation execution of abnormal transaction, it will lead to the Try, Confirm or Cancel operation of TCC service to be executed repeatedly; users need to consider idempotent control when implementing TCC service, i.e., the business result of Try, Confirm, Cancel executed once and executed many times is the same.
image.png

Roadmap

Currently we have released version 0.4.0, we will release version 0.5 ~ 1.0, continue to improve and enrich the functions of AT, TCC mode, and solve the problem of high availability of the server side, after version 1.0, this open source product will reach the standard of production environment.

image1.png

· 3 min read

Use case

A business logic for user purchasing commodities. The whole business logic is powered by 3 microservices:

  • Storage service: deduct storage count on given commodity.
  • Order service: create order according to purchase request.
  • Account service: debit the balance of user's account.

Architecture

Architecture

StorageService

public interface StorageService {

/**
* deduct storage count
*/
void deduct(String commodityCode, int count);
}

OrderService

public interface OrderService {

/**
* create order
*/
Order create(String userId, String commodityCode, int orderCount);
}

AccountService

public interface AccountService {

/**
* debit balance of user's account
*/
void debit(String userId, int money);
}

Main business logic

public class BusinessServiceImpl implements BusinessService {

private StorageService storageService;

private OrderService orderService;

/**
* purchase
*/
public void purchase(String userId, String commodityCode, int orderCount) {

storageService.deduct(commodityCode, orderCount);

orderService.create(userId, commodityCode, orderCount);
}
}
public class StorageServiceImpl implements StorageService {

private StorageDAO storageDAO;

@Override
public void deduct(String commodityCode, int count) {
Storage storage = new Storage();
storage.setCount(count);
storage.setCommodityCode(commodityCode);
storageDAO.update(storage);
}
}
public class OrderServiceImpl implements OrderService {

private OrderDAO orderDAO;

private AccountService accountService;

public Order create(String userId, String commodityCode, int orderCount) {

int orderMoney = calculate(commodityCode, orderCount);

accountService.debit(userId, orderMoney);

Order order = new Order();
order.userId = userId;
order.commodityCode = commodityCode;
order.count = orderCount;
order.money = orderMoney;

return orderDAO.insert(order);
}
}

Distributed Transaction Solution with Seata

undefined

We just need an annotation @GlobalTransactional on business method:


@GlobalTransactional
public void purchase(String userId, String commodityCode, int orderCount) {
......
}

Example powered by Dubbo + Seata

Step 1: Setup database

  • Requirement: MySQL with InnoDB engine.

Note: In fact, there should be 3 database for the 3 services in the example use case. However, we can just create one database and configure 3 data sources for simple.

Modify Spring XML with the database URL/username/password you just created.

dubbo-account-service.xml dubbo-order-service.xml dubbo-storage-service.xml

    <property name="url" value="jdbc:mysql://x.x.x.x:3306/xxx" />
<property name="username" value="xxx" />
<property name="password" value="xxx" />

Step 2: Create UNDO_LOG table for Seata

UNDO_LOG table is required by Seata AT mode.

CREATE TABLE `undo_log` (
`id` bigint(20) NOT NULL AUTO_INCREMENT,
`branch_id` bigint(20) NOT NULL,
`xid` varchar(100) NOT NULL,
`rollback_info` longblob NOT NULL,
`log_status` int(11) NOT NULL,
`log_created` datetime NOT NULL,
`log_modified` datetime NOT NULL,
`ext` varchar(100) DEFAULT NULL,
PRIMARY KEY (`id`),
KEY `idx_unionkey` (`xid`,`branch_id`)
) ENGINE=InnoDB AUTO_INCREMENT=159 DEFAULT CHARSET=utf8

Step 3: Create tables for example business


DROP TABLE IF EXISTS `storage_tbl`;
CREATE TABLE `storage_tbl` (
`id` int(11) NOT NULL AUTO_INCREMENT,
`commodity_code` varchar(255) DEFAULT NULL,
`count` int(11) DEFAULT 0,
PRIMARY KEY (`id`),
UNIQUE KEY (`commodity_code`)
) ENGINE=InnoDB DEFAULT CHARSET=utf8;


DROP TABLE IF EXISTS `order_tbl`;
CREATE TABLE `order_tbl` (
`id` int(11) NOT NULL AUTO_INCREMENT,
`user_id` varchar(255) DEFAULT NULL,
`commodity_code` varchar(255) DEFAULT NULL,
`count` int(11) DEFAULT 0,
`money` int(11) DEFAULT 0,
PRIMARY KEY (`id`)
) ENGINE=InnoDB DEFAULT CHARSET=utf8;


DROP TABLE IF EXISTS `account_tbl`;
CREATE TABLE `account_tbl` (
`id` int(11) NOT NULL AUTO_INCREMENT,
`user_id` varchar(255) DEFAULT NULL,
`money` int(11) DEFAULT 0,
PRIMARY KEY (`id`)
) ENGINE=InnoDB DEFAULT CHARSET=utf8;

Step 4: Start Seata-Server

  • Download server package, unzip it.
  • Start Seata-Server
sh seata-server.sh $LISTEN_PORT $PATH_FOR_PERSISTENT_DATA

e.g.

sh seata-server.sh 8091 /home/admin/seata/data/

Step 5: Run example

· 17 min read

Fescar has been released for a while, and distributed transactions have always been a highly focused area in the industry. Fescar received nearly 5000 stars within a month of its release, indicating its popularity. Of course, before Fescar, there were already relatively mature open-source distributed transaction solutions, such as the 2PC non-intrusive transaction of LCN, which has now evolved to version 5.0 and supports TCX transactions similar to Fescar's transaction model. Other implementations of TCC transactions include hmily and tcc-transaction. In the current era of microservice architecture, and given Alibaba's extensive background in open source, the release of Fescar has undoubtedly sparked a new wave of research into distributed transactions. Fescar originated from Alibaba Cloud's commercial distributed transaction service GTS, a model that has undergone rigorous testing in online environments. The TXC distributed transaction model of Fescar is similar to the traditional XA transaction model, with the main difference being the positioning of the resource manager—one at the application layer and the other at the database layer. The author believes that Fescar's TXC model implementation is of significant research value, so today we will thoroughly explore the Fescar project's code. This article is lengthy and will take about 30-60 minutes to read and understand.
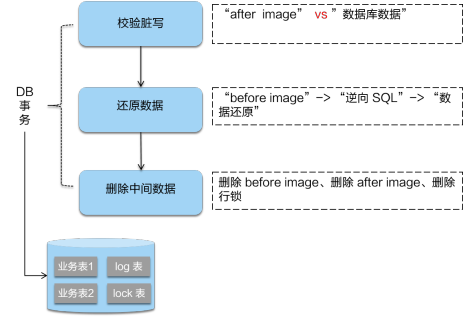
Project Address

Fescar: https://github.com/alibaba/fescar

The code discussed in this blog post is from the 0.1.2-SNAPSHOT version of Fescar. As Fescar evolves, the project structure and module implementations might change significantly.

Fescar's TXC Model

The above image is an official schematic of the TXC model created by Fescar. The quality of visuals produced by large companies is indeed impressive. From the schematic, we can see the overall implementation of TXC. TXC is implemented through three components, as depicted in the three dark yellow sections in the image, with the following roles:

  1. TM: Global Transaction Manager, which starts the Fescar distributed transaction on the server side and sends the global transaction to the TC (Transaction Coordinator) for management.
  2. TC: Transaction Coordinator, which controls the global transaction's commit or rollback. This component requires independent deployment and maintenance, currently only supporting a single-machine version. Future iterations plan to include a clustered version.
  3. RM: Resource Manager, mainly responsible for reporting branch transactions and managing local transactions.

A brief description of its implementation process: The initiating service starts a global transaction and registers it with the TC. When calling a cooperating service, the branch transaction of the cooperating service completes the first phase of transaction commit or rollback and generates an undo_log for transaction rollback, then registers the current cooperating service with the TC and reports its transaction status, merging it into the global transaction of the same business. If no issues arise, it proceeds to the next cooperating service call. If any branch transaction of the cooperating service rolls back, it will notify the TC, which then notifies all branch transactions of the global transaction that have completed the first phase to roll back. If all branch transactions proceed normally, it will notify the TC when returning to the global transaction initiator, and the TC will notify all branches of the global transaction to delete the rollback logs. To solve write isolation and degree isolation issues during this process, global locks managed by the TC will be involved.

The goal of this blog post is to delve into the code details and explore how its basic ideas are implemented. We will first outline the role of each module from the project's structure, then investigate the entire distributed transaction implementation process using the official examples.

Project Structure Analysis

After pulling the project and opening it with an IDE, the directory structure is as follows. Let's take a look at the implementation of each module:

  • common: Common components, providing commonly used utility classes, static variables, extension mechanism class loaders, and defining global exceptions, etc.
  • config: Configuration loading and parsing module, providing basic interfaces for configuration. Currently, only file configuration is implemented, with plans for implementations of configuration centers like Nacos.
  • core: The core module mainly encapsulating RPC-related content for communication between TM, RM, and TC.
  • dubbo: The Dubbo module mainly adapts the Dubbo communication framework, using Dubbo's filter mechanism to pass global transaction information to branches.
  • examples: A simple example module that we will explore to understand the implementation.
  • rm-datasource: The resource management module, a core module that proxies some JDBC classes to parse SQL, generate rollback logs, and coordinate local transactions. Personally, I think naming this module "core" would be more appropriate.
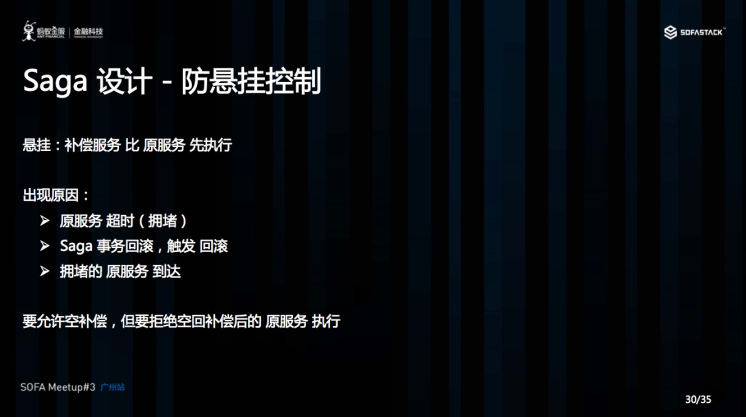
  • server: The TC component, mainly coordinating and managing global transactions, responsible for committing or rolling back global transactions, and maintaining global locks.
  • spring: The module integrated with Spring, mainly consisting of AOP logic, serving as the entry point for the entire distributed transaction, and the breakthrough point for studying Fescar.
  • tm: The global transaction management module, managing the boundaries of global transactions, and controlling the initiation and rollback points of global transactions.

Viewing the Effects through the [examples] Module

First, start the TC (Server) module, and start the main method directly. The default server port is 8091.

Second, go to the examples module and configure the configuration files for the order, business, account, and storage services, mainly the MySQL data source and Zookeeper connection address. Note that the default Dubbo Zookeeper registry dependency is missing, and starting it will throw a class not found exception. Add the following dependency:

<dependency>
<groupId>com.101tec</groupId>
<artifactId>zkclient</artifactId>
<version>0.10</version>
<exclusions>
<exclusion>
<artifactId>slf4j-log4j12</artifactId>
<groupId>org.slf4j</groupId>
</exclusion>
</exclusions>
</dependency>

Third, place a breakpoint at the simulated exception in BusinessServiceImpl. Start OrderServiceImpl, StorageServiceImpl, AccountServiceImpl, and BusinessServiceImpl services one by one. After hitting the breakpoint, check the account_tbl table in the database; the amount has been reduced by 400 yuan, to 599 yuan. Then, release the breakpoint to trigger the simulated exception in the BusinessServiceImpl module. The global transaction rolls back, and the account_tbl table amount returns to 999 yuan.

As shown above, we have experienced the control capability of Fescar transactions. Next, let's look at how it controls transactions in detail.
Analysis of Fescar Transaction Process

First, Analyze the Configuration File

This is a golden rule: to integrate any technology or framework, the configuration file is definitely a breakthrough point. From the above example, we learned that the configuration file in the example module configured an instance of a global transaction scanner, as follows:

<bean class="com.alibaba.fescar.spring.annotation.GlobalTransactionScanner">
<constructor-arg value="dubbo-demo-app"/>
<constructor-arg value="my_test_tx_group"/>
</bean>

This instance scans all instances when the project starts. The specific implementation can be found in the [spring] module, and methods marked with the @GlobalTransactional annotation are woven into the logic of GlobalTransactionalInterceptor's invoke method. When the application starts, instances of TM (TmRpcClient) and RM (RmRpcClient) are initialized, connecting the service with the TC (Transaction Coordinator). Going further involves the TransactionalTemplate class in the TM module.

[TM] Module Starts Global Transactions

The opening, committing, and rolling back of global transactions are encapsulated in the TransactionalTemplate. The code is as follows:


public Object execute(TransactionalExecutor business) throws TransactionalExecutor.ExecutionException {
// 1. get or create a transaction
GlobalTransaction tx = GlobalTransactionContext.getCurrentOrCreate();
// 2. begin transaction
try {
tx.begin(business.timeout(), business.name());
} catch (TransactionException txe) {
throw new TransactionalExecutor.ExecutionException(tx, txe,
TransactionalExecutor.Code.BeginFailure);
}
Object rs = null;
try {
// Do Your Business
rs = business.execute();
} catch (Throwable ex) {
// 3. any business exception, rollback.
try {
tx.rollback();
// 3.1 Successfully rolled back
throw new TransactionalExecutor.ExecutionException(tx, TransactionalExecutor.Code.RollbackDone, ex);
} catch (TransactionException txe) {
// 3.2 Failed to rollback
throw new TransactionalExecutor.ExecutionException(tx, txe,
TransactionalExecutor.Code.RollbackFailure, ex);
}
}
// 4. everything is fine, commit.
try {
tx.commit();
} catch (TransactionException txe) {
// 4.1 Failed to commit
throw new TransactionalExecutor.ExecutionException(tx, txe,
TransactionalExecutor.Code.CommitFailure);
}
return rs;
}

The more detailed implementation in the [TM] module is divided into two classes, as follows:

DefaultGlobalTransaction: Responsible for the specific actions of starting, committing, and rolling back global transactions.
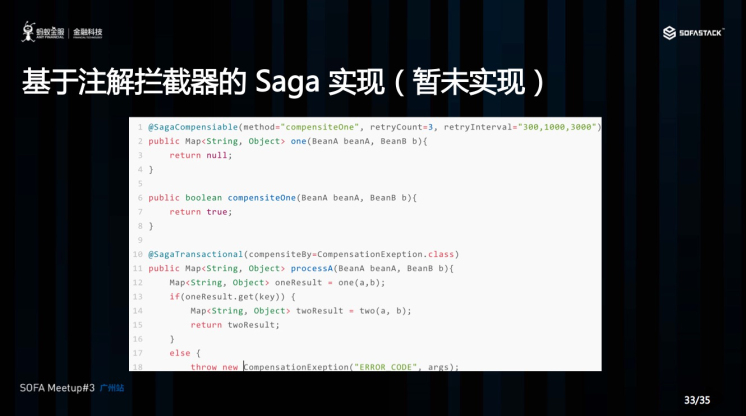
DefaultTransactionManager: Responsible for using TmRpcClient to send commands to the TC control center, such as starting a global transaction (GlobalBeginRequest), committing (GlobalCommitRequest), rolling back (GlobalRollbackRequest), and querying status (GlobalStatusRequest).

The above are the core contents of the TM module. After the TM module completes the global transaction start, we then look at how the global transaction ID, xid, is passed and how the RM component intervenes.

Passing Global Transaction xid with [dubbo]

First is the transmission of xid. Currently, the transmission in a microservice architecture implemented with the Dubbo framework has been realized. It is also easy to implement for others like Spring Cloud and Motan. By using the filter mechanism that general RPC communication frameworks have, xid is passed from the initiating node of the global transaction to the service's subordinate nodes. After being received by the subordinate nodes, it is bound to the current thread context environment to determine whether to join the global transaction when the branch transaction executes SQL. Fescar's implementation can be seen in the [dubbo] module as follows:

@Activate(group = { Constants.PROVIDER, Constants.CONSUMER }, order = 100)
public class TransactionPropagationFilter implements Filter {

private static final Logger LOGGER = LoggerFactory.getLogger(TransactionPropagationFilter.class);

@Override
public Result invoke(Invoker<?> invoker, Invocation invocation) throws RpcException {
String xid = RootContext.getXID();
String rpcXid = RpcContext.getContext().getAttachment(RootContext.KEY_XID);
if (LOGGER.isDebugEnabled()) {
LOGGER.debug("xid in RootContext\[" + xid + "\] xid in RpcContext\[" + rpcXid + "\]");
}
boolean bind = false;
if (xid != null) {
RpcContext.getContext().setAttachment(RootContext.KEY_XID, xid);
} else {
if (rpcXid != null) {
RootContext.bind(rpcXid);
bind = true;
if (LOGGER.isDebugEnabled()) {
LOGGER.debug("bind\[" + rpcXid + "\] to RootContext");
}
}
}
try {
return invoker.invoke(invocation);

} finally {
if (bind) {
String unbindXid = RootContext.unbind();
if (LOGGER.isDebugEnabled()) {
LOGGER.debug("unbind\[" + unbindXid + "\] from RootContext");
}
if (!rpcXid.equalsIgnoreCase(unbindXid)) {
LOGGER.warn("xid in change during RPC from " + rpcXid + " to " + unbindXid);
if (unbindXid != null) {
RootContext.bind(unbindXid);
LOGGER.warn("bind \[" + unbindXid + "\] back to RootContext");
}
}
}
}
}
}

When rpcXid is not null, it is added to the ContextCore of RootContext. Let's delve into this a bit. ContextCore is an extensible interface, and the default implementation is ThreadLocalContextCore, which maintains the current xid based on ThreadLocal. Fescar provides an extensible mechanism implemented in the [common] module. Through a custom class loader, EnhancedServiceLoader, it loads the service classes that need to be extended. By adding the @LoadLevel annotation with a high order attribute to the extension class, the purpose of extension implementation can be achieved.

Intervention of Local Resource Management in the [RM] Module

Fescar implements proxy classes for local transaction-related interfaces through a proxy mechanism, such as DataSourceProxy, ConnectionProxy, and StatementProxy. This can be seen in the configuration file, indicating that to use Fescar distributed transactions, the proxy data source provided by Fescar must be configured. For example:

After configuring the proxy data source, starting from DataSourceProxy, we can freely control all local operations on the database. From the xid transmission above, we know that the xid is saved in RootContext. Now, look at the following code to see it clearly:

First, look at a piece of code from StatementProxy:

Then, look at the code in ExecuteTemplate:

Similar to the transaction management template class TransactionalTemplate in the [TM] module, the crucial logic proxy here is encapsulated in the ExecuteTemplate template class. By overriding Statement with StatementProxy implementation, the execute logic of ExecuteTemplate is called when the original JDBC executeUpdate method is executed. Before the SQL is actually executed, it checks whether the current context in RootContext contains xid, i.e., whether it is a global distributed transaction. If not, the local transaction is used directly. If it is, RM adds some distributed transaction-related logic. Fescar has encapsulated five different executors to handle different types of SQL, namely UpdateExecutor, DeleteExecutor, InsertExecutor, SelectForUpdateExecutor, and PlainExecutor. The structure is as follows:

PlainExecutor:

The native JDBC interface implementation, without any processing, is used for ordinary select queries in global transactions.
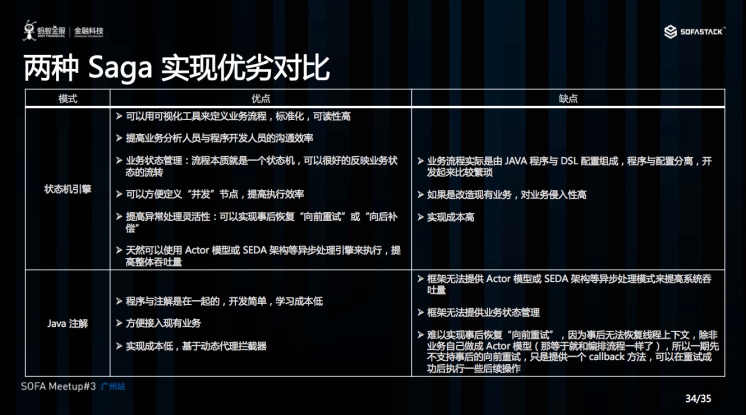
UpdateExecutor, DeleteExecutor, InsertExecutor:

The three DML (Data Manipulation Language) executors for updating, deleting, and inserting, mainly analyze the SQL statements before and after execution and implement the following two abstract interface methods:

protected abstract TableRecords beforeImage() throws SQLException;

protected abstract TableRecords afterImage(TableRecords beforeImage) throws SQLException;

During this process, the undo_log for rollback operation is generated by analyzing the SQL, and the log is currently saved in MySQL, sharing the same transaction with the business SQL operation. The table structure is as follows:

The rollback_info column contains the detailed information of the undo_log, which is of type longblob. The structure is as follows:

{
    "branchId":3958194,
    "sqlUndoLogs":[
        {
            "afterImage":{
                "rows":[
                    {
                        "fields":[
                            {
                                "keyType":"PrimaryKey",
                                "name":"ID",
                                "type":4,
                                "value":10
                            },
                            {
                                "keyType":"NULL",
                                "name":"COUNT",
                                "type":4,
                                "value":98
                            }
                        ]
                    }
                ],
                "tableName":"storage_tbl"
            },
            "beforeImage":{
                "rows":[
                    {
                        "fields":[
                            {
                                "keyType":"PrimaryKey",
                                "name":"ID",
                                "type":4,
                                "value":10
                            },
                            {
                                "keyType":"NULL",
                                "name":"COUNT",
                                "type":4,
                                "value":100
                            }
                        ]
                    }
                ],
                "tableName":"storage_tbl"
            },
            "sqlType":"UPDATE",
            "tableName":"storage_tbl"
        }
    ],
    "xid":"192.168.7.77:8091:3958193"
}


Here is an example of an update operation. The undo_log records very detailed information. It associates the branch ID with the global transaction xid, records the table name, the operation field names, and the records before and after the SQL execution. For instance, this record shows table name = storage_tbl, before SQL execution ID = 10, count = 100, after SQL execution ID = 10, count = 98. If the entire global transaction fails and needs to be rolled back, it can generate the following rollback SQL statement:

update storage_tbl set count = 100 where id = 10;

SelectForUpdateExecutor:

In Fescar's AT mode, the default isolation level above the local transaction is read uncommitted. However, through the SelectForUpdateExecutor, it can support the read committed isolation level. The code is as follows:

@Override
public Object doExecute(Object... args) throws Throwable {
SQLSelectRecognizer recognizer = (SQLSelectRecognizer) sqlRecognizer;

Connection conn = statementProxy.getConnection();
ResultSet rs = null;
Savepoint sp = null;
LockRetryController lockRetryController = new LockRetryController();
boolean originalAutoCommit = conn.getAutoCommit();

StringBuffer selectSQLAppender = new StringBuffer("SELECT ");
selectSQLAppender.append(getTableMeta().getPkName());
selectSQLAppender.append(" FROM " + getTableMeta().getTableName());
String whereCondition = null;
ArrayList<Object> paramAppender = new ArrayList<>();
if (statementProxy instanceof ParametersHolder) {
whereCondition = recognizer.getWhereCondition((ParametersHolder) statementProxy, paramAppender);
} else {
whereCondition = recognizer.getWhereCondition();
}
if (!StringUtils.isEmpty(whereCondition)) {
selectSQLAppender.append(" WHERE " + whereCondition);
}
selectSQLAppender.append(" FOR UPDATE");
String selectPKSQL = selectSQLAppender.toString();

try {
if (originalAutoCommit) {
conn.setAutoCommit(false);
}
sp = conn.setSavepoint();
rs = statementCallback.execute(statementProxy.getTargetStatement(), args);

while (true) {
// Try to get global lock of those rows selected
Statement stPK = null;
PreparedStatement pstPK = null;
ResultSet rsPK = null;
try {
if (paramAppender.isEmpty()) {
stPK = statementProxy.getConnection().createStatement();
rsPK = stPK.executeQuery(selectPKSQL);
} else {
pstPK = statementProxy.getConnection().prepareStatement(selectPKSQL);
for (int i = 0; i < paramAppender.size(); i++) {
pstPK.setObject(i + 1, paramAppender.get(i));
}
rsPK = pstPK.executeQuery();
}

TableRecords selectPKRows = TableRecords.buildRecords(getTableMeta(), rsPK);
statementProxy.getConnectionProxy().checkLock(selectPKRows);
break;

} catch (LockConflictException lce) {
conn.rollback(sp);
lockRetryController.sleep(lce);

} finally {
if (rsPK != null) {
rsPK.close();
}
if (stPK != null) {
stPK.close();
}
if (pstPK != null) {
pstPK.close();
}
}
}

} finally {
if (sp != null) {
conn.releaseSavepoint(sp);
}
if (originalAutoCommit) {
conn.setAutoCommit(true);
}
}
return rs;
}

The key code is as follows:

TableRecords selectPKRows = TableRecords.buildRecords(getTableMeta(), rsPK);
statementProxy.getConnectionProxy().checkLock(selectPKRows);

By operating on the selectPKRows table records, lockKeys are obtained, and then it checks with the TC controller to see if they are globally locked. If they are locked, it retries until the lock is released and then returns the query result.

Registration and Reporting of Branch Transactions

Before the local transaction is committed, Fescar registers and reports information related to the branch transaction. This can be seen in the commit part of the ConnectionProxy class code:

@Override
public void commit() throws SQLException {
if (context.inGlobalTransaction()) {
try {
register();
} catch (TransactionException e) {
recognizeLockKeyConflictException(e);
}

try {
if (context.hasUndoLog()) {
UndoLogManager.flushUndoLogs(this);
}
targetConnection.commit();
} catch (Throwable ex) {
report(false);
if (ex instanceof SQLException) {
throw (SQLException) ex;
} else {
throw new SQLException(ex);
}
}
report(true);
context.reset();

} else {
targetConnection.commit();
}
}

From this code, we can see that it first checks whether it is a global transaction. If it is not, it commits directly. If it is, it first registers the branch transaction with the TC controller. For write isolation, it involves obtaining global locks on the TC side. Then, it saves the undo_log used for rollback operations and finally commits the local transaction. Lastly, it reports the transaction status to the TC controller. At this point, the first phase of the local transaction is complete.

Coordinating the Global Transaction with the [server] Module

For the server module, we can focus on the DefaultCoordinator class. This is the default implementation of the AbstractTCInboundHandler controller handler. It mainly implements interfaces for starting, committing, rolling back, querying the status of global transactions, registering branch transactions, reporting, and checking locks, such as:

Returning to the TransactionalTemplate at the beginning, if the entire distributed transaction fails and needs to be rolled back, TM first initiates a rollback instruction to TC. After TC receives it and parses the request, it is routed to the doGlobalRollback method of the default controller class. The code executed on the TC controller side is as follows:

@Override
public void doGlobalRollback(GlobalSession globalSession, boolean retrying) throws TransactionException {
for (BranchSession branchSession : globalSession.getReverseSortedBranches()) {
BranchStatus currentBranchStatus = branchSession.getStatus();
if (currentBranchStatus == BranchStatus.PhaseOne_Failed) {
continue;
}
try {
BranchStatus branchStatus = resourceManagerInbound.branchRollback(XID.generateXID(branchSession.getTransactionId()), branchSession.getBranchId(),
branchSession.getResourceId(), branchSession.getApplicationData());

switch (branchStatus) {
case PhaseTwo_Rollbacked:
globalSession.removeBranch(branchSession);
LOGGER.error("Successfully rolled back branch " + branchSession);
continue;
case PhaseTwo\_RollbackFailed\_Unretryable:
GlobalStatus currentStatus = globalSession.getStatus();
if (currentStatus.name().startsWith("Timeout")) {
globalSession.changeStatus(GlobalStatus.TimeoutRollbackFailed);
} else {
globalSession.changeStatus(GlobalStatus.RollbackFailed);
}
globalSession.end();
LOGGER.error("Failed to rollback global\[" + globalSession.getTransactionId() + "\] since branch\[" + branchSession.getBranchId() + "\] rollback failed");
return;
default:
LOGGER.info("Failed to rollback branch " + branchSession);
if (!retrying) {
queueToRetryRollback(globalSession);
}
return;

}
} catch (Exception ex) {
LOGGER.info("Exception rollbacking branch " + branchSession, ex);
if (!retrying) {
queueToRetryRollback(globalSession);
if (ex instanceof TransactionException) {
throw (TransactionException) ex;
} else {
throw new TransactionException(ex);
}
}

}

}
GlobalStatus currentStatus = globalSession.getStatus();
if (currentStatus.name().startsWith("Timeout")) {
globalSession.changeStatus(GlobalStatus.TimeoutRollbacked);
} else {
globalSession.changeStatus(GlobalStatus.Rollbacked);
}
globalSession.end();
}

As seen from the above code, during rollback, each branch transaction is iterated from the global transaction session, and then each branch transaction is notified to rollback. When the branch service receives the request, it is first routed to the doBranchRollback method in RMHandlerAT, and then the branchRollback method in RM is called. The code is as follows:

@Override
public BranchStatus branchRollback(String xid, long branchId, String resourceId, String applicationData) throws TransactionException {
DataSourceProxy dataSourceProxy = get(resourceId);
if (dataSourceProxy == null) {
throw new ShouldNeverHappenException();
}
try {
UndoLogManager.undo(dataSourceProxy, xid, branchId);
} catch (TransactionException te) {
if (te.getCode() == TransactionExceptionCode.BranchRollbackFailed_Unretriable) {
return BranchStatus.PhaseTwo_RollbackFailed_Unretryable;
} else {
return BranchStatus.PhaseTwo_RollbackFailed_Retryable;
}
}
return BranchStatus.PhaseTwo_Rollbacked;
}

On the RM branch transaction side, the UndoLogManager's undo method is ultimately executed. It retrieves the rollback log from the database using xid and branchId to complete the data rollback operation. The entire process is completed synchronously. If the global transaction is successful, TC will have a similar coordination process as mentioned above, but it will be asynchronous, clearing the undo_log related to the global transaction. At this point, the two-phase commit or rollback is completed, thus achieving complete control of the global transaction.

Conclusion

If you've made it this far, thank you very much for patiently taking the time to learn amidst your busy schedule. I believe the time spent was worthwhile. By thoroughly reading and understanding this article, you likely have a comprehensive understanding of the main flow of Fescar's implementation. This article took approximately one person-day from conception to completion. During this process, I also gained a deeper understanding of Fescar's implementation. Due to space constraints, I did not delve into every detail of the implementation, such as how SQL parsing is done, but instead focused on the key points of the implementation process of Fescar's TXC model. This article has been proofread, but due to personal knowledge limitations and finite energy, errors or misunderstandings may inevitably occur. Corrections are welcome.

About the Author:

Chen Kailing joined Kaijing Technology in May 2016. Formerly a senior developer and project manager, currently the head of the Architecture & Operations Department of Kaijing Technology's R&D Center. PMP project management certification, Alibaba Cloud MVP. Enthusiastic about open source, having open-sourced several popular projects. Passionate about sharing technical insights, and author of the independent blog KL Blog (http://www.kailing.pub).

· 2 min read

Review the description in the overview: a distributed global transaction, the whole is a model of the two-phase commit. A global transaction consists of several branch transactions that meet the model requirements of the two-phase commit, which requires each branch transaction to have its own:

  • One phase prepare behavior
  • Two phase commit or rollback behavior

Overview of a global transaction

According to the two phase behavior pattern,We divide the branch transaction into Automatic (Branch) Transaction Mode and Manual (Branch) Transaction Mode.

The AT mode is based on the Relational Database that supports local ACID transactions

  • One phase prepare behavior: In the local transaction, the business data update and the corresponding rollback log record are submitted together.
  • Two phase commit behavior: Immediately ended successfully, Auto asynchronous batch cleanup of the rollback log.
  • Two phase rollback behavior: By rolling back the log, automatic generates a compensation operation to complete the data rollback.

Accordingly, the MT mode does not rely on transaction support for the underlying data resources:

  • One phase prepare behavior: Call the prepare logic of custom .
  • Two phase commit behavior:Call the commit logic of custom .
  • Two phase rollback behavior:Call the rollback logic of custom .

The so-called MT mode refers to the support of the branch transaction of custom into the management of global transactions.