"Just getting started with Seata and don't know enough about its modules?
Want to dive into the Seata source code, but haven't done so yet?
Want to find out what your application is doing "on the sly" during startup after integrating Seata?
Want to learn the design concepts and best practices of Seata as a great open source framework?
If any of the above apply to you, then today's article is for you!
Preface
In Seata's application-side (RM, TM) startup process, the first thing to do is to establish communication with the coordinator side (TC), which is a prerequisite for Seata to be able to complete the distributed transaction coordination, so Seata in the process of completing the initialisation of the application side and establishing a connection with the TC, it is How to find the cluster and address of the TC Transaction Coordinator? And how does it get various configuration information from the configuration module? That's what this article is going to explore.
Give a qualification
Seata as a middleware level of the underlying components, is very careful to introduce third-party frameworks for specific implementations, interested students can learn more about Seata's SPI mechanism, to see how Seata is through a large number of extension points (Extension), to invert the specific implementation of the dependent components out of the turn rely on abstract interfaces, and at the same time, Seata in order to better At the same time, Seata in order to better integrate into microservices, cloud native and other popular architectures derived from the ecosystem, but also based on the SPI mechanism on a number of mainstream microservice frameworks, registry, configuration centre and Java development frameworks, "the leader" - SpringBoot and so on. Do the active integration , in order to ensure that the microkernel architecture , loosely coupled , scalable at the same time , but also can be very good with all kinds of components "to play with", so that the environment using a variety of technology stacks can be more convenient to introduce Seata.
In this paper, in order to be close to everyone ** just introduced Seata trial ** scene , in the following introduction , select ** application side ** qualifications are as follows : the use of **File (file) as the configuration centre and registration centre **, and based on ** SpringBoot ** start.
With this qualification, let's dive into the Seata source code and find out what's going on.
RM/TM Initialisation Process with Alternating Multi-Module Collaboration
In Seata Client Startup Process Dissection (I) , we analysed the initialization of TM and RM on the application side of Seata, and how the application side creates a Netty Channel and sends a registration request to the TC Server to send a registration request. In addition to this, during RM initialisation, several other Seata modules (Registration Centre, Configuration Centre, Load Balancing) come into play and collaborate with each other to complete the process of connecting to the TC Server.
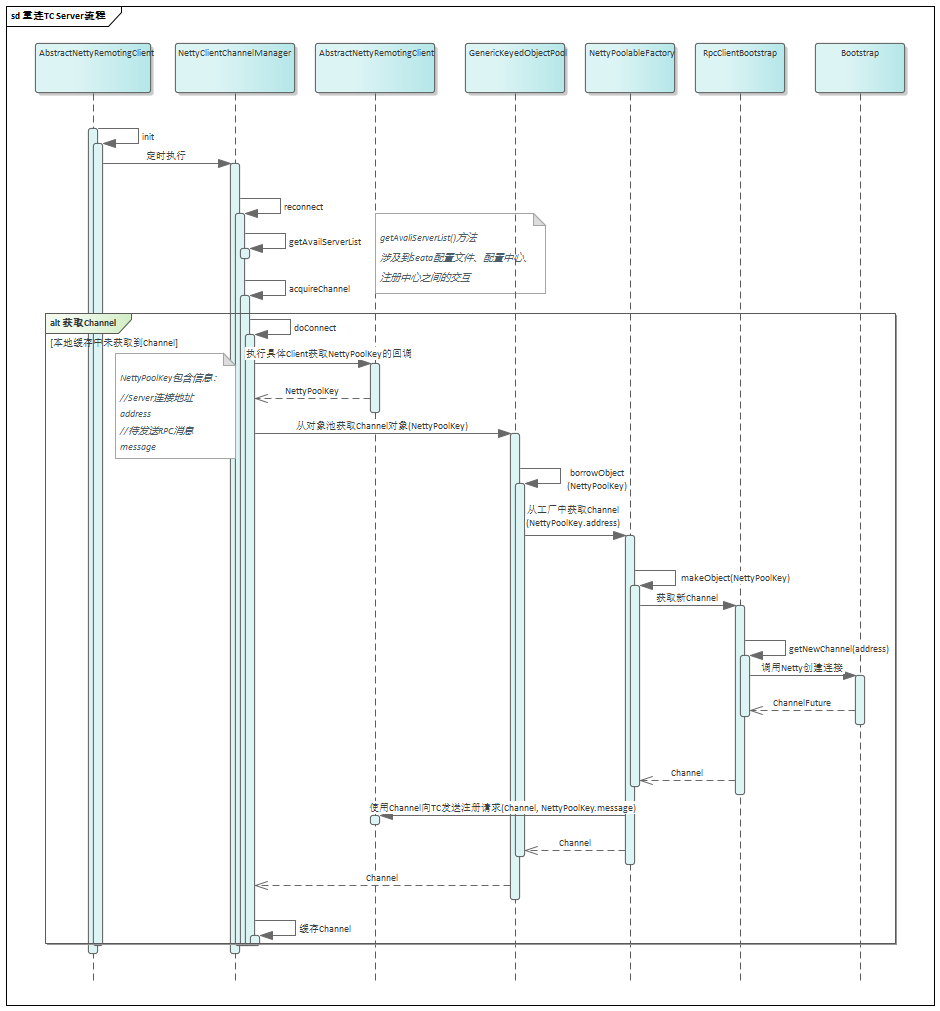
When executing the Client reconnect to TC Server method: NettyClientChannelManager.Channreconnect(), you first need to get the list of available TC Server addresses based on the current transaction grouping:
/**
     * NettyClientChannelManager.reconnect()
     * Reconnect to remote server of current transaction service group.
*
     * @param transactionServiceGroup transaction service group
*/
void reconnect(String transactionServiceGroup) {
List<String> availList = null; }
try {
// Get the available TC Server addresses from the registry
availList = getAvailServerList(transactionServiceGroup);
} catch (Exception e) {
LOGGER.error("Failed to get available servers: {}", e.getMessage(), e); return; {// Get the available TC Server addresses from the registry.
return; }
}
// The following code is omitted
}
For a detailed introduction to the concept of transaction grouping, you can refer to the official document Introduction to Transaction Grouping. Here is a brief introduction.
- Each Seata application-side RM, TM, has a transaction grouping name
- Each TC on the Seata coordinator side has a cluster name and address. The application side goes through the following two steps when connecting to the coordinator side:
- Through the name of the transaction grouping, the cluster name of the TC corresponding to this application side is obtained from the configuration
- By using the cluster name, the address list of the TC cluster can be obtained from the registry. The above concepts, relationships and processes are shown in the following figure: ! Relationship between Seata transaction grouping and connection establishment
Getting TC Server cluster addresses from Registry
After understanding the main concepts and steps involved in connecting TCs from RM/TC, let's move on to explore the getAvailServerList method:
private List<String> getAvailServerList(String transactionServiceGroup) throws Exception {
//① Use the registry factory to get a registry instance.
//② Call the registry's lookup method lookUp() to get a list of the addresses of the available Servers in the TC cluster based on the transaction group name.
List<InetSocketAddress> availInetSocketAddressList = RegistryFactory.getInstance().lookup(transactionServiceGroup);
if (CollectionUtils.isEmpty(availInetSocketAddressList)) {
return Collections.emptyList();
}

        return availInetSocketAddressList.stream()
                                         .map(NetUtil::toStringAddress)
                                         .collect(Collectors.toList()); }
    }
Which registry to use? The Seata meta-configuration file gives the answer
As mentioned above, Seata supports a variety of registry implementations, so Seata first needs to get the "type of registry" information from a place first.
Seata has designed a "configuration file" to store some basic information about the components used in its framework. I prefer to call this configuration file "meta-configuration file ", because the information it contains is actually the "configuration of the configuration", i.e., the "configuration of the configuration", i.e., the "configuration of the configuration". This is because the information it contains is actually the "configuration of the configuration", i.e., the concept of "meta", which can be understood by comparing the information in the database table with the information in the structure of the database table itself (table data and table metadata).
We can think of the information in the Registry and Configuration Centre as configuration information itself, and what is the configuration** of this **configuration information? This information, then, is contained in Seata's meta-configuration file. In fact, there are only two types of information contained in the 'meta-configuration file':
- The first is the type of registry: registry.type, as well as some basic information about that type of registry, for example, when the registry type is a file, the meta configuration file stores the file's name information; when the registry type is Nacos, the meta configuration file stores Nacos addresses, namespaces, cluster names and other information.
- Second, the type of configuration centre: config.type, as well as some basic information about the type of configuration centre, such as when the configuration centre is a file, the meta-configuration file stores information about the name of the file; when the type of registry is Consul, the meta-configuration file stores information about the address of the Consul
Seata's meta-configuration file supports Yaml, Properties and other formats , and can be integrated into the SpringBoot application.yaml file ( use seata-spring-boot-starter can be ) , easy to integrate with SpringBoot .
The default meta-configuration file that comes with Seata is registry.conf, and when we use a file as the registration and configuration centre, the content in registry.conf is set as follows:
registry {
 # file , nacos , eureka, redis, zk, consul, etcd3, sofa
 type = "file"
 file {
   name = "file.conf"
 }
}

config {
 # file, nacos, apollo, zk, consul, etcd3
 type = "file"
 file {
   name = "file.conf"
 }
}
In the following source code, we can find that the type of registry used by Seata is taken from ConfigurationFactory.CURRENT_FILE_INSTANCE, and this CURRENT_FILE_INSTANCE is what we call, an instance of the Seata **meta-configuration file **
// In getInstance(), call buildRegistryService to build the specific registry instance
public static RegistryService getInstance() {
if (instance == null) {
synchronized (RegistryFactory.class) {
if (instance == null) {
instance = buildRegistryService();
}
}
}
return instance; }
}

    private static RegistryService buildRegistryService() {
        RegistryType registryType.
        // Get the registry type
        String registryTypeName = ConfigurationFactory.CURRENT_FILE_INSTANCE.getConfig(
            ConfigurationKeys.FILE_ROOT_REGISTRY + ConfigurationKeys.FILE_CONFIG_SPLIT_CHAR
                + ConfigurationKeys.FILE_ROOT_TYPE);
        try {
            registryType = RegistryType.getType(registryTypeName); } catch (Exception exx); exx = RegistryType.
        } catch (Exception exx) {
            throw new NotSupportYetException("not support registry type: " + registryTypeName); }
        }
        if (RegistryType.File == registryType) {
            return FileRegistryServiceImpl.getInstance(); } else {
        } else {
            // Load the registry instance using the SPI method based on the registry type
            return EnhancedServiceLoader.load(RegistryProvider.class, Objects.requireNonNull(registryType).name()).provide();
        }
    }
Let's look at the initialisation process of the meta-configuration file, which triggers the initialisation of the ConfigurationFactory class when the static field CURRENT_FILE_INSTANCE is fetched for the first time:
   // Static block of the ConfigurationFactory class
   static {
       load();
   }

    /**
    * In the load() method, load Seata's meta configuration file
    */
   private static void load() {
       // The name of the meta configuration file, support through the system variable, environment variable expansion
       String seataConfigName = System.getProperty(SYSTEM_PROPERTY_SEATA_CONFIG_NAME);
       if (seataConfigName == null) {
           seataConfigName = System.getenv(ENV_SEATA_CONFIG_NAME);
       }
       if (seataConfigName == null) {
           seataConfigName = REGISTRY_CONF_DEFAULT;
       }
       String envValue = System.getProperty(ENV_PROPERTY_KEY);
       if (envValue == null) {
           envValue = System.getenv(ENV_SYSTEM_KEY); }
       }
       // Create a file configuration instance that implements the Configuration interface based on the meta-configuration file name
       Configuration configuration = (envValue == null) ? new FileConfiguration(seataConfigName,
               false) : new FileConfiguration(seataConfigName + "-" + envValue, false);
       Configuration extConfiguration = null;
       // Determine if an extended configuration provider exists by loading it through SPI
       //When the application side uses seata-spring-boot-starer, it will pass the SpringBootConfigurationProvider as the extended configuration provider, at this point, when getting the meta-configuration item, it will no longer get it from file.conf (the default), but from application. properties/application.yaml.
       try {
           // Replace the original Configuration instance with an instance of the extended configuration via the ExtConfigurationProvider's provide method
           extConfiguration = EnhancedServiceLoader.load(ExtConfigurationProvider.class).provide(configuration);
           if (LOGGER.isInfoEnabled()) {
               LOGGER.info("load Configuration:{}", extConfiguration == null ? configuration.getClass().getSimpleName()
                       : extConfiguration.getClass().getSimpleName());
           }
       } catch (EnhancedServiceNotFoundException ignore) {

       } catch (Exception e) {
           LOGGER.error("failed to load extConfiguration:{}", e.getMessage(), e);
       }
       // Existence of an extended configuration returns an instance of the extended configuration, otherwise it returns an instance of the file configuration
       CURRENT_FILE_INSTANCE = extConfiguration == null ? configuration : extConfiguration;
   }
The call sequence diagram for the load() method is as follows: ! Seata metaconfiguration file loading process
In the above sequence diagram, you can focus on the following points:
- Seata meta configuration file Name support extension
- Seata meta-configuration file suffixes** support 3 suffixes**, yaml/properties/conf, which will be attempted to match in turn when the meta-configuration file instance is created
- Seata ** configuration capabilities related to the top-level interface for the Configuration **, a variety of configuration centres are required to implement this interface, Seata's meta-configuration file is the use of FileConfiguration (file type configuration centre) to implement this interface
/**
* Seata Configuration Capability Interface
* package: io.seata.config
*/

public interface Configuration {
   /**
    * Gets short.
    *
    * @param dataId the data id
    * @param defaultValue the default value
    * @param timeoutMills the timeout mills
    * @return the short
    */short getShort(String dataId)
   short getShort(String dataId, int defaultValue, long timeoutMills);; short getShort(String dataId, int defaultValue, long timeoutMills)

   // The following content is omitted, the main ability to add, delete and retrieve configuration
}
- Seata provides an extension point of type ExtConfigurationProvider, opening up the ability to extend the specific implementation of the configuration, which has a provide() method to receive the original Configuration, return a completely new Configuration, the form of the methods of this interface determines that the general The form of this interface method determines that, in general, static proxies, dynamic proxies, decorators and other design patterns can be used to implement this method to achieve the original Configuration enhancement.
/**
* Seata extends the Configuration Provider interface
* package: io.seata.configuration
*/
public interface ExtConfigurationProvider {
   /**
    * provide a AbstractConfiguration implementation instance
    * @param originalConfiguration
    * @return configuration
    */
   Configuration provide(Configuration originalConfiguration); }
}
- When the application side is started based on seata-seata-spring-boot-starter, it will ** use "SpringBootConfigurationProvider" as the extended configuration provider ** and in its provide method, it uses dynamic bytecode generation (CGLIB) to create a dynamic proxy class for the "FileConfiguration" instance. FileConfiguration' instance using dynamic bytecode generation (CGLIB) to create a dynamic proxy class that intercepts all methods starting with "get" to get meta-configuration items from application.properties/application.yaml.
SpringBootConfigurationProvider class, this article only explains the implementation of the idea , no longer unfolding the analysis of the source code, which is only an implementation of the ExtConfigurationProvider interface, from the point of view of the Configuration can be extended, can be replaced , Seata is precisely through the ExtConfigurationProvider such an extension point for the implementation of a variety of configurations provides a broad stage , allowing a variety of configuration implementation and access options.
After going through the above loading process, if we didn't extend the configuration provider, we would get the registry type of file from the Seata meta-configuration file, and at the same time create a file registry instance: FileRegistryServiceImpl
Getting the TC Server address from the registry centre
After getting the registry instance, you need to execute the lookup() method (RegistryFactory.getInstance(). lookup(transactionServiceGroup)), FileRegistryServiceImpl.lookup() is implemented as follows:
/**
* Get a list of available addresses for TC Server based on the transaction group name
* package: io.seata.discovery.registry
* class: FileRegistryServiceImpl
*/
@Override
public List<InetSocketAddress> lookup(String key) throws Exception {
// Get TC Server cluster name
String clusterName = getServiceGroup(key);
if (clusterName == null) {
if (clusterName == null) { return null; }
}
//Get all available Server addresses in the TC cluster from the Configuration Centre
String endpointStr = CONFIG.getConfig(
PREFIX_SERVICE_ROOT + CONFIG_SPLIT_CHAR + clusterName + POSTFIX_GROUPLIST);
if (StringUtils.isNullOrEmpty(endpointStr)) {
throw new IllegalArgumentException(clusterName + POSTFIX_GROUPLIST + " is required");
}
// Encapsulate the address as InetSocketAddress and return it
String[] endpoints = endpointStr.split(ENDPOINT_SPLIT_CHAR);
List<InetSocketAddress> inetSocketAddresses = new ArrayList<>();
for (String endpoint : endpoints) {
String[] ipAndPort = endpoint.split(IP_PORT_SPLIT_CHAR);
if (ipAndPort.length ! = 2) {
throw new IllegalArgumentException("endpoint format should be like ip:port");;
}
inetSocketAddresses.add(new InetSocketAddress(ipAndPort[0], Integer.parseInt(ipAndPort[1]))); }
}
return inetSocketAddresses;
}

    /**
     * default method in the registry interface
     * package: io.seata.discovery.registry
     * class: RegistryService
     */
    default String getServiceGroup(String key) {
        key = PREFIX_SERVICE_ROOT + CONFIG_SPLIT_CHAR + PREFIX_SERVICE_MAPPING + key;
        // In the configuration cache, add a transaction group name change listening event.
        if (!SERVICE_GROUP_NAME.contains(key)) {
            ConfigurationCache.addConfigListener(key);
            SERVICE_GROUP_NAME.add(key);
        }
        // Get the TC cluster name corresponding to the transaction grouping from the Configuration Centre
        return ConfigurationFactory.getInstance().getConfig(key);
    }
As you can see, the code logic matches the flow in Figure Seata Transaction Grouping in Relation to Establishing Connections in Section I. At this point, the registry will need assistance from the Configuration Centre to get the cluster name corresponding to the transaction grouping and to find the available service addresses in the cluster.
Get TC cluster name from Configuration Centre
Configuration Centre initialisation
The initialisation of the configuration centre (in ConfigurationFactory.buildConfiguration()) is similar to the initialisation process of the registration centre, which is to get the type of the configuration centre and other information from the meta-configuration file first, and then initialise a specific instance of the configuration centre, which is no longer repeated here, with the foundation of the previous analysis.
Getting the value of a configuration item
The two methods in the above snippet, FileRegistryServiceImpl.lookup() and RegistryService.getServiceGroup(), both get the values of the configuration items from the configuration centre:
- lookup() need to be implemented by the specific registry, the use of file as a registry, in fact, is a direct connection to the TC Server, the special point is that **TC Server's address is written to death in the configuration ** (normal should be stored in the registry), so FileRegistryServiceImpl.lookup() method, is the address information of the Server in the TC cluster obtained through the configuration centre.
- getServiceGroup() is the default method in the RegistryServer interface, which is the public implementation of all registries. Any kind of registry in Seata needs to be configured to get the TC cluster name based on the name of the transaction group.
Load Balancing
After the above link configuration centre, registration centre collaboration, now we have obtained the current application side of all the available TC Server address, then before sending the real request, you also need to pass a specific load balancing policy, select a TC Server address, this part of the source code is relatively simple, will not take you to analyse.
About the load balancing source code, you can read AbstractNettyRemotingClient.doSelect(), because the code analysed in this article is the reconnection method of RMClient/TMClient, in this method, all the obtained Server addresses will be connected (reconnected) sequentially by traversing, so here There is no need to do load balancing.
The above is the Seata application side in the startup process, the registration centre and configuration centre of the two key modules between the collaboration and workflow, welcome to discuss and learn together!
Postscript: This article and its predecessor Seata client startup process dissection (a), is the first batch of technical blogs written by me, will be on the hands of Seata, I personally believe that Seata in the more complex, need to study and figure out. When I started Seata, I have analysed and documented some of the more complex parts of Seata's source code that I think need to be researched and figured out. I welcome any suggestions for improvement from readers, thank you!