活动介绍
亮点解读
- Seata 开源项目发起人带来《Seata 过去、现在和未来》以及 Seata 1.0 的新特性。
- Seata 核心贡献者详解 Seata AT, TCC, Saga 模式。
- Seata 落地互联网医疗,滴滴出行实践剖析。
如您不能前来参会
现场福利
- 讲师 PPT 打包下载
- 精美茶歇,阿里公仔,天猫精灵等好礼等你来拿
议程

core 模块定义了事务的类型、状态,通用的行为,client 和 server 通信时的协议和消息模型,还有异常处理方式,编译、压缩类型方式,配置信息名称,环境 context 等,还基于 netty 封装了 rpc ,供客户端和服务端使用。
按包顺序来分析一下 core 模块主要功能类:
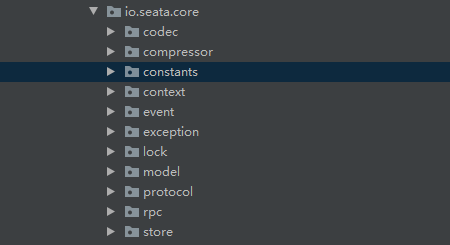
codec:定义了一个 codec 的工厂类,提供了一个方法,根据序列化类型来找对应的处理类。还提供了一个接口类 Codec ,有两个抽象方法:
<T> byte[] encode(T t);
<T> T decode(byte[] bytes);
目前 1.0 版本在 codec 模块,有三种序列化的实现:SEATA、PROTOBUF、KRYO。
compressor:和 codec 包下面类一样,都是三个类,一个压缩类型类,一个工厂类,一个压缩和解压缩操作的抽象类。1.0 版本就只有一种压缩方式:Gzip
constants:两个 ClientTableColumnsName、ServerTableColumnsName 类,分别是 client 端存储事务的表和 server 端存储事务表对应的 model 类。还有定义支持的数据库类型类和一些定义配置信息属性的前缀的类。
context:环境类 RootContext 持有一个 ThreadLocalContextCore 用来存储事务的标识信息。比如 TX_XID 用来唯一的表示一个事务。TX_LOCK 如果存在,则表示本地事务对于 update/delete/insert/selectForUpdate SQL 需要用全局锁控制。
event:这里用到了 guava 中 EventBus 事件总线来进行注册和通知,监听器模式。在 server 模块的 metrics 包中,MetricsManager 在初始化的时候,对 GlobalStatus 即 server 模块处理事务的几个状态变化时,注册了监挺事件,当 server 处理事务时,会回调监听的方法,主要是为了进行统计各种状态事务的数量。
lock: server 在收到 registerBranch 消息进行分支注册的时候,会加锁。1.0 版本有两种锁的实现,DataBaseLocker 和 MemoryLocker,分别是数��据库锁和内存锁,数据库锁根据 rowKey = resourceId + tableName + pk 进行加锁,内存锁直接就是根据 primary key。
model:BranchStatus、GlobalStatus、BranchType 用来定义事务的类型和全局、分支状态。还有 TransactionManager 和 ResourceManager,是 rm 和 tm 的抽象类。具体的 rm 和 tm 的实现,因为各种事务类型都不同,所以这里没有具体的实现类。
protocol:定义了 rpc 模块传输用的实体类,即每个事务状态场景下 request 和 response 的 model。
store:定了与数据库打交道的数据模型,和与数据库交互的语句。
这是 AbstractExceptionHandler 的 UML 图,Callback 、AbstractCallback 是 AbstractExceptionHandler 的内部接口和内部类,AbstractCallback 抽象类实现了接口 Callback 的三个方法,还有一个 execute() 未实现。AbstractExceptionHandler 使用了 AbstractCallback 作为模板方法的参数,并使用了其实现的三个方法,但是 execute() 方法仍留给子类实现。
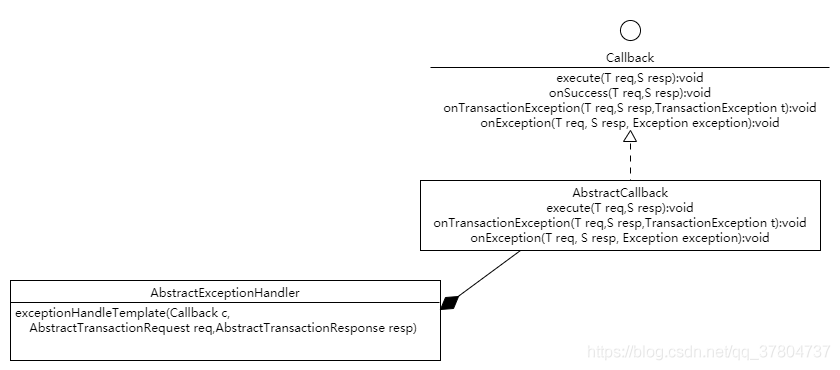 从对外暴露的角度看 AbstractExceptionHandler 定义了一个带有异常处理的模板方法,模板中有四个行为,在不同的情况下执行,其中三种行为已经实现,执行的行为交由子类自行实现,详解:
1.使用模板方法模式,在 exceptionHandlerTemplate() 中,定义好了执行的模板
    public void exceptionHandleTemplate(Callback callback, AbstractTransactionRequest request,
        AbstractTransactionResponse response) {
        try {
            callback.execute(request, response); //执行事务业务的方法
            callback.onSuccess(request, response); //设置response返回码
        } catch (TransactionException tex) {
            LOGGER.error("Catch TransactionException while do RPC, request: {}", request, tex);
            callback.onTransactionException(request, response, tex); //设置response返回码并设置msg
        } catch (RuntimeException rex) {
            LOGGER.error("Catch RuntimeException while do RPC, request: {}", request, rex);
            callback.onException(request, response, rex);  //设置response返回码并设置msg
        }
    }
onSuccess、onTransactionException、onException 在 AbstarctCallback 中已经被实现,execute 则由 AbstractExceptionHandler 子类即负责不同事务模式的 handler 类进行实现。 AbstractExceptionHandler 目前有两个子类:AbstractTCInboundHandler 负责处理全局事务的业务,AbstractRMHandler 负责处理分支事务的业务。
2.使用回调机制,优点是:允许 AbstractExceptionHandler 把需要调用的类 Callback 作为参数传递进来,handler 不需要知道 callback 的具体执行逻辑,只要知道 callback 的特性原型和限制条件(参数、返回值),就可以使用了。
先使用模板方法,把事务业务流程定下来,再通过回调,把具体执行事务业务的方法,留给子类实现。设计的非常巧妙。
这个 exceptionHandlerTemplate() 应该翻译成带有异常处理的模板方法。异常处理已经被抽象类实现,具体的不同模式下 commit 、rollback 的业务处理则交给子类实现。
seata 对于 rpc 的封装,细节��不需要纠结,可以研究一下一下对于事务业务的处理。
client 端的 rpc 类是 AbstractRpcRemotingClient:
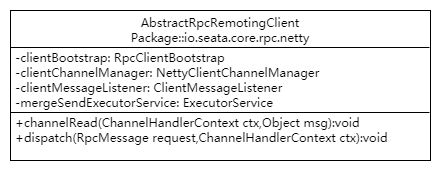
重要的属性和方法都在类图中,消息发送和初始化方法没画在类图中,详细分析一下类图:
clientBootstrap:是 netty 启动类 Bootstrap 的封装类,持有了 Bootstrap 的实例,并自定义自己想要的属性。
clientChannelManager:使用 ConcurrentHashMap<serverAddress,channel> 容器维护地址和 channel 的对应关系。
clientMessageListener: 消息的处理类,根据消息的类型的不同有三种具体的处理方法
public void onMessage(RpcMessage request, String serverAddress, ClientMessageSender sender) {
        Object msg = request.getBody();
        if (LOGGER.isInfoEnabled()) {
            LOGGER.info("onMessage:" + msg);
        }
        if (msg instanceof BranchCommitRequest) {
            handleBranchCommit(request, serverAddress, (BranchCommitRequest)msg, sender);
        } else if (msg instanceof BranchRollbackRequest) {
            handleBranchRollback(request, serverAddress, (BranchRollbackRequest)msg, sender);
        } else if (msg instanceof UndoLogDeleteRequest) {
            handleUndoLogDelete((UndoLogDeleteRequest)msg);
        }
    }
消息类中,持有 TransactionMessageHandler 对不同类型消息进行处理,最终会根据事务类型的不同(AT、TCC、SAGE)调用具体的处理类,即第二部分说的 exceptionHandleTemplate() 的实现类。
mergeSendExecutorService:是一个线程池,只有一个线程,负责对不同地址下的消息进行和并发送。在 sendAsyncRequest() 中,会给线程池的队列 LinkedBlockingQueue<> offer 消息,然后这个线程负责 poll 和处理消息。
channelRead():处理服务端的 HeartbeatMessage.PONG 心跳消息。还有消息类型是 MergeResultMessage 即异步消息的响应消息,根据 msgId 找到对应 MessageFuture ,并设置异步消息的 result 结果。
dispatch():调用 clientMessageListener 处理 server 发送过来的消息,不同类型 request 有不同的处理类。
简单点看 netty,只需要关注序列化方式和消息处理 handler 类。seata 的 rpc 序列化方式通过工厂类找 Codec 实现类进行处理,handler 即上文说的 TransactionMessageHandler 。
core 模块涉及的功能很多,其中的类大多都是其他模块的抽象类。抽象出业务模型,具体的实现分布在不同的模块。core 模块的代码非常的优秀,很多设计都是经典,比如上文分析的基于模板模式改造的,非常实用也非常美,值得仔细研究。
本文作者:FUNKYE(陈健斌),杭州某互联网公司主程。
通过GA大会上滴滴出行的高级研发工程陈鹏志的在滴滴两轮车业务中的实践,发现动态降级的必要性是非常的高,所以这边简单利用spring boot aop来简单的处理降级相关的处理,这边非常感谢陈鹏志的分享!
可利用此demo项目地址
通过以下代码改造实践.
1.创建测试用的TestAspect:
package org.test.config;

import java.lang.reflect.Method;

import org.apache.commons.lang3.StringUtils;
import org.aspectj.lang.JoinPoint;
import org.aspectj.lang.annotation.AfterReturning;
import org.aspectj.lang.annotation.AfterThrowing;
import org.aspectj.lang.annotation.Aspect;
import org.aspectj.lang.annotation.Before;
import org.aspectj.lang.reflect.MethodSignature;
import org.slf4j.Logger;
import org.slf4j.LoggerFactory;
import org.springframework.stereotype.Component;

import io.seata.core.context.RootContext;
import io.seata.core.exception.TransactionException;
import io.seata.tm.api.GlobalTransaction;
import io.seata.tm.api.GlobalTransactionContext;

@Aspect
@Component
public class TestAspect {
    private final static Logger logger = LoggerFactory.getLogger(TestAspect.class);

    @Before("execution(* org.test.service.*.*(..))")
    public void before(JoinPoint joinPoint) throws TransactionException {
        MethodSignature signature = (MethodSignature)joinPoint.getSignature();
        Method method = signature.getMethod();
        logger.info("拦截到需要分布式事务的方法," + method.getName());
        // 此处可用redis或者定时任务来获取一个key判断是否需要关闭分布式事务
        // 模拟动态关闭分布式事务
        if ((int)(Math.random() * 100) % 2 == 0) {
            GlobalTransaction tx = GlobalTransactionContext.getCurrentOrCreate();
            tx.begin(300000, "test-client");
        } else {
            logger.info("关闭分布式事务");
        }
    }

    @AfterThrowing(throwing = "e", pointcut = "execution(* org.test.service.*.*(..))")
    public void doRecoveryActions(Throwable e) throws TransactionException {
        logger.info("方法执行异常:{}", e.getMessage());
        if (!StringUtils.isBlank(RootContext.getXID()))
            GlobalTransactionContext.reload(RootContext.getXID()).rollback();
    }

    @AfterReturning(value = "execution(* org.test.service.*.*(..))", returning = "result")
    public void afterReturning(JoinPoint point, Object result) throws TransactionException {
        logger.info("方法执行结束:{}", result);
        if ((Boolean)result) {
            if (!StringUtils.isBlank(RootContext.getXID())) {
                logger.info("分布式事务Id:{}", RootContext.getXID());
                GlobalTransactionContext.reload(RootContext.getXID()).commit();
            }
        }
    }

}
请注意上面的包名可改为你自己的service包名:
2.改动service代码:
    public Object seataCommit() {
        testService.Commit();
        return true;
    }
因为异常跟返回结果我们都会拦截,所以这边可以trycatch或者直接让他抛异常来拦截也行,或者直接判断返回结果,比如你的业务代码code=200为成功,那么就commit,反之在拦截返回值那段代码加上rollback;
1.更改代码主动抛出异常
    public Object seataCommit() {
        try {
            testService.Commit();
            int i = 1 / 0;
            return true;
        } catch (Exception e) {
            // TODO: handle exception
            throw new RuntimeException();
        }
    }
查看日志:
2019-12-23 11:57:55.386  INFO 23952 --- [.0-28888-exec-7] org.test.controller.TestController       : 拦截到需要分布式事务的方法,seataCommit
2019-12-23 11:57:55.489  INFO 23952 --- [.0-28888-exec-7] i.seata.tm.api.DefaultGlobalTransaction  : Begin new global transaction [192.168.14.67:8092:2030765910]
2019-12-23 11:57:55.489  INFO 23952 --- [.0-28888-exec-7] org.test.controller.TestController       : 创建分布式事务完毕192.168.14.67:8092:2030765910
2019-12-23 11:57:55.709  INFO 23952 --- [.0-28888-exec-7] org.test.controller.TestController       : 方法执行异常:null
2019-12-23 11:57:55.885  INFO 23952 --- [.0-28888-exec-7] i.seata.tm.api.DefaultGlobalTransaction  : [192.168.14.67:8092:2030765910] rollback status: Rollbacked
2019-12-23 11:57:55.888 ERROR 23952 --- [.0-28888-exec-7] o.a.c.c.C.[.[.[/].[dispatcherServlet]    : Servlet.service() for servlet [dispatcherServlet] in context with path [] threw exception [Request processing failed; nested exception is java.lang.RuntimeException] with root cause
可以看到已被拦截也触发了rollback了.
2.恢复代码调试正常情况:
    public Object seataCommit() {
        testService.Commit();
        return true;
    }
查看日志:
2019-12-23 12:00:20.876  INFO 23952 --- [.0-28888-exec-2] org.test.controller.TestController       : 拦截到需要分布式事务的方法,seataCommit
2019-12-23 12:00:20.919  INFO 23952 --- [.0-28888-exec-2] i.seata.tm.api.DefaultGlobalTransaction  : Begin new global transaction [192.168.14.67:8092:2030765926]
2019-12-23 12:00:20.920  INFO 23952 --- [.0-28888-exec-2] org.test.controller.TestController       : 创建分布式事务完毕192.168.14.67:8092:2030765926
2019-12-23 12:00:21.078  INFO 23952 --- [.0-28888-exec-2] org.test.controller.TestController       : 方法执行结束:true
2019-12-23 12:00:21.078  INFO 23952 --- [.0-28888-exec-2] org.test.controller.TestController       : 分布式事务Id:192.168.14.67:8092:2030765926
2019-12-23 12:00:21.213  INFO 23952 --- [.0-28888-exec-2] i.seata.tm.api.DefaultGlobalTransaction  : [192.168.14.67:8092:2030765926] commit status: Committed
可以看到事务已经被提交了.
更详细的内容希望希望大家访问以下地址阅读详细文档
Seata 的动态降级需要结合配置中心的动态配置订阅功能。动态配置订阅,即通过配置中心监听订阅,根据需要读取已更新的缓存值,ZK、Apollo、Nacos 等第三方配置中心都有现成的监听器可实现动态刷新配置;动态降级,即通过动态更新指定配置参数值,使得 Seata 能够在运行过程中动态控制全局事务失效(目前只有 AT 模式有这个功能)。
那么 Seata 支持的多个配置中心是如何适配不同的动态配置订阅以及如何实现降级的呢?下面从源码的层面详细给大家讲解一番。
Seata 配置中心有一个监听器基准接口,它主要有一个抽象方法和 default 方法,如下:
io.seata.config.ConfigurationChangeListener

该监听器基准接口主要有两个实现类型:
Nacos 有自己内部实现的监听器,因此直接直接继承它内部抽象监听器 AbstractSharedListener,实现如下:

如上,
值得一提的是,nacos 并没有使用 ConfigurationChangeListener 实现自己的监听配置,一方面是因为 Nacos 本身已有监听订阅功能,不需要自己再去实现;另一方面因为 nacos 属于非阻塞式订阅,不需要复用 ConfigurationChangeListener 的线程池,即无需进行适配。
添加订阅:

Nacos 配置中心为某个 dataId 添加订阅的逻辑很简单,用 dataId 和 listener 创建一个 NacosListener 调用 configService#addListener 方法,把 NacosListener 作为 dataId 的监听器,dataId 就实现了动态配置订阅功能。
以它的实现类 FileListener 举例子,它的实现逻辑如下:

如上,
dataId:为��订阅的配置属性;
listener:配置订阅事件监听器,用于将外部传入的 listener 作为一个 wrapper,执行真正的变更逻辑,这里特别需要注意的是,该监听器与 FileListener 同样实现了 ConfigurationChangeListener 接口,只不过 FileListener 是用于给 file 提供动态配置订阅功能,而 listener 用于执行配置订阅事件;
executor:用于处理配置变更逻辑的线程池,在 ConfigurationChangeListener#onProcessEvent 方法中用到。
FileListener#onChangeEvent 方法的实现让 file 具备了动态配置订阅的功能,它的逻辑如下:
无限循环获取订阅的配置属性当前的值,从缓存中获取旧的值,判断是否有变更,如果有变更就执行外部传入 listener 的逻辑。
ConfigurationChangeEvent 用于保存配置变更的事件类,它的成员属性如下:

这里的 getConfig 方法是如何感知 file 配置的变更呢?我们点进去,发现它最终的逻辑如下:

发现它是创建一个 future 类,然后包装成一个 Runnable 放入线程池中异步执行,最后调用 get 方法阻塞获取值,那么我们继续往下看:

allowDynamicRefresh:动态刷新配置开关;
targetFileLastModified:file 最后更改的时间缓存。
以上逻辑:
获取 file 最后更新的时间值 tempLastModified,然后对比对比缓存值 targetFileLastModified,如果 tempLastModified > targetFileLastModified,说明期间配置有更改过,这时就重新加载 file 实例,替换掉旧的 fileConfig,使得后面的操作能够获取到最新的配置值。
添加一个配置属性监听器的逻辑如下:

configListenersMap 为 FileConfiguration 的配置监听器缓存,它的数据结构如下:
ConcurrentMap<String/*dataId*/, Set<ConfigurationChangeListener>> configListenersMap
从数据结构上可看出,每个配置属性可关联多个事件监听器。
最终执行 onProcessEvent 方法,这个是监听器基准接口里面的 default 方法,它会调用 onChangeEvent 方法,即最终会调用 FileListener 中的实现。
有了以上的动态配置订阅功能,我们只需要实现 ConfigurationChangeListener 监听器,就可以做各种各种的功能,目前 Seata 只有动态降级有用到动态配置订阅的功能。
在「Seata AT 模式启动源码分析」这篇文章中讲到,Spring 集成 Seata 的项目中,在 AT 模式启动时,会用 用GlobalTransactionalInterceptor 代替了被 GlobalTransactional 和 GlobalLock 注解的方法,GlobalTransactionalInterceptor 实现了 MethodInterceptor,最终会执行 invoker 方法,那么想要实现动态降级,就可以在这里做手脚。
private volatile boolean disable;
在构造函数中进行初始化赋值:

ConfigurationKeys.DISABLE_GLOBAL_TRANSACTION(service.disableGlobalTransaction)这个参数目前有两个功能:

这里的逻辑简单,就是判断监听事件是否属于 ConfigurationKeys.DISABLE_GLOBAL_TRANSACTION 配置属性,如果是,直接更新 disable 值。

如上,disable = true 时,不执行全局事务与全局锁。
io.seata.spring.annotation.GlobalTransactionScanner#wrapIfNecessary

在 Spring AOP 进行 wrap 逻辑过程中,当前配置中心将订阅降级事件监听器。
张乘辉,目前就职于中通科技信息中心技术平台部,担任 Java 工程师,主要负责中通消息平台与全链路压测项目的研发,热爱分享技术,微信公众号「后端进阶」作者,技术博客(https://objcoding.com/)博主,Seata Contributor,GitHub ID:objcoding。
Seata 可以支持多个第三方配置中心,那么 Seata 是如何同时兼容那么多个配置中心的呢?下面我给大家详细介绍下 Seata 配置中心的实现原理。
在 Seata 配置中心,有两个默认的配置文件:

file.conf 是默认的配置属性,registry.conf 主要存��储第三方注册中心与配置中心的信息,主要有两大块:
registry {
  # file 、nacos 、eureka、redis、zk、consul、etcd3、sofa
  # ...
}

config {
  # file、nacos 、apollo、zk、consul、etcd3
  type = "file"
  nacos {
    serverAddr = "localhost"
    namespace = ""
  }
  file {
    name = "file.conf"
  }
  # ...
}
其中 registry 为注册中心的配置属性,这里先不讲,config 为配置中心的属性值,默认为 file 类型,即会加载本地的 file.conf 里面的属性,如果 type 为其它类型,那么会从第三方配置中心加载配置属性值。
在 config 模块的 core 目录中,有个配置工厂类 ConfigurationFactory,它的结构如下:

可以看到都是一些配置的静态常量:
REGISTRY_CONF_PREFIX、REGISTRY_CONF_SUFFIX:配置文件名、默认配置文件类型;
SYSTEM_PROPERTY_SEATA_CONFIG_NAME、ENV_SEATA_CONFIG_NAME、ENV_SYSTEM_KEY、ENV_PROPERTY_KEY:自定义文件名配置变量,也说明我们可以自定义配置中心的属性文件。
ConfigurationFactory 里面有一处静态代码块,如下:
io.seata.config.ConfigurationFactory

根据自定义文件名配置变量找出配置��文件名称与类型,如果没有配置,默认使用 registry.conf,FileConfiguration 是 Seata 默认的配置实现类,如果为默认值,则会更具 registry.conf 配置文件生成 FileConfiguration 默认配置对象,这里也可以利用 SPI 机制支持第三方扩展配置实现,具体实现是继承 ExtConfigurationProvider 接口,在META-INF/services/创建一个文件并填写实现类的全路径名,如下所示:

在静态代码块逻辑加载完配置中心属性之后,Seata 是如何选择配置中心并获取配置中心的属性值的呢?
我们刚刚也说了 FileConfiguration 是 Seata 的默认配置实现类,它继承了 AbstractConfiguration,它的基类为 Configuration,提供了获取参数值的方法:
short getShort(String dataId, int defaultValue, long timeoutMills);
int getInt(String dataId, int defaultValue, long timeoutMills);
long getLong(String dataId, long defaultValue, long timeoutMills);
// ....
那么意味着只需要第三方配置中心实现该接口,就可以整合到 Seata 配置中心了,下面我拿 zk 来做例子:
首先,第三方配置中心需要实现一个 Provider 类:

实现的 provider 方法如其名,主要是输出具体的 Configuration 实现类。
那么我们是如何获取根据配置去获取对应的第三方配置中心实现类呢?
在 Seata 项目中,获取一个第三方配置中心实现类通常是这么做的:
Configuration CONFIG = ConfigurationFactory.getInstance();
在 getInstance() 方法中主要是使用了单例模式构造配置实现类,它的构造具体实现如下:
io.seata.config.ConfigurationFactory#buildConfiguration:

首先从 ConfigurationFactory 中的静态代码块根据 registry.conf 创建的 CURRENT_FILE_INSTANCE 中获取当前环境使用的配置中心,默认为为 File 类型,我们也可以在 registry.conf 配置其它第三方配置中心,这里也是利用了 SPI 机制去加载第三方配置中心的实现类,具体实现如下:

如上,即是刚刚我所说的 ZookeeperConfigurationProvider 配置实现输出类,我们再来�看看这行代码:
EnhancedServiceLoader.load(ConfigurationProvider.class,Objects.requireNonNull(configType).name()).provide();
EnhancedServiceLoader 是 Seata SPI 实现核心类,这行代码会加载 META-INF/services/和 META-INF/seata/目录中文件填写的类名,那么如果其中有多个配置中心实现类都被加载了怎么办呢?
我们注意到 ZookeeperConfigurationProvider 类的上面有一个注解:
@LoadLevel(name = "ZK", order = 1)
在加载多个配置中心实现类时,会根据 order 进行排序:
io.seata.common.loader.EnhancedServiceLoader#findAllExtensionClass:

io.seata.common.loader.EnhancedServiceLoader#loadFile:

这样,就不会产生冲突了。
但是我们发现 Seata 还可以用这个方法进行选择,Seata 在调用 load 方法时,还传了一个参数:
Objects.requireNonNull(configType).name()
ConfigType 为配置中心类型,是个枚举类:
public enum ConfigType {
  File, ZK, Nacos, Apollo, Consul, Etcd3, SpringCloudConfig, Custom;
}
我们注意到,LoadLevel 注解上还有一个 name 属性,在进行筛选实现类时,Seata 还做了这个操作:

根据当前 configType 来判断是否等于 LoadLevel 的 name 属性,如果相等,那么就是当前配置的第三方配置中心实现类。
ZookeeperConfiguration 继承了 AbstractConfiguration,它的构造方法如下:

构造方法创建了一个 zkClient 对象,这里的 FILE_CONFIG 是什么呢?
private static final Configuration FILE_CONFIG = ConfigurationFactory.CURRENT_FILE_INSTANCE;
原来就是刚刚静态代码块中创建的 registry.conf 配置实现类,从该配置实现��类拿到第三方配置中心的相关属性,构造第三方配置中心客户端,然后实现 Configuration 接口时:

就可以利用客户端相关方法去第三方配置获取对应的参数值了。
上周末才写好,已经提交 PR 上去了,还处于 review 中,预估会在 Seata 1.0 版本提供给大家使用,敬请期待。
具体位置在 Seata 项目的 script 目录中:

config.txt 为本地配置好的值,搭建好第三方配置中心之后,运行脚本会将 config.txt 的配置同步到第三方配置中心。
张乘辉,目前就职于中通科技信息中心技术平台部,担任 Java 工程师,主要负责中通消息平台与全链路压测项目的研发,热爱分享技术,微信公众号「后端进阶」作者,技术博客(https://objcoding.com/)博主,Seata Contributor,GitHub ID:objcoding。
运行所使用的 demo项目地址
本文作者:FUNKYE(陈健斌),杭州某互联网公司主程。
直连方式的 Seata 配置博客
Seata 整合 Nacos 配置博客
我们接着前几篇篇的基础上去配置 nacos 做配置中心跟 dubbo 注册中心.
1.安装 docker
yum -y install docker
2.创建 nacos 与 seata 的数据库
/******************************************/
/*   数据库全名 = nacos   */
/*   表名称 = config_info   */
/******************************************/
CREATE TABLE `config_info` (
  `id` bigint(20) NOT NULL AUTO_INCREMENT COMMENT 'id',
  `data_id` varchar(255) NOT NULL COMMENT 'data_id',
  `group_id` varchar(255) DEFAULT NULL,
  `content` longtext NOT NULL COMMENT 'content',
  `md5` varchar(32) DEFAULT NULL COMMENT 'md5',
  `gmt_create` datetime NOT NULL DEFAULT '2010-05-05 00:00:00' COMMENT '创建时间',
  `gmt_modified` datetime NOT NULL DEFAULT '2010-05-05 00:00:00' COMMENT '修改时间',
  `src_user` text COMMENT 'source user',
  `src_ip` varchar(20) DEFAULT NULL COMMENT 'source ip',
  `app_name` varchar(128) DEFAULT NULL,
  `tenant_id` varchar(128) DEFAULT '' COMMENT '租户字段',
  `c_desc` varchar(256) DEFAULT NULL,
  `c_use` varchar(64) DEFAULT NULL,
  `effect` varchar(64) DEFAULT NULL,
  `type` varchar(64) DEFAULT NULL,
  `c_schema` text,
  PRIMARY KEY (`id`),
  UNIQUE KEY `uk_configinfo_datagrouptenant` (`data_id`,`group_id`,`tenant_id`)
) ENGINE=InnoDB DEFAULT CHARSET=utf8 COLLATE=utf8_bin COMMENT='config_info';

/******************************************/
/*   数据库全名 = nacos_config   */
/*   表名称 = config_info_aggr   */
/******************************************/
CREATE TABLE `config_info_aggr` (
  `id` bigint(20) NOT NULL AUTO_INCREMENT COMMENT 'id',
  `data_id` varchar(255) NOT NULL COMMENT 'data_id',
  `group_id` varchar(255) NOT NULL COMMENT 'group_id',
  `datum_id` varchar(255) NOT NULL COMMENT 'datum_id',
  `content` longtext NOT NULL COMMENT '内容',
  `gmt_modified` datetime NOT NULL COMMENT '修改时间',
  `app_name` varchar(128) DEFAULT NULL,
  `tenant_id` varchar(128) DEFAULT '' COMMENT '租户字段',
  PRIMARY KEY (`id`),
  UNIQUE KEY `uk_configinfoaggr_datagrouptenantdatum` (`data_id`,`group_id`,`tenant_id`,`datum_id`)
) ENGINE=InnoDB DEFAULT CHARSET=utf8 COLLATE=utf8_bin COMMENT='增加租户字段';


/******************************************/
/*   数据库全名 = nacos_config   */
/*   表名称 = config_info_beta   */
/******************************************/
CREATE TABLE `config_info_beta` (
  `id` bigint(20) NOT NULL AUTO_INCREMENT COMMENT 'id',
  `data_id` varchar(255) NOT NULL COMMENT 'data_id',
  `group_id` varchar(128) NOT NULL COMMENT 'group_id',
  `app_name` varchar(128) DEFAULT NULL COMMENT 'app_name',
  `content` longtext NOT NULL COMMENT 'content',
  `beta_ips` varchar(1024) DEFAULT NULL COMMENT 'betaIps',
  `md5` varchar(32) DEFAULT NULL COMMENT 'md5',
  `gmt_create` datetime NOT NULL DEFAULT '2010-05-05 00:00:00' COMMENT '创建时间',
  `gmt_modified` datetime NOT NULL DEFAULT '2010-05-05 00:00:00' COMMENT '修改时间',
  `src_user` text COMMENT 'source user',
  `src_ip` varchar(20) DEFAULT NULL COMMENT 'source ip',
  `tenant_id` varchar(128) DEFAULT '' COMMENT '租户字段',
  PRIMARY KEY (`id`),
  UNIQUE KEY `uk_configinfobeta_datagrouptenant` (`data_id`,`group_id`,`tenant_id`)
) ENGINE=InnoDB DEFAULT CHARSET=utf8 COLLATE=utf8_bin COMMENT='config_info_beta';

/******************************************/
/*   数据库全名 = nacos_config   */
/*   表名称 = config_info_tag   */
/******************************************/
CREATE TABLE `config_info_tag` (
  `id` bigint(20) NOT NULL AUTO_INCREMENT COMMENT 'id',
  `data_id` varchar(255) NOT NULL COMMENT 'data_id',
  `group_id` varchar(128) NOT NULL COMMENT 'group_id',
  `tenant_id` varchar(128) DEFAULT '' COMMENT 'tenant_id',
  `tag_id` varchar(128) NOT NULL COMMENT 'tag_id',
  `app_name` varchar(128) DEFAULT NULL COMMENT 'app_name',
  `content` longtext NOT NULL COMMENT 'content',
  `md5` varchar(32) DEFAULT NULL COMMENT 'md5',
  `gmt_create` datetime NOT NULL DEFAULT '2010-05-05 00:00:00' COMMENT '创建时间',
  `gmt_modified` datetime NOT NULL DEFAULT '2010-05-05 00:00:00' COMMENT '修改时间',
  `src_user` text COMMENT 'source user',
  `src_ip` varchar(20) DEFAULT NULL COMMENT 'source ip',
  PRIMARY KEY (`id`),
  UNIQUE KEY `uk_configinfotag_datagrouptenanttag` (`data_id`,`group_id`,`tenant_id`,`tag_id`)
) ENGINE=InnoDB DEFAULT CHARSET=utf8 COLLATE=utf8_bin COMMENT='config_info_tag';

/******************************************/
/*   数据库全名 = nacos_config   */
/*   表名称 = config_tags_relation   */
/******************************************/
CREATE TABLE `config_tags_relation` (
  `id` bigint(20) NOT NULL COMMENT 'id',
  `tag_name` varchar(128) NOT NULL COMMENT 'tag_name',
  `tag_type` varchar(64) DEFAULT NULL COMMENT 'tag_type',
  `data_id` varchar(255) NOT NULL COMMENT 'data_id',
  `group_id` varchar(128) NOT NULL COMMENT 'group_id',
  `tenant_id` varchar(128) DEFAULT '' COMMENT 'tenant_id',
  `nid` bigint(20) NOT NULL AUTO_INCREMENT,
  PRIMARY KEY (`nid`),
  UNIQUE KEY `uk_configtagrelation_configidtag` (`id`,`tag_name`,`tag_type`),
  KEY `idx_tenant_id` (`tenant_id`)
) ENGINE=InnoDB DEFAULT CHARSET=utf8 COLLATE=utf8_bin COMMENT='config_tag_relation';

/******************************************/
/*   数据库全名 = nacos_config   */
/*   表名称 = group_capacity   */
/******************************************/
CREATE TABLE `group_capacity` (
  `id` bigint(20) unsigned NOT NULL AUTO_INCREMENT COMMENT '主键ID',
  `group_id` varchar(128) NOT NULL DEFAULT '' COMMENT 'Group ID,空字符表示整个集群',
  `quota` int(10) unsigned NOT NULL DEFAULT '0' COMMENT '配额,0表示使用默认值',
  `usage` int(10) unsigned NOT NULL DEFAULT '0' COMMENT '使用量',
  `max_size` int(10) unsigned NOT NULL DEFAULT '0' COMMENT '单个配置大小上限,单位为字节,0表示使用默认值',
  `max_aggr_count` int(10) unsigned NOT NULL DEFAULT '0' COMMENT '聚合子配置最大个数,,0表示使用默认值',
  `max_aggr_size` int(10) unsigned NOT NULL DEFAULT '0' COMMENT '单个聚合数据的子配置大小上限,单位为字节,0表示使用默认值',
  `max_history_count` int(10) unsigned NOT NULL DEFAULT '0' COMMENT '最大变更历史数量',
  `gmt_create` datetime NOT NULL DEFAULT '2010-05-05 00:00:00' COMMENT '创建时间',
  `gmt_modified` datetime NOT NULL DEFAULT '2010-05-05 00:00:00' COMMENT '修改时间',
  PRIMARY KEY (`id`),
  UNIQUE KEY `uk_group_id` (`group_id`)
) ENGINE=InnoDB DEFAULT CHARSET=utf8 COLLATE=utf8_bin COMMENT='集群、各Group容量信息表';

/******************************************/
/*   数据库全名 = nacos_config   */
/*   表名称 = his_config_info   */
/******************************************/
CREATE TABLE `his_config_info` (
  `id` bigint(64) unsigned NOT NULL,
  `nid` bigint(20) unsigned NOT NULL AUTO_INCREMENT,
  `data_id` varchar(255) NOT NULL,
  `group_id` varchar(128) NOT NULL,
  `app_name` varchar(128) DEFAULT NULL COMMENT 'app_name',
  `content` longtext NOT NULL,
  `md5` varchar(32) DEFAULT NULL,
  `gmt_create` datetime NOT NULL DEFAULT '2010-05-05 00:00:00',
  `gmt_modified` datetime NOT NULL DEFAULT '2010-05-05 00:00:00',
  `src_user` text,
  `src_ip` varchar(20) DEFAULT NULL,
  `op_type` char(10) DEFAULT NULL,
  `tenant_id` varchar(128) DEFAULT '' COMMENT '租户字段',
  PRIMARY KEY (`nid`),
  KEY `idx_gmt_create` (`gmt_create`),
  KEY `idx_gmt_modified` (`gmt_modified`),
  KEY `idx_did` (`data_id`)
) ENGINE=InnoDB DEFAULT CHARSET=utf8 COLLATE=utf8_bin COMMENT='多租户改造';


/******************************************/
/*   数据库全名 = nacos_config   */
/*   表名称 = tenant_capacity   */
/******************************************/
CREATE TABLE `tenant_capacity` (
  `id` bigint(20) unsigned NOT NULL AUTO_INCREMENT COMMENT '主键ID',
  `tenant_id` varchar(128) NOT NULL DEFAULT '' COMMENT 'Tenant ID',
  `quota` int(10) unsigned NOT NULL DEFAULT '0' COMMENT '配额,0表示使用默认值',
  `usage` int(10) unsigned NOT NULL DEFAULT '0' COMMENT '使用量',
  `max_size` int(10) unsigned NOT NULL DEFAULT '0' COMMENT '单个配置大小上限,单位为字节,0表示使用默认值',
  `max_aggr_count` int(10) unsigned NOT NULL DEFAULT '0' COMMENT '聚合子配置最大个数',
  `max_aggr_size` int(10) unsigned NOT NULL DEFAULT '0' COMMENT '单个聚合数据的子配置大小上限,单位为字节,0表示使用默认值',
  `max_history_count` int(10) unsigned NOT NULL DEFAULT '0' COMMENT '最大变更历史数量',
  `gmt_create` datetime NOT NULL DEFAULT '2010-05-05 00:00:00' COMMENT '创建时间',
  `gmt_modified` datetime NOT NULL DEFAULT '2010-05-05 00:00:00' COMMENT '修改时间',
  PRIMARY KEY (`id`),
  UNIQUE KEY `uk_tenant_id` (`tenant_id`)
) ENGINE=InnoDB DEFAULT CHARSET=utf8 COLLATE=utf8_bin COMMENT='租户容量信息表';


CREATE TABLE `tenant_info` (
  `id` bigint(20) NOT NULL AUTO_INCREMENT COMMENT 'id',
  `kp` varchar(128) NOT NULL COMMENT 'kp',
  `tenant_id` varchar(128) default '' COMMENT 'tenant_id',
  `tenant_name` varchar(128) default '' COMMENT 'tenant_name',
  `tenant_desc` varchar(256) DEFAULT NULL COMMENT 'tenant_desc',
  `create_source` varchar(32) DEFAULT NULL COMMENT 'create_source',
  `gmt_create` bigint(20) NOT NULL COMMENT '创建时间',
  `gmt_modified` bigint(20) NOT NULL COMMENT '修改时间',
  PRIMARY KEY (`id`),
  UNIQUE KEY `uk_tenant_info_kptenantid` (`kp`,`tenant_id`),
  KEY `idx_tenant_id` (`tenant_id`)
) ENGINE=InnoDB DEFAULT CHARSET=utf8 COLLATE=utf8_bin COMMENT='tenant_info';

CREATE TABLE users (
	username varchar(50) NOT NULL PRIMARY KEY,
	password varchar(500) NOT NULL,
	enabled boolean NOT NULL
);

CREATE TABLE roles (
	username varchar(50) NOT NULL,
	role varchar(50) NOT NULL
);

INSERT INTO users (username, password, enabled) VALUES ('nacos', '$2a$10$EuWPZHzz32dJN7jexM34MOeYirDdFAZm2kuWj7VEOJhhZkDrxfvUu', TRUE);

INSERT INTO roles (username, role) VALUES ('nacos', 'ROLE_ADMIN');
-- the table to store GlobalSession data
CREATE TABLE IF NOT EXISTS `global_table`
(
    `xid`                       VARCHAR(128) NOT NULL,
    `transaction_id`            BIGINT,
    `status`                    TINYINT      NOT NULL,
    `application_id`            VARCHAR(32),
    `transaction_service_group` VARCHAR(32),
    `transaction_name`          VARCHAR(128),
    `timeout`                   INT,
    `begin_time`                BIGINT,
    `application_data`          VARCHAR(2000),
    `gmt_create`                DATETIME,
    `gmt_modified`              DATETIME,
    PRIMARY KEY (`xid`),
    KEY `idx_gmt_modified_status` (`gmt_modified`, `status`),
    KEY `idx_transaction_id` (`transaction_id`)
) ENGINE = InnoDB
  DEFAULT CHARSET = utf8;

-- the table to store BranchSession data
CREATE TABLE IF NOT EXISTS `branch_table`
(
    `branch_id`         BIGINT       NOT NULL,
    `xid`               VARCHAR(128) NOT NULL,
    `transaction_id`    BIGINT,
    `resource_group_id` VARCHAR(32),
    `resource_id`       VARCHAR(256),
    `branch_type`       VARCHAR(8),
    `status`            TINYINT,
    `client_id`         VARCHAR(64),
    `application_data`  VARCHAR(2000),
    `gmt_create`        DATETIME(6),
    `gmt_modified`      DATETIME(6),
    PRIMARY KEY (`branch_id`),
    KEY `idx_xid` (`xid`)
) ENGINE = InnoDB
  DEFAULT CHARSET = utf8;

-- the table to store lock data
CREATE TABLE IF NOT EXISTS `lock_table`
(
    `row_key`        VARCHAR(128) NOT NULL,
    `xid`            VARCHAR(128),
    `transaction_id` BIGINT,
    `branch_id`      BIGINT       NOT NULL,
    `resource_id`    VARCHAR(256),
    `table_name`     VARCHAR(32),
    `pk`             VARCHAR(36),
    `gmt_create`     DATETIME,
    `gmt_modified`   DATETIME,
    PRIMARY KEY (`row_key`),
    KEY `idx_branch_id` (`branch_id`)
) ENGINE = InnoDB
  DEFAULT CHARSET = utf8;
3.拉取 nacos 以及 seata 镜像并运行
docker run -d --name nacos -p 8848:8848 -e MODE=standalone -e MYSQL_MASTER_SERVICE_HOST=你的mysql所在ip -e MYSQL_MASTER_SERVICE_DB_NAME=nacos -e MYSQL_MASTER_SERVICE_USER=root -e MYSQL_MASTER_SERVICE_PASSWORD=mysql密码 -e MYSQL_SLAVE_SERVICE_HOST=你的mysql所在ip -e SPRING_DATASOURCE_PLATFORM=mysql -e MYSQL_DATABASE_NUM=1 nacos/nacos-server:latest
docker run -d --name seata -p 8091:8091 -e SEATA_IP=你想指定的ip -e SEATA_PORT=8091 seataio/seata-server:1.4.2
1.由于 seata 容器内没有内置 vim,我们可以直接将要文件夹 cp 到宿主机外来编辑好了,再 cp 回去
docker cp 容器id:seata-server/resources 你想放置的目录
2.使用如下代码获取两个容器的 ip 地址
docker inspect --format='{{.NetworkSettings.IPAddress}}' ID/NAMES
3.nacos-config.txt 编辑为如下内容
transport.type=TCP
transport.server=NIO
transport.heartbeat=true
transport.enableClientBatchSendRequest=false
transport.threadFactory.bossThreadPrefix=NettyBoss
transport.threadFactory.workerThreadPrefix=NettyServerNIOWorker
transport.threadFactory.serverExecutorThreadPrefix=NettyServerBizHandler
transport.threadFactory.shareBossWorker=false
transport.threadFactory.clientSelectorThreadPrefix=NettyClientSelector
transport.threadFactory.clientSelectorThreadSize=1
transport.threadFactory.clientWorkerThreadPrefix=NettyClientWorkerThread
transport.threadFactory.bossThreadSize=1
transport.threadFactory.workerThreadSize=default
transport.shutdown.wait=3
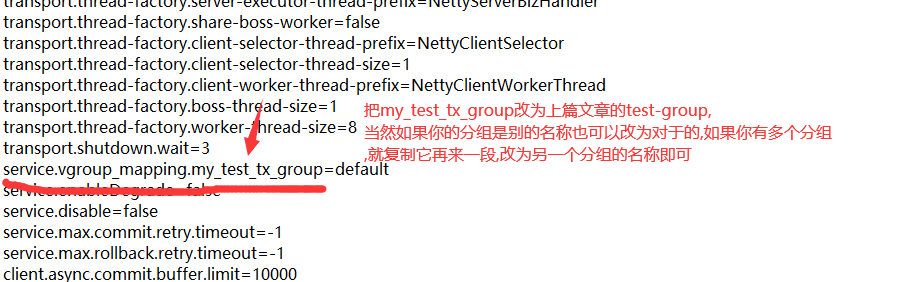
service.vgroupMapping.你的事务组名=default
service.default.grouplist=127.0.0.1:8091
service.enableDegrade=false
service.disableGlobalTransaction=false
client.rm.asyncCommitBufferLimit=10000
client.rm.lock.retryInterval=10
client.rm.lock.retryTimes=30
client.rm.lock.retryPolicyBranchRollbackOnConflict=true
client.rm.reportRetryCount=5
client.rm.tableMetaCheckEnable=false
client.rm.tableMetaCheckerInterval=60000
client.rm.sqlParserType=druid
client.rm.reportSuccessEnable=false
client.rm.sagaBranchRegisterEnable=false
client.tm.commitRetryCount=5
client.tm.rollbackRetryCount=5
client.tm.defaultGlobalTransactionTimeout=60000
client.tm.degradeCheck=false
client.tm.degradeCheckAllowTimes=10
client.tm.degradeCheckPeriod=2000
store.mode=file
store.publicKey=
store.file.dir=file_store/data
store.file.maxBranchSessionSize=16384
store.file.maxGlobalSessionSize=512
store.file.fileWriteBufferCacheSize=16384
store.file.flushDiskMode=async
store.file.sessionReloadReadSize=100
store.db.datasource=druid
store.db.dbType=mysql
store.db.driverClassName=com.mysql.jdbc.Driver
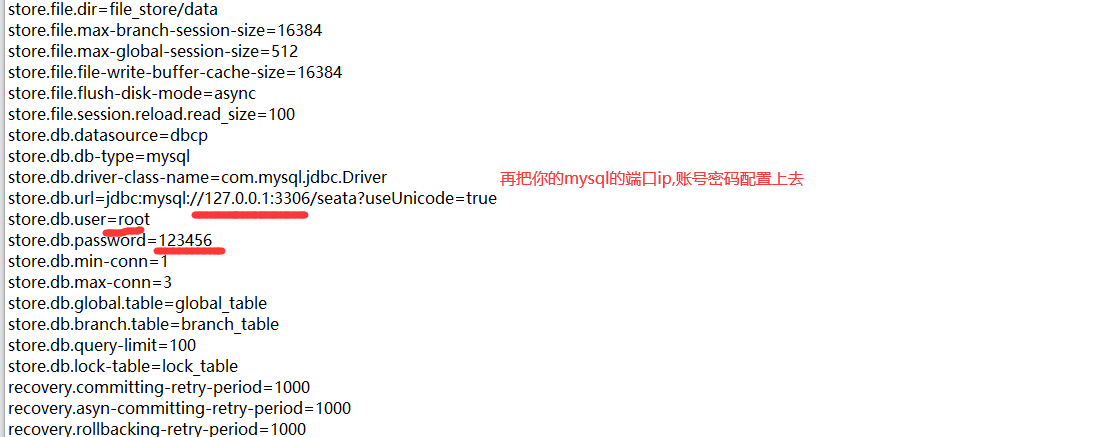
store.db.url=jdbc:mysql://你的mysql所在ip:3306/seata?useUnicode=true&rewriteBatchedStatements=true
store.db.user=mysql账号
store.db.password=mysql密码
store.db.minConn=5
store.db.maxConn=30
store.db.globalTable=global_table
store.db.branchTable=branch_table
store.db.queryLimit=100
store.db.lockTable=lock_table
store.db.maxWait=5000
server.recovery.committingRetryPeriod=1000
server.recovery.asynCommittingRetryPeriod=1000
server.recovery.rollbackingRetryPeriod=1000
server.recovery.timeoutRetryPeriod=1000
server.maxCommitRetryTimeout=-1
server.maxRollbackRetryTimeout=-1
server.rollbackRetryTimeoutUnlockEnable=false
client.undo.dataValidation=true
client.undo.logSerialization=jackson
client.undo.onlyCareUpdateColumns=true
server.undo.logSaveDays=7
server.undo.logDeletePeriod=86400000
client.undo.logTable=undo_log
client.undo.compress.enable=true
client.undo.compress.type=zip
client.undo.compress.threshold=64k
log.exceptionRate=100
transport.serialization=seata
transport.compressor=none
metrics.enabled=false
metrics.registryType=compact
metrics.exporterList=prometheus
metrics.exporterPrometheusPort=9898
详细参数配置请点此处
4.registry.conf 编辑为如下内容
registry {
  # file 、nacos 、eureka、redis、zk、consul、etcd3、sofa
  type = "nacos"

  nacos {
    serverAddr = "nacos容器ip:8848"
    namespace = ""
    cluster = "default"
  }
}

config {
  # file、nacos 、apollo、zk、consul、etcd3
  type = "nacos"

  nacos {
    serverAddr = "nacos容器ip:8848"
    namespace = ""
  }
}
5.配置完成后使用如下命令,把修改完成的 registry.conf 复制到容器中,并重启查看日志运行
docker cp /home/seata/resources/registry.conf seata:seata-server/resources/
docker restart seata
docker logs -f seata
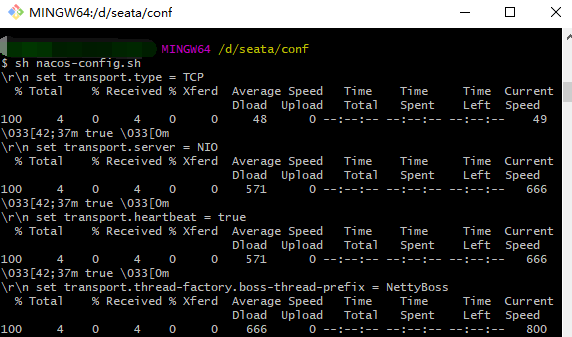
6.运行 nacos-config.sh 导入 Nacos 配置
eg: sh ${SEATAPATH}/script/config-center/nacos/nacos-config.sh -h localhost -p 8848 -g SEATA_GROUP -t 5a3c7d6c-f497-4d68-a71a-2e5e3340b3ca -u username -w password
具体参数释义��参考:配置导入说明
7.登录 nacos 控制中心查看
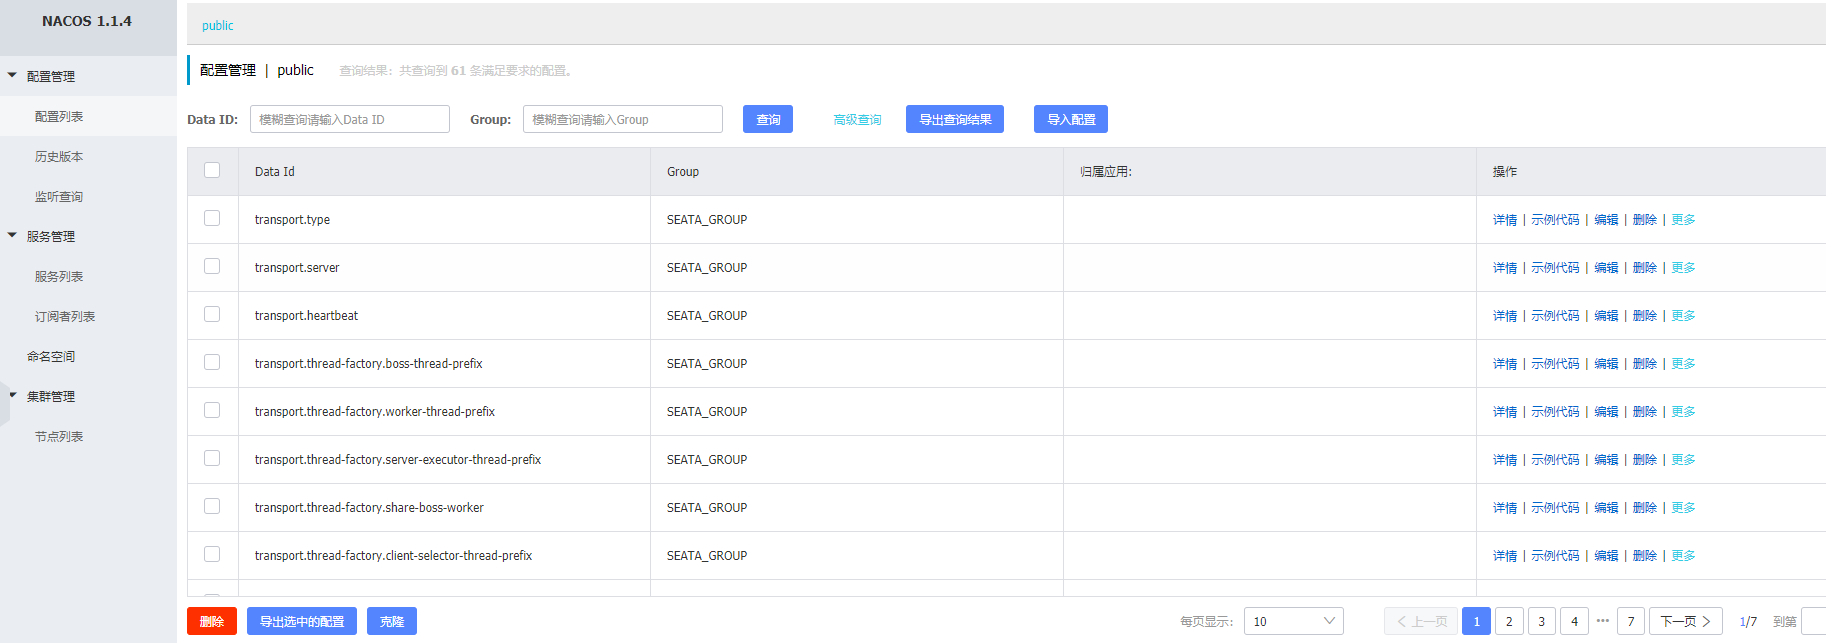
如图所示便是成功了.
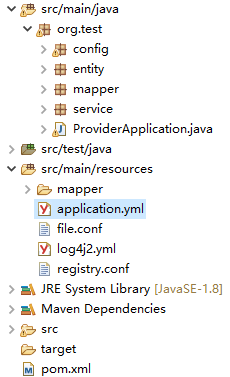
1.拉取博文中所示的项目,修改 test-service 的 application.yml 与 registry.conf
registry {
  type = "nacos"
  nacos {
    serverAddr = "宿主机ip:8848"
    namespace = ""
    cluster = "default"
  }
}
config {
  type = "nacos"
  nacos {
    serverAddr = "宿主机ip:8848"
    namespace = ""
    cluster = "default"
  }
}
server:
  port: 38888
spring:
  application:
      name: test-service
  datasource:
    type: com.alibaba.druid.pool.DruidDataSource
    url: jdbc:mysql://mysqlip:3306/test?useUnicode=true&characterEncoding=UTF-8&serverTimezone=UTC
    driver-class-name: com.mysql.cj.jdbc.Driver
    username: root
    password: 123456
dubbo:
  protocol:
    threadpool: cached
  scan:
    base-packages: com.example
  application:
    qos-enable: false
    name: testserver
  registry:
    id: my-registry
    address:  nacos://宿主机ip:8848
mybatis-plus:
  mapper-locations: classpath:/mapper/*Mapper.xml
  typeAliasesPackage: org.test.entity
  global-config:
    db-config:
      field-strategy: not-empty
      id-type: auto
      db-type: mysql
  configuration:
    map-underscore-to-camel-case: true
    cache-enabled: true
    log-impl: org.apache.ibatis.logging.stdout.StdOutImpl
    auto-mapping-unknown-column-behavior: none
2.把修改完成的 registry.conf 复制到 test-client-resources 中,并修改 application
spring:
  application:
     name: test
  datasource:
     driver-class-name: com.mysql.cj.jdbc.Driver
     url: jdbc:mysql://mysqlIp:3306/test?userSSL=true&useUnicode=true&characterEncoding=UTF8&serverTimezone=Asia/Shanghai
     username: root
     password: 123456
  mvc:
    servlet:
      load-on-startup: 1
  http:
    encoding:
            force: true
            charset: utf-8
            enabled: true
    multipart:
      max-file-size: 10MB
      max-request-size: 10MB
dubbo:
  registry:
    id: my-registry
    address:  nacos://宿主机ip:8848
  application:
    name: dubbo-demo-client
    qos-enable: false
server:
  port: 28888
  max-http-header-size: 8192
  address: 0.0.0.0
  tomcat:
    max-http-post-size: 104857600
CREATE TABLE IF NOT EXISTS `undo_log`
(
    `branch_id`     BIGINT       NOT NULL COMMENT 'branch transaction id',
    `xid`           VARCHAR(128) NOT NULL COMMENT 'global transaction id',
    `context`       VARCHAR(128) NOT NULL COMMENT 'undo_log context,such as serialization',
    `rollback_info` LONGBLOB     NOT NULL COMMENT 'rollback info',
    `log_status`    INT(11)      NOT NULL COMMENT '0:normal status,1:defense status',
    `log_created`   DATETIME(6)  NOT NULL COMMENT 'create datetime',
    `log_modified`  DATETIME(6)  NOT NULL COMMENT 'modify datetime',
    UNIQUE KEY `ux_undo_log` (`xid`, `branch_id`)
) ENGINE = InnoDB
  AUTO_INCREMENT = 1
  DEFAULT CHARSET = utf8 COMMENT ='AT transaction mode undo table';
5.依次运行 test-service,test-client.
6.查看 nacos 中服务列表是否如下图所示

关于 nacos 与 seata 的 docker 部署已经完成了,更详细的内容希望希望大家访问以下地址阅读详细文档
本文作者:FUNKYE(陈健斌),杭州某互联网公司主程。
上次发布了直连方式的seata配置,详细可以看这篇博客
我们接着上一篇的基础上去配置nacos做配置中心跟dubbo注册中心.
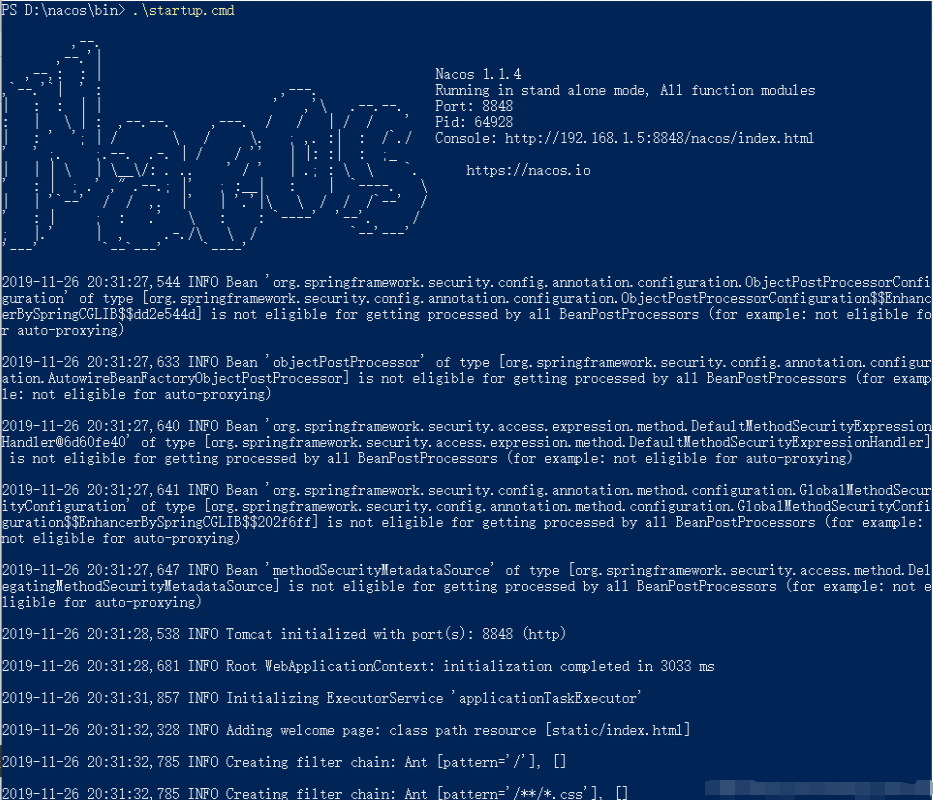
1.首先去nacos的github上下载最新版本

2.下载好了后,很简单,解压后到bin目录下去启动就好了,看到如图所示就成了:
3.启动完毕后访问:http://127.0.0.1:8848/nacos/#/login
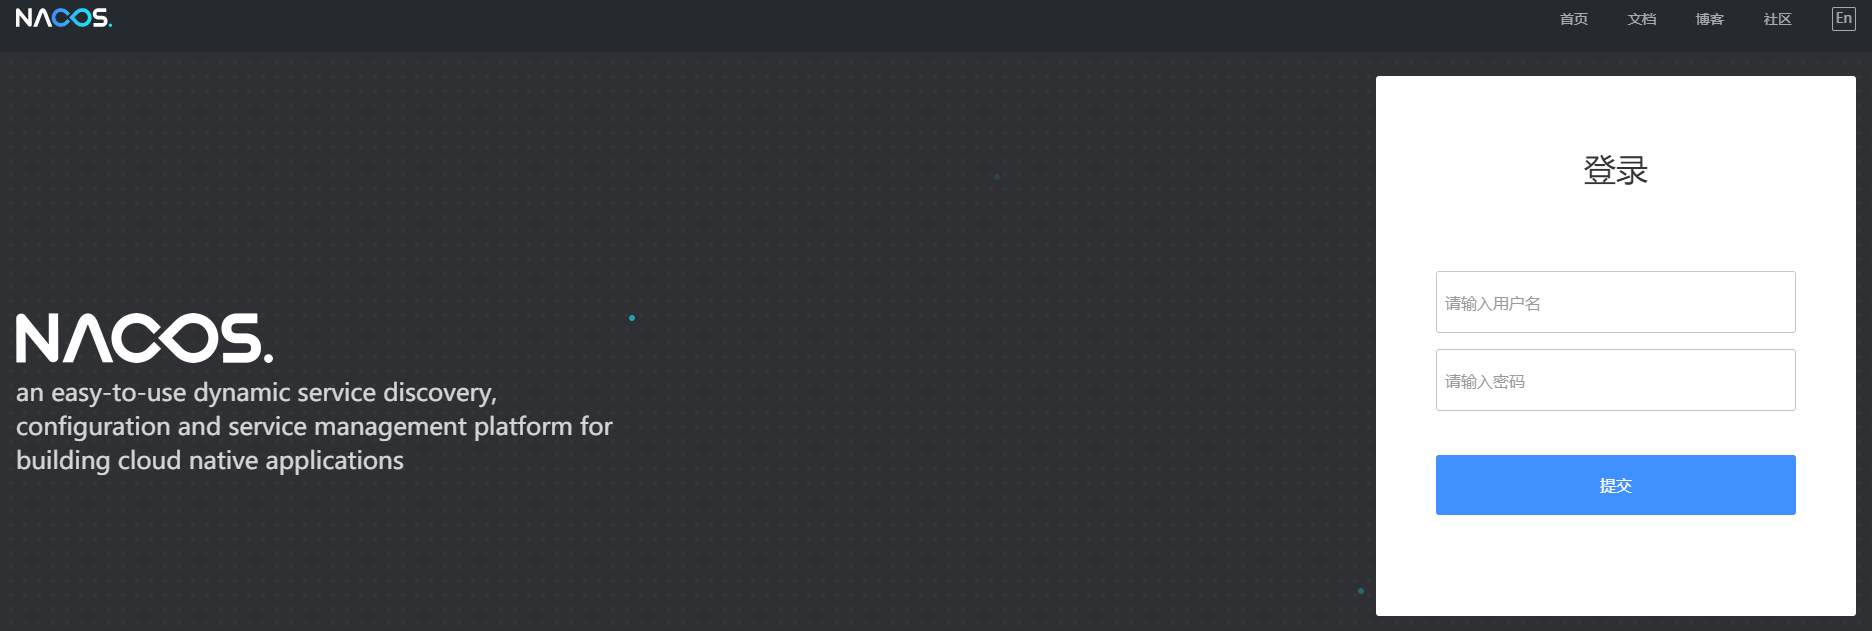
是不是看到这样的界面了?输入nacos(账号密码相同),先进去看看吧.
这时候可以发现没有任何服务注册
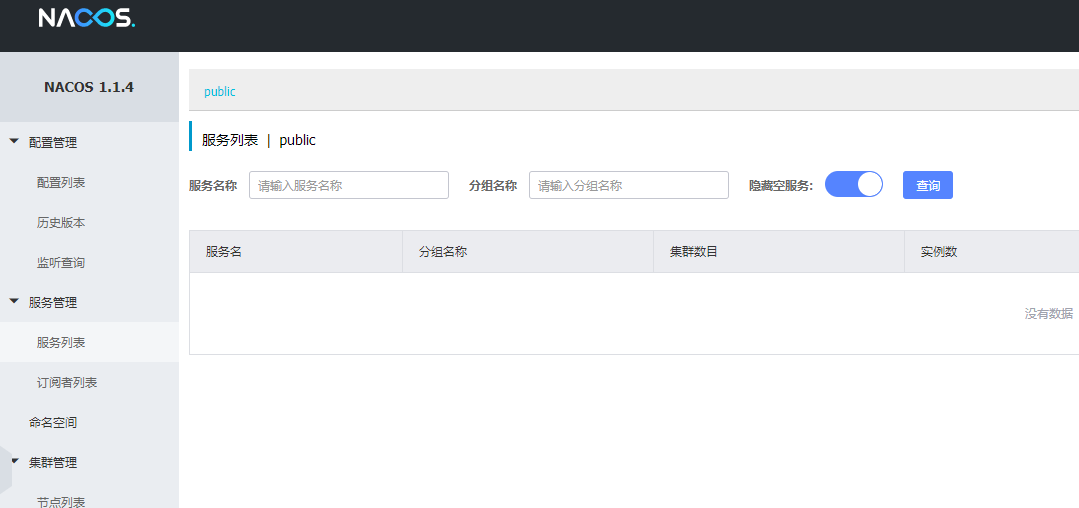
别急我们马上让seata服务连接进来.
1.进入seata的conf文件夹看到这个木有?
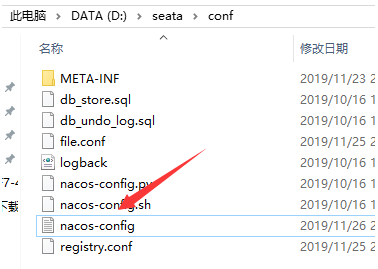
就是它,编辑它:
2.然后记得保存哦!接着我们把registry.conf文件打开编辑:
registry {
  # file 、nacos 、eureka、redis、zk、consul、etcd3、sofa
  type = "nacos"

  nacos {
    serverAddr = "localhost"
    namespace = ""
    cluster = "default"
  }
  eureka {
    serviceUrl = "http://localhost:8761/eureka"
    application = "default"
    weight = "1"
  }
  redis {
    serverAddr = "localhost:6379"
    db = "0"
  }
  zk {
    cluster = "default"
    serverAddr = "127.0.0.1:2181"
    session.timeout = 6000
    connect.timeout = 2000
  }
  consul {
    cluster = "default"
    serverAddr = "127.0.0.1:8500"
  }
  etcd3 {
    cluster = "default"
    serverAddr = "http://localhost:2379"
  }
  sofa {
    serverAddr = "127.0.0.1:9603"
    application = "default"
    region = "DEFAULT_ZONE"
    datacenter = "DefaultDataCenter"
    cluster = "default"
    group = "SEATA_GROUP"
    addressWaitTime = "3000"
  }
  file {
    name = "file.conf"
  }
}

config {
  # file、nacos 、apollo、zk、consul、etcd3
  type = "nacos"

  nacos {
    serverAddr = "localhost"
    namespace = ""
  }
  consul {
    serverAddr = "127.0.0.1:8500"
  }
  apollo {
    app.id = "seata-server"
    apollo.meta = "http://192.168.1.204:8801"
  }
  zk {
    serverAddr = "127.0.0.1:2181"
    session.timeout = 6000
    connect.timeout = 2000
  }
  etcd3 {
    serverAddr = "http://localhost:2379"
  }
  file {
    name = "file.conf"
  }
}
都编辑好了后,我们运行nacos-config.sh,这时候我们配置的nacos-config.txt的内容已经被发送到nacos中了详细如图:
出现以上类似的代码就是说明成功了,接着我们登录nacos配置中心,查看配置列表,出现如图列表说明配置成功了:
看到了吧,你的配置已经全部都提交上去了,如果再git工具内运行sh不行的话,试着把编辑sh文件,试试改成如下操作
for line in $(cat nacos-config.txt)

do

key=${line%%=*}
value=${line#*=}
echo "\r\n set "${key}" = "${value}

result=`curl -X POST "http://127.0.0.1:8848/nacos/v1/cs/configs?dataId=$key&group=SEATA_GROUP&content=$value"`

if [ "$result"x == "true"x ]; then

  echo "\033[42;37m $result \033[0m"

else

  echo "\033[41;37 $result \033[0m"
  let error++

fi

done


if [ $error -eq 0 ]; then

echo  "\r\n\033[42;37m init nacos config finished, please start seata-server. \033[0m"

else

echo  "\r\n\033[41;33m init nacos config fail. \033[0m"

fi
3.目前我们的准备工作全部完成,我们去seata-service/bin去运行seata服务吧,如图所示就成功啦!
1.首先把springboot-dubbo-mybatsiplus-seata项目的pom的依赖更改,去除掉zk这些配置,因为我们使用nacos做注册中心了.
<properties>
<webVersion>3.1</webVersion>
<project.build.sourceEncoding>UTF-8</project.build.sourceEncoding>
<project.reporting.outputEncoding>UTF-8</project.reporting.outputEncoding>
<maven.compiler.source>1.8</maven.compiler.source>
<maven.compiler.target>1.8</maven.compiler.target>
<HikariCP.version>3.2.0</HikariCP.version>
<mybatis-plus-boot-starter.version>3.2.0</mybatis-plus-boot-starter.version>
</properties>
<parent>
<groupId>org.springframework.boot</groupId>
<artifactId>spring-boot-starter-parent</artifactId>
<version>2.1.8.RELEASE</version>
</parent>
<dependencies>
<dependency>
<groupId>com.alibaba.nacos</groupId>
<artifactId>nacos-client</artifactId>
<version>1.1.4</version>
</dependency>
<dependency>
<groupId>org.apache.dubbo</groupId>
<artifactId>dubbo-registry-nacos</artifactId>
<version>2.7.4.1</version>
</dependency>
<dependency>
<groupId>org.apache.dubbo</groupId>
<artifactId>dubbo-spring-boot-starter</artifactId>
<version>2.7.4.1</version>
</dependency>
<dependency>
<groupId>org.apache.commons</groupId>
<artifactId>commons-lang3</artifactId>
</dependency>
<dependency>
<groupId>com.alibaba</groupId>
<artifactId>fastjson</artifactId>
<version>1.2.60</version>
</dependency>
<!-- <dependency> <groupId>javax</groupId> <artifactId>javaee-api</artifactId>
<version>7.0</version> <scope>provided</scope> </dependency> -->
<dependency>
<groupId>io.springfox</groupId>
<artifactId>springfox-swagger2</artifactId>
<version>2.9.2</version>
</dependency>
<dependency>
<groupId>io.springfox</groupId>
<artifactId>springfox-swagger-ui</artifactId>
<version>2.9.2</version>
</dependency>
<!-- mybatis-plus begin -->
<dependency>
<groupId>com.baomidou</groupId>
<artifactId>mybatis-plus-boot-starter</artifactId>
<version>${mybatis-plus-boot-starter.version}</version>
</dependency>
<!-- mybatis-plus end -->
<!-- https://mvnrepository.com/artifact/org.projectlombok/lombok -->
<dependency>
<groupId>org.projectlombok</groupId>
<artifactId>lombok</artifactId>
<scope>provided</scope>
</dependency>
<dependency>
<groupId>io.seata</groupId>
<artifactId>seata-all</artifactId>
<version>0.9.0.1</version>
</dependency>
<!-- <dependency> <groupId>com.baomidou</groupId> <artifactId>dynamic-datasource-spring-boot-starter</artifactId>
<version>2.5.4</version> </dependency> -->
<!-- <dependency> <groupId>com.baomidou</groupId> <artifactId>mybatis-plus-generator</artifactId>
<version>3.1.0</version> </dependency> -->
<!-- https://mvnrepository.com/artifact/org.freemarker/freemarker -->
<dependency>
<groupId>org.freemarker</groupId>
<artifactId>freemarker</artifactId>
</dependency>
<!-- https://mvnrepository.com/artifact/com.alibaba/druid-spring-boot-starter -->
<dependency>
<groupId>com.alibaba</groupId>
<artifactId>druid-spring-boot-starter</artifactId>
<version>1.1.20</version>
</dependency>
<!-- 加上这个才能辨��认到log4j2.yml文件 -->
<dependency>
<groupId>com.fasterxml.jackson.dataformat</groupId>
<artifactId>jackson-dataformat-yaml</artifactId>
</dependency>
<dependency> <!-- 引入log4j2依赖 -->
<groupId>org.springframework.boot</groupId>
<artifactId>spring-boot-starter-log4j2</artifactId>
</dependency>
<!-- https://mvnrepository.com/artifact/mysql/mysql-connector-java -->
<dependency>
<groupId>mysql</groupId>
<artifactId>mysql-connector-java</artifactId>
</dependency>
<dependency>
<groupId>org.springframework.boot</groupId>
<artifactId>spring-boot-starter-web</artifactId>
<exclusions>
<exclusion>
<groupId>org.springframework.boot</groupId>
<artifactId>spring-boot-starter-logging</artifactId>
</exclusion>
<exclusion>
<groupId>org.slf4j</groupId>
<artifactId>slf4j-log4j12</artifactId>
</exclusion>
</exclusions>
</dependency>
<dependency>
<groupId>org.springframework.boot</groupId>
<artifactId>spring-boot-starter-aop</artifactId>
</dependency>
<dependency>
<groupId>org.springframework.boot</groupId>
<artifactId>spring-boot-starter-test</artifactId>
<scope>test</scope>
</dependency>
<!-- <dependency> <groupId>org.scala-lang</groupId> <artifactId>scala-library</artifactId>
<version>2.11.0</version> </dependency> -->
<dependency>
<groupId>org.springframework.boot</groupId>
<artifactId>spring-boot-configuration-processor</artifactId>
<optional>true</optional>
</dependency>
</dependencies>
2.然后更改test-service的目录结构,删除zk的配置并更改application.yml文件,目录结构与代码:
server:
  port: 38888
spring:
  application:
      name: test-service
  datasource:
    type: com.alibaba.druid.pool.DruidDataSource
    url: jdbc:mysql://127.0.0.1:3306/test?useUnicode=true&characterEncoding=UTF-8&serverTimezone=UTC
    driver-class-name: com.mysql.cj.jdbc.Driver
    username: root
    password: 123456
dubbo:
  protocol:
    loadbalance: leastactive
    threadpool: cached
  scan:
    base-packages: org。test.service
  application:
    qos-enable: false
    name: testserver
  registry:
    id: my-registry
    address:  nacos://127.0.0.1:8848
mybatis-plus:
  mapper-locations: classpath:/mapper/*Mapper.xml
  typeAliasesPackage: org.test.entity
  global-config:
    db-config:
      field-strategy: not-empty
      id-type: auto
      db-type: mysql
  configuration:
    map-underscore-to-camel-case: true
    cache-enabled: true
    auto-mapping-unknown-column-behavior: none
3.再更改registry.conf文件,如果你的nacos是其它服务器,请改成对应都ip跟端口
registry {
  type = "nacos"
  file {
    name = "file.conf"
  }
   zk {
    cluster = "default"
    serverAddr = "127.0.0.1:2181"
    session.timeout = 6000
    connect.timeout = 2000
  }
    nacos {
    serverAddr = "localhost"
    namespace = ""
    cluster = "default"
  }
}
config {
  type = "nacos"
  file {
    name = "file.conf"
  }
  zk {
    serverAddr = "127.0.0.1:2181"
    session.timeout = 6000
    connect.timeout = 2000
  }
    nacos {
    serverAddr = "localhost"
    namespace = ""
    cluster = "default"
  }
}
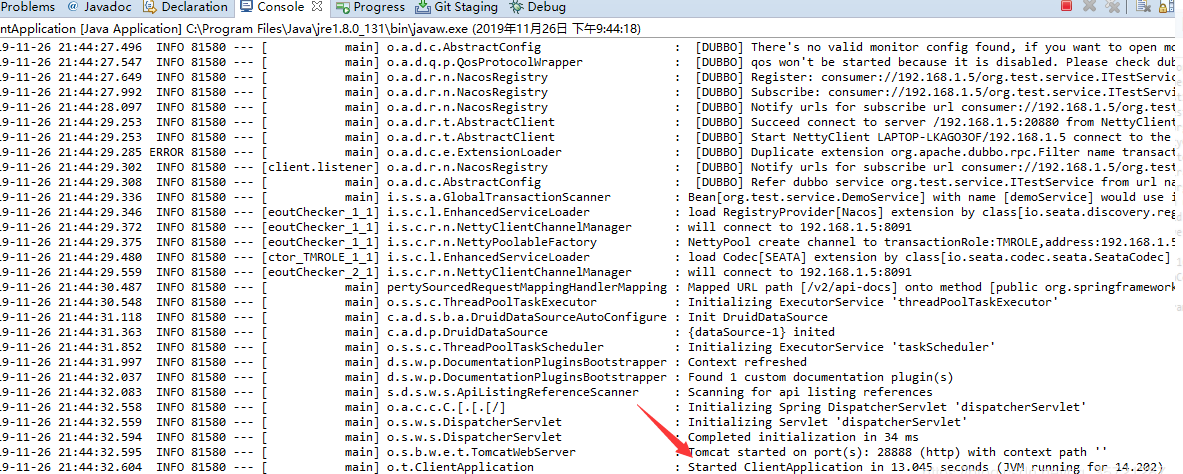
4.接着我们运行provideApplication

启动成功啦,我们再去看seata的日志:

成功了,这下我们一样,去修改test-client的内容,首先一样application.yml,把zk换成nacos,这里就不详细描述了,把test-service内的registry.conf,复制到client项目的resources中覆盖原来的registry.conf.
然后我们可以运行clientApplication:
5.确认服务已经被发布并测试事务运行是否正常

服务成功发布出来,也被成功消费了.这下我们再去swagger中去测试回滚是否一切正常,访问http://127.0.0.1:28888/swagger-ui.html
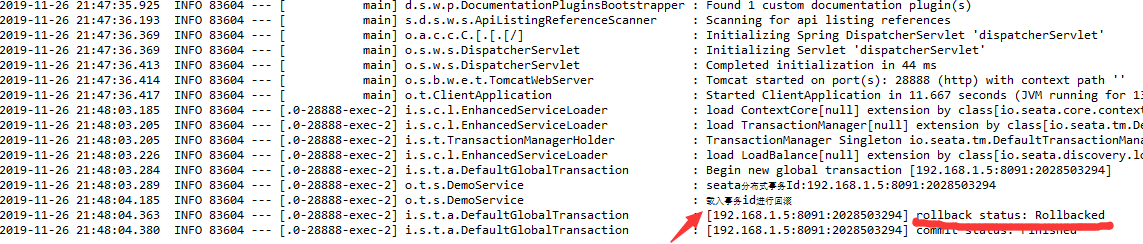
恭喜你,看到这一定跟我一样成功了!
关于nacos的使用跟seata的简单搭建已经完成了,更详细的内容希望希望大家访问以下地址阅读详细文档

Seata 开源项目发起人带来《Seata 过去、现在和未来》以及 Seata 1.0 的新特性。
Seata 核心贡献者详解 Seata AT, TCC, Saga 模式。
Seata 落地互联网医疗,滴滴出行实践剖析。
季敏(清铭) 《Seata 的过去、现在和未来》 slides

吴江坷《我与SEATA的开源之路以及SEATA在互联网医疗系统中的应用》 slides

申海强(煊檍)《带你读透 Seata AT 模式的精髓》 slides

张森 《分布式事务Seata之TCC模式详解》

陈龙(屹远)《Seata 长事务解决方案 Saga 模式》
陈鹏志《Seata%20在滴滴两轮车业务的实践》 slides

项目地址:https://gitee.com/itCjb/springboot-dubbo-mybatisplus-seata
本文作者:FUNKYE(陈健斌),杭州某互联网公司主程。
Mybatis-Plus:MyBatis-Plus(简称 MP)是一个 MyBatis 的增强工具,在 MyBatis 的基础上只做增强不做改变,为简化开发、提高效率而生。
MP配置:
<bean id="sqlSessionFactory" class="com.baomidou.mybatisplus.extension.spring.MybatisSqlSessionFactoryBean">
    <property name="dataSource" ref="dataSource"/>
</bean>
Seata:Seata 是一款开源的分布式事务解决方案,致力于提供高性能和简单易用的分布式事务服务。Seata 将为用户提供了 AT、TCC、SAGA 和 XA 事务模式,为用户打造一站式的分布式解决方案。
AT模式机制:
1.首先我们通过介绍,可以看到,mp是需要注册sqlSessionFactory,注入数据源,而Seata是通过代理数据源来保证事务的正常回滚跟提交。
2.我们来看基于seata的官方demo提供的SeataAutoConfig的代码
package org.test.config;

import javax.sql.DataSource;

import org.apache.ibatis.session.SqlSessionFactory;
import org.slf4j.Logger;
import org.slf4j.LoggerFactory;
import org.springframework.beans.factory.annotation.Autowired;
import org.springframework.boot.autoconfigure.jdbc.DataSourceProperties;
import org.springframework.context.annotation.Bean;
import org.springframework.context.annotation.Configuration;
import org.springframework.context.annotation.Primary;

import com.alibaba.druid.pool.DruidDataSource;
import com.baomidou.mybatisplus.extension.spring.MybatisSqlSessionFactoryBean;

import io.seata.rm.datasource.DataSourceProxy;
import io.seata.spring.annotation.GlobalTransactionScanner;

@Configuration
public class SeataAutoConfig {
	@Autowired(required = true)
	private DataSourceProperties dataSourceProperties;
	private final static Logger logger = LoggerFactory.getLogger(SeataAutoConfig.class);

	@Bean(name = "dataSource") // 声明其为Bean实例
	@Primary // 在同样的DataSource中,首先使用被标注的DataSource
	public DataSource druidDataSource() {
		DruidDataSource druidDataSource = new DruidDataSource();
		logger.info("dataSourceProperties.getUrl():{}",dataSourceProperties.getUrl());
		druidDataSource.setUrl(dataSourceProperties.getUrl());
		druidDataSource.setUsername(dataSourceProperties.getUsername());
		druidDataSource.setPassword(dataSourceProperties.getPassword());
		druidDataSource.setDriverClassName(dataSourceProperties.getDriverClassName());
		druidDataSource.setInitialSize(0);
		druidDataSource.setMaxActive(180);
		druidDataSource.setMaxWait(60000);
		druidDataSource.setMinIdle(0);
		druidDataSource.setValidationQuery("Select 1 from DUAL");
		druidDataSource.setTestOnBorrow(false);
		druidDataSource.setTestOnReturn(false);
		druidDataSource.setTestWhileIdle(true);
		druidDataSource.setTimeBetweenEvictionRunsMillis(60000);
		druidDataSource.setMinEvictableIdleTimeMillis(25200000);
		druidDataSource.setRemoveAbandoned(true);
		druidDataSource.setRemoveAbandonedTimeout(1800);
		druidDataSource.setLogAbandoned(true);
		logger.info("装载dataSource........");
		return druidDataSource;
	}

	/**
	 * init datasource proxy
	 *
	 * @Param: druidDataSource datasource bean instance
	 * @Return: DataSourceProxy datasource proxy
	 */
	@Bean
	public DataSourceProxy dataSourceProxy(DataSource dataSource) {
		logger.info("代理dataSource........");
		return new DataSourceProxy(dataSource);
	}

	@Bean
	public SqlSessionFactory sqlSessionFactory(DataSourceProxy dataSourceProxy) throws Exception {
		MybatisSqlSessionFactoryBean factory = new MybatisSqlSessionFactoryBean();
		factory.setDataSource(dataSourceProxy);
        factory.setMapperLocations(new PathMatchingResourcePatternResolver()
            .getResources("classpath*:/mapper/*.xml"));
		return factory.getObject();
	}

	/**
	 * init global transaction scanner
	 *
	 * @Return: GlobalTransactionScanner
	 */
	@Bean
	public GlobalTransactionScanner globalTransactionScanner() {
		logger.info("配置seata........");
		return new GlobalTransactionScanner("test-service", "test-group");
	}
}
首先看到我们的seata配置数据源的类里,我们配置了一个数据源,然后又配置了一个seata代理datasource的bean,这时候.
然后我们如果直接启动mp整合seata的项目会发现,分页之类的插件会直接失效,连扫描mapper都得从代码上写,这是为什么呢?
通过阅读以上代码,是因为我们另外的配置了一个sqlSessionFactory,导致mp的sqlSessionFactory失效了,这时候我们发现了问题的所在了,即使我们不配置sqlSessionFactoryl,也会因为mp所使用的数据源不是被seata代理过后的数据源,导致分布式事务失效.但是如何解决这个问题呢?
这时候我们需要去阅读mp的源码,找到他的启动类,一看便知
/*
 * Copyright (c) 2011-2020, baomidou (jobob@qq.com).
 * <p>
 * Licensed under the Apache License, Version 2.0 (the "License"); you may not
 * use this file except in compliance with the License. You may obtain a copy of
 * the License at
 * <p>
 * https://www.apache.org/licenses/LICENSE-2.0
 * <p>
 * Unless required by applicable law or agreed to in writing, software
 * distributed under the License is distributed on an "AS IS" BASIS, WITHOUT
 * WARRANTIES OR CONDITIONS OF ANY KIND, either express or implied. See the
 * License for the specific language governing permissions and limitations under
 * the License.
 */
package com.baomidou.mybatisplus.autoconfigure;


import com.baomidou.mybatisplus.core.MybatisConfiguration;
import com.baomidou.mybatisplus.core.config.GlobalConfig;
import com.baomidou.mybatisplus.core.handlers.MetaObjectHandler;
import com.baomidou.mybatisplus.core.incrementer.IKeyGenerator;
import com.baomidou.mybatisplus.core.injector.ISqlInjector;
import com.baomidou.mybatisplus.extension.spring.MybatisSqlSessionFactoryBean;
import org.apache.ibatis.annotations.Mapper;
import org.apache.ibatis.mapping.DatabaseIdProvider;
import org.apache.ibatis.plugin.Interceptor;
import org.apache.ibatis.scripting.LanguageDriver;
import org.apache.ibatis.session.ExecutorType;
import org.apache.ibatis.session.SqlSessionFactory;
import org.apache.ibatis.type.TypeHandler;
import org.mybatis.spring.SqlSessionFactoryBean;
import org.mybatis.spring.SqlSessionTemplate;
import org.mybatis.spring.mapper.MapperFactoryBean;
import org.mybatis.spring.mapper.MapperScannerConfigurer;
import org.slf4j.Logger;
import org.slf4j.LoggerFactory;
import org.springframework.beans.BeanWrapper;
import org.springframework.beans.BeanWrapperImpl;
import org.springframework.beans.factory.BeanFactory;
import org.springframework.beans.factory.BeanFactoryAware;
import org.springframework.beans.factory.InitializingBean;
import org.springframework.beans.factory.ObjectProvider;
import org.springframework.beans.factory.support.BeanDefinitionBuilder;
import org.springframework.beans.factory.support.BeanDefinitionRegistry;
import org.springframework.boot.autoconfigure.AutoConfigurationPackages;
import org.springframework.boot.autoconfigure.AutoConfigureAfter;
import org.springframework.boot.autoconfigure.EnableAutoConfiguration;
import org.springframework.boot.autoconfigure.condition.ConditionalOnClass;
import org.springframework.boot.autoconfigure.condition.ConditionalOnMissingBean;
import org.springframework.boot.autoconfigure.condition.ConditionalOnSingleCandidate;
import org.springframework.boot.autoconfigure.jdbc.DataSourceAutoConfiguration;
import org.springframework.boot.context.properties.EnableConfigurationProperties;
import org.springframework.context.ApplicationContext;
import org.springframework.context.annotation.Bean;
import org.springframework.context.annotation.Configuration;
import org.springframework.context.annotation.Import;
import org.springframework.context.annotation.ImportBeanDefinitionRegistrar;
import org.springframework.core.io.Resource;
import org.springframework.core.io.ResourceLoader;
import org.springframework.core.type.AnnotationMetadata;
import org.springframework.util.Assert;
import org.springframework.util.CollectionUtils;
import org.springframework.util.ObjectUtils;
import org.springframework.util.StringUtils;

import javax.sql.DataSource;
import java.util.List;
import java.util.Optional;
import java.util.stream.Stream;

/**
 * {@link EnableAutoConfiguration Auto-Configuration} for Mybatis. Contributes a
 * {@link SqlSessionFactory} and a {@link SqlSessionTemplate}.
 * <p>
 * If {@link org.mybatis.spring.annotation.MapperScan} is used, or a
 * configuration file is specified as a property, those will be considered,
 * otherwise this auto-configuration will attempt to register mappers based on
 * the interface definitions in or under the root auto-configuration package.
 * </p>
 * <p> copy from {@link org.mybatis.spring.boot.autoconfigure.MybatisAutoConfiguration}</p>
 *
 * @author Eddú Meléndez
 * @author Josh Long
 * @author Kazuki Shimizu
 * @author Eduardo Macarrón
 */
@Configuration
@ConditionalOnClass({SqlSessionFactory.class, SqlSessionFactoryBean.class})
@ConditionalOnSingleCandidate(DataSource.class)
@EnableConfigurationProperties(MybatisPlusProperties.class)
@AutoConfigureAfter(DataSourceAutoConfiguration.class)
public class MybatisPlusAutoConfiguration implements InitializingBean {

    private static final Logger logger = LoggerFactory.getLogger(MybatisPlusAutoConfiguration.class);

    private final MybatisPlusProperties properties;

    private final Interceptor[] interceptors;

    private final TypeHandler[] typeHandlers;

    private final LanguageDriver[] languageDrivers;

    private final ResourceLoader resourceLoader;

    private final DatabaseIdProvider databaseIdProvider;

    private final List<ConfigurationCustomizer> configurationCustomizers;

    private final List<MybatisPlusPropertiesCustomizer> mybatisPlusPropertiesCustomizers;

    private final ApplicationContext applicationContext;


    public MybatisPlusAutoConfiguration(MybatisPlusProperties properties,
                                        ObjectProvider<Interceptor[]> interceptorsProvider,
                                        ObjectProvider<TypeHandler[]> typeHandlersProvider,
                                        ObjectProvider<LanguageDriver[]> languageDriversProvider,
                                        ResourceLoader resourceLoader,
                                        ObjectProvider<DatabaseIdProvider> databaseIdProvider,
                                        ObjectProvider<List<ConfigurationCustomizer>> configurationCustomizersProvider,
                                        ObjectProvider<List<MybatisPlusPropertiesCustomizer>> mybatisPlusPropertiesCustomizerProvider,
                                        ApplicationContext applicationContext) {
        this.properties = properties;
        this.interceptors = interceptorsProvider.getIfAvailable();
        this.typeHandlers = typeHandlersProvider.getIfAvailable();
        this.languageDrivers = languageDriversProvider.getIfAvailable();
        this.resourceLoader = resourceLoader;
        this.databaseIdProvider = databaseIdProvider.getIfAvailable();
        this.configurationCustomizers = configurationCustomizersProvider.getIfAvailable();
        this.mybatisPlusPropertiesCustomizers = mybatisPlusPropertiesCustomizerProvider.getIfAvailable();
        this.applicationContext = applicationContext;
    }

    @Override
    public void afterPropertiesSet() {
        if (!CollectionUtils.isEmpty(mybatisPlusPropertiesCustomizers)) {
            mybatisPlusPropertiesCustomizers.forEach(i -> i.customize(properties));
        }
        checkConfigFileExists();
    }

    private void checkConfigFileExists() {
        if (this.properties.isCheckConfigLocation() && StringUtils.hasText(this.properties.getConfigLocation())) {
            Resource resource = this.resourceLoader.getResource(this.properties.getConfigLocation());
            Assert.state(resource.exists(),
                "Cannot find config location: " + resource + " (please add config file or check your Mybatis configuration)");
        }
    }

    @SuppressWarnings("SpringJavaInjectionPointsAutowiringInspection")
    @Bean
    @ConditionalOnMissingBean
    public SqlSessionFactory sqlSessionFactory(DataSource dataSource) throws Exception {
        // TODO 使用 MybatisSqlSessionFactoryBean 而不是 SqlSessionFactoryBean
        MybatisSqlSessionFactoryBean factory = new MybatisSqlSessionFactoryBean();
        factory.setDataSource(dataSource);
        factory.setVfs(SpringBootVFS.class);
        if (StringUtils.hasText(this.properties.getConfigLocation())) {
            factory.setConfigLocation(this.resourceLoader.getResource(this.properties.getConfigLocation()));
        }
        applyConfiguration(factory);
        if (this.properties.getConfigurationProperties() != null) {
            factory.setConfigurationProperties(this.properties.getConfigurationProperties());
        }
        if (!ObjectUtils.isEmpty(this.interceptors)) {
            factory.setPlugins(this.interceptors);
        }
        if (this.databaseIdProvider != null) {
            factory.setDatabaseIdProvider(this.databaseIdProvider);
        }
        if (StringUtils.hasLength(this.properties.getTypeAliasesPackage())) {
            factory.setTypeAliasesPackage(this.properties.getTypeAliasesPackage());
        }
        if (this.properties.getTypeAliasesSuperType() != null) {
            factory.setTypeAliasesSuperType(this.properties.getTypeAliasesSuperType());
        }
        if (StringUtils.hasLength(this.properties.getTypeHandlersPackage())) {
            factory.setTypeHandlersPackage(this.properties.getTypeHandlersPackage());
        }
        if (!ObjectUtils.isEmpty(this.typeHandlers)) {
            factory.setTypeHandlers(this.typeHandlers);
        }
        if (!ObjectUtils.isEmpty(this.properties.resolveMapperLocations())) {
            factory.setMapperLocations(this.properties.resolveMapperLocations());
        }

        // TODO 对源码做了一定的修改(因为源码适配了老旧的mybatis版本,但我们不需要适配)
        Class<? extends LanguageDriver> defaultLanguageDriver = this.properties.getDefaultScriptingLanguageDriver();
        if (!ObjectUtils.isEmpty(this.languageDrivers)) {
            factory.setScriptingLanguageDrivers(this.languageDrivers);
        }
        Optional.ofNullable(defaultLanguageDriver).ifPresent(factory::setDefaultScriptingLanguageDriver);

        // TODO 自定义枚举包
        if (StringUtils.hasLength(this.properties.getTypeEnumsPackage())) {
            factory.setTypeEnumsPackage(this.properties.getTypeEnumsPackage());
        }
        // TODO 此处必为非 NULL
        GlobalConfig globalConfig = this.properties.getGlobalConfig();
        // TODO 注入填充器
        if (this.applicationContext.getBeanNamesForType(MetaObjectHandler.class,
            false, false).length > 0) {
            MetaObjectHandler metaObjectHandler = this.applicationContext.getBean(MetaObjectHandler.class);
            globalConfig.setMetaObjectHandler(metaObjectHandler);
        }
        // TODO 注入主键生成器
        if (this.applicationContext.getBeanNamesForType(IKeyGenerator.class, false,
            false).length > 0) {
            IKeyGenerator keyGenerator = this.applicationContext.getBean(IKeyGenerator.class);
            globalConfig.getDbConfig().setKeyGenerator(keyGenerator);
        }
        // TODO 注入sql注入器
        if (this.applicationContext.getBeanNamesForType(ISqlInjector.class, false,
            false).length > 0) {
            ISqlInjector iSqlInjector = this.applicationContext.getBean(ISqlInjector.class);
            globalConfig.setSqlInjector(iSqlInjector);
        }
        // TODO 设置 GlobalConfig 到 MybatisSqlSessionFactoryBean
        factory.setGlobalConfig(globalConfig);
        return factory.getObject();
    }

    // TODO 入参使用 MybatisSqlSessionFactoryBean
    private void applyConfiguration(MybatisSqlSessionFactoryBean factory) {
        // TODO 使用 MybatisConfiguration
        MybatisConfiguration configuration = this.properties.getConfiguration();
        if (configuration == null && !StringUtils.hasText(this.properties.getConfigLocation())) {
            configuration = new MybatisConfiguration();
        }
        if (configuration != null && !CollectionUtils.isEmpty(this.configurationCustomizers)) {
            for (ConfigurationCustomizer customizer : this.configurationCustomizers) {
                customizer.customize(configuration);
            }
        }
        factory.setConfiguration(configuration);
    }

    @Bean
    @ConditionalOnMissingBean
    public SqlSessionTemplate sqlSessionTemplate(SqlSessionFactory sqlSessionFactory) {
        ExecutorType executorType = this.properties.getExecutorType();
        if (executorType != null) {
            return new SqlSessionTemplate(sqlSessionFactory, executorType);
        } else {
            return new SqlSessionTemplate(sqlSessionFactory);
        }
    }

    /**
     * This will just scan the same base package as Spring Boot does. If you want more power, you can explicitly use
     * {@link org.mybatis.spring.annotation.MapperScan} but this will get typed mappers working correctly, out-of-the-box,
     * similar to using Spring Data JPA repositories.
     */
    public static class AutoConfiguredMapperScannerRegistrar implements BeanFactoryAware, ImportBeanDefinitionRegistrar {

        private BeanFactory beanFactory;

        @Override
        public void registerBeanDefinitions(AnnotationMetadata importingClassMetadata, BeanDefinitionRegistry registry) {

            if (!AutoConfigurationPackages.has(this.beanFactory)) {
                logger.debug("Could not determine auto-configuration package, automatic mapper scanning disabled.");
                return;
            }

            logger.debug("Searching for mappers annotated with @Mapper");

            List<String> packages = AutoConfigurationPackages.get(this.beanFactory);
            if (logger.isDebugEnabled()) {
                packages.forEach(pkg -> logger.debug("Using auto-configuration base package '{}'", pkg));
            }

            BeanDefinitionBuilder builder = BeanDefinitionBuilder.genericBeanDefinition(MapperScannerConfigurer.class);
            builder.addPropertyValue("processPropertyPlaceHolders", true);
            builder.addPropertyValue("annotationClass", Mapper.class);
            builder.addPropertyValue("basePackage", StringUtils.collectionToCommaDelimitedString(packages));
            BeanWrapper beanWrapper = new BeanWrapperImpl(MapperScannerConfigurer.class);
            Stream.of(beanWrapper.getPropertyDescriptors())
                // Need to mybatis-spring 2.0.2+
                .filter(x -> x.getName().equals("lazyInitialization")).findAny()
                .ifPresent(x -> builder.addPropertyValue("lazyInitialization", "${mybatis.lazy-initialization:false}"));
            registry.registerBeanDefinition(MapperScannerConfigurer.class.getName(), builder.getBeanDefinition());
        }

        @Override
        public void setBeanFactory(BeanFactory beanFactory) {
            this.beanFactory = beanFactory;
        }
    }

    /**
     * If mapper registering configuration or mapper scanning configuration not present, this configuration allow to scan
     * mappers based on the same component-scanning path as Spring Boot itself.
     */
    @Configuration
    @Import(AutoConfiguredMapperScannerRegistrar.class)
    @ConditionalOnMissingBean({MapperFactoryBean.class, MapperScannerConfigurer.class})
    public static class MapperScannerRegistrarNotFoundConfiguration implements InitializingBean {

        @Override
        public void afterPropertiesSet() {
            logger.debug(
                "Not found configuration for registering mapper bean using @MapperScan, MapperFactoryBean and MapperScannerConfigurer.");
        }
    }
}
看到mp启动类里的sqlSessionFactory方法了吗,他也是一样的注入一个数据源,这时候大家应该都知道解决方法了吧?
没错,就是把被代理过的数据源给放到mp的sqlSessionFactory中.
很简单,我们需要稍微改动一下我们的seata配置类就行了
package org.test.config;

import javax.sql.DataSource;

import org.mybatis.spring.annotation.MapperScan;
import org.slf4j.Logger;
import org.slf4j.LoggerFactory;
import org.springframework.beans.factory.annotation.Autowired;
import org.springframework.boot.autoconfigure.jdbc.DataSourceProperties;
import org.springframework.context.annotation.Bean;
import org.springframework.context.annotation.Configuration;
import org.springframework.context.annotation.Primary;

import com.alibaba.druid.pool.DruidDataSource;

import io.seata.rm.datasource.DataSourceProxy;
import io.seata.spring.annotation.GlobalTransactionScanner;

@Configuration
@MapperScan("com.baomidou.springboot.mapper*")
public class SeataAutoConfig {
    @Autowired(required = true)
    private DataSourceProperties dataSourceProperties;
    private final static Logger logger = LoggerFactory.getLogger(SeataAutoConfig.class);
    private DataSourceProxy dataSourceProxy;

    @Bean(name = "dataSource") // 声明其为Bean实例
    @Primary // 在同样的DataSource中,首先使用被标注的DataSource
    public DataSource druidDataSource() {
        DruidDataSource druidDataSource = new DruidDataSource();
        logger.info("dataSourceProperties.getUrl():{}", dataSourceProperties.getUrl());
        druidDataSource.setUrl(dataSourceProperties.getUrl());
        druidDataSource.setUsername(dataSourceProperties.getUsername());
        druidDataSource.setPassword(dataSourceProperties.getPassword());
        druidDataSource.setDriverClassName(dataSourceProperties.getDriverClassName());
        druidDataSource.setInitialSize(0);
        druidDataSource.setMaxActive(180);
        druidDataSource.setMaxWait(60000);
        druidDataSource.setMinIdle(0);
        druidDataSource.setValidationQuery("Select 1 from DUAL");
        druidDataSource.setTestOnBorrow(false);
        druidDataSource.setTestOnReturn(false);
        druidDataSource.setTestWhileIdle(true);
        druidDataSource.setTimeBetweenEvictionRunsMillis(60000);
        druidDataSource.setMinEvictableIdleTimeMillis(25200000);
        druidDataSource.setRemoveAbandoned(true);
        druidDataSource.setRemoveAbandonedTimeout(1800);
        druidDataSource.setLogAbandoned(true);
        logger.info("装载dataSource........");
        dataSourceProxy = new DataSourceProxy(druidDataSource);
        return dataSourceProxy;
    }

    /**
     * init datasource proxy
     *
     * @Param: druidDataSource datasource bean instance
     * @Return: DataSourceProxy datasource proxy
     */
    @Bean
    public DataSourceProxy dataSourceProxy() {
        logger.info("代理dataSource........");
        return dataSourceProxy;
    }

    /**
     * init global transaction scanner
     *
     * @Return: GlobalTransactionScanner
     */
    @Bean
    public GlobalTransactionScanner globalTransactionScanner() {
        logger.info("配置seata........");
        return new GlobalTransactionScanner("test-service", "test-group");
    }
}
看代码,我们去掉了自己配置的sqlSessionFactory,直接让DataSource bean返回的是一个被代理过的bean,并且我们加入了@Primary,导致mp优先使用我们配置的数据源,这样就解决了mp因为seata代理了数据源跟创建了新的sqlSessionFactory,导致mp的插件,组件失效的bug了!
踩到坑不可怕,主要又耐心的顺着每个组件实现的原理,再去思考,查找对应冲突的代码块,你一定能找到个兼容二者的方法。
本文作者:FUNKYE(陈健斌),杭州某互联网公司主程。
事务:事务是由一组操作构成的可靠的独立的工作单元,事务具备ACID的特性,即原子性、一致性、隔离性和持久性。 分布式事务:当一个操作牵涉到多个服务,多台数据库协力完成时(比如分表分库后,业务拆分),多个服务中,本地的Transaction已经无法应对这个情况了,为了保证数据一致性,就需要用到分布式事务。 Seata :是一款开源的分布式事务解决方案,致力于在微服务架构下提供高性能和简单易用的分布式事务服务。 本文目的:现如今微服务越来越流行,而市面上的分布式事务的方案可谓不少,参差不齐,比较流行的以MQ代表的保证的是消息最终一致性的解决方案(消费确认,消息回查,消息补偿机制等),以及TX-LCN的LCN模式协调本地事务来保证事务统一提交或回滚(已经停止更新,对Dubbo2.7不兼容)。而MQ的分布式事务太过复杂,TX-LCN断更,这时候需要一个高效可靠及易上手的分布式事务解决方案,Seata脱颖而出,本文要介绍的就是如何快速搭建一个整合Seata的Demo项目,一起来吧!
1.首先安装mysql,eclipse之类常用的工具,这不展开了.
2.访问seata下载中心地址我们使用的0.9.0版本
3.下载并解压seata-server
1.首先我�们链接mysql创建一个名为seata的数据库,然后运行一下建表sql,这个在seata-server的conf文件夹内的db_store.sql就是我的所需要使用的sql了.
/*
Navicat MySQL Data Transfer
Source Server         : mysql
Source Server Version : 50721
Source Host           : localhost:3306
Source Database       : seata
Target Server Type    : MYSQL
Target Server Version : 50721
File Encoding         : 65001
Date: 2019-11-23 22:03:18
*/

SET FOREIGN_KEY_CHECKS=0;

-- ----------------------------

-- Table structure for branch_table

-- ----------------------------

DROP TABLE IF EXISTS `branch_table`;
CREATE TABLE `branch_table` (
  `branch_id` bigint(20) NOT NULL,
  `xid` varchar(128) NOT NULL,
  `transaction_id` bigint(20) DEFAULT NULL,
  `resource_group_id` varchar(32) DEFAULT NULL,
  `resource_id` varchar(256) DEFAULT NULL,
  `lock_key` varchar(128) DEFAULT NULL,
  `branch_type` varchar(8) DEFAULT NULL,
  `status` tinyint(4) DEFAULT NULL,
  `client_id` varchar(64) DEFAULT NULL,
  `application_data` varchar(2000) DEFAULT NULL,
  `gmt_create` datetime DEFAULT NULL,
  `gmt_modified` datetime DEFAULT NULL,
  PRIMARY KEY (`branch_id`),
  KEY `idx_xid` (`xid`)
) ENGINE=InnoDB DEFAULT CHARSET=utf8mb4;

-- ----------------------------

-- Records of branch_table

-- ----------------------------

-- ----------------------------

-- Table structure for global_table

-- ----------------------------

DROP TABLE IF EXISTS `global_table`;
CREATE TABLE `global_table` (
  `xid` varchar(128) NOT NULL,
  `transaction_id` bigint(20) DEFAULT NULL,
  `status` tinyint(4) NOT NULL,
  `application_id` varchar(32) DEFAULT NULL,
  `transaction_service_group` varchar(32) DEFAULT NULL,
  `transaction_name` varchar(128) DEFAULT NULL,
  `timeout` int(11) DEFAULT NULL,
  `begin_time` bigint(20) DEFAULT NULL,
  `application_data` varchar(2000) DEFAULT NULL,
  `gmt_create` datetime DEFAULT NULL,
  `gmt_modified` datetime DEFAULT NULL,
  PRIMARY KEY (`xid`),
  KEY `idx_gmt_modified_status` (`gmt_modified`,`status`),
  KEY `idx_transaction_id` (`transaction_id`)
) ENGINE=InnoDB DEFAULT CHARSET=utf8mb4;

-- ----------------------------

-- Records of global_table

-- ----------------------------

-- ----------------------------

-- Table structure for lock_table

-- ----------------------------

DROP TABLE IF EXISTS `lock_table`;
CREATE TABLE `lock_table` (
  `row_key` varchar(128) NOT NULL,
  `xid` varchar(96) DEFAULT NULL,
  `transaction_id` mediumtext,
  `branch_id` mediumtext,
  `resource_id` varchar(256) DEFAULT NULL,
  `table_name` varchar(32) DEFAULT NULL,
  `pk` varchar(36) DEFAULT NULL,
  `gmt_create` datetime DEFAULT NULL,
  `gmt_modified` datetime DEFAULT NULL,
  PRIMARY KEY (`row_key`)
) ENGINE=InnoDB DEFAULT CHARSET=utf8mb4;

-- ----------------------------

-- Records of lock_table

-- ----------------------------

-- ----------------------------

-- Table structure for undo_log

-- ----------------------------

DROP TABLE IF EXISTS `undo_log`;
CREATE TABLE `undo_log` (
  `id` bigint(20) NOT NULL AUTO_INCREMENT,
  `branch_id` bigint(20) NOT NULL,
  `xid` varchar(100) NOT NULL,
  `context` varchar(128) NOT NULL,
  `rollback_info` longblob NOT NULL,
  `log_status` int(11) NOT NULL,
  `log_created` datetime NOT NULL,
  `log_modified` datetime NOT NULL,
  `ext` varchar(100) DEFAULT NULL,
  PRIMARY KEY (`id`),
  UNIQUE KEY `ux_undo_log` (`xid`,`branch_id`)
) ENGINE=InnoDB DEFAULT CHARSET=utf8;

-- ----------------------------

-- Records of undo_log
2.运行完上面的seata所需要的数据库后,我们进行搭建我们所需要写的demo的库,创建一个名为test的数据库,然后执行以下sql代码:
/*
Navicat MySQL Data Transfer
Source Server         : mysql
Source Server Version : 50721
Source Host           : localhost:3306
Source Database       : test
Target Server Type    : MYSQL
Target Server Version : 50721
File Encoding         : 65001
Date: 2019-11-23 22:03:24
*/

SET FOREIGN_KEY_CHECKS=0;

-- ----------------------------

-- Table structure for test

-- ----------------------------

DROP TABLE IF EXISTS `test`;
CREATE TABLE `test` (
  `id` int(11) NOT NULL AUTO_INCREMENT,
  `one` varchar(255) DEFAULT NULL,
  `two` varchar(255) DEFAULT NULL,
  `createTime` datetime DEFAULT NULL,
  PRIMARY KEY (`id`)
) ENGINE=InnoDB AUTO_INCREMENT=4 DEFAULT CHARSET=utf8mb4;

-- ----------------------------

-- Records of test

-- ----------------------------

INSERT INTO `test` VALUES ('1', '1', '2', '2019-11-23 16:07:34');

-- ----------------------------

-- Table structure for undo_log

-- ----------------------------

DROP TABLE IF EXISTS `undo_log`;
CREATE TABLE `undo_log` (
  `id` bigint(20) NOT NULL AUTO_INCREMENT,
  `branch_id` bigint(20) NOT NULL,
  `xid` varchar(100) NOT NULL,
  `context` varchar(128) NOT NULL,
  `rollback_info` longblob NOT NULL,
  `log_status` int(11) NOT NULL,
  `log_created` datetime NOT NULL,
  `log_modified` datetime NOT NULL,
  `ext` varchar(100) DEFAULT NULL,
  PRIMARY KEY (`id`),
  UNIQUE KEY `ux_undo_log` (`xid`,`branch_id`)
) ENGINE=InnoDB AUTO_INCREMENT=3 DEFAULT CHARSET=utf8;

-- ----------------------------

-- Records of undo_log
3.我们找到seata-server/conf 文件夹内的file编辑它: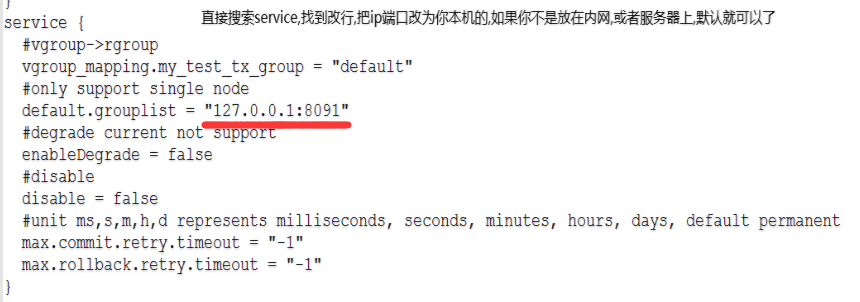
4.再次找到其中的db配置方法块,更改方法如下图: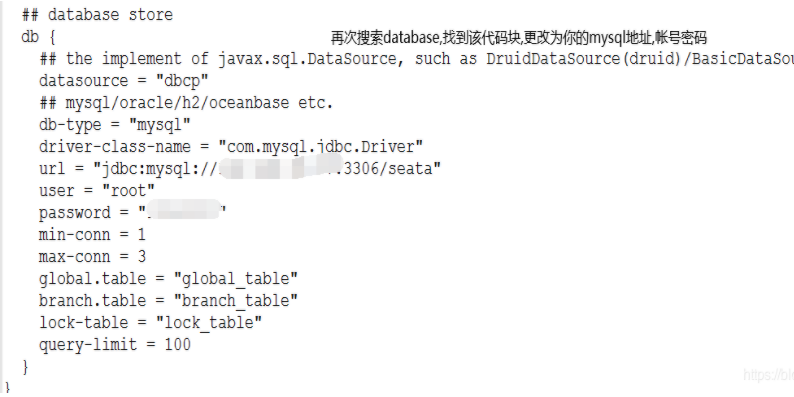
好了,可以到bin目录去./seata-server.bat 运行看看了
首先我们使用的是eclipse,当然你也可以用idea之类的工具,详细请按下面步骤来运行
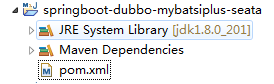
1.创建一个新的maven项目,并删除多余文件夹:
2.打开项目的pom.xml,加入以下依赖:
	<properties>
		<webVersion>3.1</webVersion>
		<project.build.sourceEncoding>UTF-8</project.build.sourceEncoding>
		<project.reporting.outputEncoding>UTF-8</project.reporting.outputEncoding>
		<maven.compiler.source>1.8</maven.compiler.source>
		<maven.compiler.target>1.8</maven.compiler.target>
		<HikariCP.version>3.2.0</HikariCP.version>
		<mybatis-plus-boot-starter.version>3.2.0</mybatis-plus-boot-starter.version>
	</properties>
	<parent>
		<groupId>org.springframework.boot</groupId>
		<artifactId>spring-boot-starter-parent</artifactId>
		<version>2.1.8.RELEASE</version>
	</parent>
	<dependencies>
		<dependency>
			<groupId>org.apache.curator</groupId>
			<artifactId>curator-framework</artifactId>
			<version>4.2.0</version>
		</dependency>
		<dependency>
			<groupId>org.apache.curator</groupId>
			<artifactId>curator-recipes</artifactId>
			<version>4.2.0</version>
		</dependency>
		<dependency>
			<groupId>org.apache.dubbo</groupId>
			<artifactId>dubbo-spring-boot-starter</artifactId>
			<version>2.7.4.1</version>
		</dependency>
		<dependency>
			<groupId>org.apache.commons</groupId>
			<artifactId>commons-lang3</artifactId>
			</dependency>
		<dependency>
			<groupId>com.alibaba</groupId>
			<artifactId>fastjson</artifactId>
			<version>1.2.60</version>
		</dependency>
		<!-- <dependency> <groupId>javax</groupId> <artifactId>javaee-api</artifactId>
			<version>7.0</version> <scope>provided</scope> </dependency> -->
		<dependency>
			<groupId>io.springfox</groupId>
			<artifactId>springfox-swagger2</artifactId>
			<version>2.9.2</version>
		</dependency>
		<dependency>
			<groupId>io.springfox</groupId>
			<artifactId>springfox-swagger-ui</artifactId>
			<version>2.9.2</version>
		</dependency>

		<!-- mybatis-plus begin -->
		<dependency>
			<groupId>com.baomidou</groupId>
			<artifactId>mybatis-plus-boot-starter</artifactId>
			<version>${mybatis-plus-boot-starter.version}</version>
		</dependency>
		<!-- mybatis-plus end -->
		<!-- https://mvnrepository.com/artifact/org.projectlombok/lombok -->
		<dependency>
			<groupId>org.projectlombok</groupId>
			<artifactId>lombok</artifactId>
			<scope>provided</scope>
		</dependency>
		<dependency>
			<groupId>io.seata</groupId>
			<artifactId>seata-all</artifactId>
			<version>0.9.0.1</version>
		</dependency>
		<!-- Zookeeper -->
		<dependency>
			<groupId>org.apache.zookeeper</groupId>
			<artifactId>zookeeper</artifactId>
			<version>3.4.9</version>
			<exclusions>
				<exclusion>
					<groupId>org.slf4j</groupId>
					<artifactId>slf4j-log4j12</artifactId>
				</exclusion>
			</exclusions>
		</dependency>
		<!-- <dependency> <groupId>com.baomidou</groupId> <artifactId>dynamic-datasource-spring-boot-starter</artifactId>
			<version>2.5.4</version> </dependency> -->

		<!-- <dependency> <groupId>com.baomidou</groupId> <artifactId>mybatis-plus-generator</artifactId>
			<version>3.1.0</version> </dependency> -->
		<!-- https://mvnrepository.com/artifact/org.freemarker/freemarker -->
		<dependency>
			<groupId>org.freemarker</groupId>
			<artifactId>freemarker</artifactId>
		</dependency>
		<!-- https://mvnrepository.com/artifact/com.alibaba/druid-spring-boot-starter -->
		<dependency>
			<groupId>com.alibaba</groupId>
			<artifactId>druid-spring-boot-starter</artifactId>
			<version>1.1.20</version>
		</dependency>
		<!-- 加上这个才能辨认到log4j2.yml文件 -->
		<dependency>
			<groupId>com.fasterxml.jackson.dataformat</groupId>
			<artifactId>jackson-dataformat-yaml</artifactId>
		</dependency>
		<dependency> <!-- 引入log4j2依赖 -->
			<groupId>org.springframework.boot</groupId>
			<artifactId>spring-boot-starter-log4j2</artifactId>
		</dependency>
		<!-- https://mvnrepository.com/artifact/mysql/mysql-connector-java -->
		<dependency>
			<groupId>mysql</groupId>
			<artifactId>mysql-connector-java</artifactId>
		</dependency>
		<dependency>
			<groupId>org.springframework.boot</groupId>
			<artifactId>spring-boot-starter-web</artifactId>
			<exclusions>
				<exclusion>
					<groupId>org.springframework.boot</groupId>
					<artifactId>spring-boot-starter-logging</artifactId>
				</exclusion>
				<exclusion>
					<groupId>org.slf4j</groupId>
					<artifactId>slf4j-log4j12</artifactId>
				</exclusion>
			</exclusions>
		</dependency>
		<dependency>
			<groupId>org.springframework.boot</groupId>
			<artifactId>spring-boot-starter-aop</artifactId>
		</dependency>
		<dependency>
			<groupId>org.springframework.boot</groupId>
			<artifactId>spring-boot-starter-test</artifactId>
			<scope>test</scope>
		</dependency>
		<!-- <dependency> <groupId>org.scala-lang</groupId> <artifactId>scala-library</artifactId>
			<version>2.11.0</version> </dependency> -->
		<dependency>
			<groupId>org.springframework.boot</groupId>
			<artifactId>spring-boot-configuration-processor</artifactId>
			<optional>true</optional>
		</dependency>
	</dependencies>
3.再切换父项目为pom模式,还是pom文件,切换为 overview ,做如图操作: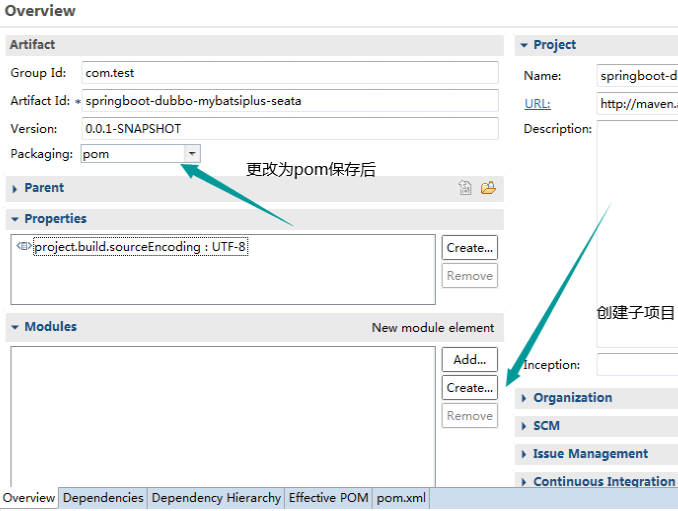
4.创建我们的demo子项目,test-service: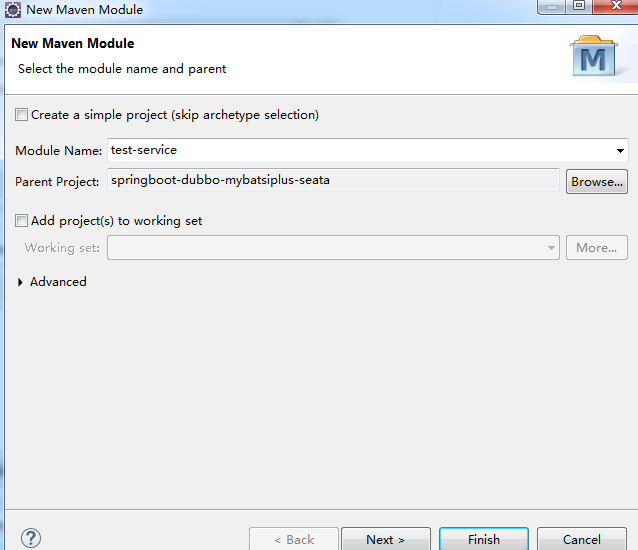
目录如下:
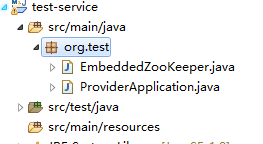
创建EmbeddedZooKeeper.java文件,跟 ProviderApplication.java,代码如下:
package org.test;

import java.io.File;
import java.lang.reflect.Method;
import java.util.Properties;
import java.util.UUID;

import org.apache.zookeeper.server.ServerConfig;
import org.apache.zookeeper.server.ZooKeeperServerMain;
import org.apache.zookeeper.server.quorum.QuorumPeerConfig;
import org.slf4j.Logger;
import org.slf4j.LoggerFactory;
import org.springframework.context.SmartLifecycle;
import org.springframework.util.ErrorHandler;
import org.springframework.util.SocketUtils;

/**
 * from:
 * https://github.com/spring-projects/spring-xd/blob/v1.3.1.RELEASE/spring-xd-dirt/src/main/java/org/springframework/xd/dirt/zookeeper/ZooKeeperUtils.java
 *
 * Helper class to start an embedded instance of standalone (non clustered) ZooKeeper.
 *
 * NOTE: at least an external standalone server (if not an ensemble) are recommended, even for
 * {@link org.springframework.xd.dirt.server.singlenode.SingleNodeApplication}
 *
 * @author Patrick Peralta
 * @author Mark Fisher
 * @author David Turanski
 */
public class EmbeddedZooKeeper implements SmartLifecycle {

    /**
     * Logger.
     */
    private static final Logger logger = LoggerFactory.getLogger(EmbeddedZooKeeper.class);

    /**
     * ZooKeeper client port. This will be determined dynamically upon startup.
     */
    private final int clientPort;

    /**
     * Whether to auto-start. Default is true.
     */
    private boolean autoStartup = true;

    /**
     * Lifecycle phase. Default is 0.
     */
    private int phase = 0;

    /**
     * Thread for running the ZooKeeper server.
     */
    private volatile Thread zkServerThread;

    /**
     * ZooKeeper server.
     */
    private volatile ZooKeeperServerMain zkServer;

    /**
     * {@link ErrorHandler} to be invoked if an Exception is thrown from the ZooKeeper server thread.
     */
    private ErrorHandler errorHandler;

    private boolean daemon = true;

    /**
     * Construct an EmbeddedZooKeeper with a random port.
     */
    public EmbeddedZooKeeper() {
        clientPort = SocketUtils.findAvailableTcpPort();
    }

    /**
     * Construct an EmbeddedZooKeeper with the provided port.
     *
     * @param clientPort
     *            port for ZooKeeper server to bind to
     */
    public EmbeddedZooKeeper(int clientPort, boolean daemon) {
        this.clientPort = clientPort;
        this.daemon = daemon;
    }

    /**
     * Returns the port that clients should use to connect to this embedded server.
     *
     * @return dynamically determined client port
     */
    public int getClientPort() {
        return this.clientPort;
    }

    /**
     * Specify whether to start automatically. Default is true.
     *
     * @param autoStartup
     *            whether to start automatically
     */
    public void setAutoStartup(boolean autoStartup) {
        this.autoStartup = autoStartup;
    }

    /**
     * {@inheritDoc}
     */
    public boolean isAutoStartup() {
        return this.autoStartup;
    }

    /**
     * Specify the lifecycle phase for the embedded server.
     *
     * @param phase
     *            the lifecycle phase
     */
    public void setPhase(int phase) {
        this.phase = phase;
    }

    /**
     * {@inheritDoc}
     */
    public int getPhase() {
        return this.phase;
    }

    /**
     * {@inheritDoc}
     */
    public boolean isRunning() {
        return (zkServerThread != null);
    }

    /**
     * Start the ZooKeeper server in a background thread.
     * <p>
     * Register an error handler via {@link #setErrorHandler} in order to handle any exceptions thrown during startup or
     * execution.
     */
    public synchronized void start() {
        if (zkServerThread == null) {
            zkServerThread = new Thread(new ServerRunnable(), "ZooKeeper Server Starter");
            zkServerThread.setDaemon(daemon);
            zkServerThread.start();
        }
    }

    /**
     * Shutdown the ZooKeeper server.
     */
    public synchronized void stop() {
        if (zkServerThread != null) {
            // The shutdown method is protected...thus this hack to invoke it.
            // This will log an exception on shutdown; see
            // https://issues.apache.org/jira/browse/ZOOKEEPER-1873 for details.
            try {
                Method shutdown = ZooKeeperServerMain.class.getDeclaredMethod("shutdown");
                shutdown.setAccessible(true);
                shutdown.invoke(zkServer);
            }

            catch (Exception e) {
                throw new RuntimeException(e);
            }

            // It is expected that the thread will exit after
            // the server is shutdown; this will block until
            // the shutdown is complete.
            try {
                zkServerThread.join(5000);
                zkServerThread = null;
            } catch (InterruptedException e) {
                Thread.currentThread().interrupt();
                logger.warn("Interrupted while waiting for embedded ZooKeeper to exit");
                // abandoning zk thread
                zkServerThread = null;
            }
        }
    }

    /**
     * Stop the server if running and invoke the callback when complete.
     */
    public void stop(Runnable callback) {
        stop();
        callback.run();
    }

    /**
     * Provide an {@link ErrorHandler} to be invoked if an Exception is thrown from the ZooKeeper server thread. If none
     * is provided, only error-level logging will occur.
     *
     * @param errorHandler
     *            the {@link ErrorHandler} to be invoked
     */
    public void setErrorHandler(ErrorHandler errorHandler) {
        this.errorHandler = errorHandler;
    }

    /**
     * Runnable implementation that starts the ZooKeeper server.
     */
    private class ServerRunnable implements Runnable {

        public void run() {
            try {
                Properties properties = new Properties();
                File file = new File(System.getProperty("java.io.tmpdir") + File.separator + UUID.randomUUID());
                file.deleteOnExit();
                properties.setProperty("dataDir", file.getAbsolutePath());
                properties.setProperty("clientPort", String.valueOf(clientPort));

                QuorumPeerConfig quorumPeerConfig = new QuorumPeerConfig();
                quorumPeerConfig.parseProperties(properties);

                zkServer = new ZooKeeperServerMain();
                ServerConfig configuration = new ServerConfig();
                configuration.readFrom(quorumPeerConfig);

                zkServer.runFromConfig(configuration);
            } catch (Exception e) {
                if (errorHandler != null) {
                    errorHandler.handleError(e);
                } else {
                    logger.error("Exception running embedded ZooKeeper", e);
                }
            }
        }
    }

}
package org.test;

import org.apache.dubbo.config.spring.context.annotation.DubboComponentScan;
import org.springframework.boot.SpringApplication;
import org.springframework.boot.autoconfigure.SpringBootApplication;
import org.springframework.context.annotation.ComponentScan;
import org.springframework.transaction.annotation.EnableTransactionManagement;

/**
 *
 * @author cjb
 * @date 2019/10/24
 */
@EnableTransactionManagement
@ComponentScan(basePackages = {"org.test.config", "org.test.service.impl"})
@DubboComponentScan(basePackages = "org.test.service.impl")
@SpringBootApplication
public class ProviderApplication {

    public static void main(String[] args) {
        new EmbeddedZooKeeper(2181, false).start();
        SpringApplication app = new SpringApplication(ProviderApplication.class);
        app.run(args);
    }

}
创建实体包 org.test.entity以及创建实体类Test 用到了lombok,详细百度一下,eclipse装lombok插件
package org.test.entity;

import java.io.Serializable;
import java.time.LocalDateTime;

import com.baomidou.mybatisplus.annotation.IdType;
import com.baomidou.mybatisplus.annotation.TableField;
import com.baomidou.mybatisplus.annotation.TableId;

import io.swagger.annotations.ApiModel;
import io.swagger.annotations.ApiModelProperty;
import lombok.Data;
import lombok.EqualsAndHashCode;
import lombok.experimental.Accessors;

/**
 * <p>
 * 功能
 * </p>
 *
 * @author Funkye
 * @since 2019-04-23
 */
@Data
@EqualsAndHashCode(callSuper = false)
@Accessors(chain = true)
@ApiModel(value = "test对象", description = "功能")
public class Test implements Serializable {

    private static final long serialVersionUID = 1L;

    @ApiModelProperty(value = "主键")
    @TableId(value = "id", type = IdType.AUTO)
    private Integer id;

    @ApiModelProperty(value = "one")
    @TableField("one")
    private String one;

    @ApiModelProperty(value = "two")
    @TableField("two")
    private String two;

    @ApiModelProperty(value = "createTime")
    @TableField("createTime")
    private LocalDateTime createTime;

}
创建service,service.impl,mapper等包,依次创建ITestservice,以及实现类,mapper
package org.test.service;

import org.test.entity.Test;

import com.baomidou.mybatisplus.extension.service.IService;

/**
 * <p>
 * 功能 服务类
 * </p>
 *
 * @author Funkye
 * @since 2019-04-10
 */
public interface ITestService extends IService<Test> {

}
package org.test.service.impl;


import org.apache.dubbo.config.annotation.Service;
import org.test.entity.Test;
import org.test.mapper.TestMapper;
import org.test.service.ITestService;

import com.baomidou.mybatisplus.extension.service.impl.ServiceImpl;

@Service(version = "1.0.0",interfaceClass =ITestService.class )
public class TestServiceImpl extends ServiceImpl<TestMapper, Test> implements ITestService {

}
package org.test.mapper;

import org.test.entity.Test;

import com.baomidou.mybatisplus.core.mapper.BaseMapper;

/**
 * <p>
 * 功能 Mapper 接口
 * </p>
 *
 * @author Funkye
 * @since 2019-04-10
 */
public interface TestMapper extends BaseMapper<Test> {

}
创建org.test.config包,创建SeataAutoConfig.java,配置信息都在此处,主要作用为代理数据,连接事务服务分组
package org.test.config;

import javax.sql.DataSource;

import org.slf4j.Logger;
import org.slf4j.LoggerFactory;
import org.springframework.beans.factory.annotation.Autowired;
import org.springframework.beans.factory.annotation.Qualifier;
import org.springframework.boot.autoconfigure.jdbc.DataSourceProperties;
import org.springframework.context.annotation.Bean;
import org.springframework.context.annotation.Configuration;
import org.springframework.context.annotation.Primary;

import com.alibaba.druid.pool.DruidDataSource;

import io.seata.rm.datasource.DataSourceProxy;
import io.seata.spring.annotation.GlobalTransactionScanner;

@Configuration
public class SeataAutoConfig {
	@Autowired(required = true)
	private DataSourceProperties dataSourceProperties;
	private final static Logger logger = LoggerFactory.getLogger(SeataAutoConfig.class);

	@Bean(name = "druidDataSource") // 声明其为Bean实例
	public DataSource druidDataSource() {
		DruidDataSource druidDataSource = new DruidDataSource();
		logger.info("dataSourceProperties.getUrl():{}", dataSourceProperties.getUrl());
		druidDataSource.setUrl(dataSourceProperties.getUrl());
		druidDataSource.setUsername(dataSourceProperties.getUsername());
		druidDataSource.setPassword(dataSourceProperties.getPassword());
		druidDataSource.setDriverClassName(dataSourceProperties.getDriverClassName());
		druidDataSource.setInitialSize(0);
		druidDataSource.setMaxActive(180);
		druidDataSource.setMaxWait(60000);
		druidDataSource.setMinIdle(0);
		druidDataSource.setValidationQuery("Select 1 from DUAL");
		druidDataSource.setTestOnBorrow(false);
		druidDataSource.setTestOnReturn(false);
		druidDataSource.setTestWhileIdle(true);
		druidDataSource.setTimeBetweenEvictionRunsMillis(60000);
		druidDataSource.setMinEvictableIdleTimeMillis(25200000);
		druidDataSource.setRemoveAbandoned(true);
		druidDataSource.setRemoveAbandonedTimeout(1800);
		druidDataSource.setLogAbandoned(true);
		logger.info("装载dataSource........");
		return druidDataSource;
	}

	/**
	 * init datasource proxy
	 *
	 * @Param: druidDataSource datasource bean instance
	 * @Return: DataSourceProxy datasource proxy
	 */
	@Bean(name = "dataSource")
	@Primary // 在同样的DataSource中,首先使用被标注的DataSource
	public DataSourceProxy dataSourceProxy(@Qualifier(value = "druidDataSource") DruidDataSource druidDataSource) {
		logger.info("代理dataSource........");
		return new DataSourceProxy(druidDataSource);
	}

	/**
	 * init global transaction scanner
	 *
	 * @Return: GlobalTransactionScanner
	 */
	@Bean
	public GlobalTransactionScanner globalTransactionScanner() {
		logger.info("配置seata........");
		return new GlobalTransactionScanner("test-service", "test-group");
	}
}
再创建mybatisplus所需的配置文件MybatisPlusConfig
package org.test.config;

import java.util.ArrayList;
import java.util.List;

import org.mybatis.spring.mapper.MapperScannerConfigurer;
import org.springframework.context.annotation.Bean;
import org.springframework.context.annotation.Configuration;

import com.baomidou.mybatisplus.core.parser.ISqlParser;
import com.baomidou.mybatisplus.extension.parsers.BlockAttackSqlParser;
import com.baomidou.mybatisplus.extension.plugins.PaginationInterceptor;

@Configuration
// @MapperScan("com.baomidou.springboot.mapper*")//这个注解,作用相当于下面的@Bean
// MapperScannerConfigurer,2者配置1份即可
public class MybatisPlusConfig {

    /**
     * mybatis-plus分页插件<br>
     * 文档:http://mp.baomidou.com<br>
     */
    @Bean
    public PaginationInterceptor paginationInterceptor() {
        PaginationInterceptor paginationInterceptor = new PaginationInterceptor();
        List<ISqlParser> sqlParserList = new ArrayList<ISqlParser>();
        // 攻击 SQL 阻断解析器、加入解析链
        sqlParserList.add(new BlockAttackSqlParser());
        paginationInterceptor.setSqlParserList(sqlParserList);
        return paginationInterceptor;
    }

    /**
     * 相当于顶部的: {@code @MapperScan("com.baomidou.springboot.mapper*")} 这里可以扩展,比如使用配置文件来配置扫描Mapper的路径
     */

    @Bean
    public MapperScannerConfigurer mapperScannerConfigurer() {
        MapperScannerConfigurer scannerConfigurer = new MapperScannerConfigurer();
        scannerConfigurer.setBasePackage("org.test.mapper");
        return scannerConfigurer;
    }

}
再创建resources目录,创建mapper文件夹,application.yml等文�件
server:
  port: 38888
spring:
  application:
      name: test-service
  datasource:
    type: com.alibaba.druid.pool.DruidDataSource
    url: jdbc:mysql://127.0.0.1:3306/test?useUnicode=true&characterEncoding=UTF-8&serverTimezone=UTC
    driver-class-name: com.mysql.cj.jdbc.Driver
    username: root
    password: 123456
dubbo:
  protocol:
    loadbalance: leastactive
    threadpool: cached
  scan:
    base-packages: org。test.service
  application:
    qos-enable: false
    name: testserver
  registry:
    id: my-registry
    address:  zookeeper://127.0.0.1:2181?client=curator
mybatis-plus:
  mapper-locations: classpath:/mapper/*Mapper.xml
  typeAliasesPackage: org.test.entity
  global-config:
    db-config:
      field-strategy: not-empty
      id-type: auto
      db-type: mysql
  configuration:
    map-underscore-to-camel-case: true
    cache-enabled: true
    auto-mapping-unknown-column-behavior: none
创建file.conf,此处的service 内的vgroup_mapping.你的事务分组,比如上面SeataAutoConfig内配置了test-group,那么这里也要改为test-group,然后下面ip端口都是seata运行的ip跟端口就行了
transport {
  type = "TCP"
  server = "NIO"
  heartbeat = true
  thread-factory {
    boss-thread-prefix = "NettyBoss"
    worker-thread-prefix = "NettyServerNIOWorker"
    server-executor-thread-prefix = "NettyServerBizHandler"
    share-boss-worker = false
    client-selector-thread-prefix = "NettyClientSelector"
    client-selector-thread-size = 1
    client-worker-thread-prefix = "NettyClientWorkerThread"
    boss-thread-size = 1
    worker-thread-size = 8
  }
  shutdown {
    wait = 3
  }
  serialization = "seata"
  compressor = "none"
}
service {
  vgroup_mapping.test-group = "default"
  default.grouplist = "127.0.0.1:8091"
  enableDegrade = false
  disable = false
  max.commit.retry.timeout = "-1"
  max.rollback.retry.timeout = "-1"
}

client {
  async.commit.buffer.limit = 10000
  lock {
    retry.internal = 10
    retry.times = 30
  }
  report.retry.count = 5
  tm.commit.retry.count = 1
  tm.rollback.retry.count = 1
  undo.log.table = "undo_log"
}

recovery {
  committing-retry-period = 1000
  asyn-committing-retry-period = 1000
  rollbacking-retry-period = 1000
  timeout-retry-period = 1000
}

transaction {
  undo.data.validation = true
  undo.log.serialization = "jackson"
  undo.log.save.days = 7
  undo.log.delete.period = 86400000
  undo.log.table = "undo_log"
}

metrics {
  enabled = false
  registry-type = "compact"
  exporter-list = "prometheus"
  exporter-prometheus-port = 9898
}

support {
  spring {
    datasource.autoproxy = false
  }
}
创建registry.conf,来指定file,zk的ip端口之类的配置
registry {
  type = "file"
  file {
    name = "file.conf"
  }
}
config {
  type = "file"
  file {
    name = "file.conf"
  }
  zk {
    serverAddr = "127.0.0.1:2181"
    session.timeout = 6000
    connect.timeout = 2000
  }
}
大功告成,可以直接运行啦,这时候观察seata-server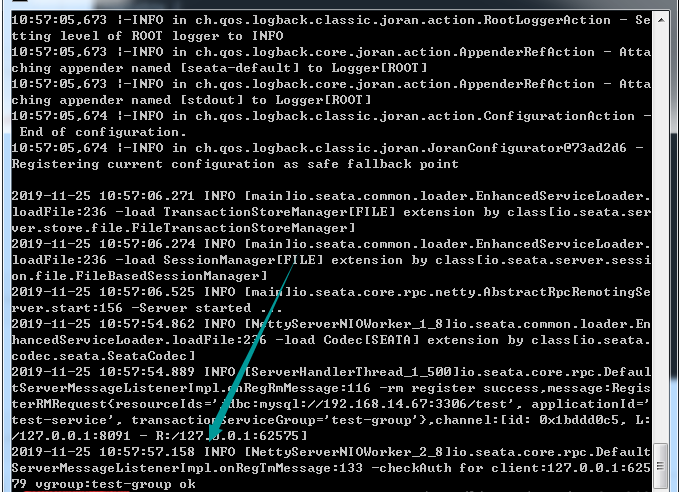
接下来我们创建test-client项目项目,这里就不赘述了,跟上面的test-service一样的创建方式
接下来我们复制test-service内的service跟实体过去,当然你嫌麻烦,可以单独搞个子项目放通用的service跟实体,一些工具类等等,我这边为了快速搭建这个demo,就选择复制黏贴的方式了.
目录结构: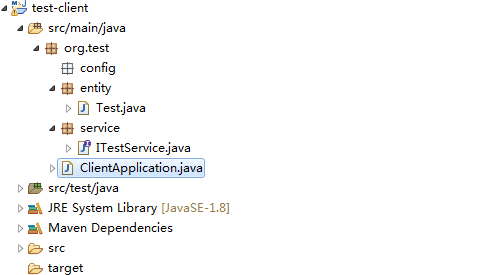
然后我们创建ClientApplication:
package org.test;

import java.util.TimeZone;
import java.util.concurrent.Executor;

import org.apache.dubbo.config.spring.context.annotation.EnableDubbo;
import org.springframework.boot.SpringApplication;
import org.springframework.boot.autoconfigure.SpringBootApplication;
import org.springframework.boot.autoconfigure.jdbc.DataSourceAutoConfiguration;
import org.springframework.context.annotation.Bean;
import org.springframework.context.annotation.ComponentScan;
import org.springframework.context.annotation.Configuration;
import org.springframework.scheduling.annotation.EnableAsync;
import org.springframework.scheduling.annotation.EnableScheduling;
import org.springframework.scheduling.concurrent.ThreadPoolTaskExecutor;

import com.baomidou.mybatisplus.autoconfigure.MybatisPlusAutoConfiguration;

@SpringBootApplication(exclude = {DataSourceAutoConfiguration.class, MybatisPlusAutoConfiguration.class})
@EnableScheduling
@EnableAsync
@Configuration
@EnableDubbo(scanBasePackages = {"org.test.service"})
@ComponentScan(basePackages = {"org.test.service", "org.test.controller", "org.test.config"})
public class ClientApplication {
    public static void main(String[] args) {
        TimeZone.setDefault(TimeZone.getTimeZone("Asia/Shanghai"));
        SpringApplication app = new SpringApplication(ClientApplication.class);
        app.run(args);
    }

    @Bean(name = "threadPoolTaskExecutor")
    public Executor threadPoolTaskExecutor() {
        return new ThreadPoolTaskExecutor();
    }
}
再到config包内创建SwaggerConfig :
package org.test.config;

import java.util.ArrayList;
import java.util.List;

import org.springframework.context.annotation.Bean;
import org.springframework.context.annotation.Configuration;

import springfox.documentation.builders.ApiInfoBuilder;
import springfox.documentation.builders.PathSelectors;
import springfox.documentation.builders.RequestHandlerSelectors;
import springfox.documentation.service.ApiInfo;
import springfox.documentation.service.Contact;
import springfox.documentation.service.Parameter;
import springfox.documentation.spi.DocumentationType;
import springfox.documentation.spring.web.plugins.Docket;
import springfox.documentation.swagger2.annotations.EnableSwagger2;

@Configuration
@EnableSwagger2
public class SwaggerConfig {
    // swagger2的配置文件,这里可以配置swagger2的一些基本的内容,比如扫描的包等等
    @Bean
    public Docket createRestApi() {
        List<Parameter> pars = new ArrayList<Parameter>();
        return new Docket(DocumentationType.SWAGGER_2).apiInfo(apiInfo()).select()
            // 为当前包路径
            .apis(RequestHandlerSelectors.basePackage("org.test.controller")).paths(PathSelectors.any()).build()
            .globalOperationParameters(pars);
    }

    // 构建 api文档的详细信息函数,注意这里的注解引用的是哪个
    private ApiInfo apiInfo() {
        return new ApiInfoBuilder()
            // 页面标题
            .title("项目接口")
            // 创建人
            .contact(new Contact("FUNKYE", "", ""))
            // 版本号
            .version("1.0")
            // 描述
            .description("API 描述").build();
    }
}
再创建SpringMvcConfigure,再里面放入seata的配置,我为了偷懒直接集成在mvc配置的类里了,大家规范点可以另外创建个配置seata的类,大家可以发现下面还是有个组名称,我把两个项目都分配到一个组去,貌似另外取一个也没事的.
package org.test.config;

import java.nio.charset.Charset;
import java.util.ArrayList;
import java.util.List;
import java.util.Map;

import org.apache.dubbo.config.annotation.Reference;
import org.springframework.boot.web.servlet.FilterRegistrationBean;
import org.springframework.context.annotation.Bean;
import org.springframework.context.annotation.Configuration;
import org.springframework.core.Ordered;
import org.springframework.http.MediaType;
import org.springframework.http.converter.HttpMessageConverter;
import org.springframework.http.converter.StringHttpMessageConverter;
import org.springframework.web.cors.CorsConfiguration;
import org.springframework.web.cors.UrlBasedCorsConfigurationSource;
import org.springframework.web.filter.CorsFilter;
import org.springframework.web.servlet.HandlerInterceptor;
import org.springframework.web.servlet.config.annotation.InterceptorRegistry;
import org.springframework.web.servlet.config.annotation.WebMvcConfigurer;
import org.springframework.web.servlet.view.InternalResourceViewResolver;

import com.alibaba.fastjson.serializer.SerializerFeature;
import com.alibaba.fastjson.support.config.FastJsonConfig;
import com.alibaba.fastjson.support.spring.FastJsonHttpMessageConverter;
import com.google.common.collect.Maps;

import io.seata.spring.annotation.GlobalTransactionScanner;

@Configuration
public class SpringMvcConfigure implements WebMvcConfigurer {

    @Bean
    public FilterRegistrationBean corsFilter() {
        UrlBasedCorsConfigurationSource source = new UrlBasedCorsConfigurationSource();
        CorsConfiguration config = new CorsConfiguration();
        config.setAllowCredentials(true);
        config.addAllowedOrigin("*");
        config.addAllowedHeader(CorsConfiguration.ALL);
        config.addAllowedMethod(CorsConfiguration.ALL);
        source.registerCorsConfiguration("/**", config);
        FilterRegistrationBean filterRegistrationBean = new FilterRegistrationBean(new CorsFilter(source));
        filterRegistrationBean.setOrder(Ordered.HIGHEST_PRECEDENCE);
        filterRegistrationBean.setOrder(1);
        filterRegistrationBean.setEnabled(true);
        filterRegistrationBean.addUrlPatterns("/**");
        Map<String, String> initParameters = Maps.newHashMap();
        initParameters.put("excludes", "/favicon.ico,/img/*,/js/*,/css/*");
        initParameters.put("isIncludeRichText", "true");
        filterRegistrationBean.setInitParameters(initParameters);
        return filterRegistrationBean;
    }

    @Bean
    public InternalResourceViewResolver viewResolver() {
        InternalResourceViewResolver viewResolver = new InternalResourceViewResolver();
        viewResolver.setPrefix("/WEB-INF/jsp/");
        viewResolver.setSuffix(".jsp");
        // viewResolver.setViewClass(JstlView.class);
        // 这个属性通常并不需要手动配置,高版本的Spring会自动检测
        return viewResolver;
    }


    /**
     * 替换框架json为fastjson
     */
    @Override
    public void configureMessageConverters(List<HttpMessageConverter<?>> converters) {
        FastJsonHttpMessageConverter fastConverter = new FastJsonHttpMessageConverter();
        FastJsonConfig fastJsonConfig = new FastJsonConfig();
        fastJsonConfig.setSerializerFeatures(SerializerFeature.PrettyFormat, SerializerFeature.WriteMapNullValue,
            SerializerFeature.WriteNullStringAsEmpty, SerializerFeature.DisableCircularReferenceDetect);
        // 处理中文乱码问题
        List<MediaType> fastMediaTypes = new ArrayList<>();
        fastMediaTypes.add(MediaType.APPLICATION_JSON_UTF8);
        fastConverter.setSupportedMediaTypes(fastMediaTypes);
        fastConverter.setFastJsonConfig(fastJsonConfig);
        // 处理字符串, 避免直接返回字符串的时候被添加了引号
        StringHttpMessageConverter smc = new StringHttpMessageConverter(Charset.forName("UTF-8"));
        converters.add(smc);
        converters.add(fastConverter);
    }

    @Bean
    public GlobalTransactionScanner globalTransactionScanner() {
        return new GlobalTransactionScanner("test-client", "test-group");
    }

}
再创建controller包,再包下创建TestController :
package org.test.controller;

import org.slf4j.Logger;
import org.slf4j.LoggerFactory;
import org.springframework.beans.factory.annotation.Autowired;
import org.springframework.context.annotation.Lazy;
import org.springframework.web.bind.annotation.GetMapping;
import org.springframework.web.bind.annotation.RequestMapping;
import org.springframework.web.bind.annotation.RestController;
import org.test.service.DemoService;

import io.swagger.annotations.Api;
import io.swagger.annotations.ApiOperation;

/**
 * <p>
 * 文件表 前端控制器
 * </p>
 *
 * @author funkye
 * @since 2019-03-20
 */
@RestController
@RequestMapping("/test")
@Api(tags = "测试接口")
public class TestController {

    private final static Logger logger = LoggerFactory.getLogger(TestController.class);
    @Autowired
    @Lazy
    DemoService demoService;

    @GetMapping(value = "testSeataOne")
    @ApiOperation(value = "测试手动回滚分布式事务接口")
    public Object testSeataOne() {
        return demoService.One();
    }

    @GetMapping(value = "testSeataTwo")
    @ApiOperation(value = "测试异常回滚分布式事务接口")
    public Object testSeataTwo() {
        return demoService.Two();
    }

}
再到service去创建需要依赖的DemoService
package org.test.service;

import java.time.LocalDateTime;

import org.apache.dubbo.config.annotation.Reference;
import org.slf4j.Logger;
import org.slf4j.LoggerFactory;
import org.springframework.stereotype.Service;
import org.test.controller.TestController;
import org.test.entity.Test;

import io.seata.core.context.RootContext;
import io.seata.core.exception.TransactionException;
import io.seata.spring.annotation.GlobalTransactional;
import io.seata.tm.api.GlobalTransactionContext;

@Service
public class DemoService {
	@Reference(version = "1.0.0", timeout = 60000)
	private ITestService testService;
	private final static Logger logger = LoggerFactory.getLogger(DemoService.class);

	/**
	 * 手动回滚示例
	 *
	 * @return
	 */
	@GlobalTransactional
	public Object One() {
		logger.info("seata分布式事务Id:{}", RootContext.getXID());
		Test t = new Test();
		t.setOne("1");
		t.setTwo("2");
		t.setCreateTime(LocalDateTime.now());
		testService.save(t);
		try {
			int i = 1 / 0;
			return true;
		} catch (Exception e) {
			// TODO: handle exception
			try {
				logger.info("载入事务id进行回滚");
				GlobalTransactionContext.reload(RootContext.getXID()).rollback();
			} catch (TransactionException e1) {
				// TODO Auto-generated catch block
				e1.printStackTrace();
			}
		}
		return false;
	}

	/**
	 * 抛出异常进行回滚示例
	 *
	 * @return
	 */
	@GlobalTransactional
	public Object Two() {
		logger.info("seata分布式事务Id:{}", RootContext.getXID());
		Test t = new Test();
		t.setOne("1");
		t.setTwo("2");
		t.setCreateTime(LocalDateTime.now());
		testService.save(t);
		try {
			int i = 1 / 0;
			return true;
		} catch (Exception e) {
			// TODO: handle exception
			throw new RuntimeException();
		}
	}
}
一样创建resources文件夹,先创建常用的application.yml
spring:
  application:
     name: test
  datasource:
     driver-class-name: com.mysql.cj.jdbc.Driver
     url: jdbc:mysql://127.0.0.1:3306/test?userSSL=true&useUnicode=true&characterEncoding=UTF8&serverTimezone=Asia/Shanghai
     username: root
     password: 123456
  mvc:
    servlet:
      load-on-startup: 1
  http:
    encoding:
            force: true
            charset: utf-8
            enabled: true
    multipart:
      max-file-size: 10MB
      max-request-size: 10MB
dubbo:
  registry:
    id: my-registry
    address:  zookeeper://127.0.0.1:2181?client=curator
#    address:  zookeeper://127.0.0.1:2181?client=curator
  application:
    name: dubbo-demo-client
    qos-enable: false
server:
  port: 28888
  max-http-header-size: 8192
  address: 0.0.0.0
  tomcat:
    max-http-post-size: 104857600
再把之前service配置好的file跟registry文件复制来,如果你的client组名称再配置类里修改了,那么这里的file文件内的组名称一样需要更改.
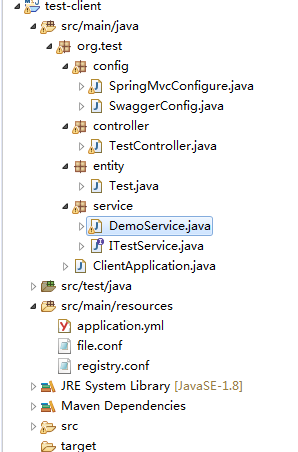
完整的目录结构如上,这时候可以启动test-service后,再启动test-client,到swagger里测试咯
4.访问127.0.0.1:28888/swagger-ui.html做最后的收尾 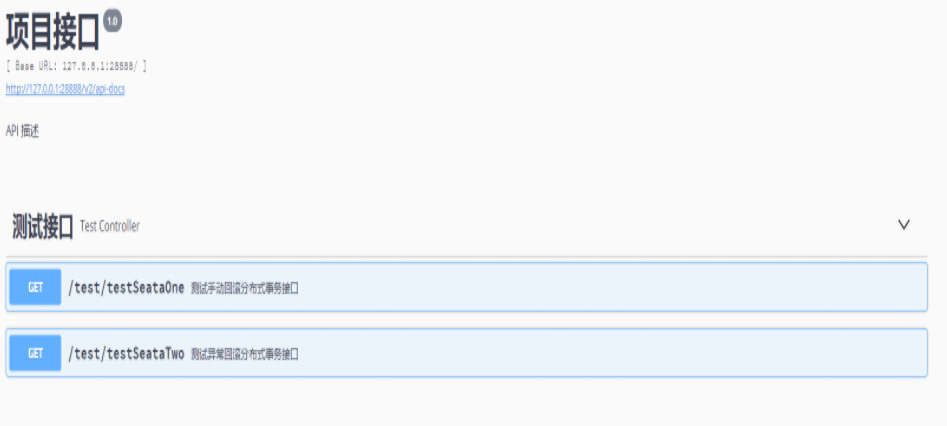

这里数据我已经存了一条记录了,我们看看会不会成功回滚:
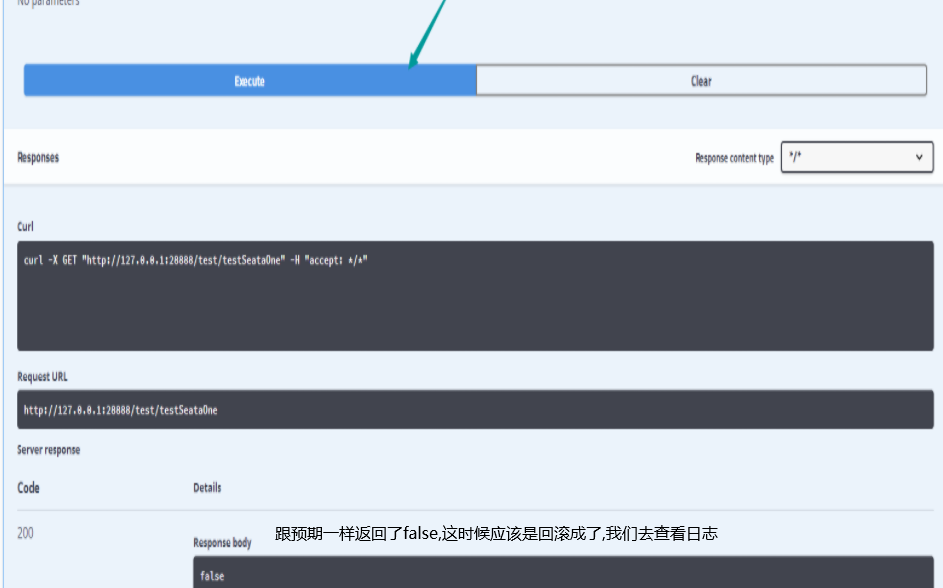
刷新数据库,发现还是只有一条数据:
再查看日志:

显示已经回滚,我们再看看seata-server的日志:
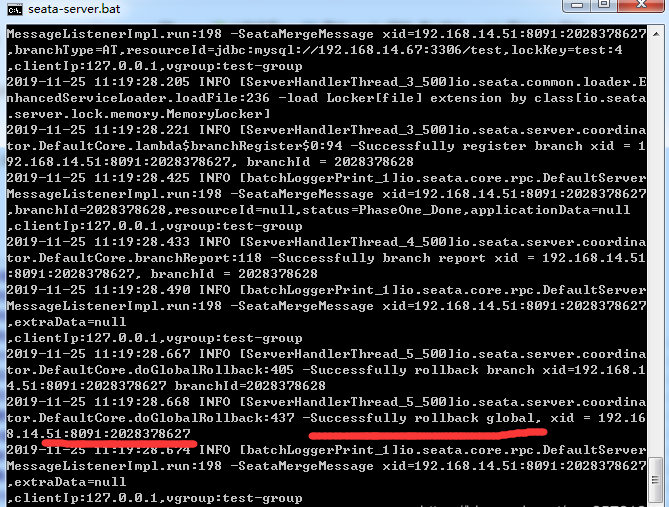
显示回滚成功,事务id也是一致的,这下我们的分布式事务就跑通咯,通过打断点方式,大家可以查看undo_log,会发现再事务提交前,会存入一条事务信息的数据,如果回滚成功,该信息就会被删除.
seata的整合还是比较简单易入手,稍微用心一些你肯定写的比我更好!
欢迎大家也多去阅读seata,dubbo之类的源代码,能解决业务中遇到的大量的坑哦!