- 1. Overview
- 2. Architecture Introduction
- 3. Deployment and Usage
- 4. Benchmark Comparison
- 5. Conclusion
Seata is an open-source distributed transaction solution with over 24000 stars and a highly active community. It is dedicated to providing high-performance and user-friendly distributed transaction services in microservices architecture.
Currently, Seata's distributed transaction data storage modes include file, db, and redis. This article focuses on the architecture, deployment and usage, benchmark comparison of Seata-Server Raft mode. It explores why Seata needs Raft and provides insights into the process from research and comparison to design, implementation, and knowledge accumulation.
Presenter: Jianbin Chen(funkye) github id: funky-eyes
2. Architecture Introduction
2.1 What is Raft Mode?
Firstly, it is essential to understand what the Raft distributed consensus algorithm is. The following excerpt is a direct quote from the official documentation of sofa-jraft:
RAFT is a novel and easy-to-understand distributed consensus replication protocol proposed by Diego Ongaro and John Ousterhout at Stanford University. It serves as the central coordination component in the RAMCloud project. Raft is a Leader-Based variant of Multi-Paxos, providing a more complete and clear protocol description compared to protocols like Paxos, Zab, View Stamped Replication. It also offers clear descriptions of node addition and deletion. As a replication state machine, Raft is the most fundamental component in distributed systems, ensuring ordered replication and execution of commands among multiple nodes, guaranteeing consistency when the initial states of multiple nodes are consistent.

In summary, Seata's Raft mode is based on the Sofa-Jraft component, implementing the ability to ensure the data consistency and high availability of Seata-Server itself.
2.2 Why Raft Mode is Needed
After understanding the definition of Seata-Raft mode, you might wonder whether Seata-Server is now unable to ensure consistency and high availability. Let's explore how Seata-Server currently achieves this from the perspectives of consistency and high availability.
2.2.1 Existing Storage Modes
In the current Seata design, the role of the Server is to ensure the correct execution of the two-phase commit for transactions. However, this depends on the correct storage of transaction records. To ensure that transaction records are not lost, it is necessary to drive all Seata-RM instances to perform the correct two-phase commit behavior while maintaining correct state. So, how does Seata currently store transaction states and records?
Firstly, let's introduce the three transaction storage modes supported by Seata: file, db, and redis. In terms of consistency ranking, the db mode provides the best guarantee for transaction records, followed by the asynchronous flushing of the file mode, and finally the aof and rdb modes of redis.
To elaborate:
-
The file mode is Seata's self-implemented transaction storage method. It stores transaction information on the local disk in a sequential write manner. For performance considerations, it defaults to asynchronous mode and stores transaction information in memory to ensure consistency between memory and disk data. In the event of Seata-Server (TC) unexpected crash, it reads transaction information from the disk upon restarting and restores it to memory for the continuation of transaction contexts.
-
The db mode is another implementation of Seata's abstract transaction storage manager (AbstractTransactionStoreManager). It relies on databases such as PostgreSQL, MySQL, Oracle, etc., to perform transaction information operations. Consistency is guaranteed by the local transactions of the database, and data persistence is the responsibility of the database.
-
Redis, similar to db, is a transaction storage method using Jedis and Lua scripts. It performs transaction operations using Lua scripts, and in Seata 2.x, all operations (such as lock competition) are handled using Lua scripts. Data storage is similar to db, relying on the storage side (Redis) to ensure data consistency. Like db, redis adopts a computation and storage separation architecture design in Seata.
2.2.2 High Availability
High availability is simply the ability of a cluster to continue running normally after the main node crashes. The common approach is to deploy multiple nodes providing the same service and use a registry center to real-time sense the online and offline status of the main node for timely switching to an available node.
It may seem that deploying a few more machines is all that's needed. However, there is a problem behind it – how to ensure that multiple nodes operate as a whole. If one node crashes, another node can seamlessly take over the work of the crashed node, including handling the data of the crashed node. The answer to solving this problem is simple: in a computation and storage separation architecture, store data in a shared middleware. Any node can access this shared storage area to obtain transaction information for all nodes' operations, thus achieving high availability.
However, the prerequisite is that computation and storage must be separated. Why is the integration of computation and storage not feasible? This brings us to the implementation of the File mode. As described earlier, the File mode stores data on local disks and node memory, with no synchronization in data writing operations. This means that the current File mode cannot achieve high availability and only supports single-machine deployment. For basic quick start and simple use, the File mode has lower applicability, and the high-performance, memory-based File mode is practically no longer used in production environments.
2.3 How is Seata-Raft Designed?
2.3.1 Design Principles
The design philosophy of Seata-Raft mode is to encapsulate the File mode, which is unable to achieve high availability, and use the Raft algorithm to synchronize data between multiple TCs. This mode ensures data consistency among multiple TCs when using the File mode and replaces asynchronous flushing operations with Raft logs and snapshots for data recovery.
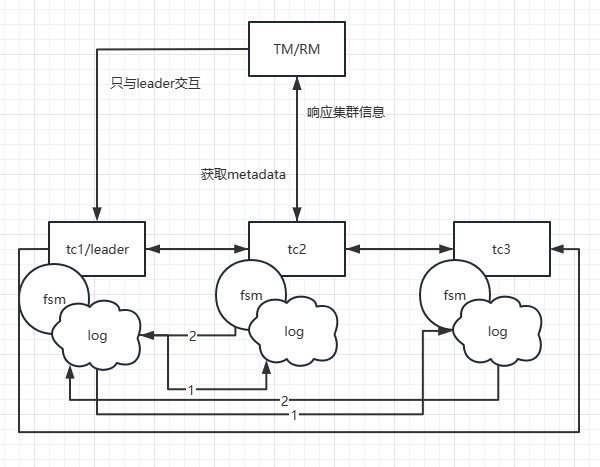
In the Seata-Raft mode, the client-side, upon startup, retrieves its transaction group (e.g., default) and the IP addresses of relevant Raft cluster nodes from the configuration center. By sending a request to the control port of Seata-Server, the client can obtain metadata for the Raft cluster corresponding to the default group, including leader, follower, and learner member nodes. Subsequently, the client monitors (watches) any member nodes of non-leader nodes.
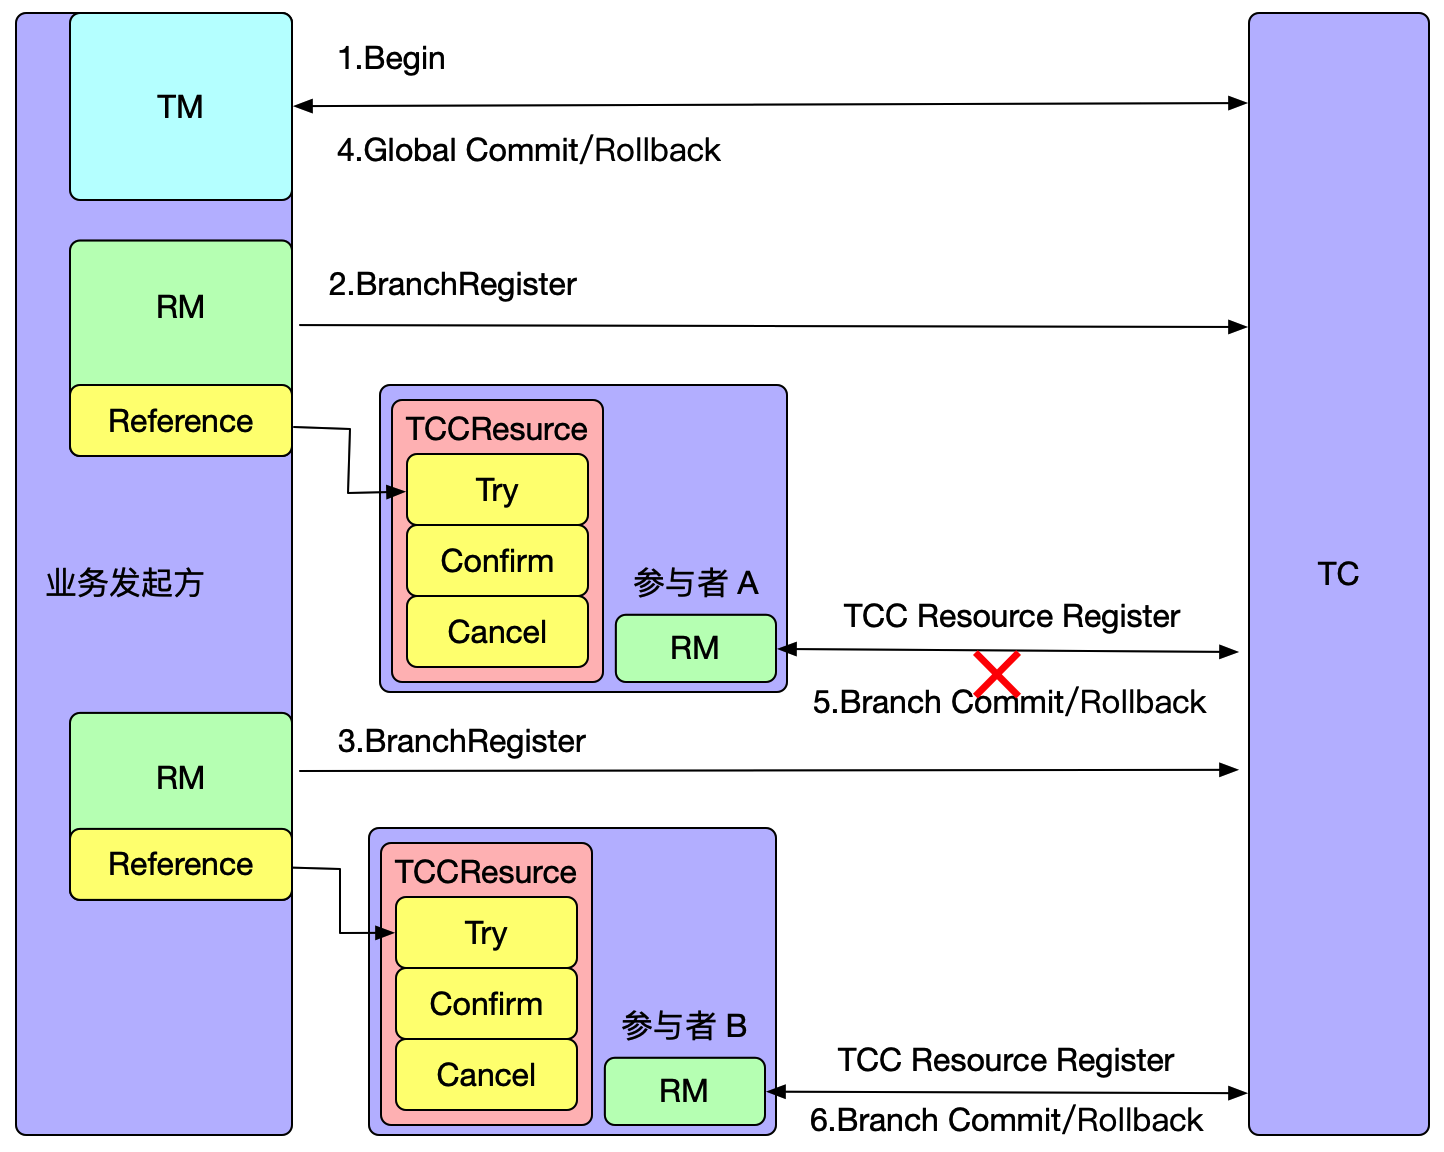
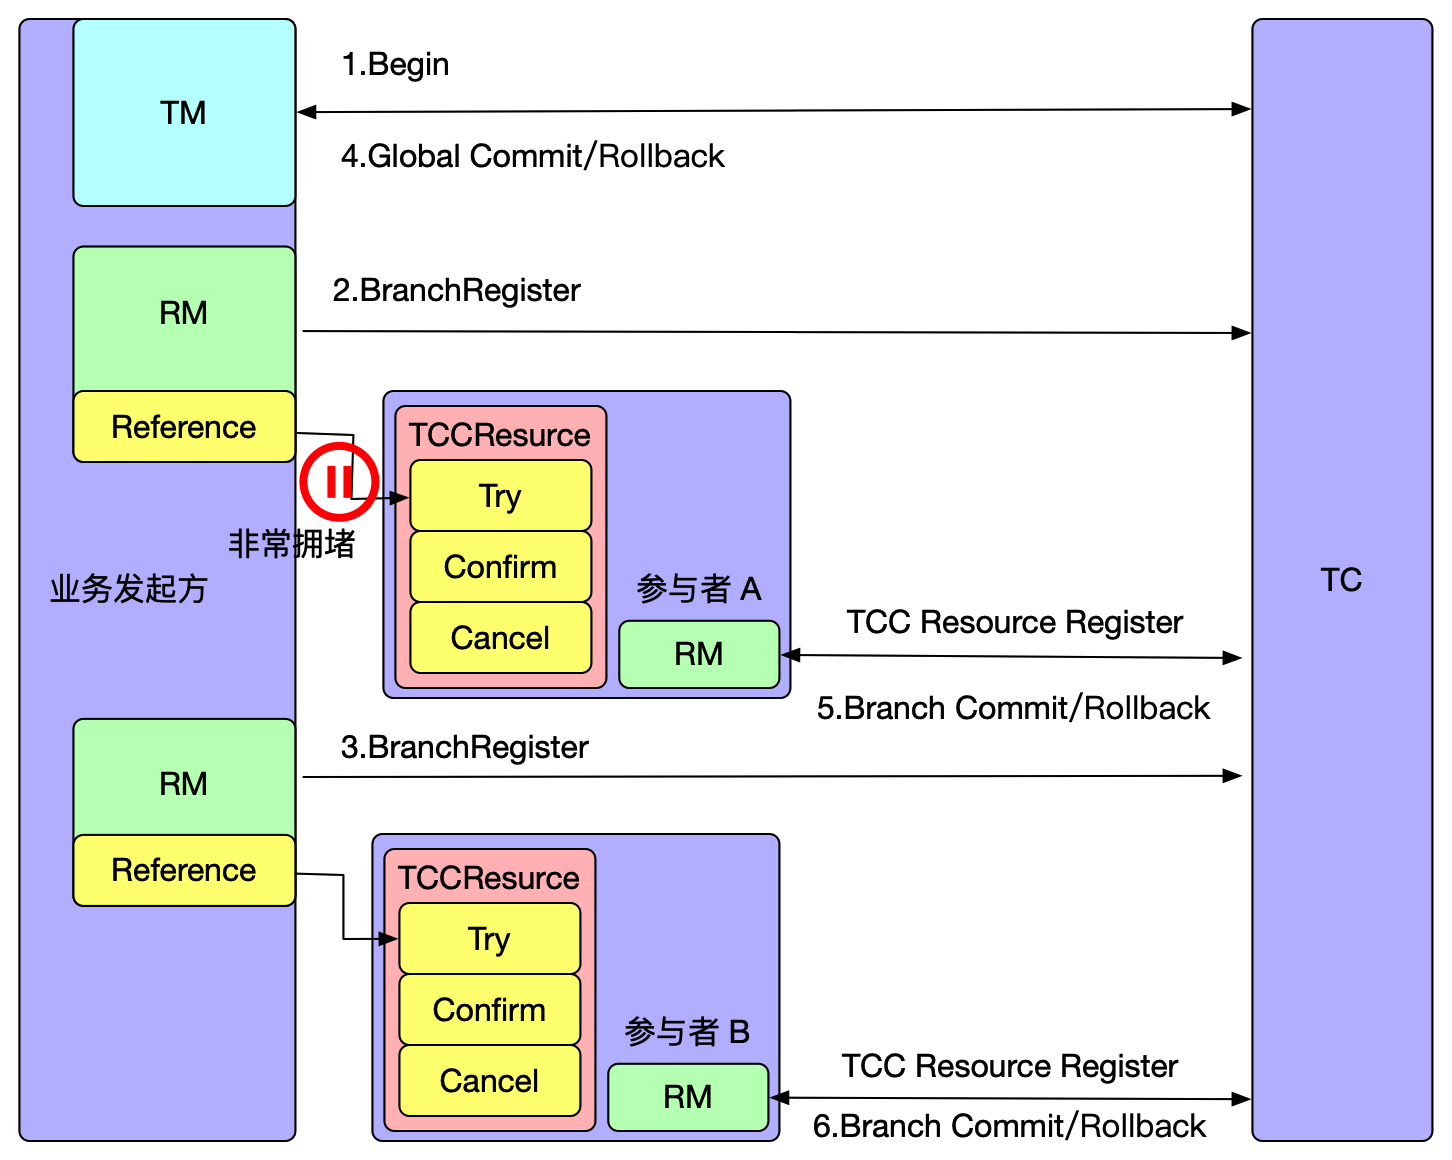
Assuming that TM initiates a transaction, and the leader node in the local metadata points to the address of TC1, TM will only interact with TC1. When TC1 adds global transaction information, through the Raft protocol, denoted as step 1 in the diagram, TC1 sends the log to other nodes. Step 2 represents the response of follower nodes to log reception. When more than half of the nodes (such as TC2) accept and respond successfully, the state machine (FSM) on TC1 will execute the action of adding a global transaction.
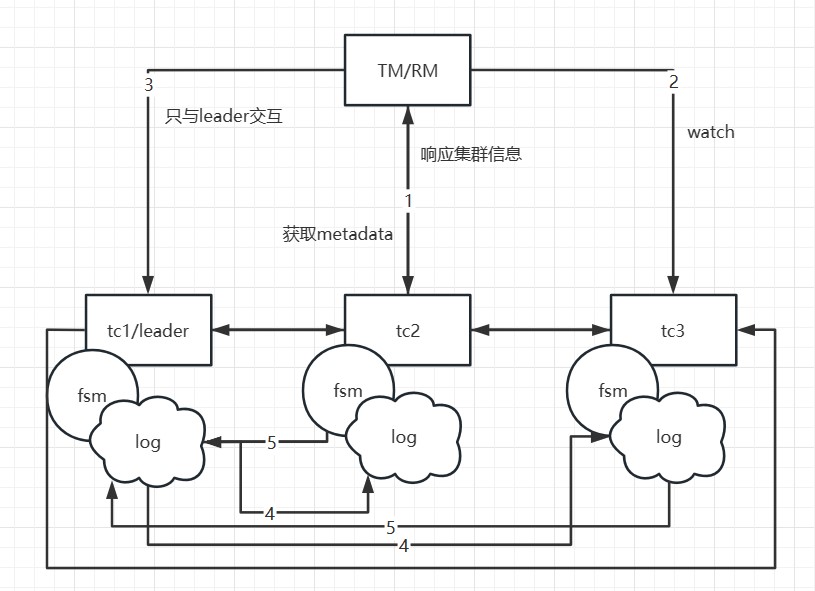
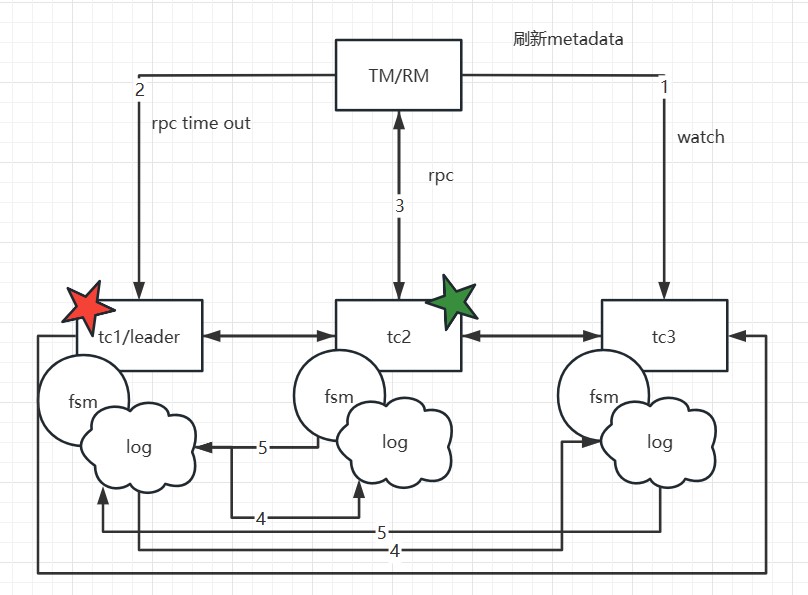
If TC1 crashes or a reelection occurs, what happens? Since the metadata has been obtained during the initial startup, the client will execute the watch follower node's interface to update the local metadata information. Therefore, subsequent transaction requests will be sent to the new leader (e.g., TC2). Meanwhile, TC1's data has already been synchronized to TC2 and TC3, ensuring data consistency. Only at the moment of the election, if a transaction happens to be sent to the old leader, it will be actively rolled back to ensure data correctness.
It is important to note that in this mode, if a transaction is in the phase of sending resolution requests or the one-phase process has not yet completed at the moment of the election, and it happens exactly during the election, these transactions will be actively rolled back. This is because the RPC node has crashed or a reelection has occurred, and there is currently no implemented RPC retry. The TM side has a default retry mechanism of 5 times, but due to the approximately 1s-2s time required for the election, transactions in the 'begin' state may not successfully resolve, so they are prioritized for rollback to release locks, avoiding impacting the correctness of other business.
2.3.2 Fault Recovery
In Seata, when a TC experiences a failure, the data recovery process is as follows:
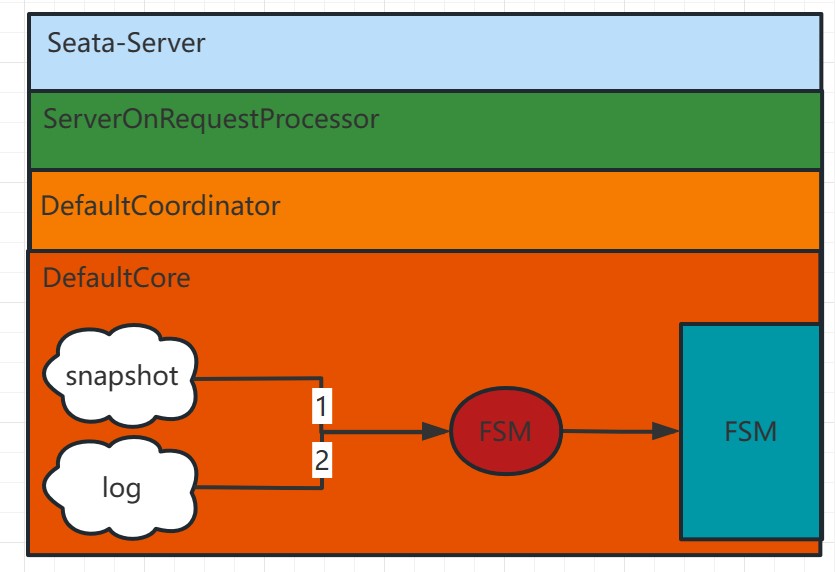
As shown in the above diagram:
-
Check for the Latest Data Snapshot: Firstly, the system checks for the existence of the latest data snapshot file. The data snapshot is a one-time full copy of the in-memory data state. If there is a recent data snapshot, the system directly loads it into memory.
-
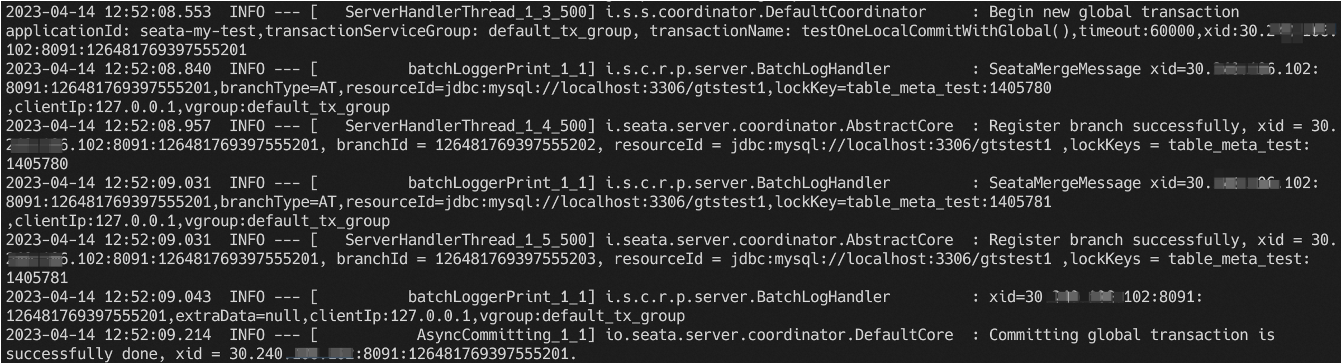
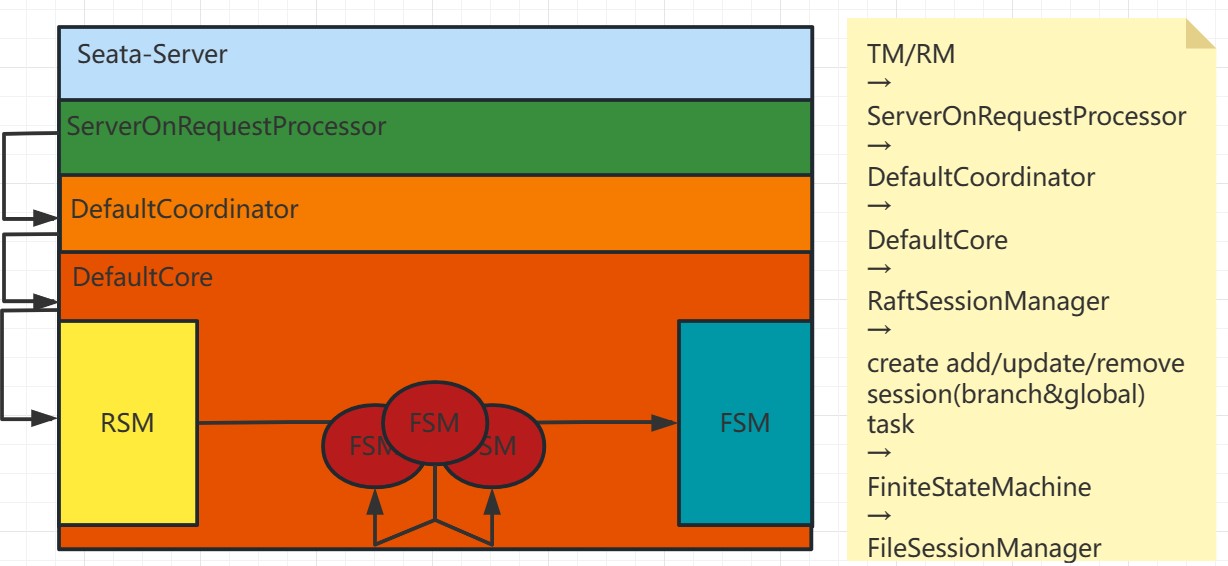
Replay Based on Raft Logs After Snapshot: If there is the latest snapshot or no snapshot file, the system replays the data based on the previously recorded Raft logs. Each request in Seata-Server ultimately goes through the ServerOnRequestProcessor for processing, then moves to the specific coordinator class (DefaultCoordinator or RaftCoordinator), and further proceeds to the specific business code (DefaultCore) for the corresponding transaction processing (e.g., begin, commit, rollback).
-
After the log replay is complete, the leader initiates log synchronization and continues to execute the related transaction's add, delete, and modify actions.
Through these steps, Seata can achieve data recovery after a failure. It first attempts to load the latest snapshot, if available, to reduce replay time. Then, it replays based on Raft logs to ensure the consistency of data operations. Finally, through the log synchronization mechanism, it ensures data consistency among multiple nodes.
2.3.3 Business Processing Synchronization Process
 For the case where the client side is obtaining the latest metadata while a business thread is executing operations such as begin, commit, or registry, Seata adopts the following handling:
-
On the client side:
- If the client is executing operations like begin, commit, or registry, and at this moment, it needs to obtain the latest metadata, the RPC request from the client might fail since the leader may no longer exist or is not the current leader.
- If the request fails, the client receives an exception response, and in this case, the client needs to roll back based on the request result.
-
TC side for detecting the old leader:
- On the TC side, if the client's request reaches the old leader node, TC checks if it is the current leader. If it is not the leader, it rejects the request.
- If it is the leader but fails midway, such as failing during the process of submitting a task to the state machine, the creation of the task (createTask) fails due to the current state not being the leader. In this case, the client also receives a response with an exception.
- The old leader's task submission also fails, ensuring the consistency of transaction information.
Through the above handling, when the client obtains the latest metadata while a business operation is in progress, Seata ensures data consistency and transaction correctness. If the client's RPC request fails, it triggers a rollback operation. On the TC side, detection of the old leader and the failure of task submission prevent inconsistencies in transaction information. This way, the client's data can also maintain consistency.
3. Usage and Deployment
In terms of usage and deployment, the community adheres to the principles of minimal intrusion and minimal changes. Therefore, the overall deployment should be straightforward. The following sections introduce deployment changes separately for the client and server sides.
3.1 Client
Firstly, those familiar with the use of registry configuration centers should be aware of the seata.registry.type configuration item in Seata's configuration, supporting options like Nacos, ZooKeeper, etcd, Redis, etc. After version 2.0, a configuration item for Raft was added.
   registry:
      type: raft
      raft:
         server-addr: 192.168.0.111:7091, 192.168.0.112:7091, 192.168.0.113:7091
Switch the registry.type to 'raft' and configure the address for obtaining Raft-related metadata, which is unified as the IP of the seata-server + HTTP port. Then, it is essential to configure the traditional transaction group.
seata:
   tx-service-group: default_tx_group
   service:
      vgroup-mapping:
         default_tx_group: default
If the current transaction group used is default_tx_group, then the corresponding Seata cluster/group is 'default'. There is a corresponding relationship, and this will be further explained in the server deployment section.
With this, the changes on the client side are complete.
3.2 Server
For server-side changes, there might be more adjustments, involving familiarity with some tuning parameters and configurations. Of course, default values can be used without any modifications.
seata:
  server:
    raft:
      group: default # This value represents the group of this raft cluster, and the value corresponding to the client's transaction group should match it.
      server-addr: 192.168.0.111:9091,192.168.0.112:9091,192.168.0.113:9091 # IP and port of the 3 nodes, the port is the netty port of the node + 1000, default netty port is 8091
      snapshot-interval: 600 # Take a snapshot every 600 seconds for fast rolling of raftlog. However, making a snapshot every 600 seconds may cause business response time jitter if there is too much transaction data in memory. But it is friendly for fault recovery and faster node restart. You can adjust it to 30 minutes, 1 hour, etc., according to the business. You can test whether there is jitter on your own, and find a balance point between rt jitter and fault recovery.
      apply-batch: 32 # At most, submit raftlog once for 32 batches of actions
      max-append-bufferSize: 262144 # Maximum size of the log storage buffer, default is 256K
      max-replicator-inflight-msgs: 256 # In the case of enabling pipeline requests, the maximum number of in-flight requests, default is 256
      disruptor-buffer-size: 16384 # Internal disruptor buffer size. If it is a scenario with high write throughput, you need to appropriately increase this value. Default is 16384
      election-timeout-ms: 1000 # How long without a leader's heartbeat to start a new election
      reporter-enabled: false # Whether the monitoring of raft itself is enabled
      reporter-initial-delay: 60 # Interval of monitoring
      serialization: jackson # Serialization method, do not change
      compressor: none # Compression method for raftlog, such as gzip, zstd, etc.
      sync: true # Flushing method for raft log, default is synchronous flushing
  config:
    # support: nacos, consul, apollo, zk, etcd3
    type: file # This configuration can choose different configuration centers
  registry:
    # support: nacos, eureka, redis, zk, consul, etcd3, sofa
    type: file # Non-file registration center is not allowed in raft mode
  store:
    # support: file, db, redis, raft
    mode: raft # Use raft storage mode
    file:
      dir: sessionStore # This path is the storage location of raftlog and related transaction logs, default is relative path, it is better to set a fixed location
In 3 or more nodes of seata-server, after configuring the above parameters, you can directly start it, and you will see similar log output, which means the cluster has started successfully:
2023-10-13 17:20:06.392  WARN --- [Rpc-netty-server-worker-10-thread-1] [com.alipay.sofa.jraft.rpc.impl.BoltRaftRpcFactory] [ensurePipeline] []: JRaft SET bolt.rpc.dispatch-msg-list-in-default-executor to be false for replicator pipeline optimistic.
2023-10-13 17:20:06.439  INFO --- [default/PeerPair[10.58.16.231:9091 -> 10.58.12.217:9091]-AppendEntriesThread0] [com.alipay.sofa.jraft.storage.impl.LocalRaftMetaStorage] [save] []: Save raft meta, path=sessionStore/raft/9091/default/raft_meta, term=4, votedFor=0.0.0.0:0, cost time=25 ms
2023-10-13 17:20:06.441  WARN --- [default/PeerPair[10.58.16.231:9091 -> 10.58.12.217:9091]-AppendEntriesThread0] [com.alipay.sofa.jraft.core.NodeImpl] [handleAppendEntriesRequest] []: Node <default/10.58.16.231:9091> reject term_unmatched AppendEntriesRequest from 10.58.12.217:9091, term=4, prevLogIndex=4, prevLogTerm=4, localPrevLogTerm=0, lastLogIndex=0, entriesSize=0.
2023-10-13 17:20:06.442  INFO --- [JRaft-FSMCaller-Disruptor-0] [io.seata.server.cluster.raft.RaftStateMachine] [onStartFollowing] []: groupId: default, onStartFollowing: LeaderChangeContext [leaderId=10.58.12.217:9091, term=4, status=Status[ENEWLEADER<10011>: Raft node receives message from new leader with higher term.]].
2023-10-13 17:20:06.449  WARN --- [default/PeerPair[10.58.16.231:9091 -> 10.58.12.217:9091]-AppendEntriesThread0] [com.alipay.sofa.jraft.core.NodeImpl] [handleAppendEntriesRequest] []: Node <default/10.58.16.231:9091> reject term_unmatched AppendEntriesRequest from 10.58.12.217:9091, term=4, prevLogIndex=4, prevLogTerm=4, localPrevLogTerm=0, lastLogIndex=0, entriesSize=0.
2023-10-13 17:20:06.459  INFO --- [Bolt-default-executor-4-thread-1] [com.alipay.sofa.jraft.core.NodeImpl] [handleInstallSnapshot] []: Node <default/10.58.16.231:9091> received InstallSnapshotRequest from 10.58.12.217:9091, lastIncludedLogIndex=4, lastIncludedLogTerm=4, lastLogId=LogId [index=0, term=0].
2023-10-13 17:20:06.489  INFO --- [Bolt-conn-event-executor-13-thread-1] [com.alipay.sofa.jraft.rpc.impl.core.ClientServiceConnectionEventProcessor] [onEvent] []: Peer 10.58.12.217:9091 is connected
2023-10-13 17:20:06.519  INFO --- [JRaft-Group-Default-Executor-0] [com.alipay.sofa.jraft.util.Recyclers] [<clinit>] []: -Djraft.recyclers.maxCapacityPerThread: 4096.
2023-10-13 17:20:06.574  INFO --- [JRaft-Group-Default-Executor-0] [com.alipay.sofa.jraft.storage.snapshot.local.LocalSnapshotStorage] [destroySnapshot] []: Deleting snapshot sessionStore/raft/9091/default/snapshot/snapshot_4.
2023-10-13 17:20:06.574  INFO --- [JRaft-Group-Default-Executor-0] [com.alipay.sofa.jraft.storage.snapshot.local.LocalSnapshotStorage] [close] []: Renaming sessionStore/raft/9091/default/snapshot/temp to sessionStore/raft/9091/default/snapshot/snapshot_4.
2023-10-13 17:20:06.689  INFO --- [JRaft-FSMCaller-Disruptor-0] [io.seata.server.cluster.raft.snapshot.session.SessionSnapshotFile] [load] []: on snapshot load start index: 4
2023-10-13 17:20:06.694  INFO --- [JRaft-FSMCaller-Disruptor-0] [io.seata.server.cluster.raft.snapshot.session.SessionSnapshotFile] [load] []: on snapshot load end index: 4
2023-10-13 17:20:06.694  INFO --- [JRaft-FSMCaller-Disruptor-0] [io.seata.server.cluster.raft.RaftStateMachine] [onSnapshotLoad] []: groupId: default, onSnapshotLoad cost: 110 ms.
2023-10-13 17:20:06.694  INFO --- [JRaft-FSMCaller-Disruptor-0] [io.seata.server.cluster.raft.RaftStateMachine] [onConfigurationCommitted] []: groupId: default, onConfigurationCommitted: 10.58.12.165:9091,10.58.12.217:9091,10.58.16.231:9091.
2023-10-13 17:20:06.705  INFO --- [JRaft-FSMCaller-Disruptor-0] [com.alipay.sofa.jraft.storage.snapshot.SnapshotExecutorImpl] [onSnapshotLoadDone] []: Node <default/10.58.16.231:9091> onSnapshotLoadDone, last_included_index: 4
last_included_term: 4
peers: "10.58.12.165:9091"
peers: "10.58.12.217:9091"
peers: "10.58.16.231:9091"

2023-10-13 17:20:06.722  INFO --- [JRaft-Group-Default-Executor-1] [com.alipay.sofa.jraft.storage.impl.RocksDBLogStorage] [lambda$truncatePrefixInBackground$2] []: Truncated prefix logs in data path: sessionStore/raft/9091/default/log from log index 1 to 5, cost 0 ms.
3.3 faq
-
Once the
seata.raft.server-addris configured, cluster scaling or shrinking must be done through the server's openapi. Directly changing this configuration and restarting won't take effect. The API for this operation is/metadata/v1/changeCluster?raftClusterStr=new_cluster_list. -
If the addresses in
server-addr:are all on the local machine, you need to add a 1000 offset to the netty ports of different servers on the local machine. For example, ifserver.port: 7092, the netty port will be 8092, and the raft election and communication port will be 9092. You need to add the startup parameter-Dserver.raftPort=9092. On Linux, this can be specified usingexport JAVA_OPT="-Dserver.raftPort=9092".
4. Performance Test Comparison
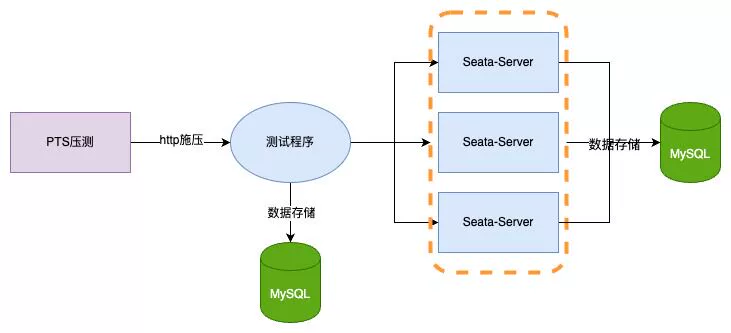
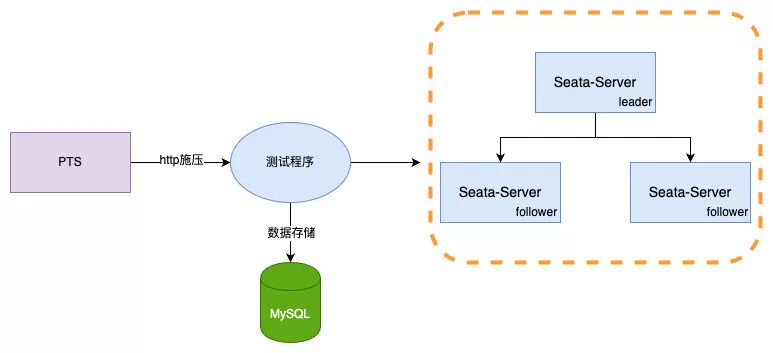
Performance testing is divided into two scenarios. To avoid data hotspots and thread optimization, the client side initializes 3 million items and uses jdk21 virtual threads + Spring Boot3 + Seata AT for testing. Garbage collection is handled with the ZGC generational garbage collector. The testing tool used is Alibaba Cloud PTS. Server-side is uniformly configured with jdk21 (not yet adapted for virtual threads). Server configurations are as follows:
-
TC: 4c8g * 3
-
Client: 4c * 8G * 1
-
Database: Alibaba Cloud RDS 4c16g
-
64 concurrent performance test only increases the performance of the
@GlobalTransactionalannotated interface with empty submissions. -
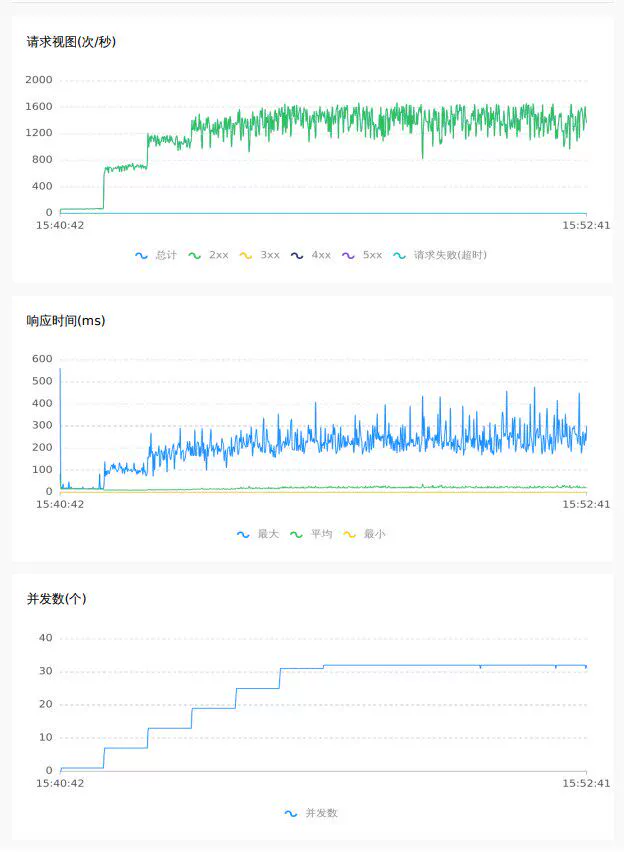
Random 3 million data items are used for inventory deduction in a 32 concurrent scenario for 10 minutes.
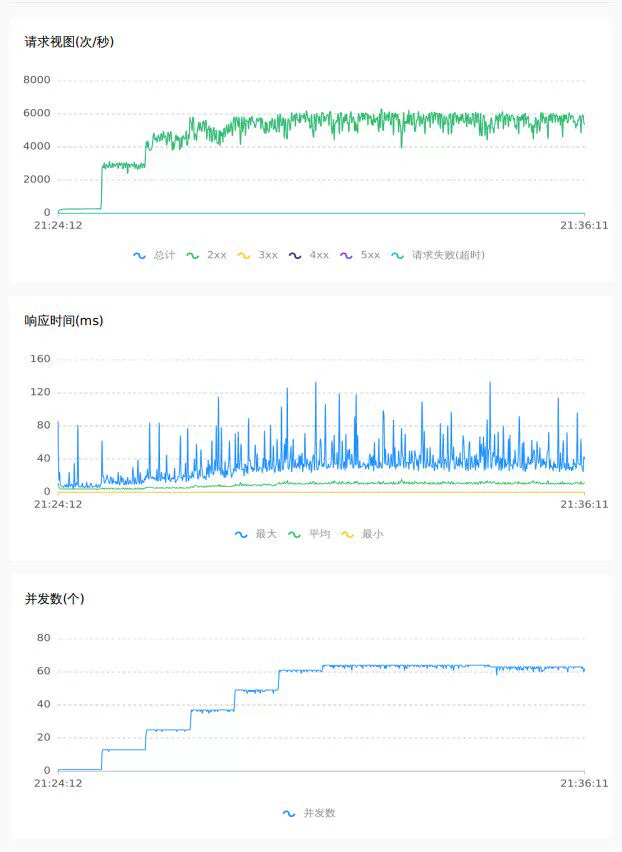
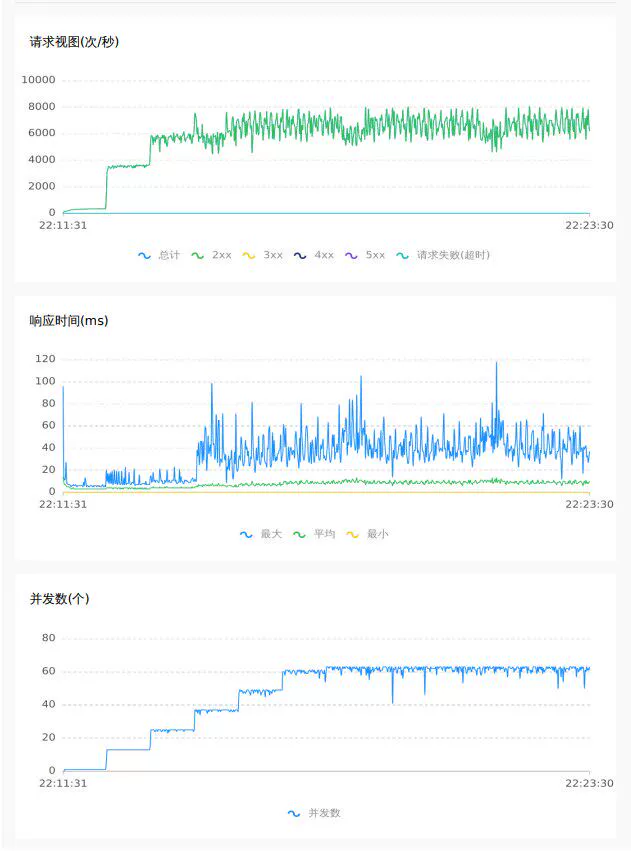
4.1 1.7.1 db mode
Empty submission 64C
Random inventory deduction 32C
4.2 2.0 raft mode
Empty submission 64C
Random inventory deduction 32C
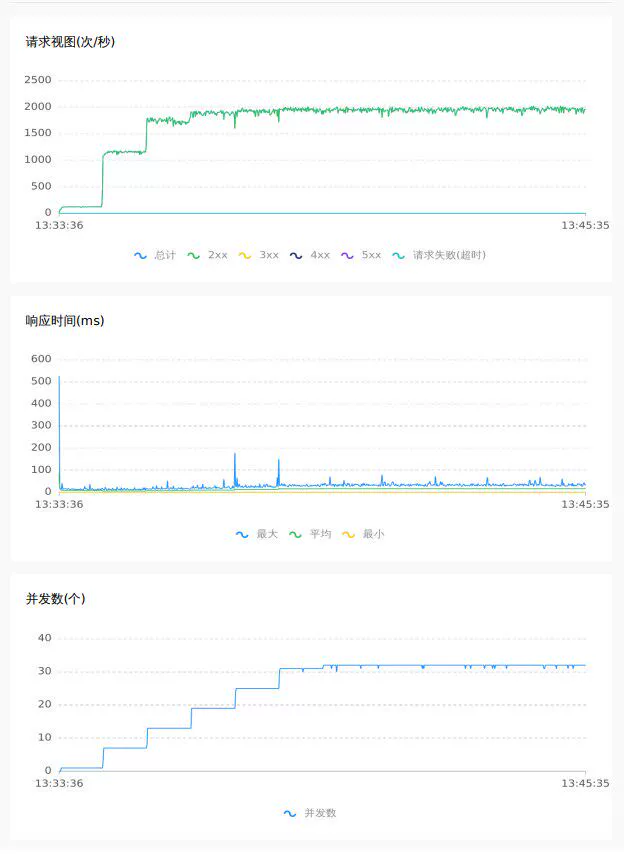
4.3 Test Result Comparison
32 concurrent random inventory deduction scenario with 3 million items
| tps avg | tps max | count | rt | error | Storage Type |
|---|---|---|---|---|---|
| 1709 (42%↑) | 2019 (21%↑) | 1228803 (42%↑) | 13.86ms (30%↓) | 0 | Raft |
| 1201 | 1668 | 864105 | 19.86ms | 0 | DB |
64 concurrent empty pressure on @GlobalTransactional interface (test peak limit is 8000)
| tps avg | tps max | count | rt | error | Storage Type |
|---|---|---|---|---|---|
| 5704 (20%↑) | 8062 (30%↑) | 4101236 (20%↑) | 7.79ms (19%↓) | 0 | Raft |
| 4743 | 6172 | 3410240 | 9.65ms | 0 | DB |
In addition to the direct comparison of the above data, by observing the curves of the pressure test, it can be seen that under the raft mode, TPS and RT are more stable, with less jitter, and better performance and throughput.
5. Summary
In the future development of Seata, performance, entry threshold, and deployment and operation costs are directions that we need to pay attention to and continuously optimize. After the introduction of the raft mode, Seata has the following characteristics:
- In terms of storage, after the separation of storage and computation, Seata's upper limit for optimization has been raised, making it more self-controlled.
- Lower deployment costs, no need for additional registration centers, storage middleware.
- Lower entry threshold, no need to learn other knowledge such as registration centers; one can directly use Seata Raft.
In response to industry trends, some open-source projects such as ClickHouse and Kafka have started to abandon the use of ZooKeeper and instead adopt self-developed solutions, such as ClickKeeper and KRaft. These solutions ensure the storage of metadata and other information by themselves, reducing the need for third-party dependencies, thus reducing operational and learning costs. These features are mature and worth learning from.
Of course, currently, solutions based on the Raft mode may not be mature enough and may not fully meet the beautiful descriptions above. However, precisely because of such theoretical foundations, the community should strive in this direction, gradually bringing practice closer to the theoretical requirements. Here, all students interested in Seata are welcome to join the community, contributing to the development of Seata!
 Seata is internally codenamed TXC (taobao transaction constructor) within Alibaba, a name with a strong organizational structure flavor. TXC originated from Alibaba's Wushi (Five Color Stones) project, which in ancient mythology were the stones used by the goddess Nüwa to mend the heavens, symbolizing Alibaba's important milestone in the evolution from monolithic architecture to distributed architecture. During this project, a batch of epoch-making Internet middleware was developed, including the well-known "Big Three":
 TXC has been widely used within Alibaba Group for many years and has been baptized by the surging traffic of large-scale events like Singles' Day, significantly improving business development efficiency and ensuring data accuracy, eliminating financial and reputational issues caused by data inconsistencies. With the continuous evolution of the architecture, a standard three-node cluster can now handle peak values of nearly 100K TPS and millisecond-level transaction processing. In terms of availability and performance, it has reached a four-nines SLA guarantee, ensuring no failures throughout the year even in unattended conditions.
 Subsequently, we had extensive discussions and systematic reviews. We first needed to define the consistency problem. Were we to achieve majority consensus consistency like RAFT, solve database consistency issues like Google Spanner, or something else? Looking at the top-down layered structure from the application node, it mainly includes development frameworks, service invocation frameworks, data middleware, database drivers, and databases. We had to decide at which layer to solve the data consistency problem. We compared the consistency requirements, universality, implementation complexity, and business integration costs faced when solving data consistency issues at different levels. In the end, we weighed the pros and cons, decided to keep the implementation complexity to ourselves, and adopted the AT mode initially as a consistency component. We needed to ensure high consistency, but not be locked into specific database implementations, ensuring the generality of scenarios and the business integration costs were low enough to be easily implemented. This is also why TXC initially adopted the AT mode.
A distributed transaction is not just a framework; it's a system. We defined the consistency problem in theory, abstractly conceptualized modes, roles, actions, and isolation, etc. From an engineering practice perspective, we defined the programming model, including low-intrusion annotations, simple method templates, and flexible APIs, and defined basic and enhanced transaction capabilities (e.g., how to support a large number of activities at low cost), as well as capabilities in operations, security, performance, observability, and high availability.
Subsequently, we had extensive discussions and systematic reviews. We first needed to define the consistency problem. Were we to achieve majority consensus consistency like RAFT, solve database consistency issues like Google Spanner, or something else? Looking at the top-down layered structure from the application node, it mainly includes development frameworks, service invocation frameworks, data middleware, database drivers, and databases. We had to decide at which layer to solve the data consistency problem. We compared the consistency requirements, universality, implementation complexity, and business integration costs faced when solving data consistency issues at different levels. In the end, we weighed the pros and cons, decided to keep the implementation complexity to ourselves, and adopted the AT mode initially as a consistency component. We needed to ensure high consistency, but not be locked into specific database implementations, ensuring the generality of scenarios and the business integration costs were low enough to be easily implemented. This is also why TXC initially adopted the AT mode.
A distributed transaction is not just a framework; it's a system. We defined the consistency problem in theory, abstractly conceptualized modes, roles, actions, and isolation, etc. From an engineering practice perspective, we defined the programming model, including low-intrusion annotations, simple method templates, and flexible APIs, and defined basic and enhanced transaction capabilities (e.g., how to support a large number of activities at low cost), as well as capabilities in operations, security, performance, observability, and high availability.
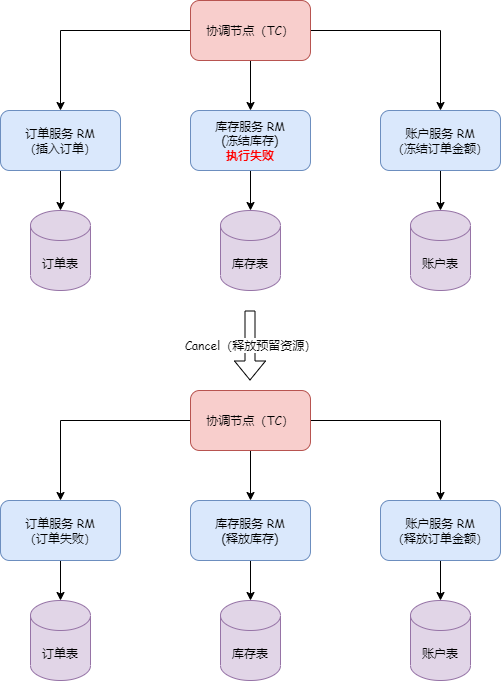
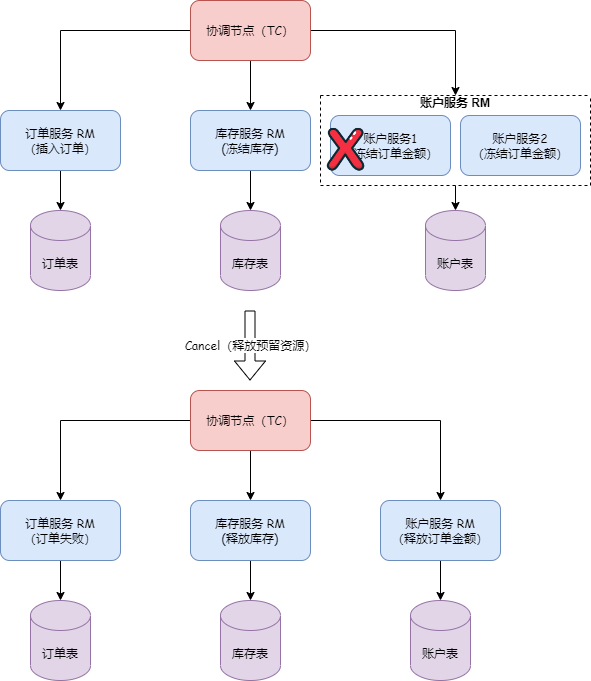
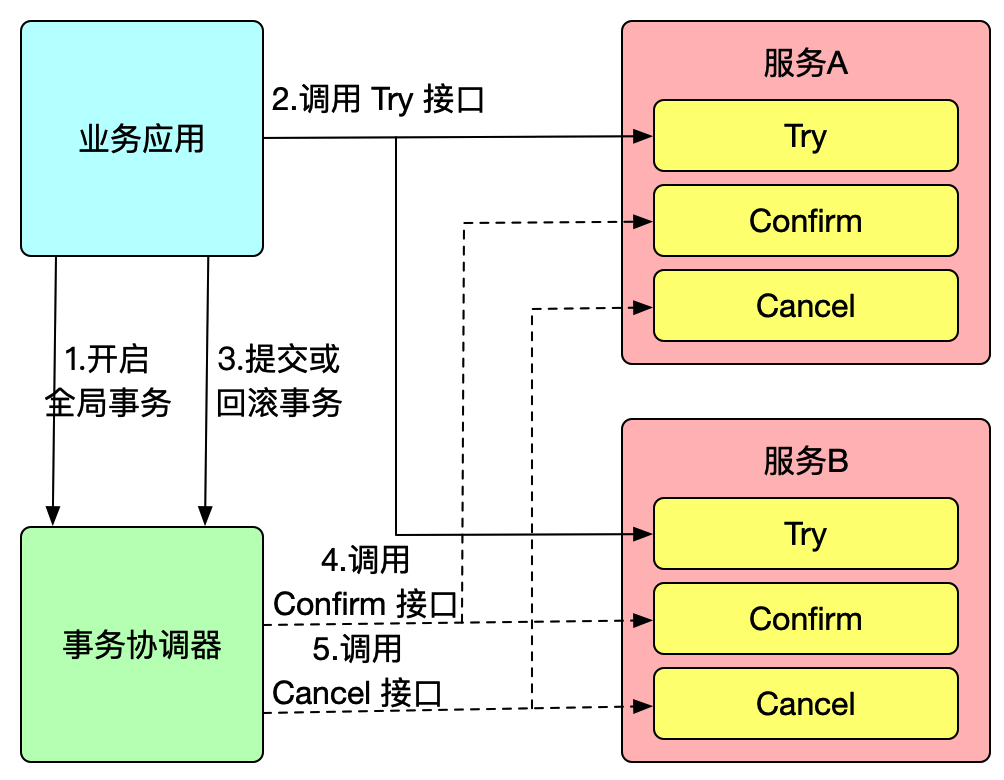
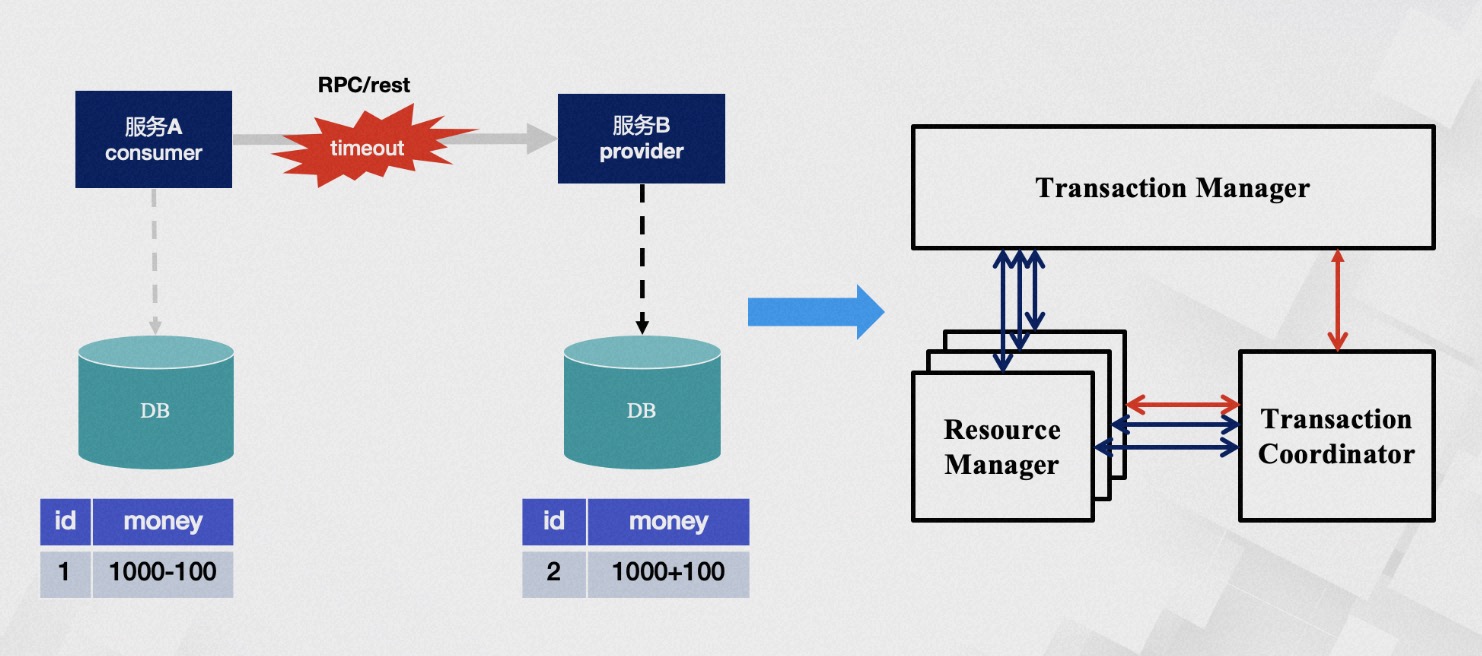 What problems do distributed transactions solve? A classic and tangible example is the money transfer scenario. The transfer process includes subtracting balance and adding balance, how do we ensure the atomicity of the operation? Without any intervention, these two steps may encounter various problems, such as account B being canceled or service call timeouts, etc.
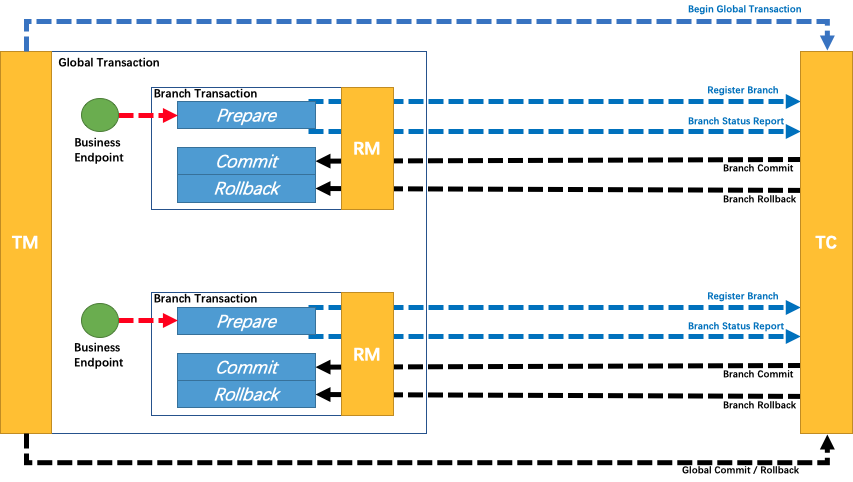
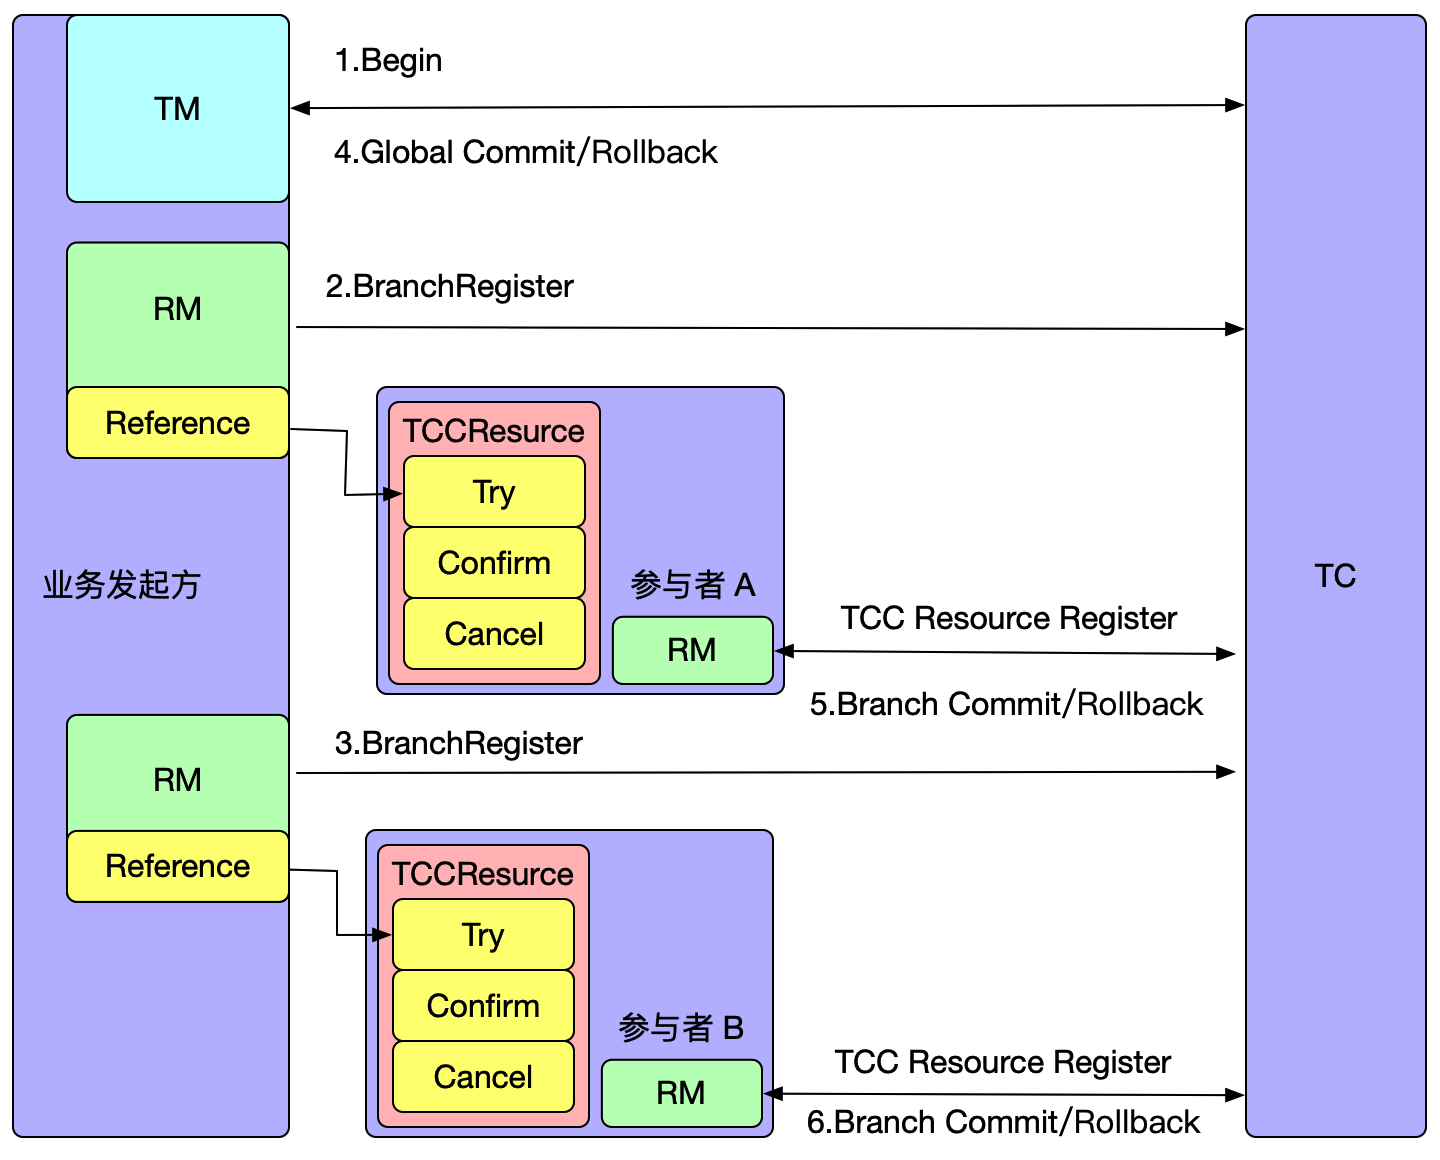
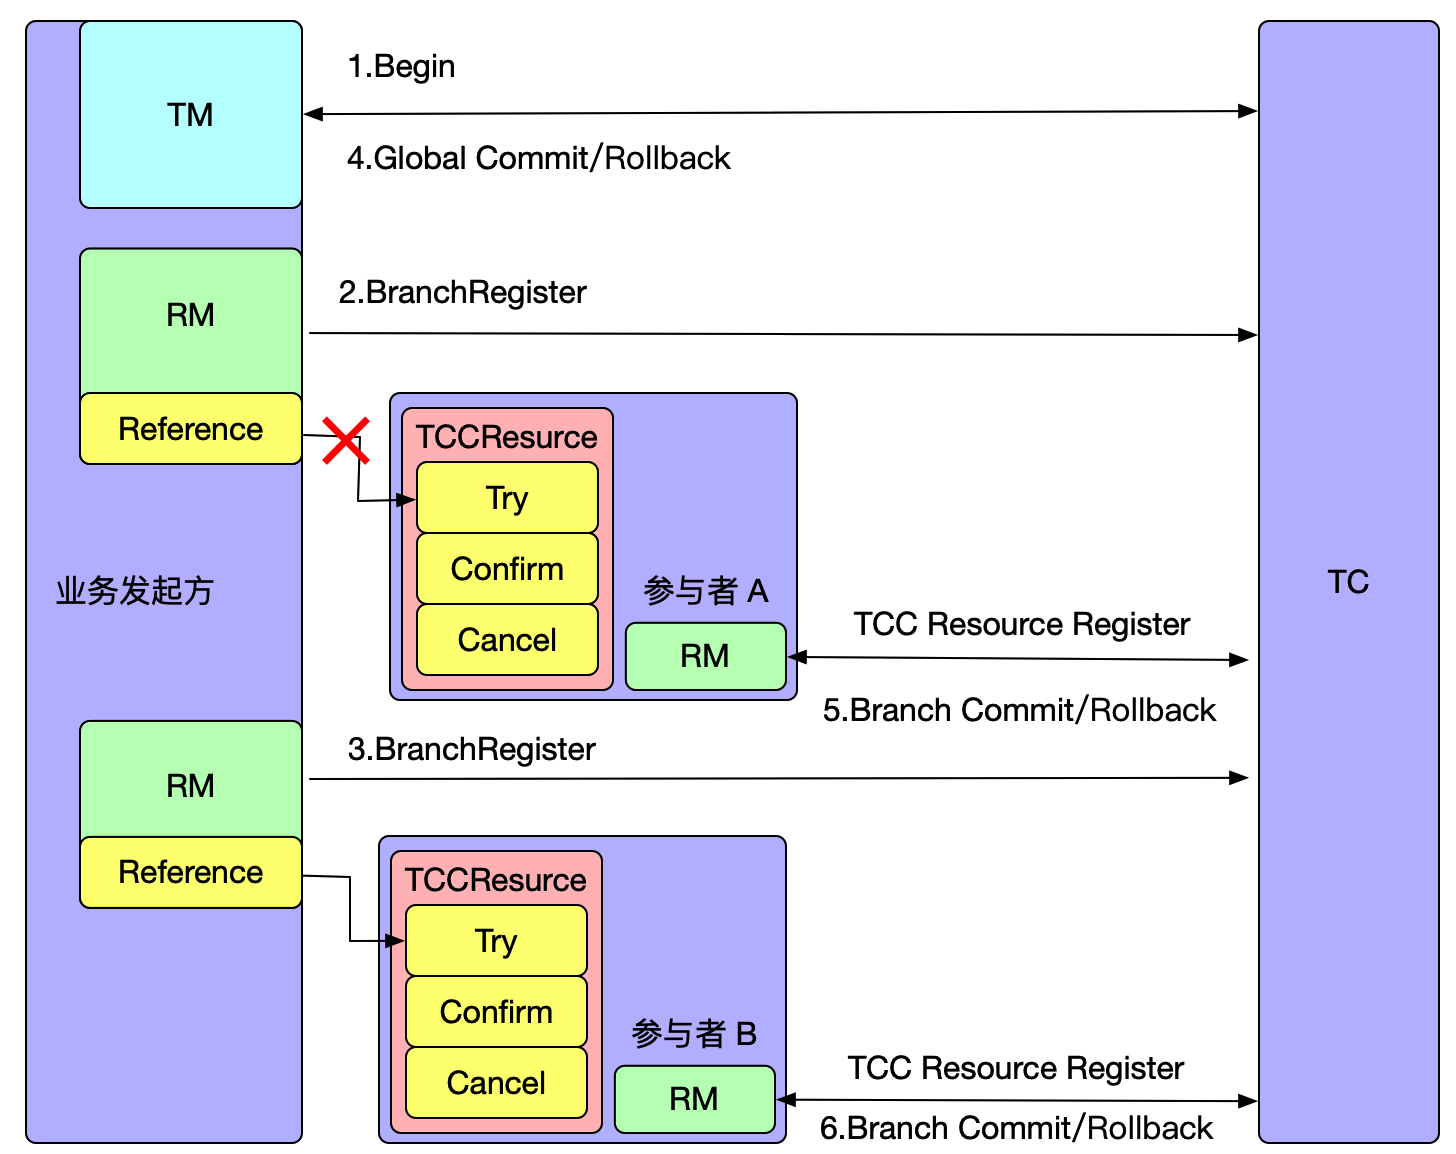
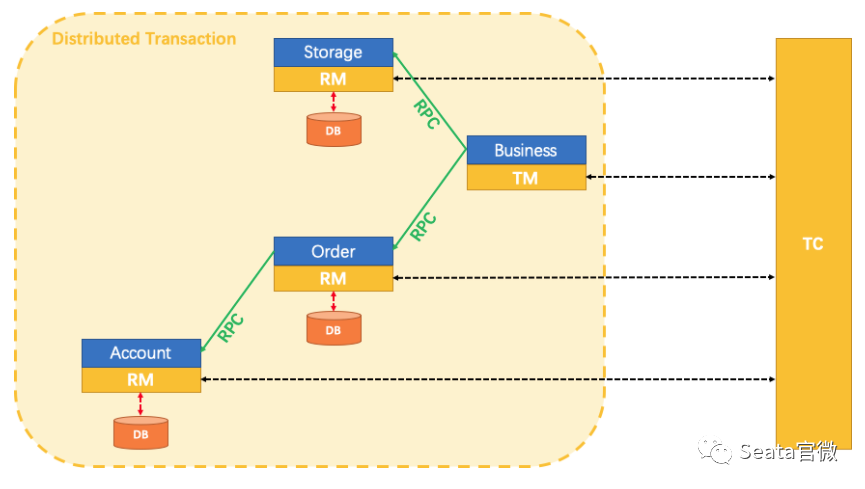
Timeout issues have always been a difficult problem to solve in distributed applications; we cannot accurately know whether service B has executed and in what order. From a data perspective, this means the money in account B may not be successfully added. After the service-oriented transformation, each node only has partial information, while the transaction itself requires global coordination of all nodes, thus requiring a centralized role with a god's-eye view, capable of obtaining all information, which is the TC (transaction coordinator), used to globally coordinate the transaction state. The TM (Transaction Manager) is the role that drives the generation of transaction proposals. However, even gods nod off, and their judgments are not always correct, so we need an RM (resource manager) role to verify the authenticity of the transaction as a representative of the soul. This is TXC's most basic philosophical model. We have methodologically verified that its data consistency is very complete, of course, our cognition is bounded. Perhaps the future will prove we were turkey engineers, but under current circumstances, its model is already sufficient to solve most existing problems.
What problems do distributed transactions solve? A classic and tangible example is the money transfer scenario. The transfer process includes subtracting balance and adding balance, how do we ensure the atomicity of the operation? Without any intervention, these two steps may encounter various problems, such as account B being canceled or service call timeouts, etc.
Timeout issues have always been a difficult problem to solve in distributed applications; we cannot accurately know whether service B has executed and in what order. From a data perspective, this means the money in account B may not be successfully added. After the service-oriented transformation, each node only has partial information, while the transaction itself requires global coordination of all nodes, thus requiring a centralized role with a god's-eye view, capable of obtaining all information, which is the TC (transaction coordinator), used to globally coordinate the transaction state. The TM (Transaction Manager) is the role that drives the generation of transaction proposals. However, even gods nod off, and their judgments are not always correct, so we need an RM (resource manager) role to verify the authenticity of the transaction as a representative of the soul. This is TXC's most basic philosophical model. We have methodologically verified that its data consistency is very complete, of course, our cognition is bounded. Perhaps the future will prove we were turkey engineers, but under current circumstances, its model is already sufficient to solve most existing problems.
 After years of architectural evolution, from the perspective of transaction single-link latency, TXC takes an average of about 0.2 milliseconds to process at the start of the transaction and about 0.4 milliseconds for branch registration, with the entire transaction's additional latency within the millisecond range. This is also the theoretical limit value we have calculated. In terms of throughput, the TPS of a single node reaches 30,000 times/second, and the TPS of a standard cluster is close to 100,000 times/second.
 Alibaba's open-source journey has gone through three main stages. The first stage is the stage where Dubbo is located, where developers contribute out of love, Dubbo has been open sourced for over 10 years, and time has fully proven that Dubbo is an excellent open-source software, and its microkernel plugin extensibility design is an important reference for me when I initially open sourced Seata. When designing software, we need to consider which is more important between extensibility and performance, whether we are doing a three-year design, a five-year design, or a ten-year design that meets business development. While solving the 0-1 service call problem, can we predict the governance problems after the 1-100 scale-up?
The second stage is the closed loop of open source and commercialization, where commercialization feeds back into the open-source community, promoting the development of the open-source community. I think cloud manufacturers are more likely to do open source well for the following reasons:
Alibaba's open-source journey has gone through three main stages. The first stage is the stage where Dubbo is located, where developers contribute out of love, Dubbo has been open sourced for over 10 years, and time has fully proven that Dubbo is an excellent open-source software, and its microkernel plugin extensibility design is an important reference for me when I initially open sourced Seata. When designing software, we need to consider which is more important between extensibility and performance, whether we are doing a three-year design, a five-year design, or a ten-year design that meets business development. While solving the 0-1 service call problem, can we predict the governance problems after the 1-100 scale-up?
The second stage is the closed loop of open source and commercialization, where commercialization feeds back into the open-source community, promoting the development of the open-source community. I think cloud manufacturers are more likely to do open source well for the following reasons: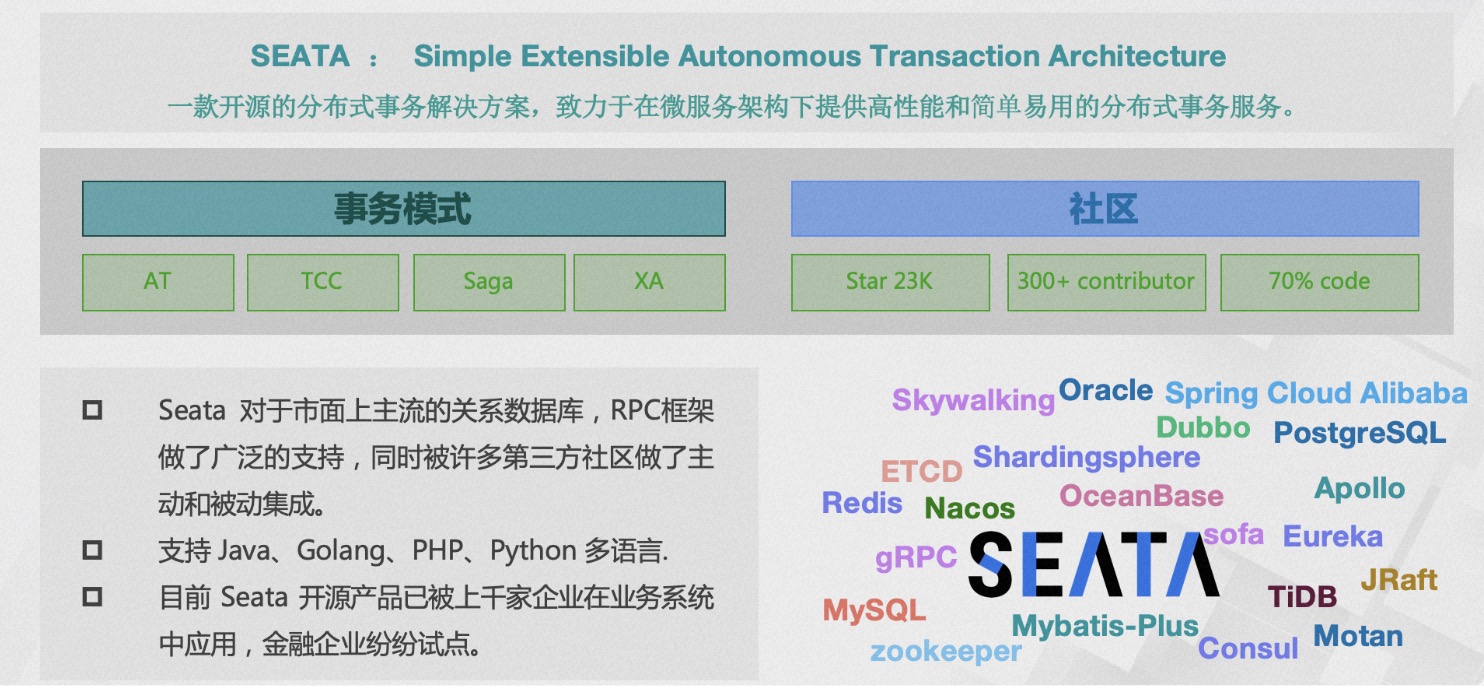 At present, Seata has open-sourced 4 transaction modes, including AT, TCC, Saga, and XA, and is actively exploring other viable transaction solutions. Seata has integrated with more than 10 mainstream RPC frameworks and relational databases, and has integrated or been integrated relationships with more than 20 communities. In addition, we are also exploring languages other than Java in the multi-language system, such as Golang, PHP, Python, and JS.
Seata has been applied to business systems by thousands of customers. Seata applications have become more mature, with successful cooperation with the community in the financial business scenarios of CITIC Bank and Everbright Bank, and successfully adopted into core accounting systems. The landing of microservices systems in financial scenarios is very stringent, which also marks a new level of maturity for Seata's kernel.
At present, Seata has open-sourced 4 transaction modes, including AT, TCC, Saga, and XA, and is actively exploring other viable transaction solutions. Seata has integrated with more than 10 mainstream RPC frameworks and relational databases, and has integrated or been integrated relationships with more than 20 communities. In addition, we are also exploring languages other than Java in the multi-language system, such as Golang, PHP, Python, and JS.
Seata has been applied to business systems by thousands of customers. Seata applications have become more mature, with successful cooperation with the community in the financial business scenarios of CITIC Bank and Everbright Bank, and successfully adopted into core accounting systems. The landing of microservices systems in financial scenarios is very stringent, which also marks a new level of maturity for Seata's kernel.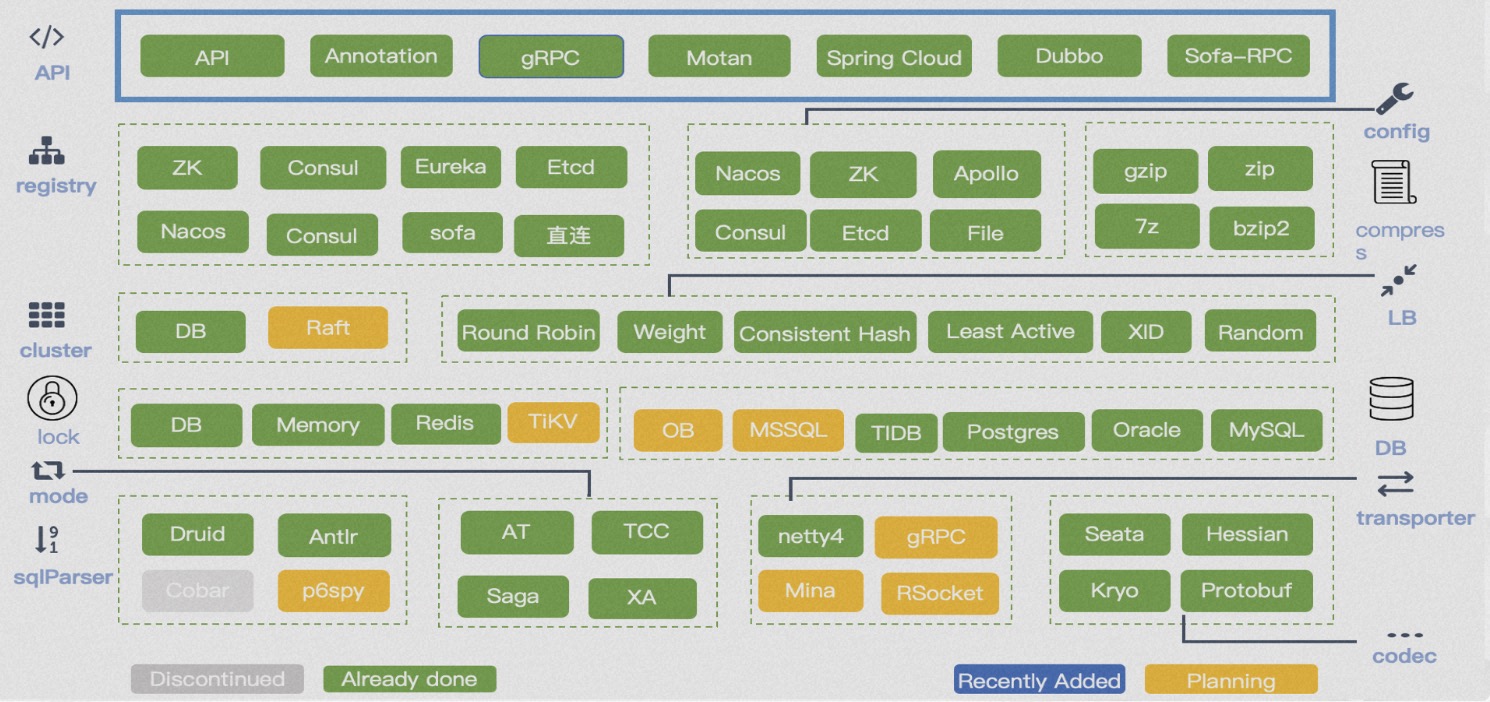 Seata adopts a microkernel and plugin architecture design, exposing rich extension points in APIs, registry configuration centers, storage modes, lock control, SQL parsers, load balancing, transport, protocol encoding and decoding, observability, and more. This allows businesses to easily perform flexible extensions and select technical components.
 Case 1: China Aviation Information's Air Travel Project
The China Aviation Information Air Travel project introduced Seata in the 0.2 version to solve the data consistency problem of ticket and coupon business, greatly improving development efficiency, reducing asset losses caused by data inconsistency, and enhancing user interaction experience.
Case 2: Didi Chuxing's Two-Wheeler Business Unit
Didi Chuxing's Two-Wheeler Business Unit introduced Seata in version 0.6.1, solving the data consistency problem of business processes such as blue bicycles, electric vehicles, and assets, optimizing the user experience, and reducing asset loss.
Case 3: Meituan's Infrastructure
Meituan's infrastructure team developed the internal distributed transaction solution Swan based on the open-source Seata project, which is used to solve distributed transaction problems within Meituan's various businesses.
Case 4: Hema Town
Hema Town uses Seata to control the flower-stealing process in game interactions, significantly shortening the development cycle from 20 days to 5 days, effectively reducing development costs.
Case 1: China Aviation Information's Air Travel Project
The China Aviation Information Air Travel project introduced Seata in the 0.2 version to solve the data consistency problem of ticket and coupon business, greatly improving development efficiency, reducing asset losses caused by data inconsistency, and enhancing user interaction experience.
Case 2: Didi Chuxing's Two-Wheeler Business Unit
Didi Chuxing's Two-Wheeler Business Unit introduced Seata in version 0.6.1, solving the data consistency problem of business processes such as blue bicycles, electric vehicles, and assets, optimizing the user experience, and reducing asset loss.
Case 3: Meituan's Infrastructure
Meituan's infrastructure team developed the internal distributed transaction solution Swan based on the open-source Seata project, which is used to solve distributed transaction problems within Meituan's various businesses.
Case 4: Hema Town
Hema Town uses Seata to control the flower-stealing process in game interactions, significantly shortening the development cycle from 20 days to 5 days, effectively reducing development costs.
 Mainly includes the following aspects:
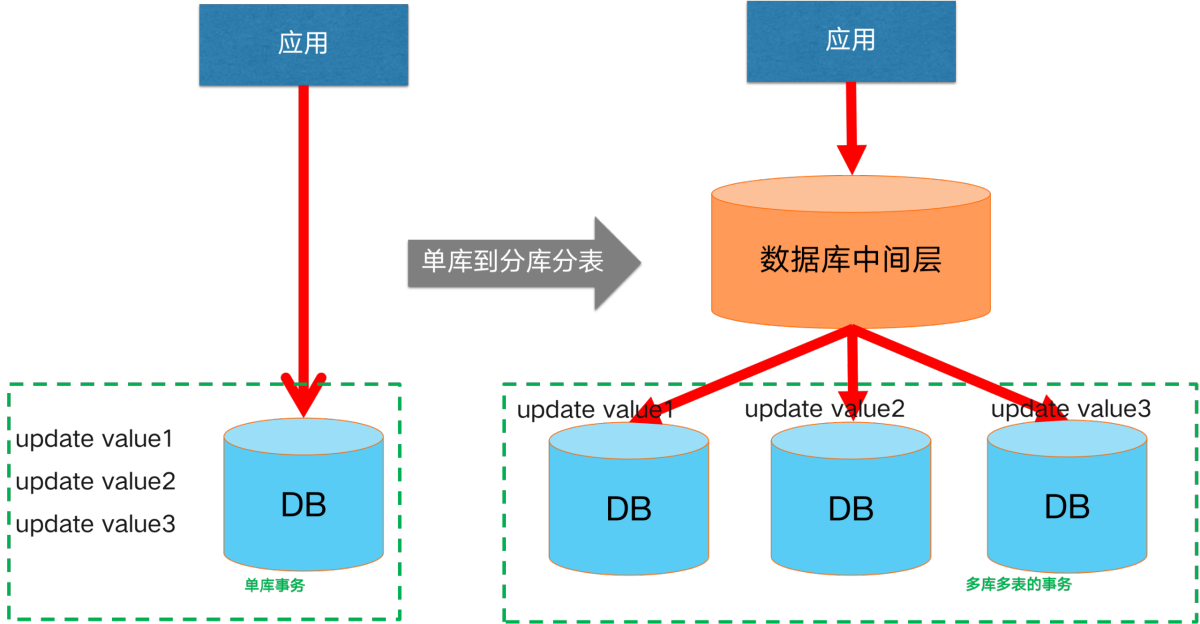 Initially, our business was small and lightweight, and a single database was able to secure our data links. However, as the business scale continues to grow and the business continues to become more complex, usually a single database encounters bottlenecks in terms of capacity and performance. The usual solution is to evolve to a split-database, split-table architecture. At this point, that is, the introduction of **split library and split table scenario **distributed transaction scenarios.
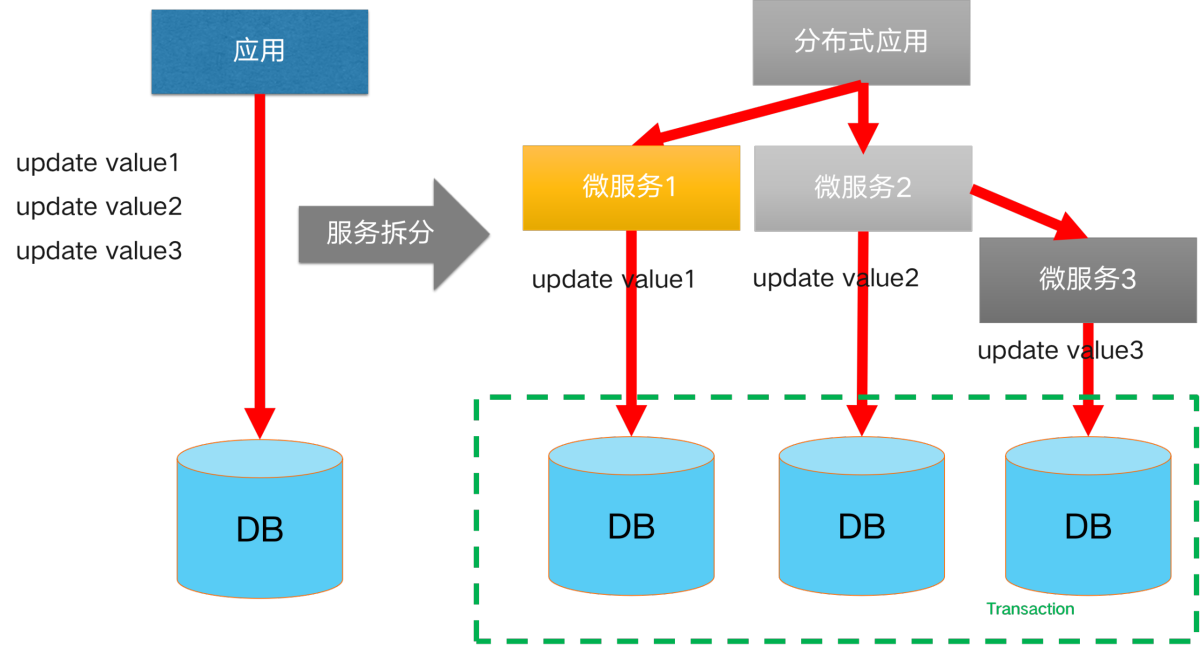 A solution to reduce the complexity of a monolithic application: application microservice splitting. After splitting, our product consists of multiple microservice components with different functions, each of which uses independent database resources. When it comes to data consistency scenarios involving cross-service calls, distributed transactions are introduced in cross-service scenarios.
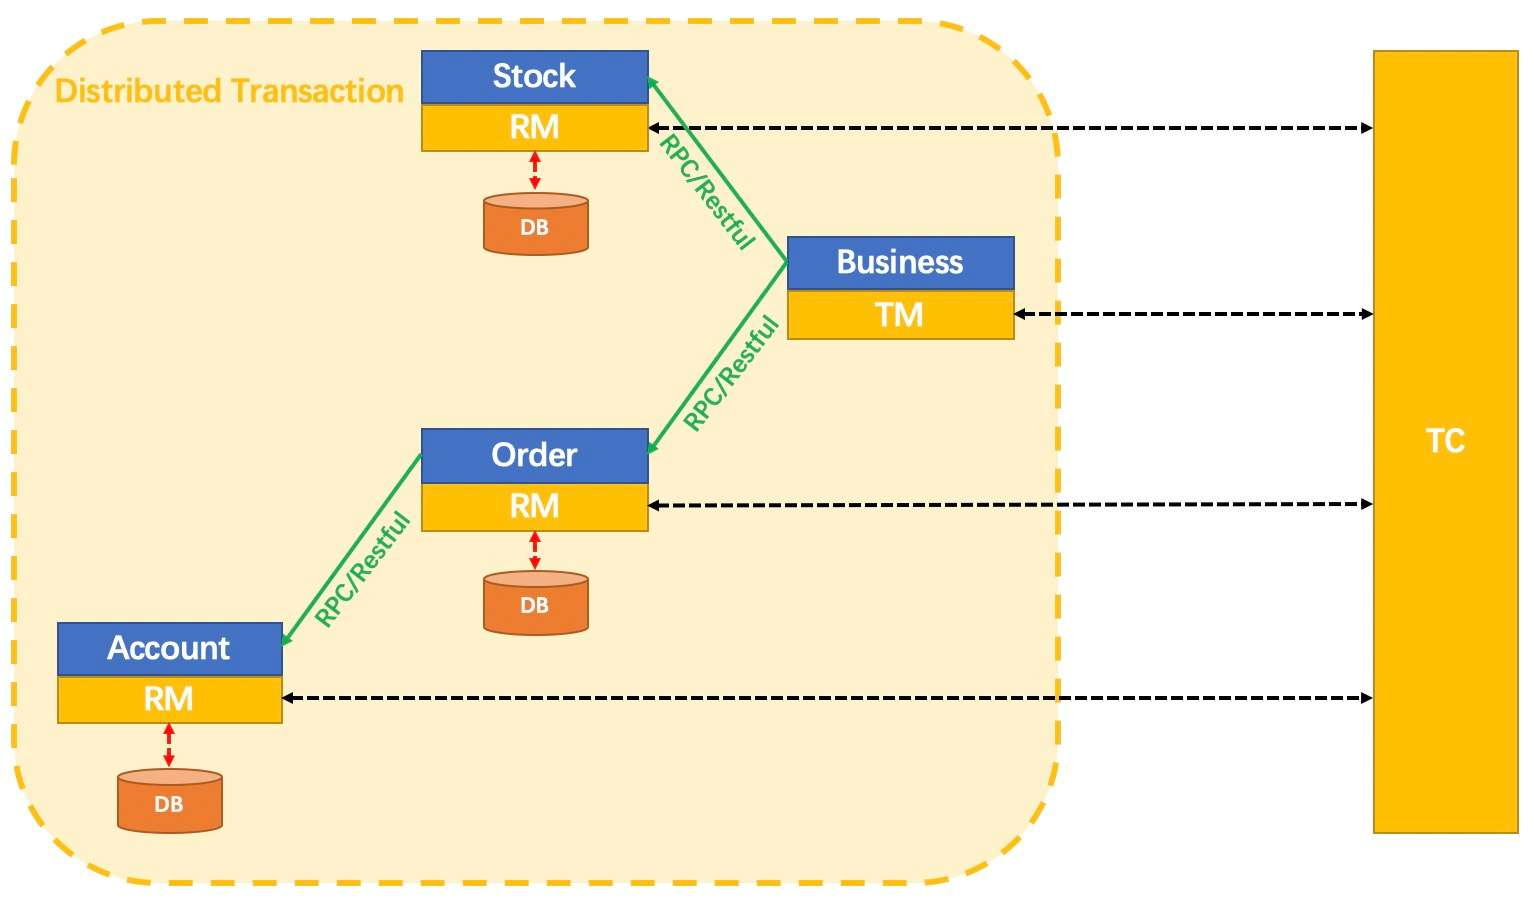 Its core components are mainly as follows:
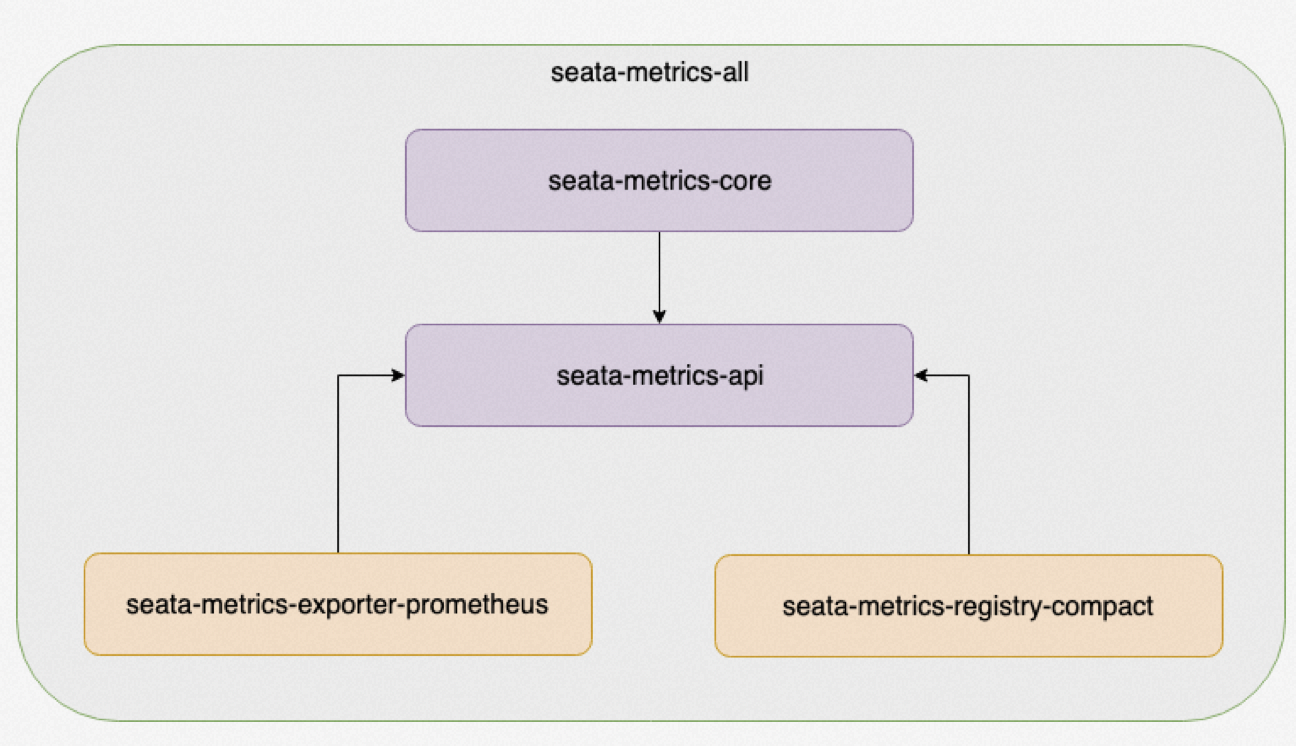
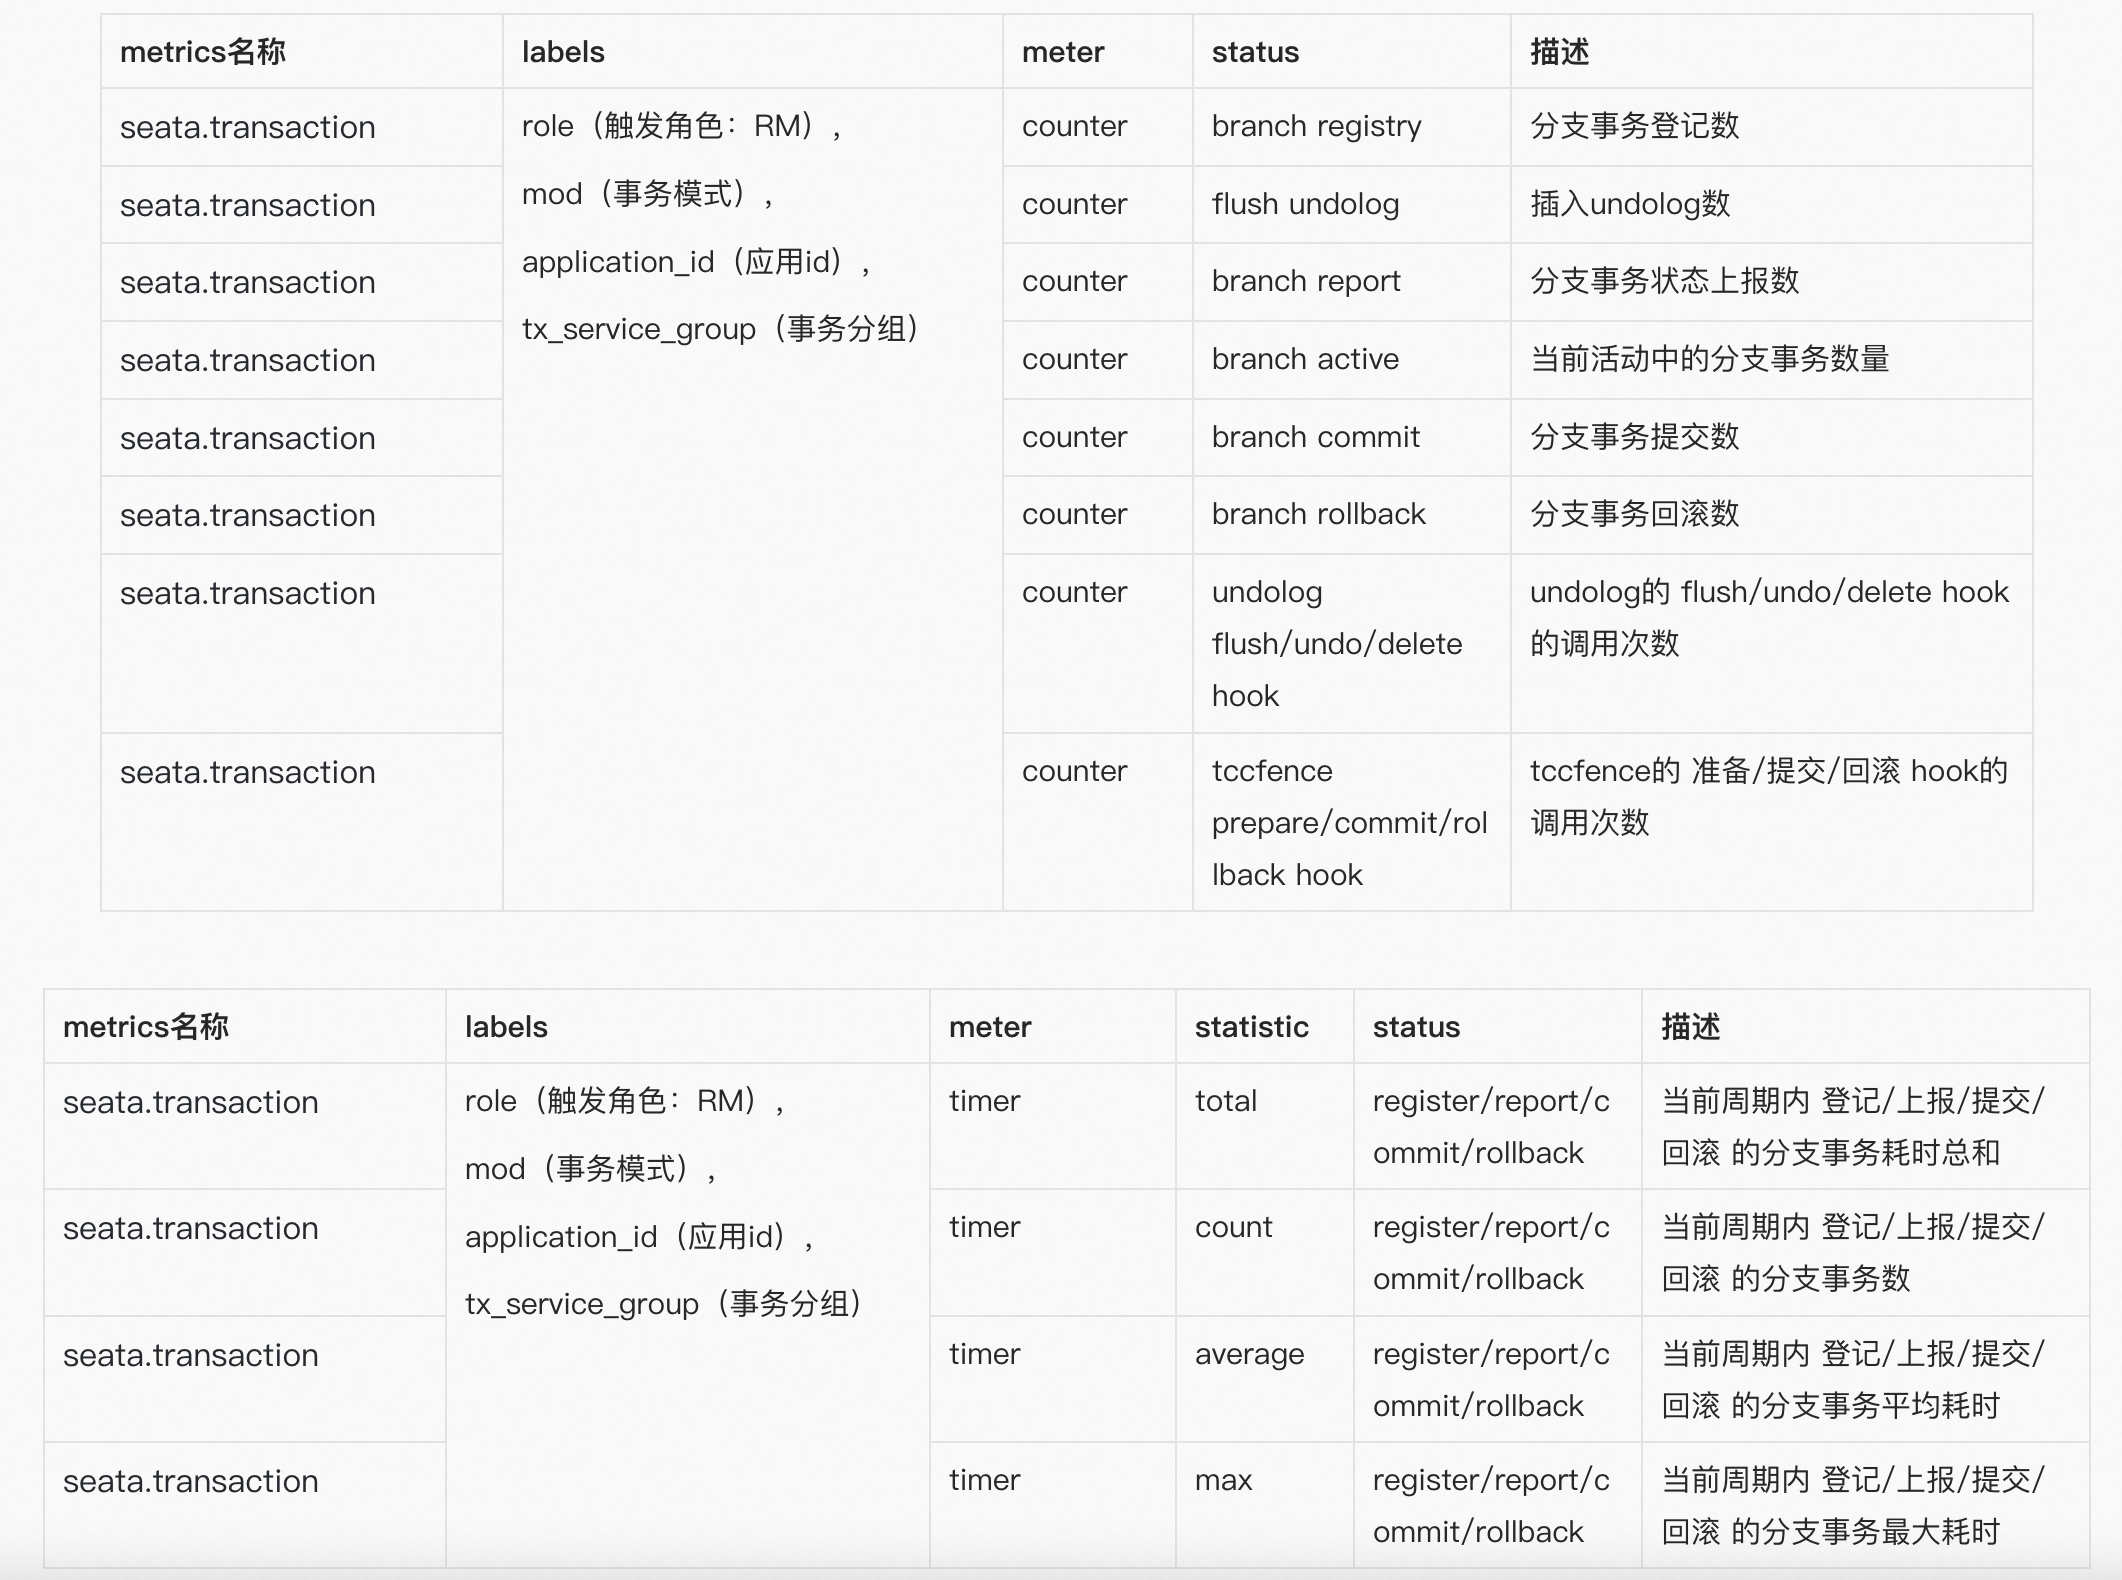
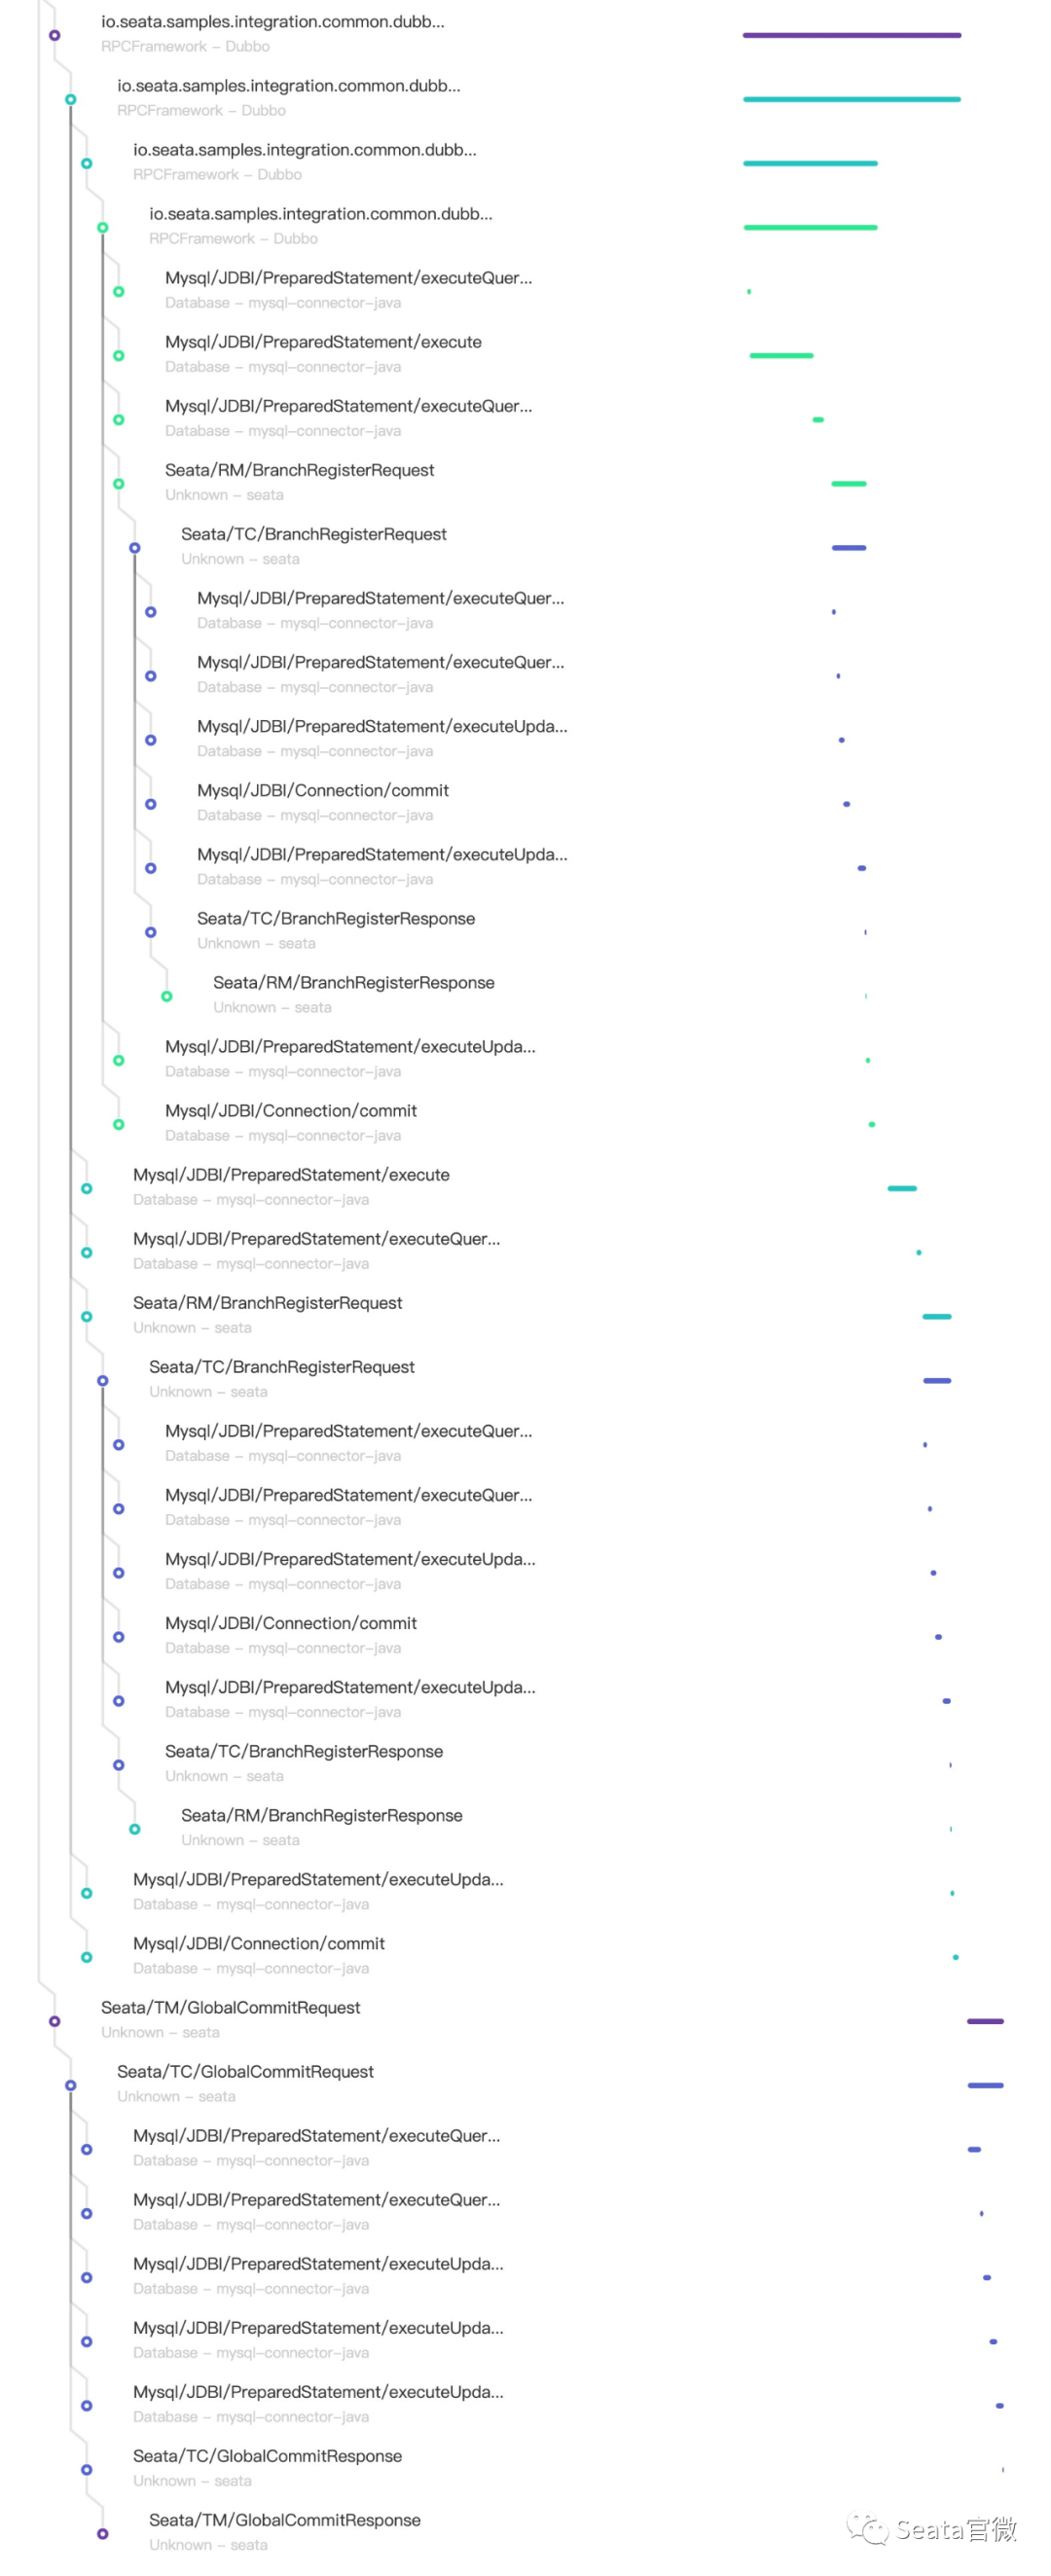
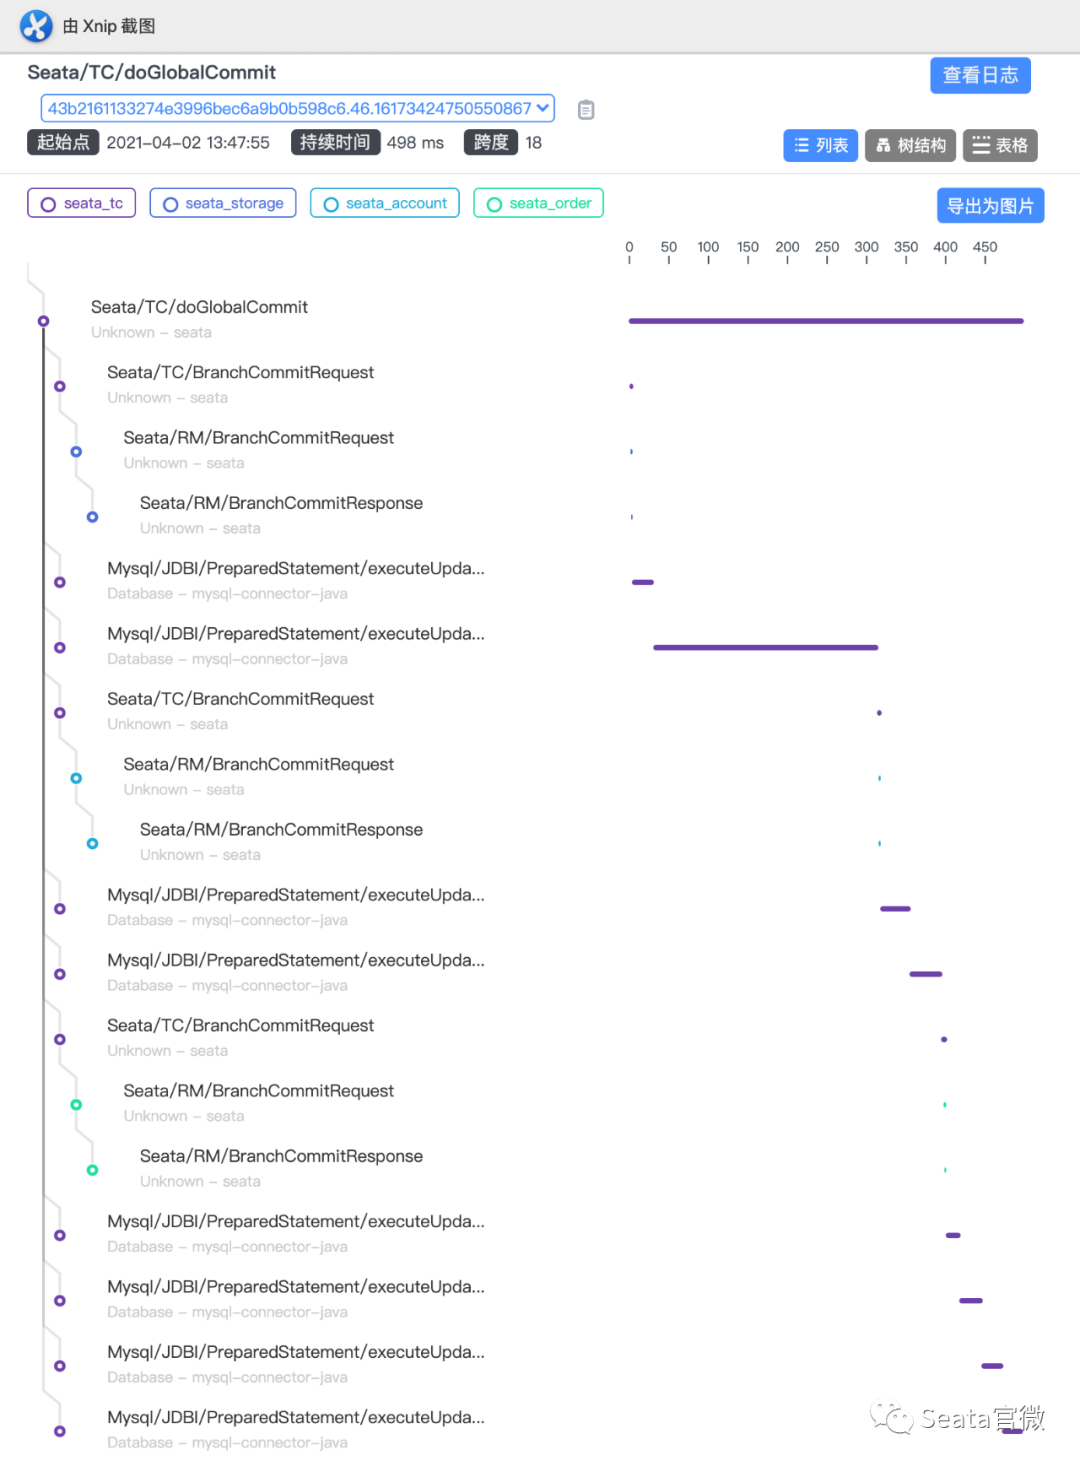
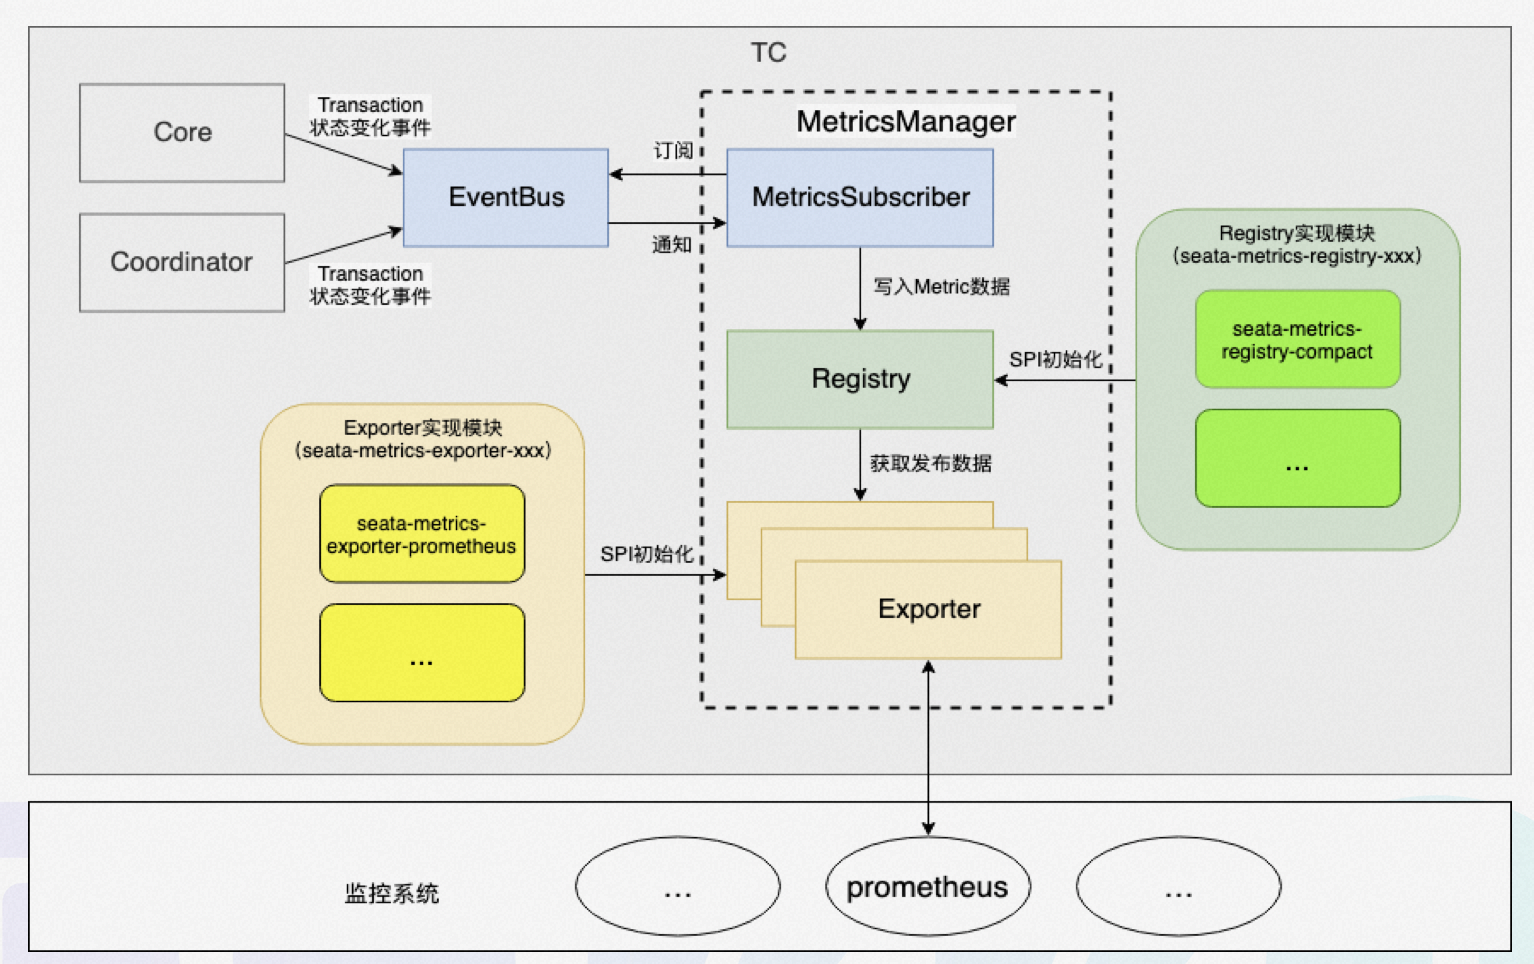 The above figure shows the workflow of the metrics module, which works as follows:

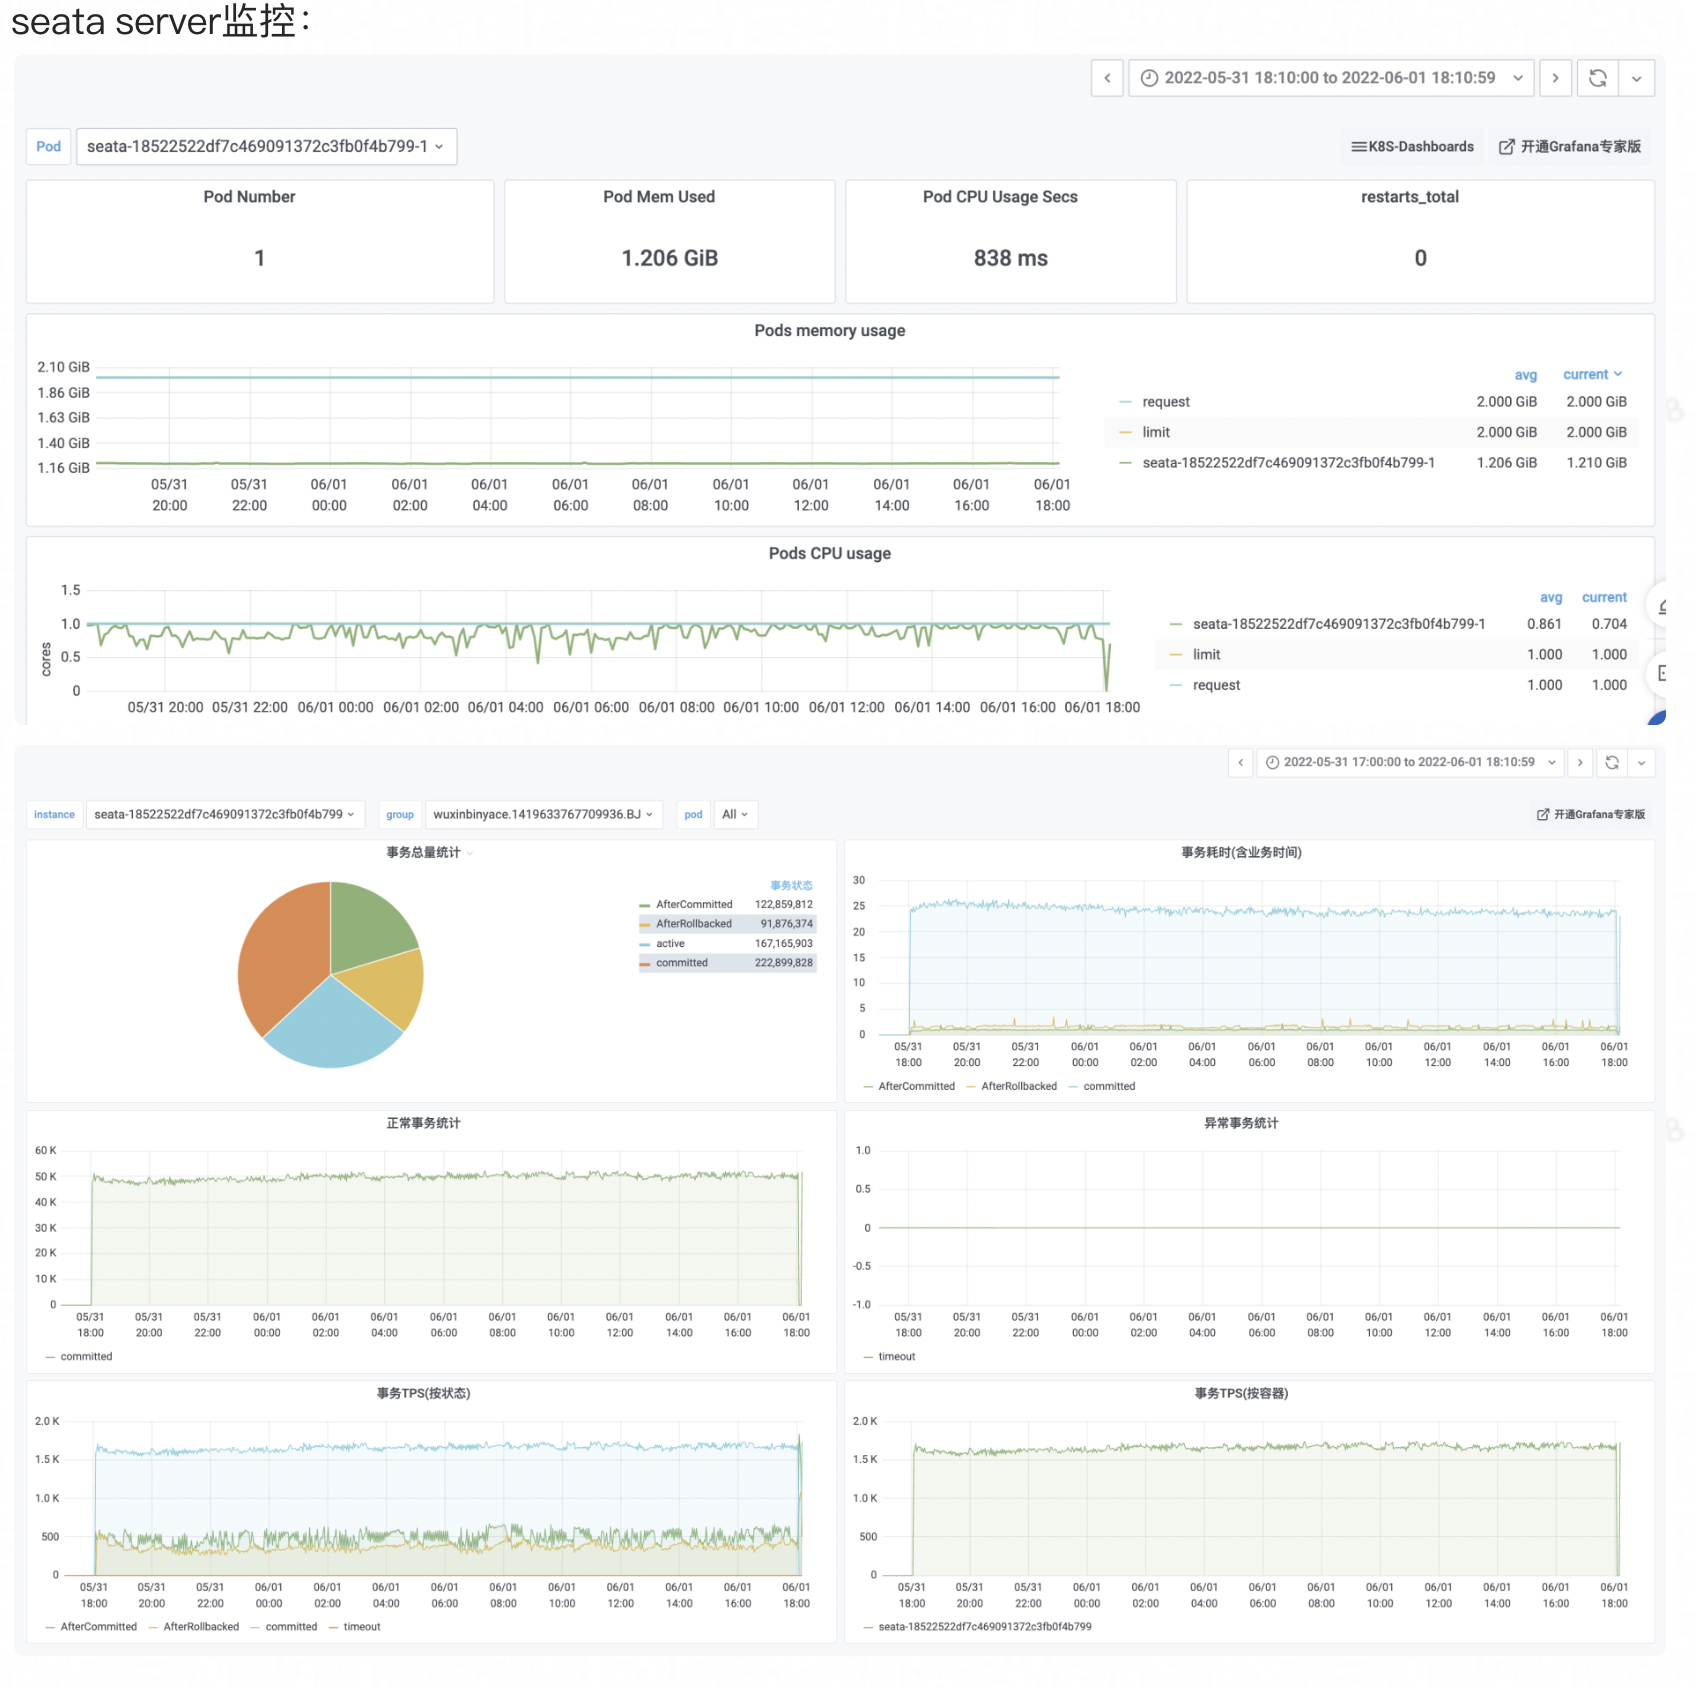
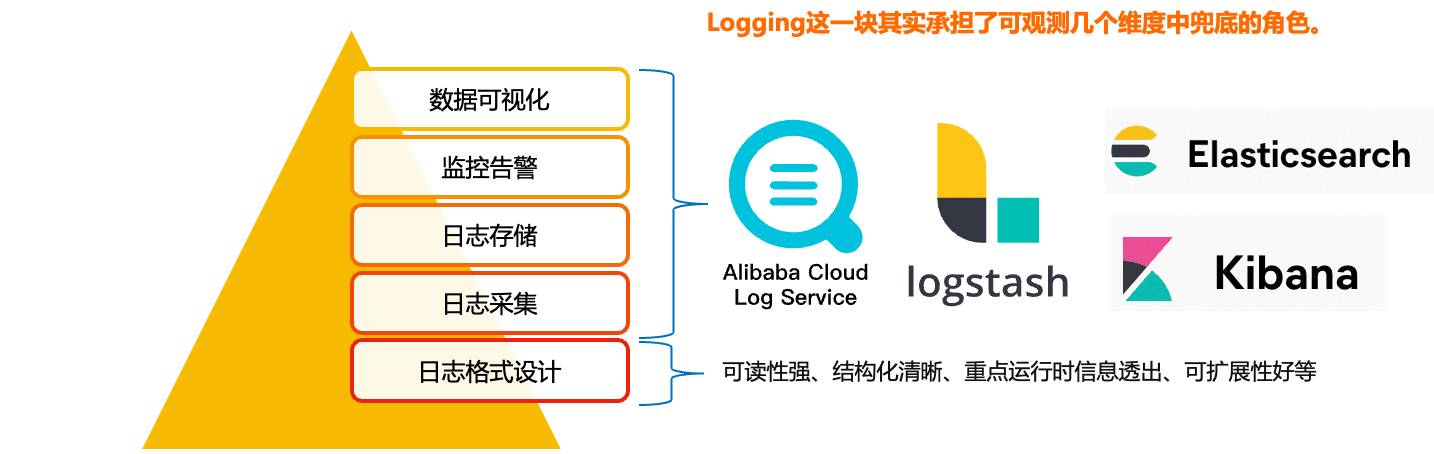 Logging is the bottom of the observable dimensions. Placed at the bottom, in fact, is the design of our log format, only a good log format, we can make it a better collection, modular storage and display. On top of it, is the log collection, storage, monitoring, alarms, data visualisation, these modules are more ready-made tools, such as Ali's SLS logging service, and ELK's set of technology stack, we are more overhead costs, access complexity, ecological prosperity, etc. as a consideration.