"Just started with Seata and don't have a deep understanding of its various modules?
Want to delve into Seata's source code but haven't taken the plunge yet?
Curious about what your application does 'secretly' during startup after integrating Seata?
Want to learn about the design principles and best practices embodied in Seata as an excellent open-source framework?
If you have any of the above thoughts, then this article is tailor-made for you~
Introduction
Those who have seen the first picture in the official README should know that Seata coordinates distributed transactions through its coordinator side TC, which communicates and interacts with the application side TM and RM to ensure data consistency among multiple transaction participants in distributed transactions. So, how does Seata establish connections and communicate between the coordinator side and the application side?
That's right, the answer is Netty. Netty, as a high-performance RPC communication framework, ensures efficient communication between TC and RM. This article will not go into detail about Netty; instead, our focus today is on how the **application side, during startup, uses a series of Seata's key modules (such as RPC, Config/Registry Center, etc.) to establish communication with the coordinator side.
Starting with GlobalTransactionScanner
We know that Seata provides several development annotations, such as @GlobalTransactional for enabling distributed transactions, @TwoPhraseBusinessAction for declaring TCC two-phase services, and so on, which are based on the Spring AOP mechanism to enhance the annotations by assigning the corresponding bean methods to interceptors. Interceptors are enhanced to complete the corresponding processing logic. GlobalTransactionScanner, a Spring bean, carries the responsibility of assigning interceptors to annotations. From the name of its scanner, it is not difficult to deduce that it is designed for the startup of the Spring application, and the global transaction (GlobalTransactionScanner). GlobalTransactionScanner) during Spring application startup.
In addition, the process of initialising the application-side RPC clients (TMClient, RMClient) and establishing a connection with the TC is also initiated in GlobalTransactionScanner#afterPropertiesSet():
/**
* package: io.seata.spring.annotation
* class: GlobalTransactionScanner
*/
@Override
public void afterPropertiesSet() {
if (disableGlobalTransaction) {
if (LOGGER.isInfoEnabled()) {
LOGGER.info("Global transaction is disabled.");
}
return.
}
// Perform TM, RM initialisation after the bean properties are initialised
initClient();

    }
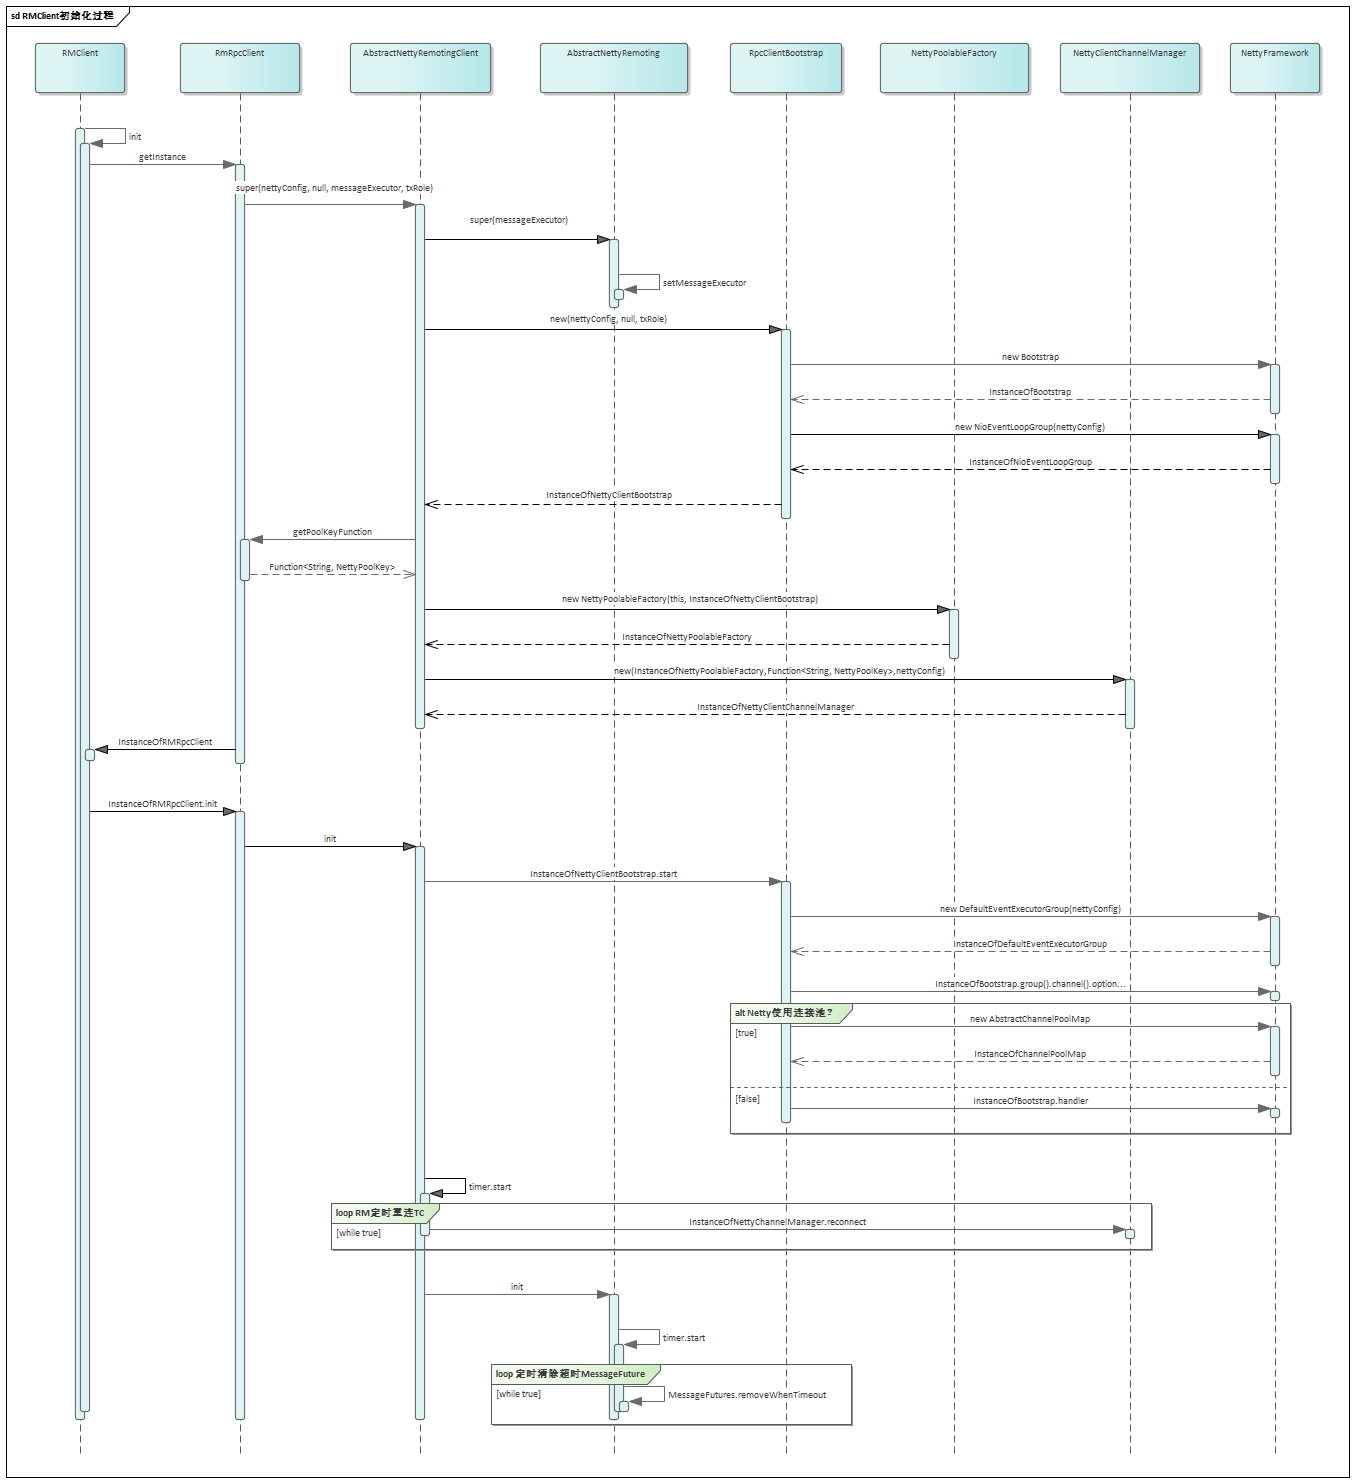
Initialisation and connection process of RM & TM
Here, we take RMClient.init() as an example, and the initialisation process of TMClient is the same.
Design of class relationship
Looking at the source code of RMClient#init(), we find that RMClient first constructs an RmNettyRemotingClient, and then executes its initialisation init() method. The constructor and initialisation methods of RmNettyRemotingClient call the constructor and initialisation methods of the parent class layer by layer
    /**
     * RMClient's initialisation logic
     * package: io.seata.rm
     * class: RMClient
     */
    public static void init(String applicationId, String transactionServiceGroup) {
        //① Start with the RmNettyRemotingClient class and call the constructor of the parent class in turn

        rmNettyRemotingClient.setResourceManager(DefaultResourceManager.get());
        rmNettyRemotingClient.setTransactionMessageHandler(DefaultRMHandler.get()); rmNettyRemotingClient.setTransactionMessageHandler(DefaultRMHandler.get());
        //② Then, starting with the RmNettyRemotingClient class, call init() of the parent class in turn
        rmNettyRemotingClient.init();
    }
The relationship between the above RMClient family classes and the process of calling the constructor and init() initialisation method is illustrated in the following diagram:
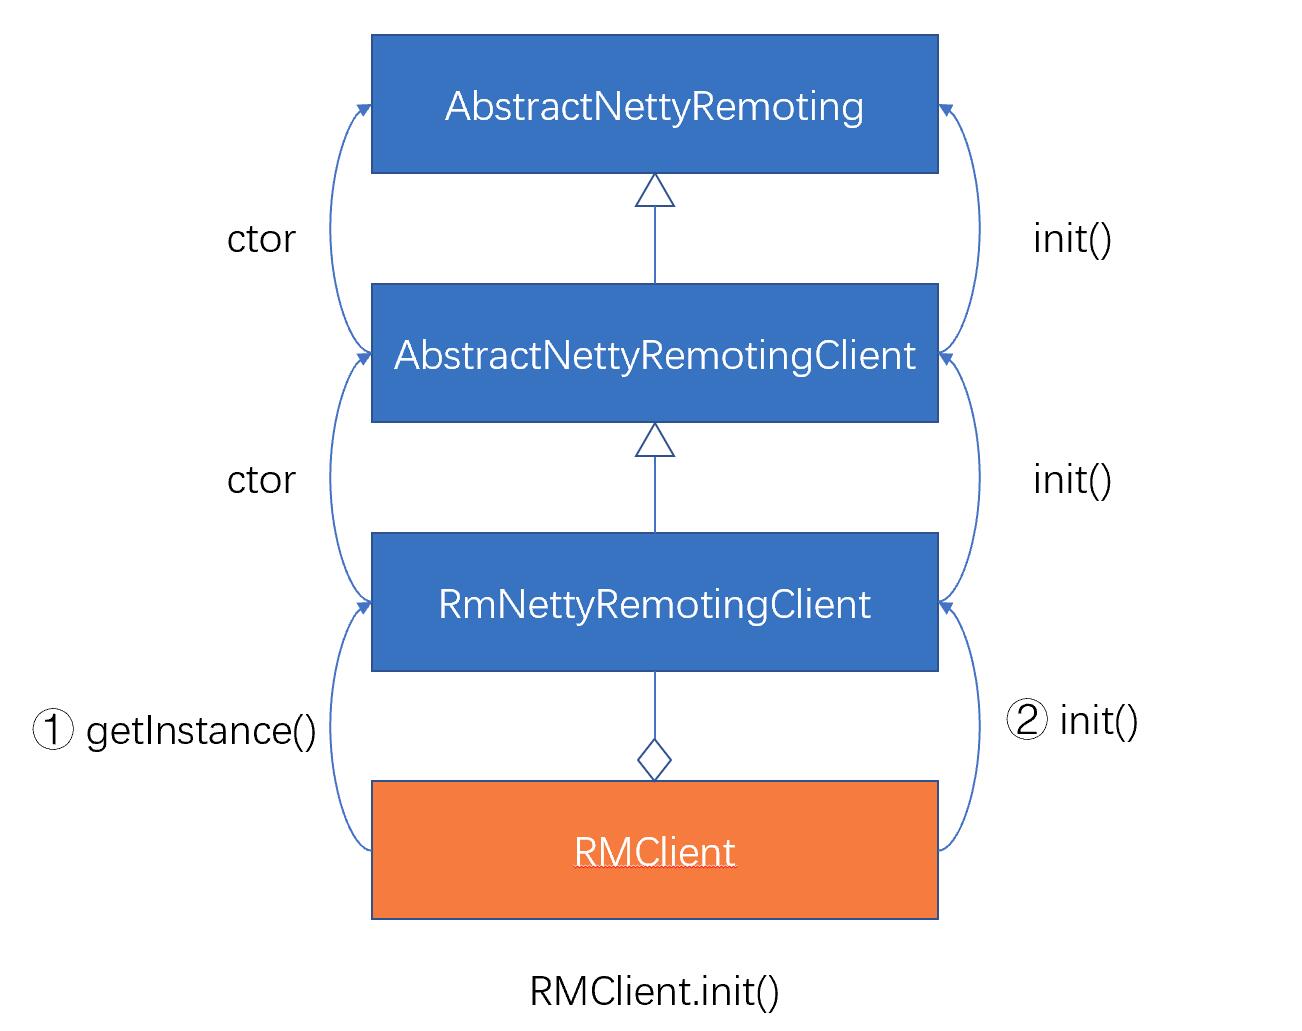
So why did you design RMClient with such a more complex inheritance relationship? In fact, it is in order to divide the responsibilities and boundaries of each layer clearly, so that each layer can focus on specific logic processing, to achieve better scalability, this part of the detailed design ideas, you can refer to the Seata RPC module refactoring PR of the operator by Hui brother's article! The Road to Seata-RPC Refactoring)
The complete flow of initialisation
The main logic in the constructor and initialisation methods of each class can be sorted out with the help of the following ideographic sequence diagram, which can also be skipped first, and then looked back to see when these classes debut and how they interact with each other after we have analysed a few key classes below.
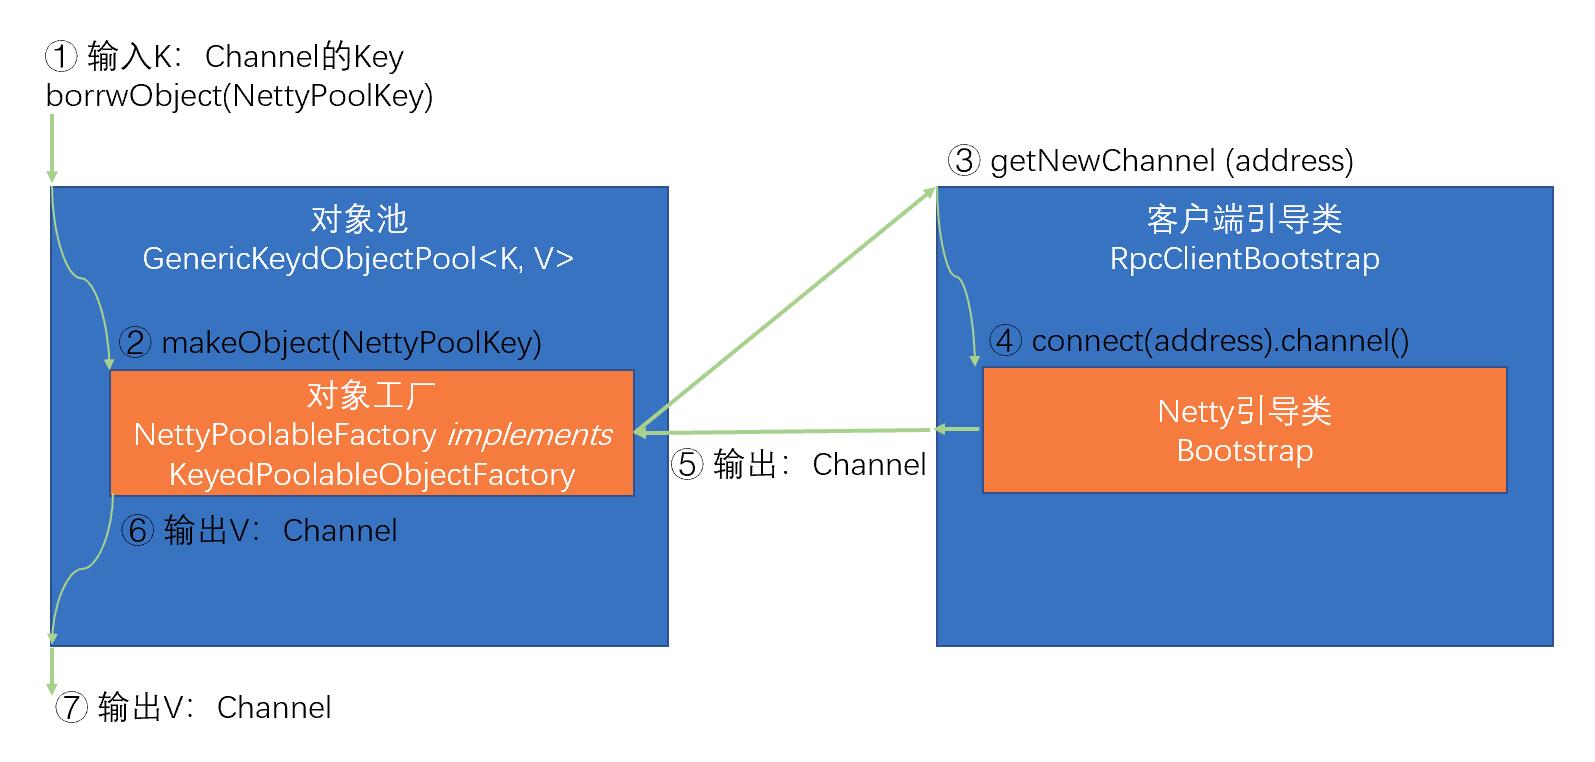
Grabbing the core - Channel creation
First of all, we need to know that the communication between the application side and the coordinator side is done with the help of Netty's Channel, so the key to the communication process lies in the creation of the Channel**, which is created and managed in Seata by means of pooling (with the help of the object pool in common-pool).
Here we need to briefly introduce the simple concept of object pool and its implementation in Seata: The main classes in common-pool are involved:
- GenericKeydObjectPool<K, V>: A KV generic object pool that provides access to all objects, while object creation is done by its internal factory class.
- KeyedPoolableObjectFactory<K, V>: KV generic object factory responsible for the creation of pooled objects, held by the object pool
The main classes involved are related to the implementation of object pooling in Seata:
-
First, the pooled objects are Channel, which corresponds to the generic V in common-pool.
-
NettyPoolKey: Key for Channel, corresponding to generic K in common-pool, NettyPoolKey contains two main information:
- address:Address of TC Server when the Channel is created.
- message:The RPC message sent to TC Server when the Channel is created.
-
GenericKeydObjectPool<NettyPoolKey,Channel>: Pool of Channel objects.
-
NettyPoolableFactory: the factory class for creating Channel. Having recognised the main classes related to object pooling above, let's take a look at some of the main classes in Seata that are involved in channel management and are related to RPC:
-
NettyClientChannelManager:
- Holds the pool of Channel objects.
- Interacts with the channel object pool to manage application-side channels (acquisition, release, destruction, caching, etc.).
-
RpcClientBootstrap: core bootstrap class for RPC clients, holds the Netty framework bootstrap object with start/stop capability; has the ability to get a new Channel based on the connection address for the Channel factory class to call.
-
AbstractNettyRemotingClient:
- Initialises and holds the RpcClientBootstrap.
- Application-side Netty client top-level abstraction, abstracts the ability of application-side RM/TM to obtain the NettyPoolKey corresponding to their respective Channel, for NettyClientChannelManager to call.
- Initialising the NettyPoolableFactory
Understanding the above concepts, we can simplify the process of creating a channel in Seata as follows:
When you see this, you can go back and take a look at the above Initialisation Sequence Diagram for RMClient, and you should have a clearer understanding of the responsibilities and relationships of the various categories in the diagram, as well as the intent of the entire initialisation process.
Timing and flow of establishing a connection
So, when does RMClient establish a connection with Server?
During the initialisation of RMClient, you will find that many init() methods set up some timed tasks, and the mechanism of reconnecting (connecting) the Seata application side to the coordinator is achieved through timed tasks:
/**
* package: io.seata.core.rpcn.netty
* class: AbstractNettyRemotingClient
*/
public void init() {
// Set the timer to reconnect to the TC Server at regular intervals.
timerExecutor.scheduleAtFixedRate(new Runnable() {
@Override
public void run() {
clientChannelManager.reconnect(getTransactionServiceGroup());
}
}, SCHEDULE_DELAY_MILLS, SCHEDULE_INTERVAL_MILLS, TimeUnit.MILLISECONDS);
if (NettyClientConfig.isEnableClientBatchSendRequest()) {
mergeSendExecutorService = new ThreadPoolExecutor(MAX_MERGE_SEND_THREAD,
MAX_MERGE_SEND_THREAD,
KEEP_ALIVE_TIME, TimeUnit.
new LinkedBlockingQueue<>(),
new NamedThreadFactory(getThreadPrefix(), MAX_MERGE_SEND_THREAD));
mergeSendExecutorService.submit(new MergedSendRunnable());
}
super.init();
clientBootstrap.start();
}
Let's see how the classes we explored above work together to connect RMClient to TC by tracing the execution of a reconnect (the first connection may actually occur during registerResource, but the process is the same)
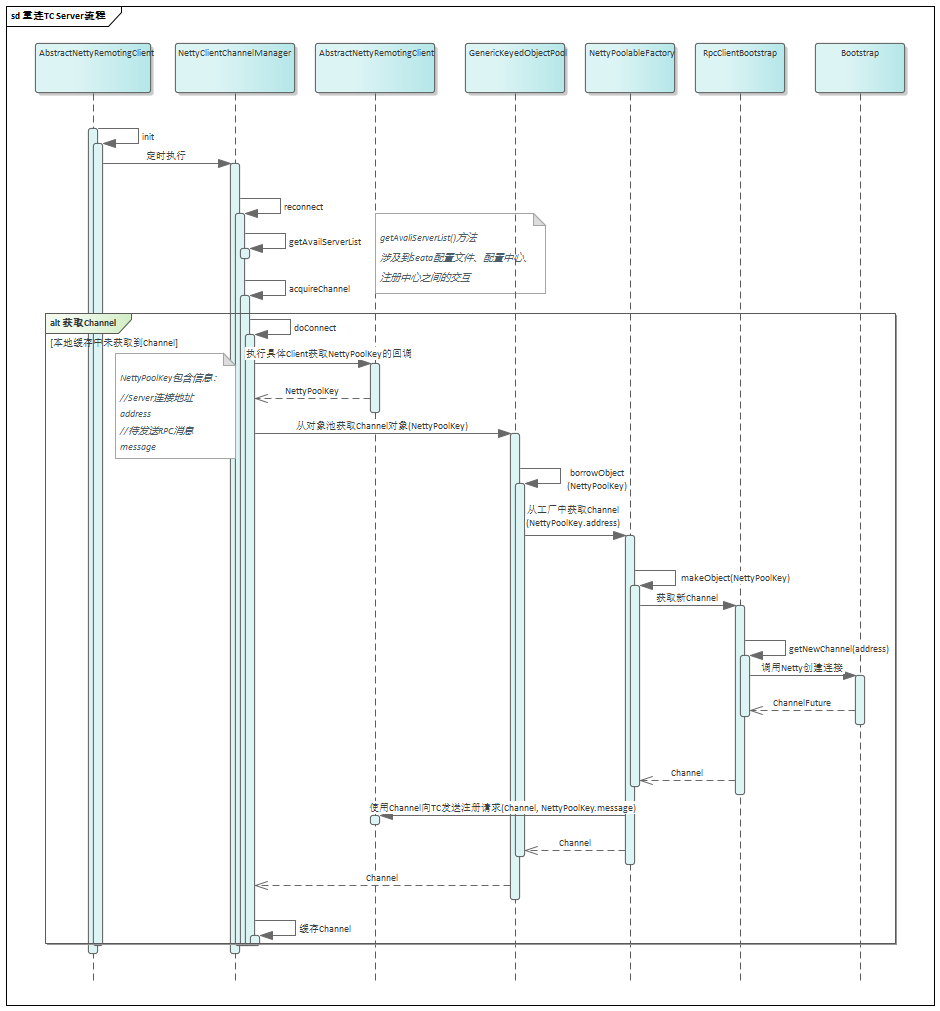
In this diagram, you can focus on these points:
- NettyClientChannelManager executes the callback function (getPoolKeyFunction()) to get the NettyPoolKey in the concrete AbstractNettyRemotingClient: the different Clients (RMClient and TMClient) on the application side, when they create the NettyPoolKey, they create the NettyChannelManager. TMClient) on the application side, the Key used when creating the Channel is different, so that they send different registration messages when reconnecting to the TC Server, which is also determined by the different roles they play in Seata:
- TMClient: plays the role of transaction manager, when creating a Channel, it only sends a TM registration request (RegisterTMRequest) to the TC.
- RMClient: plays the role of resource manager, needs to manage all transaction resources on the application side, therefore, when creating a Channel, it needs to get all transaction resource information on the application side before sending RM registration request (RegisterRMRequest), and register it to TC Server.
- In the Channel object factory's
NettyPoolableFactory'smakeObject(create Channel) method, two tasks are completed using the two pieces of information inNettyPoolKey:- A new Channel is created using the address from
NettyPoolKey. - A registration request is sent to the TC Server using the message from
NettyPoolKeyand the new Channel. This is the Client's initial connection (first execution) or reconnection (subsequent executions driven by scheduled tasks) request to the TC Server.
- A new Channel is created using the address from
The above content covers the entire process of the Seata application's initialization and its connection establishment with the TC Server coordinator side.
For deeper details, it is recommended to thoroughly read the source code based on the outline and key points mentioned in this article. This will undoubtedly lead to a deeper understanding and new insights!
Postscript: Considering the length and to maintain a suitable amount of information for a source code analysis article, the collaboration of configuration and registration modules mentioned in the introduction was not expanded upon in this article.
In the next source code analysis, I will focus on the configuration center and registration center, analyzing how the Seata application side discovers the TC Server through service discovery and how it obtains various information from the configuration module before establishing connections between RMClient/TM Client and the TC Server.