In Seata version 1.3.0, data source auto-proxy and manual proxy must not be mixed, otherwise it will lead to multi-layer proxy, which will lead to the following problems:
- single data source case: cause branch transaction commit, undo_log itself is also proxied, i.e.
generated undo_log for undo_log, assumed to be undo_log2, at this time, undo_log will be treated as a branch transaction; branch transaction rollback, because of the undo_log2 generated by the faulty in undo_log corresponding transaction branch rollback. When the branch transaction is rolled back, because there is a problem with the generation of undo_log2, when the transaction branch corresponding to the undo_log is rolled back, it will delete the undo_log associated with the business table, which will lead to the discovery that the business table corresponding to the business tableis rolled back and theundo_logdoesn't exist, and thus generate an additional status of 1 for theundo_log.' This time, the overall logic is already messed up, which is a very serious problem!
- multiple data sources and
logical data sources are proxied case: in addition to the problems that will occur in the case of a single data source, may also cause deadlock problems. The reason for the deadlock is that for the undo_log operation, the select for update and delete operations that should have been performed in one transaction are spread out over multiple transactions, resulting in one transaction not committing after executing the select for update, and one transaction waiting for a lock when executing the delete until the timeout expires, and then the lock will not lock until the timeout expires. until it times out.
Proxy description
This is a layer of DataSource proxying that overrides some methods. For example, the getConnection method does not return a Connection, but a ConnectionProxy, and so on.
public DataSourceProxy(DataSource targetDataSource) {
this(targetDataSource, DEFAULT_RESOURCE_GROUP_ID);
}
private void init(DataSource dataSource, String resourceGroupId) {
DefaultResourceManager.get().registerResource(this); }
}
public Connection getPlainConnection() throws SQLException {
return targetDataSource.getConnection(); } public Connection getPlainConnection(); return targetDataSource.
}
@Override
public ConnectionProxy getConnection() throws SQLException {
Connection targetConnection = targetDataSource.getConnection(); } @Override public ConnectionProxy getConnection(); }
return new ConnectionProxy(this, targetConnection);
}
Manual Proxy
That is, manually inject a DataSourceProxy as follows
@Bean
public DataSource druidDataSource() {
return new DruidDataSource()
}

@Primary
@Bean("dataSource")
public DataSourceProxy dataSource(DataSource druidDataSource) {
return new DataSourceProxy(druidDataSource); }
}
AutoProxy
Create a proxy class for DataSource, get DataSourceProxy (create it if it doesn't exist) based on DataSource inside the proxy class, and then call the relevant methods of DataSourceProxy. The core logic is in SeataAutoDataSourceProxyCreator.
public class SeataAutoDataSourceProxyCreator extends AbstractAutoProxyCreator {
private static final Logger LOGGER = LoggerFactory.getLogger(SeataAutoDataSourceProxyCreator.class);
private final String[] excludes; private final Advisor advisor = new SeataAutoDataSourceProxyCreator.class
private final Advisor advisor = new DefaultIntroductionAdvisor(new SeataAutoDataSourceProxyAdvice());

    public SeataAutoDataSourceProxyCreator(boolean useJdkProxy, String[] excludes) {
        this.excludes = excludes;
        setProxyTargetClass(!useJdkProxy);
    }

    @Override
    protected Object[] getAdvicesAndAdvisorsForBean(Class<? > beanClass, String beanName, TargetSource customTargetSource) throws BeansException {
        if (LOGGER.isInfoEnabled()) {
            LOGGER.info("Auto proxy of [{}]", beanName);
        }
        return new Object[]{advisor};
    }

    @Override
    protected boolean shouldSkip(Class<? > beanClass, String beanName) {
        return SeataProxy.class.isAssignableFrom(beanClass) ||
                DataSourceProxy.class.isAssignableFrom(beanClass) ||
                !DataSource.class.isAssignableFrom(beanClass) ||
                Arrays.asList(excludes).contains(beanClass.getName());
    }
}

public class SeataAutoDataSourceProxyAdvice implements MethodInterceptor, IntroductionInfo {
}
public Object invoke(MethodInvocation invocation) throws Throwable {
DataSourceProxy dataSourceProxy = DataSourceProxyHolder.get().putDataSource((DataSource) invocation.getThis());
Method method = invocation.getMethod();
Object[] args = invocation.getArguments();
Method m = BeanUtils.findDeclaredMethod(DataSourceProxy.class, method.getName(), method.getParameterTypes());
if (m ! = null) {
return m.invoke(dataSourceProxy, args); } else { m.invoke(DataSourceProxy.class, method.getName(), method.getParameterTypes())
} else {
return invocation.proceed();
}
}

    @Override
    public Class<? >[] getInterfaces() {
        return new Class[]{SeataProxy.class};
    }
}
Data Source Multi-Level Proxy
@Bean.
@DependsOn("strangeAdapter")
public DataSource druidDataSource(StrangeAdapter strangeAdapter) {
druidDataSource(StrangeAdapter strangeAdapter) { doxx
return new DruidDataSource()
}

@Primary
@Bean("dataSource")
public DataSourceProxy dataSource(DataSource druidDataSource) {
return new DataSourceProxy(druidDataSource); }
}
- First we inject two
DataSources into the configuration class: DruidDataSource and DataSourceProxy, where DruidDataSource is used as the targetDataSource attribute of DataSourceProxy and DataSourceProxy is used as the targetDataSource attribute of DruidDataSource. DataSourceProxyis declared using the@Primary` annotation.
- The application has automatic data source proxying enabled by default, so when calling methods related to
DruidDataSource, a corresponding data source proxy DataSourceProxy2 will be created for DruidDataSource.
- What happens when we want to get a Connection in our application?
- first get a
DataSource, because the DataSourceProxy is Primary, so we get a DataSourceProxy. 2. based on the DataSource, we create a corresponding DataSourceProxy2.
- get a
Connection based on the DataSource, i.e. get the Connection through the DataSourceProxy. At this time, we will first call the getConnection method of targetDataSource, i.e. DruidDataSource, but since the cutover will intercept DruidDataSource, according to the interception logic in step 2, we can know that a DataSourceProxy2will be created automatically, and then call theDataSourceProxy2. Then call DataSourceProxy2#getConnection, and then call DruidDataSource#getConnection. This results in a two-tier proxy, and the returned Connectionis also a two-tierConnectionProxy`.
!
The above is actually the modified proxy logic, Seata's default autoproxy will proxy the DataSourceProxy again, the consequence is that there is one more layer of proxy at this time the corresponding diagram is as follows
!
The two problems that can result from multiple layers of proxies for a data source are summarised at the beginning of the article, with case studies below.
Branching Transaction Commits
What happens when the corresponding method is executed through the ConnectionProxy? Let's take an example of a branching transaction commit involving an update operation:
- Execute
ConnectionProxy#prepareStatement, which returns a PreparedStatementProxy.
- Execute
PreparedStatementProxy#executeUpdate, PreparedStatementProxy#executeUpdate will probably do two things: execute the business SQL and commit the undo_log.
Commit business SQL
if (sqlRecognizers.size() == 1) {
SQLRecognizer sqlRecognizer = sqlRecognizers.get(0);
switch (sqlRecognizer.getSQLType()) {
case INSERT.
executor = EnhancedServiceLoader.load(InsertExecutor.class, dbType, new Class[]{StatementLoader.load(InsertExecutor.class, dbType)) { case INSERT.
new Class[]{StatementProxy.class, StatementCallback.class, SQLRecognizer.class}, new
new Object[]{statementProxy, statementCallback, sqlRecognizer});
statementProxy, statementCallback, sqlRecognizer}); break;
case UPDATE: executor = new UpdateExecutor
executor = new UpdateExecutor<>(statementProxy, statementCallback, sqlRecognizer); break; case UPDATE.
break;
case DELETE.
executor = new DeleteExecutor<>(statementProxy, statementCallback, sqlRecognizer); break; case DELETE.
break; case SELECT_FOR_UPDATE.
case SELECT_FOR_UPDATE: executor = new SelectForUpdate.
executor = new SelectForUpdateExecutor<>(statementProxy, statementCallback, sqlRecognizer); break; case SELECT_FOR_UPDATE.
break; break
default: executor = new PlainExecutor
executor = new PlainExecutor<>(statementProxy, statementCallback); break; default.
break;
}
} else {
executor = new MultiExecutor<>(statementProxy, statementCallback, sqlRecognizers); } else { executor = new MultiExecutor<>(statementProxy, statementCallback, sqlRecognizers); }
}
The main process is: first execute the business SQL, then execute the commit method of the ConnectionProxy, in which the corresponding undo_log SQL will be executed for us, and then commit the transaction.
PreparedStatementProxy#executeUpdate =>
ExecuteTemplate#execute =>
BaseTransactionalExecutor#execute =>
AbstractDMLBaseExecutor#doExecute =>
AbstractDMLBaseExecutor#executeAutoCommitTrue =>
AbstractDMLBaseExecutor#executeAutoCommitFalse => In this step, the statementCallback#execute method will be triggered, i.e. the native PreparedStatement#executeUpdate method will be called.
ConnectionProxy#commit
ConnectionProxy#processGlobalTransactionCommit
UNDO_LOG insert
private void processGlobalTransactionCommit() throws SQLException {
try {
register();
} catch (TransactionException e) {
recognizeLockKeyConflictException(e, context.buildLockKeys());
}
try {
UndoLogManagerFactory.getUndoLogManager(this.getDbType()).flushUndoLogs(this);
targetConnection.commit(); } catch (Throwable ex)
} catch (Throwable ex) {
LOGGER.error("process connectionProxy commit error: {}", ex.getMessage(), ex); report(false); }
report(false); } catch (Throwable ex); }
throw new SQLException(ex);
}
if (IS_REPORT_SUCCESS_ENABLE) {
report(true); }
}
context.reset();
}
- undo_log processing @1, parses the
undo_log involved in the current transaction branch and writes it to the database using TargetConnection.
   public void flushUndoLogs(ConnectionProxy cp) throws SQLException {
   ConnectionContext connectionContext = cp.getContext();
   if (!connectionContext.hasUndoLog()) {
   return;
   }

   String xid = connectionContext.getXid(); long branchId = connectionContext.hasUndoLog(); { return; }
   long branchId = connectionContext.getBranchId(); }

   BranchUndoLog branchUndoLog = new BranchUndoLog(); branchUndoLog.setBranchId = connectionContext.getBranchId(); }
   branchUndoLog.setXid(xid); branchUndoLog.
   branchUndoLog.setBranchId(branchId); branchUndoLog.
   branchUndoLog.setSqlUndoLogs(connectionContext.getUndoItems());

   UndoLogParser parser = UndoLogParserFactory.getInstance();
   byte[] undoLogContent = parser.encode(branchUndoLog);

   if (LOGGER.isDebugEnabled()) {
   LOGGER.debug("Flushing UNDO LOG: {}", new String(undoLogContent, Constants.DEFAULT_CHARSET));
   }

   insertUndoLogWithNormal(xid, branchId, buildContext(parser.getName()), undoLogContent,cp.getTargetConnection());
   }
- Commit local transaction @2, i.e., commit the transaction via
TargetConnection. That is, the same TargetConnection is used for service SQL execution, undo_log write, and i.e. transaction commit.
lcn's built-in database solution, lcn is to write undolog to his embedded h2 (I forget if it's this one) database, at this time it will become two local transactions, one is h2's undolog insertion transaction, one is the transaction of the business database, if the business database is abnormal after the insertion of the h2, lcn's solution will be data redundancy, roll back the data. data is the same, delete undolog and rollback business data is not a local transaction.
But the advantage of lcn is the invasion of small, do not need to add another undolog table. Thanks to @FUNKYE for the advice, I don't know much about lcn, I'll look into it when I get a chance!
Branch Transaction Rollback
- Server sends a rollback request to Client. 2.
- Client receives the request from Server, and after a series of processing, it ends up in the
DataSourceManager#branchRollback method. 3.
- first according to the resourceId from the
DataSourceManager.dataSourceCache to get the corresponding DataSourceProxy, at this time for the masterSlaveProxy (rollback stage we do not test the proxy data source, simple and direct, anyway, the final get all the TragetConnection)
- According to the xid and branchId sent from the Server side to find the corresponding undo_log and parse its
rollback_info attribute, each undo_log may be parsed out of more than one SQLUndoLog, each SQLUndoLog can be interpreted as an operation. For example, if a branch transaction updates table A and then table B, the undo_log generated for the branch transaction contains two SQLUndoLogs: the first SQLUndoLog corresponds to the snapshot before and after the update of table A; the second SQLUndoLog corresponds to the snapshot before and after the update of table B.
- for each
SQLUndoLog execute the corresponding rollback operation, for example, a SQLUndoLog corresponds to the operation INSERT, then its corresponding rollback operation is DELETE.
- Delete the undo_log based on the xid and branchId.
public void undo(DataSourceProxy dataSourceProxy, String xid, long branchId) throws TransactionException {
Connection conn = null;
ResultSet rs = null;
PreparedStatement selectPST = null;
boolean originalAutoCommit = true; for (; ; ) {
for (; ; ) {
try {
conn = dataSourceProxy.getPlainConnection();
if (originalAutoCommit = conn.getAutoCommit()) {
conn.setAutoCommit(false);
}
selectPST = conn.prepareStatement(SELECT_UNDO_LOG_SQL);
selectPST.setLong(1, branchId); selectPST.setString(1, branchId); selectPST.setString(1, branchId)
selectPST.setString(2, xid);
rs = selectPST.executeQuery(); boolean exists = false; rs = selectPST.
boolean exists = false; while (rs.next())
while (rs.next()) {
exists = true; boolean exists = false; while (rs.next()) {
if (!canUndo(state)) {
return; }
}
byte[] rollbackInfo = getRollbackInfo(rs);
BranchUndoLog branchUndoLog = UndoLogParserFactory.getInstance(serialiser).decode(rollbackInfo);
try {
setCurrentSerializer(parser.getName());
List<SQLUndoLog> sqlUndoLogs = branchUndoLog.getSqlUndoLogs(); if (sqlUndoLog.getSqlUndoLogs(parser.getName()); } }
if (sqlUndoLogs.size() > 1) {
Collections.reverse(sqlUndoLogs);
}
for (SQLUndoLog sqlUndoLog : sqlUndoLogs) {
AbstractUndoExecutor undoExecutor = UndoExecutorFactory.getUndoExecutor(dataSourceProxy.getDbType(), sqlUndoLog);
undoExecutor.executeOn(conn);
}
}
}
if (exists) {
LOGGER.error("\n delete from undo_log where xid={} AND branchId={} \n", xid, branchId);
deleteUndoLog(xid, branchId, conn);
conn.commit();
} else {
LOGGER.error("\n insert into undo_log xid={},branchId={} \n", xid, branchId);
insertUndoLogWithGlobalFinished(xid, branchId, UndoLogParserFactory.getInstance(), conn);
conn.commit();
}
return; }
} catch (Throwable e) {
throw new BranchTransactionException(BranchRollbackFailed_Retriable, String
.format("Branch session rollback failed and try again later xid = %s branchId = %s %s", xid,branchId, e.getMessage()), e); }
}
}
}
There are several notes:
- rollback does not take into account data source proxying, and ends up using
TargetConnection.
- set atuoCommit to false, i.e. you need to commit the transaction manually
for update is added when querying the undo_log based on xid and branchId, i.e. the transaction will hold the lock for this undo_log until all rollbacks are complete, as it is not until they are done that the
Multi-Tier Proxy Issues
Several issues that can be caused by multi-tier proxying of data sources have been mentioned at the beginning of the article, focusing on analysing why the above issues are caused:
Impact on branch transaction commits
Let's start by analysing what happens if we use a two-tier proxy. Let's analyse it from two aspects: business SQL and undo_log
- business SQL
   PreparedStatementProxy1.executeUpdate =>
   statementCallback#executeUpdate(PreparedStatementProxy2#executeUpdate) =>
   PreparedStatement#executeUpdate
It doesn't seem to matter, it's just an extra loop, and it's still executed through PreparedStatement in the end.
- undo_log
ConnectionProxy1#getTargetConnection ->
ConnectionProxy2#prepareStatement ->
PreparedStatementProxy2#executeUpdate ->
PreparedStatement#executeUpdate (native undo_log write, before generating undo_log2 (the undo_log of undo_log) for that undo_log) ->
ConnectionProxy2#commit ->
ConnectionProxy2#processGlobalTransactionCommit(write undo_log2) ->
ConnectionProxy2#getTargetConnection ->
TargetConnection#prepareStatement ->
PreparedStatement#executeUpdate
Impact on branch transaction rollback
Why isn't the undo_log deleted after a transaction rollback?
It is not actually not deleted. As I said before, the two-tier proxy causes the undo_log to be treated as a branch transaction, so it generates an undo_log for that undo_log (assuming it's undo_log2), and undo_log2 is generated wrongly (which is fine, it should be generated this way), which results in the business-table-associated undo_log being deleted when rolling back. This leads to a rollback that deletes the undo_log associated with the business table, which ultimately leads to the business table corresponding to the transaction branch rolling back to find that the undo_log does not exist, thus generating one more undo_log with a status of 1.
Before the rollback
// undo_log
84 59734070967644161 172.16.120.59:23004:59734061438185472 serializer=jackson 1.1KB 0
85 59734075254222849 172.16.120.59:23004:59734061438185472 serializer=jackson 4.0KB 0

// branch_table
59734070967644161 172.16.120.59:23004:59734061438185472 jdbc:mysql://172.16.248.10:3306/tuya_middleware
59734075254222849 172.16.120.59:23004:59734061438185472 jdbc:mysql://172.16.248.10:3306/tuya_middleware

// lock_table
jdbc:mysql://xx^^^seata_storage^^^1 59734070967644161 jdbc:mysql://172.16.248.10:3306/tuya_middleware seata_storage 1
jdbc:mysql://xx^^^^undo_log^^^^84 59734075254222849 jdbc:mysql://172.16.248.10:3306/tuya_middleware undo_log 84
After the rollback
// An undo_log with status 1 was generated, corresponding to the log: undo_log added with GlobalFinished
86 59734070967644161 172.16.120.59:23004:59734061438185472 serializer=jackson 1.0Byte 1
Problem analysis
- find the corresponding undo_log log based on xid and branchId
- parse the undo_log, mainly its
rollback_info field, rollback_info is a SQLUndoLog collection, each SQLUndoLog corresponds to an operation, which contains a snapshot before and after the operation, and then perform a corresponding rollback
- Delete undo_log logs based on xid and branchId.
Because of the two-tier proxy problem, an undo_log becomes a branch transaction, so when a rollback occurs, we also need to rollback the undo_log branch transaction:
1, first according to the xid and branchId to find the corresponding undo_log and parse its rollback_info attribute, here the parsed rollback_info contains two SQLUndoLog. Why are there two?
If you think about it, you can understand that the first layer of proxy operations on seata_storage are put into the cache, which should be cleared after execution, but because of the two-tier proxy, the process is not finished at this time. When it's the second tier proxy's turn to operate on undo_log, it puts that operation into the cache, and at that point there are two operations in the cache, UPDATE for seata_storage and INSERT for undo_log. So it's easy to see why the undo_log operation is extra large (4KB) because it has two operations in its rollback_info.
One thing to note is that the first SQLUndoLog corresponds to the after snapshot, which has branchId=59734070967644161 pk=84, i.e., branchIdcorresponding to theseata_storage branch and undo_log corresponding to the seata_storage PK. In other words, the undo_log rollback deletes the seata_storage corresponding undo_log`.
How to delete the undo_log itself? In the next logic, it will be deleted according to xid and branchId.
- Parsing the first
SQLUndoLog, it corresponds to the INSERToperation ofundo_log, so its corresponding rollback operation is DELETE. Because undo_logis treated as a business table at this point. So this step will delete the59734075254222849corresponding to theundo_log, **but this is actually the corresponding business table corresponding to the corresponding undo_log`**.
3, parse the second SQLUndoLog, at this time corresponds to the seata_storage UPDATE operation, this time will be through the snapshot of the seata_storage corresponding to the recovery of records
4、Delete the undo_log log according to xid and branchId, here the deletion is the undo_log of undo_log , i.e. undo_log2. So, by this point, both undo_logs have been deleted.
- Next, roll back
seata_storage, because at this time its corresponding undo_log has been deleted in step 2, so at this time can not check the undo_log, and then regenerate a status == 1 undo_log.
Case Study
Background
- Three data sources are configured: two physical data sources and one logical data source, but the corresponding connection addresses of the two physical data sources are the same. Is this interesting?
@Bean("dsMaster")
DynamicDataSource dsMaster() {
   return new DynamicDataSource(masterDsRoute);
}

@Bean("dsSlave")
DynamicDataSource dsSlave() {
   return new DynamicDataSource(slaveDsRoute); }
}

@Primary
@Bean("masterSlave")
DataSource masterSlave(@Qualifier("dsMaster") DataSource dataSourceMaster,
                       @Qualifier("dsSlave") DataSource dataSourceSlave) throws SQLException {
   Map<String, DataSource> dataSourceMap = new HashMap<>(2);
   // Master database
   dataSourceMap.put("dsMaster", dataSourceMaster);
   //slave
   dataSourceMap.put("dsSlave", dataSourceSlave); // Configure read/write separation rules.
   // Configure read/write separation rules
   MasterSlaveRuleConfiguration masterSlaveRuleConfig = new MasterSlaveRuleConfiguration(
           "masterSlave", "dsMaster", Lists.newArrayList("dsSlave")
   );
   Properties shardingProperties = new Properties();
   shardingProperties.setProperty("sql.show", "true");
   shardingProperties.setProperty("sql.simple", "true");
   // Get the data source object
   DataSource dataSource = MasterSlaveDataSourceFactory.createDataSource(dataSourceMap, masterSlaveRuleConfig, shardingProperties);
   log.info("datasource initialised!");
   return dataSource;˚
}
!
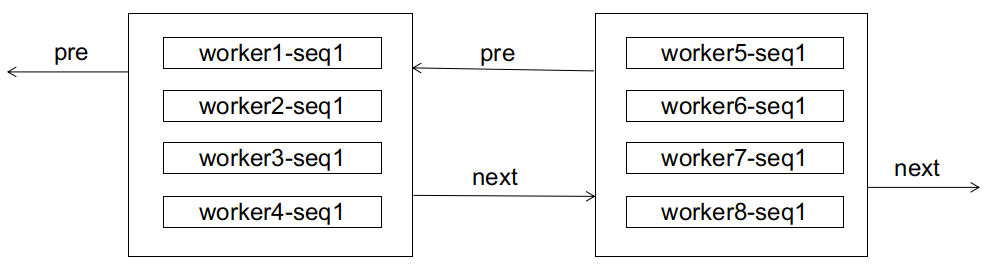
2, open seata's data source dynamic proxy, according to seata's data source proxy logic can be known, will eventually generate three proxy data sources, the relationship between the native data source and the proxy data source is cached in the DataSourceProxyHolder.dataSourceProxyMap, if the native data source and the proxy data source corresponds to the relationship is as follows:
dsMaster(DynamicDataSource) => dsMasterProxy(DataSourceProxy)
dsSlave(DynamicDataSource) => dsSlaveProxy(DataSourceProxy)
masterSlave(MasterSlaveDataSource) => masterSlaveProxy(DataSourceProxy)
So, ultimately, the three data sources that exist in the IOC container are: dsMasterProxy, dsSlaveProxy, masterSlaveProxy. According to the @Primary feature, when we get a DataSource from the container, the default data source returned is the proxy masterSlaveProxy.
I haven't studied shardingjdbc specifically, but just guessed its working mechanism based on the code I saw during the debug.
masterSlaveProxy can be seen as MasterSlaveDataSource wrapped by DataSourceProxy. We can venture to guess that MasterSlaveDataSource is not a physical data source, but a logical data source, which can simply be thought of as containing routing logic. When we get a connection, we will use the routing rules inside to select a specific physical data source, and then get a real connection through that physical data source.
The routing rules should be able to be defined by yourself. According to the phenomenon observed when debugging, the default routing rules should be:
-
for select read operations, will be routed to the slave library, that is, our dsSlave
-
for update write operations, will be routed to the master library, that is, our dsMaster
-
When each DataSourceProxy is initialised, it will parse the connection address of that real DataSource, and then maintain that connection address and the DataSourceProxy itself in DataSourceManager.dataSourceCache. The DataSourceManager.dataSourceCache is used for rollback: when rolling back, it finds the corresponding DataSourceProxy based on the connection address, and then does the rollback operation based on that DataSourceProxy.
But we can find this problem, these three data sources are resolved to the same connection address, that is, the key is duplicated, so in the DataSourceManager.dataSourceCache, when the connection place is the same, after the registration of the data source will overwrite the existing one. That is: DataSourceManager.dataSourceCache ultimately exists masterSlaveProxy, that is to say, will ultimately be rolled back through the masterSlaveProxy, this point is very important.
4, the table involved: very simple, we expect a business table seata_account, but because of the duplicate proxy problem, resulting in seata will undo_log also as a business table
- seata_account
- undo_log
OK, here's a brief background, moving on to the Seata session
Requirements
We have a simple requirement to perform a simple update operation inside a branch transaction to update the count value of seata_account. After the update, manually throw an exception that triggers a rollback of the global transaction.
To make it easier to troubleshoot and reduce interference, we use one branch transaction in the global transaction and no other branch transactions.SQL is as follows.
update seata_account set count = count - 1 where id = 100;
Problems
Client: In the console log, the following logs are printed over and over again
- the above logs are printed at 20s intervals, and I checked the value of the
innodb_lock_wait_timeout property of the database, and it happens to be 20, which means that every time a rollback request comes through, the rollback fails because of the timeout for acquiring the lock (20).
- Why is it not printed once after 20s? Because the server side will have a timer to process the rollback request.
// Branch rollback starts
Branch rollback start: 172.16.120.59:23004:59991911632711680 59991915571163137 jdbc:mysql://172.16.248.10:3306/tuya_middleware

// undo_log transaction branch The original action corresponds to insert, so it rolls back to delete.
undoSQL undoSQL=DELETE FROM undo_log WHERE id = ?  and PK=[[id,139]]
// Since the corresponding operation of the first-level agent is also in the context, when the undo_log branch transaction commits, the corresponding undo_log contains two actions
undoSQL undoSQL=UPDATE seata_account SET money = ? WHERE id = ?  and PK=[[id,1]].

// After the branch transaction has been rolled back, delete the corresponding undo_log for that branch transaction
delete from undo_log where xid=172.16.120.59:23004:59991911632711680 AND branchId=59991915571163137

// Threw an exception indicating that the rollback failed because `Lock wait timeout exceeded`, and failed when deleting the undo_log based on the xid and branchId because a lock acquisition timeout occurred, indicating that there was another operation that held a lock on the record that was not released.
branchRollback failed. branchType:[AT], xid:[172.16.120.59:23004:59991911632711680], branchId:[59991915571163137], resourceId:[jdbc. mysql://172.16.248.10:3306/tuya_middleware], applicationData:[null]. reason:[Branch session rollback failed and try again later xid = 172.16.120.59:23004:59991911632711680 branchId = 59991915571163137 Lock wait timeout exceeded; try restarting transaction]
Server: the following log is printed every 20s, indicating that the server is constantly retrying to send a rollback request
Rollback branch transaction failed and will retry, xid = 172.16.120.59:23004:59991911632711680 branchId = 59991915571163137
The SQL involved in the process is roughly as follows:
1. SELECT * FROM undo_log WHERE branch_id = ? AND xid = ? FOR UPDATE slaveDS
2. SELECT * FROM undo_log WHERE (id ) in ( (?)  ) slaveDS
3. DELETE FROM undo_log WHERE id = ?                                masterDS
4. SELECT * FROM seata_account WHERE (id ) in ( (?)  ) masterDS
5. UPDATE seata_account SET money = ? WHERE id = ?                      masterDS
6. DELETE FROM undo_log WHERE branch_id = ? AND xid = ?                 masterDS
At this point, check the database transaction status, lock status, lock wait relationship
1, check the current transaction being executed
SELECT * FROM information_schema.INNODB_TRX.
!
- Check the current lock status
SELECT * FROM information_schema.INNODB_LOCKs;
!
- Check the current lock wait relationship
SELECT * FROM information_schema.INNODB_LOCK_waits;
SELECT
block_trx.trx_mysql_thread_id AS sessionID that already holds a lock, request_trx.
request_trx.trx_mysql_thread_id AS the sessionID that is requesting the lock,
block_trx.trx_query AS the SQL statement that already holds the lock, request_trx.
request_trx.trx_query AS the SQL statement for which the lock is being requested,
waits.blocking_trx_id AS Transaction ID that already holds the lock, waits.requesting_trx.trx_query
waits.requesting_trx_id AS 正在申请锁的事务ID,
waits.requested_lock_id AS the ID of the lock object, waits.
locks.lock_table AS lock_table,
locks.lock_type AS lock_type,
locks.lock_mode AS lock_mode
FROM
information_schema.innodb_lock_waits AS waits
INNER JOIN information_schema.innodb_trx AS block_trx ON waits.blocking_trx_id = block_trx.trx_id
INNER JOIN information_schema.innodb_trx AS request_trx ON waits.requesting_trx_id = request_trx.trx_id
INNER JOIN information_schema.innodb_locks AS locks ON waits.requested_lock_id = locks.lock_id;
!
- the record involved is
branch_id = 59991915571163137 AND xid = 172.16.120.59:23004:59991911632711680.
- transaction ID
1539483284 holds the lock for this record, but its corresponding SQL is empty, so it should be waiting for a commit.
- transaction ID
1539483286 is trying to acquire a lock on this record, but the logs show that it is waiting for a lock timeout.
Probably a good guess is that select for update and delete from undo ... are in conflict. According to the logic in the code, these two operations should have been committed in a single transaction, so why have they been separated into two transactions?
Problem Analysis
In conjunction with the rollback process described above, let's look at what happens during the rollback of our example.
- first get the data source, at this time dataSourceProxy.getPlainConnection() to get the
MasterSlaveDataSource data source
- during the
select for update operation, get a Connection from the MasterSlaveDataSource, as I said before, the MasterSlaveDataSource is a logical datasource, which has a routing logic, according to the above, this time we get the dsSlave's Connection, and then we get the ddsSlave's Connection. dsSlave's Connection`.
- When executing the
delete from undo ... 3. When performing the delete from undo ...' operation, you get the Connection from the `dsMaster'.
- Although
dsSlave and dsMaster correspond to the same address, they must be getting different connections, so the two operations must be spread across two transactions.
- the transaction that executes
select for update will wait until the deletion of the undo_log is complete before committing.
- the transaction that executes
delete from undo ... The transaction executing delete from undo ...' waits for the select for update transaction to release the lock.
- Typical deadlock problem
Verify the conjecture
I tried to verify this problem in two ways:
-
change the Seata code from select for update to select, then the query to undo_log does not need to hold a lock on the record, and will not cause a deadlock.
-
change the data source proxy logic, this is the key to the problem, the main cause of the problem is not select for update. The main cause of the problem is not select for update. The multi-layer proxy problem has already been created before that, and then it will cause the deadlock problem. We should never have proxied the masterSlave datasource in the first place. It's just a logical data source, so why proxy it? If we proxy the masterSlave, we won't cause multiple layers of proxies, and we won't cause the deadlock problem when deleting the undo_log!
Final implementation
masterSlave is also a DataSource type, how to proxy just dsMaster and dsSlave but not masterSlave? Observing the SeataAutoDataSourceProxyCreator#shouldSkip method, we can solve this problem with the excludes attribute of the EnableAutoDataSourceProxy annotation
@Override
protected boolean shouldSkip(Class<? > beanClass, String beanName) {
return SeataProxy.class.isAssignableFrom(beanClass) ||
DataSourceProxy.class.isAssignableFrom(beanClass) ||
!DataSource.class.isAssignableFrom(beanClass) ||
Arrays.asList(excludes).contains(beanClass.getName());
}
i.e.: turn off the data source autoproxy, then add this annotation to the startup class
@EnableAutoDataSourceProxy(excludes = {"org.apache.shardingsphere.shardingjdbc.jdbc.core.datasource.MasterSlaveDataSource"})
Autoproxy optimisation in new releases
Since Seata 1.4.0 has not been officially released yet, I'm currently looking at the 1.4.0-SNAPSHOT version of the code, which is the latest code in the ddevelop branch at the current time
Code changes
The main changes are as follows, but I won't go into too much detail on the minor ones:
DataSourceProxyHolder adjustmentDataSourceProxy adjustmentSeataDataSourceBeanPostProcessor is added.
DataSourceProxyHolder
The most significant of the changes to this class are to its putDataSource method
public SeataDataSourceProxy putDataSource(DataSource dataSource, BranchType dataSourceProxyMode) {
DataSource originalDataSource; if (dataSource instanceof SeataDataSource)
if (dataSource instanceof SeataDataSourceProxy) {
SeataDataSourceProxy dataSourceProxy = (SeataDataSourceProxy) dataSource;
if (dataSourceProxyMode == dataSourceProxy.getBranchType()) {
return (SeataDataSourceProxy)dataSource; }
}
originalDataSource = dataSourceProxy.getTargetDataSource(); } else { dataSourceProxy.getTargetDataSource()
} else {
originalDataSource = dataSource; } else { originalDataSource = dataSource.
}
return this.dataSourceProxyMap.computeIfAbsent(originalDataSource, originalDataSource, BranchType.
BranchType.XA == dataSourceProxyMode ? DataSourceProxyXA::new : DataSourceProxy::new); }
}
The DataSourceProxyHolder#putDataSource method is used in two main places: in the SeataAutoDataSourceProxyAdvice cutout; and in the SeataDataSourceBeanPostProcessor.
What problem does this judgement solve for us? The problem of multi-tier proxying of data sources. Think about the following scenarios with automatic data source proxying turned on:
- If we manually injected a
DataSourceProxy into our project, a call to the DataSourceProxyHolder#putDataSource method in a cutover would return the DataSourceProxy itself directly, without creating another ` DataSourceProxy
- if we manually inject a
DruidSource into the project, then the DataSourceProxyHolder#putDataSource method will create another DataSourceProxy for it and return it when it is called from the facet.
It looks like the problem is solved, but is it possible that there are other problems? Take a look at the following code
@Bean
public DataSourceProxy dsA(){
   return new DataSourceProxy(druidA)
}

@Bean
public DataSourceProxy dsB(DataSourceProxy dsA){
   return new DataSourceProxy(dsA)
}
- this is definitely wrong, but you can't help it if he wants to write it this way
- there's nothing wrong with
dsA, but dsB still has a double proxy problem, because the TargetDataSource of dsB is dsA.
- This brings us to the
DataSourceProxy change.
DataSourceProxy
public DataSourceProxy(DataSource targetDataSource, String resourceGroupId) {
if (targetDataSource instanceof SeataDataSourceProxy) {
LOGGER.info("Unwrap the target data source, because the type is: {}", targetDataSource.getClass().getName());
targetDataSource = ((SeataDataSourceProxy) targetDataSource).getTargetDataSource();
}
this.targetDataSource = targetDataSource;
init(targetDataSource, resourceGroupId);
}
SeataDataSourceBeanPostProcessor
public class SeataDataSourceBeanPostProcessor implements BeanPostProcessor {
private static final Logger LOGGER = LoggerFactory.getLogger(SeataDataSourceBeanPostProcessor.class);
......
@Override
public Object postProcessAfterInitialization(Object bean, String beanName) throws BeansException {
if (bean instanceof DataSource) {
if (!excludes.contains(bean.getClass().getName())) {
DataSourceProxyHolder.get().putDataSource((DataSource) bean, dataSourceProxyMode);
}
if (bean instanceof SeataDataSourceProxy) {
LOGGER.info("Unwrap the bean of the data source," +
" and return the original data source to replace the data source proxy."); return ((SeataDataSourceProxy); } }
return ((SeataDataSourceProxy) bean).getTargetDataSource();
}
}
return bean.
}
}
SeataDataSourceBeanPostProcessor implements the BeanPostProcessor interface, which executes the BeanPostProcessor#postProcessAfterInitialization method after a bean is initialised. That is, in the postProcessAfterInitialization method, the bean is already available at this point.- Why provide such a class? From its code, it is just to initialise the corresponding
DataSourceProxy for the data source after the bean has been initialised, but why is this necessary?
Because some data sources may not be initialised (i.e. the relevant methods of the data source will not be called) after the application is started. If the SeataDataSourceBeanPostProcessor class is not provided, then the DataSourceProxyHolder#putDataSource method will only be triggered in the SeataAutoDataSourceProxyAdvice cutout. If a client goes down during the rollback, after restarting, the Server sends it a rollback request via a timed task, at which point the client needs to first find the corresponding DatasourceProxy based on the rsourceId (connection address). However, if the client hasn't triggered the data source's related methods before then, it won't enter the SeataAutoDataSourceProxyAdvice cutover logic, and won't initialise the corresponding DataSourceProxy for the data source, which will result in the failure of the rollback.
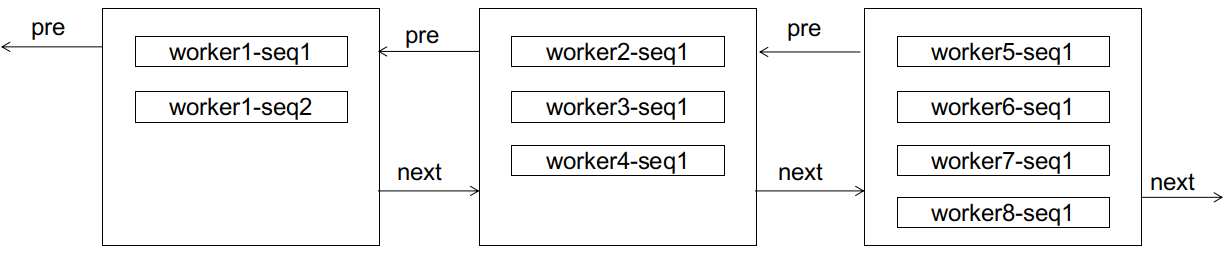
Multi-Layer Proxy Summary
Through the above analysis, we probably already know some optimisations of seata in avoiding multi-layer proxies, but there is actually one more issue to pay attention to:** Logical data source proxies**
!
The calling relationship at this point is: masterSlaveProxy -> masterSlave -> masterproxy/slaveProxy -> master/slave
At this point you can exclude the logical datasource via the excludes attribute so that no datasource proxy is created for it.
To summarise:
- when initialising the corresponding
DataSourceProxy for a DataSource, determine whether it is necessary to create a corresponding DataSourceProxy for it, and if it is a DataSourceProxy itself, return it directly.
- For the case of manual injection of some
DataSource, in order to avoid the problem of multi-layer proxy caused by human error, we add a judgement in the constructor of DataSourceProxy, If the input parameter TragetDatasource is a DataSourceProxy itself, then we get the target attribute of TragetDatasource as the target attribute of the new DataSourceProxy. TragetDatasource of the new DataSourceProxy.
- for other cases, such as logical data source proxy issues, add exclusions to the
excludes attribute to avoid creating a DataSourceProxy for the logical data source.
Suggestions for using global and local transactions
There is a question, if there are multiple DB operations involved in a method, say 3 update operations are involved, do we need to use @Transactional annotation in spring for this method? We consider this question from two perspectives: without @Transactional annotation and with @Transactional annotation.
Not using the @Transactional annotation
- in the commit phase, since the branch transaction has 3 update operations, each time the update operation is executed, a branch transaction will be registered with the TC through the data broker and a corresponding undo_log will be generated for it, so that the 3 update operations will be treated as 3 branch transactions
- In the rollback phase, the three branch transactions need to be rolled back.
- data consistency is ensured by the seata global transaction.
Use the @Transactional annotation.
- in the commit phase, the three update operations are committed as one branch transaction, so only one branch transaction will be registered in the end
- in the rollback phase, 1 branch transaction needs to be rolled back.
- data consistency: the 3 update operations are guaranteed by the consistency of the local transaction; global consistency is guaranteed by the seata global transaction. At this point, the 3 updates are just a branch transaction.
Conclusion
Through the above comparison, the answer is obvious, the reasonable use of local transactions can greatly improve the processing speed of global transactions. The above is just 3 DB operations, what if there are more DB operations involved in a method, then the difference between the two ways is not greater?
Finally, thanks to @FUNKYE for answering a lot of questions and providing valuable suggestions!
 to:
to:

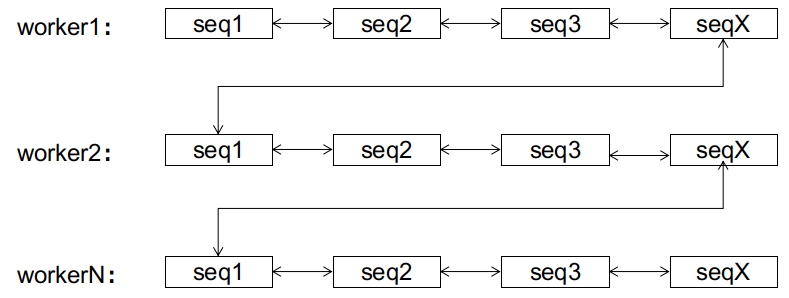
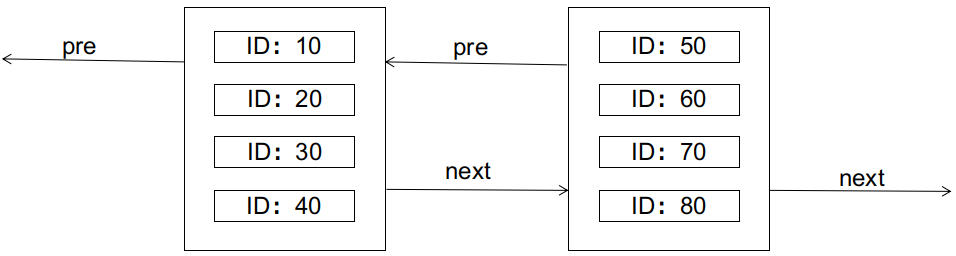 The characteristics of the B+ tree require that the left node should be smaller than the right node. What happens if we want to insert a record with an ID of 25 at this point (assuming each data page can only hold 4 records)? The answer is that it will cause a page split, as shown in the diagram:
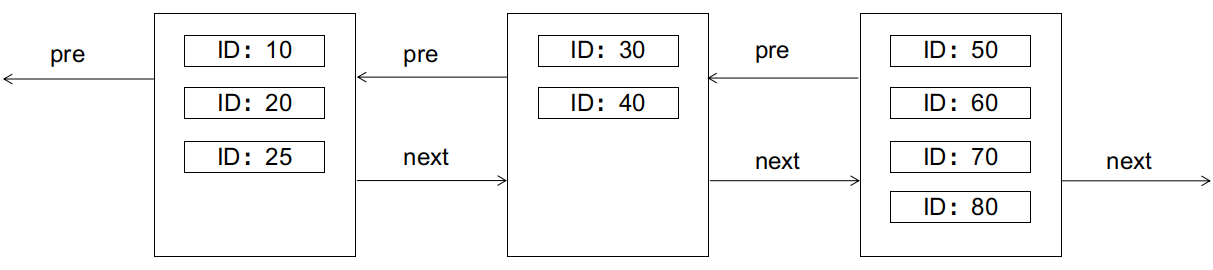 Page splits are unfriendly to I/O, requiring the creation of new data pages, copying and transferring part of the records from the old data page, etc., and should be avoided as much as possible.