· 9 min read

RPC module is where I initially started to study Seata source code, so I have had some deep research on Seata's RPC module. After I did some research, I found that the code in the RPC module needs to be optimised to make the code more elegant and the interaction logic more clear and easy to understand, and in line with the original intention of "**Let the world have no difficult to understand In the spirit of "Let there be no difficult RPC communication code", I started the refactoring of the RPC module.

Here I suggest that if you want to know more about Seata interaction details, you may want to start from the source code of RPC module, RPC module is equivalent to Seata's hub, Seata all the interaction logic in the RPC module to show the most.

This refactoring of the RPC module will make the Seata hub more robust and easier to interpret.

Refactoring Inheritance

In the old version of Seata, the overall structure of the RPC module was a bit confusing, especially in terms of the inheritance relationships between classes:

  1. directly inheriting Netty Handler in Remoting class, which makes Remoting class coupled with Netty Handler processing logic;
  2. The inheritance relationship between the Reomting class on the client side and the Reomting class on the server side is not unified;
  3. RemotingClient is implemented by RpcClientBootstrap, while RemotingServer is implemented by RpcServer without an independent ServerBootstrap, which seems to be a very confusing relationship. 4. Some interfaces are not necessary to be extracted;
  4. Some interfaces are not necessary to extract, such as ClientMessageSender, ClientMessageListener, ServerMessageSender and so on, because these interfaces will increase the complexity of the overall structure of the inheritance relationship.

In response to the problems identified above, I did the following during the refactoring process:

  1. Abstract Netty Handler as an inner class and put it in Remoting class. 2) Put RemotingClient as an inner class and put it in RemotingClass;
  1. put RemotingClient as the top-level client interface, define the basic methods of client-server interaction, abstract a layer of AbstractNettyRemotingClient, and the following are respectively RmNettyRemotingClient, TmNettyRemotingClient; RemotingServer is the top-level interface of server, defining the basic methods of interaction between the server and the client, and the implementation of NettyRemotingServer;
  2. At the same time, ClientMessageSender, ClientMessageListener, ServerMessageSender and other interface methods are grouped into RemotingClient, RemotingServer, and implemented by Reomting. class to implement RemotingClient and RemotingServer and unify the inheritance relationship of Remoting class;
  3. Create a new RemotingBootstrap interface and implement NettyClientBootstrap and NettyServerBootstrap on the client and server side respectively, so as to extract the bootstrap logic from the Reomting class.

The inheritance relationship in the latest RPC module is simple and clear, represented by the following class relationship diagram:

  1. AbstractNettyRemoting: the top level abstraction of Remoting class, contains common member variables and common methods for both client and server, has common request methods (we will talk about it later in the article), and Processor processor invocation logic (we will talk about it later in the article);
  2. RemotingClient: the client's top-level interface, defining the basic methods of client-server interaction;
  3. RemotingServer: the top-level interface of the server side, defining the basic methods of interaction between the server side and the client side;
  4. AbstractNettyRemotingClient: client-side abstract class, inherits AbstractNettyRemoting class and implements RemotingClient interface;
  5. NettyRemotingServer: server implementation class, inherits AbstractNettyRemoting class and implements RemotingServer interface;
  6. RmNettyRemotingClient: Rm client implementation class, inherits AbstractNettyRemotingClient class;
  7. TmNettyRemotingClient: Tm client implementation class, inherits AbstractNettyRemotingClient class.

At the same time, the client-side and server-side bootstrap class logic is abstracted out, as shown in the following class relationship diagram:

  1. RemotingBootstrap: bootstrap class interface with two abstract methods: start and stop. 2;
  2. NettyClientBootstrap: client-side bootstrap implementation class. 3;
  3. NettyServerBootstrap: server-side bootstrap implementation class.

Decoupled processing logic

Decoupled processing logic is the processing logic of RPC interactions from the Netty Handler abstracted out, and processing logic into a Processor abstraction, why do this? I'm going to talk about some of the problems that exist right now:

  1. Netty Handler and Processing Logic are blended together, since both client and server share a set of Processing Logic, in order to be compatible with more interactions, in the Processing Logic you can see a lot of difficult to understand judgement logic. 2. in Seata interactions, the Netty Handler is not a Processor;
  2. In Seata's interaction, some requests are processed asynchronously and some requests are processed synchronously, but the expression of synchronous and asynchronous processing in the old processing code logic is very obscure and difficult to understand;
  3. It is not possible to clearly express the relationship between the type of request message and the corresponding processing logic in the code logic;
  4. In the later iterations of Seata, it will be very difficult to add new interaction logic to this part of the code if the processing logic is not extracted from it.

Before extracting the processing logic from the Netty Handler, let's take a look at Seata's existing interaction logic:

  • RM client-server interaction logic:

RM client request server interaction logic:

  • TM client-server interaction logic:

RM Client Request Server Interaction Logic:

  • Interaction logic for a server requesting an RM client:

The interaction logic of Seata can be clearly seen in the above interaction diagram.

The client receives messages from the server side in total:

  1. Server-side request messages
  1. BranchCommitRequest, BranchRollbackRequest, UndoLogDeleteRequest
  1. Server-side response messages
  1. RegisterRMResponse, BranchRegisterResponse, BranchReportResponse, GlobalLockQueryResponse

RegisterTMResponse, GlobalBeginResponse, GlobalCommitResponse, GlobalRollbackResponse, GlobalStatusResponse, GlobalReportResponse 3. HeartbeatMessage(PONG)

The server receives messages from the client in total:

  1. Client request messages:
  1. RegisterRMRequest, BranchRegisterRequest, BranchReportRequest, GlobalLockQueryRequest

RegisterTMRequest, GlobalBeginRequest, GlobalCommitRequest, GlobalRollbackRequest, GlobalStatusRequest, GlobalReportRequest 3. HeartbeatMessage(PING)

  1. Client response message:
  1. BranchCommitResponse, BranchRollbackResponse

Based on the above analysis of the interaction logic, we can abstract the logic of processing messages into a number of Processor, a Processor can handle one or more message types of messages, only in Seata startup registration will be registered to the message type ProcessorTable A Processor can process messages of one or more message types, just register the message types into the ProcessorTable when Seata starts up, forming a mapping relationship, so that the corresponding Processor can be called to process the message according to the message type, as shown in the following diagram:

In the abstract Remoting class, there is a processMessage method, the logic of the method is to get the corresponding Processor from the ProcessorTable according to the message type.

In this way, the processing logic is completely removed from the Netty Handler, and the Handler#channelRead method only needs to call the processMessage method, and it can dynamically register Processors into the ProcessorTable according to the message type. ProcessorTable, the scalability of the processing logic has been greatly improved.

The following is the invocation flow of Processor:

  1. Client

  1. RmBranchCommitProcessor: process the server-side global commit request;
  2. RmBranchRollbackProcessor: process server-side global rollback request;
  3. RmUndoLogProcessor: handles server-side undo log deletion requests;
  4. ClientOnResponseProcessor: client-side processing of server-side response requests, such as: BranchRegisterResponse, GlobalBeginResponse, GlobalCommitResponse and so on;
  5. ClientHeartbeatProcessor: processing server-side heartbeat response.
  1. Server-side

  1. RegRmProcessor: Handle RM client registration request. 2;
  2. RegTmProcessor: handle TM client registration request;
  3. ServerOnRequestProcessor: handle client related requests, such as: BranchRegisterRequest, GlobalBeginRequest, GlobalLockQueryRequest, etc. 4;
  4. ServerOnResponseProcessor: handle client-related responses, such as: BranchCommitResponse, BranchRollbackResponse and so on;
  5. ServerHeartbeatProcessor: handle client heartbeat response.

Below is an example of a TM initiating a global transaction commit request to give you a sense of where the Processor sits in the entire interaction:

Refactoring the request method

In older versions of Seata, the request methods for RPC also lacked elegance:

  1. request methods are too cluttered and not hierarchical;
  2. sendAsyncRequest method is coupled with too much code, the logic is too confusing, the client and server both share a set of request logic, the method to decide whether to send bulk is based on the parameter address is null or not to decide, to decide whether to synchronise the request is based on whether the timeout is greater than 0, it is extremely unreasonable, and it is not reasonable. The method to decide whether to send bulk is based on whether the address is null, and to decide whether to make a synchronous request is based on whether the timeout is greater than 0, which is extremely unreasonable;
  3. request method name style is not uniform, for example, the client sendMsgWithResponse, but the server is called sendSyncRequest;

To address the above shortcomings of the old RPC request methods, I have made the following changes. 1:

  1. put the request method into the RemotingClient and RemotingServer interfaces as the top-level interface. 2. separate the client-side and server-side request methods;
  2. Separate the client-side and server-side request logic, and separate the batch request logic into the client-side request method, so that the decision of whether or not to send a batch of requests is no longer based on whether or not the parameter address is null;
  3. due to Seata's Due to Seata's own logic characteristics, the parameters of client-server request methods cannot be unified, so we can extract common synchronous/asynchronous request methods, the client and server implement their own synchronous/asynchronous request logic according to their own request logic characteristics, and then finally call the common synchronous/asynchronous request methods, so that synchronous/asynchronous requests have a clear method, and are no longer decided according to whether or not the timeout is greater than 0. 4;
  4. Unify the request name style.

Finally, Seata RPC request methods look more elegant and hierarchical.

Synchronous requests:

Asynchronous request:

Other

  1. Class Catalogue Adjustment: There is also a netty catalogue in the RPC module catalogue, and it can be found from the catalogue structure that Seata's original intention is to be compatible with multiple RPC frameworks, and only netty is implemented at present, but it is found that some of the classes in the netty module are not "netty" and the classes in the RPC classes in the netty module are not "netty", and the RPC classes in the catalogue are not common, so the location of the relevant classes needs to be adjusted;
  2. some classes are renamed, e.g. netty related classes contain "netty";

The final RPC module looks like this:

Author Bio

Zhang Chenghui, currently working in Ant Group, loves to share technology, author of WeChat public number "Backend Advanced", technical blog (https://objcoding.com/) blogger, Seata Contributor, GitHub ID: objcoding.

· 18 min read

[Distributed Transaction Seata Source Code Interpretation I] Server-side startup process

Core points for implementing distributed transactions:

  1. transaction persistence, the various states of the transaction at the various state of the transaction participants need to be persistent, when the instance is down in order to roll back or commit the transaction based on the persistent data to achieve the ultimate consistency
  2. Timing on the timeout transaction processing (continue to try to commit or rollback), that is, through the retry mechanism to achieve the ultimate consistency of the transaction
  3. cross-service instance propagation of distributed transactions, when distributed transactions across multiple instances need to achieve transaction propagation, generally need to adapt to different rpc frameworks.
  4. transaction isolation level: most distributed transactions for performance, the default isolation level is read uncommitted
  5. idempotency: for XA or seata's AT such distributed transactions, have been implemented by default idempotency, and TCC, Saga interface level implementation of distributed transactions are still required to implement their own business developers to achieve idempotency.

This article introduces the source code of seata-server from the point of view of the startup process of seata-server, the startup flow chart is as follows:

! [Insert image description here](https://img-blog.csdnimg.cn/20200726213919467.jpg?x-oss-process=image/watermark,type_ZmFuZ3poZW5naGVpdGk,shadow_10, text_aHR0cHM6Ly9ibG9nLmNzZG4ubmV0L3dlaXhpbl80NTE0NTg0OA==,size_16,colour_FFFFFF,t_70)

1. Startup class Server

The entry class for seata-server is in the Server class with the following source code:

public static void main(String[] args) throws IOException {
// Get the listening port from an environment variable or runtime parameter, default port 8091
int port = PortHelper.getPort(args);

// Set the listening port to SystemProperty, Logback's LoggerContextListener implementation class.
// SystemPropertyLoggerContextListener writes the Port to Logback's Context.
// The Port variable will be used in the logback.xml file to construct the log file name.
System.setProperty(ConfigurationKeys.SERVER_PORT, Integer.toString(port));; // Create LoggerContextListener.

// Create the Logger
final Logger logger = LoggerFactory.getLogger(Server.class);
if (ContainerHelper.isRunningInContainer()) {
logger.info("The server is running in container."); }
}

// Parsing various configuration parameters for startup and configuration files
ParameterParser parameterParser = new ParameterParser(args); // metrics related, here is the metrics.

// metrics related, here is the SPI mechanism to get the Registry instance object
MetricsManager.get().init(); // read the metrics from the configuration file.

// Write the storeMode read from the config file into SystemProperty for use by other classes.
System.setProperty(ConfigurationKeys.STORE_MODE, parameterParser.getStoreMode());

// Create an instance of NettyRemotingServer, an rpc framework based on the Netty implementation.
// Not initialised at this point, NettyRemotingServer is responsible for network communication with the TM and RM in the client SDK.
nettyRemotingServer = new NettyRemotingServer(WORKING_THREADS);

// Set the listening port
nettyRemotingServer.setListenPort(parameterParser.getPort()); // Set the port to listen to.

// Initialise UUIDGenerator, which is implemented based on the snowflake algorithm.
// Used to generate ids for global transactions, branch transactions.
// Multiple Server instances are configured with different ServerNodes to ensure uniqueness of the ids
UUIDGenerator.init(parameterParser.getServerNode());; // The UUIDGenerator.init(parameterParser.getServerNode()).

// SessionHodler is responsible for persistent storage of transaction logs (state).
// Currently supports three storage modes: file, db, and redis; for cluster deployment mode, use db or redis mode
SessionHolder.init(parameterParser.getStoreMode()); // Create the initialisation DefaultCoher.

// Create an instance of DefaultCoordinator, the core transaction logic processing class of TC.
DefaultCoordinator is the core transaction logic handling class of TC, // containing logic handling for different transaction types such as AT, TCC, SAGA, etc. at the bottom.
DefaultCoordinator coordinator = new DefaultCoordinator(nettyRemotingServer);
coordinator.init();
nettyRemotingServer.setHandler(coordinator); // register ShutdownHook.
// register ShutdownHook
ShutdownHook.getInstance().addDisposable(coordinator); // register ShutdownHook.
ShutdownHook.getInstance().addDisposable(nettyRemotingServer);; // 127.0.0.1

// 127.0.0.1 and 0.0.0.0 are not valid here.
if (NetUtil.isValidIp(parameterParser.getHost(), false)) {
XID.setIpAddress(parameterParser.getHost());
} else {
XID.setIpAddress(NetUtil.getLocalIp());
}
XID.setPort(nettyRemotingServer.getListenPort()); }

try {
// Initialise Netty, start listening on the port and block here, waiting for the application to shut down.
nettyRemotingServer.init(); } catch (Throwable e); }
} catch (Throwable e) {
logger.error("nettyServer init error:{}", e.getMessage(), e);
System.exit(-1); }
}

System.exit(0);
}

2. Parsing Configuration

The implementation code for parameter parsing is in the ParameterParser class, the init method source code is as follows:

private void init(String[] args) {
try {
// Determine if you are running in a container, and if you are, get the configuration from the environment variable.
if (ContainerHelper.isRunningInContainer()) {
this.seataEnv = ContainerHelper.getEnv();
this.host = ContainerHelper.getHost();
this.port = ContainerHelper.getPort();
this.serverNode = ContainerHelper.getServerNode(); this.storeMode = ContainerHelper.getServerNode()
this.storeMode = ContainerHelper.getStoreMode();
} else {
// Based on JCommander's ability to get the parameters configured when starting the application.
// JCommander assigns the parameters to the fields of the current class via annotations and reflection.
JCommander jCommander = JCommander.newBuilder().addObject(this).build();
JCommander.parse(args);
if (help) {
jCommander.setProgramName(PROGRAM_NAME);
jCommander.usage();
System.exit(0);
}
}
// serverNode is used as a unique identifier for instances in snowflake maths and needs to be guaranteed unique.
// If you don't specify a randomly generated one based on the current server's I
if (this.serverNode == null) {
this.serverNode = IdWorker.initWorkerId();
}
if (StringUtils.isNotBlank(seataEnv)) {
System.setProperty(ENV_PROPERTY_KEY, seataEnv);
}
if (StringUtils.isBlank(storeMode)) {
// There is an important Configuration class involved here, ParameterParser is only responsible for getting the core parameters such as ip, port and storeMode.
// All other parameters are taken from the Configuration. Here, if there is no startup parameter that doesn't specify a storeMode, // it's taken from Configuration.
// is taken from the Configuration class.
storeMode = ConfigurationFactory.getInstance().getConfig(ConfigurationKeys.STORE_MODE, // SERVER_DEFAULT, SERVER_DEFAULT, SERVER_DEFAULT))
SERVER_DEFAULT_STORE_MODE);
}
} catch (ParameterException e) {
printError(e);
}

}

The first call to ConfigurationFactory.getInstance() in the ParameterParser's init method initialises a singleton Configuration object, which is responsible for initialising all other configuration parameter information. From the Seata Server side of the source code we can see two configuration files file.conf, registry.conf. So what is the difference between these two configuration files, both files are required? We continue to look at the code.

ConfigurationFactory.getInstance method is actually to get a singleton object, the core is in the buildConfiguration method, but before the buidlConfiguration method, there is a static code block of the ConfigurationFactory class will be executed first.

// Get the singleton object for Configuration.
public static Configuration getInstance() {
if (instance == null) {
synchronized (Configuration.class) {
if (instance == null) {
instance = buildConfiguration();
}
}
}
return instance;
}

// ConfigurationFactory static code block
static
// Get the name of the configuration file, defaults to registry.conf.
String seataConfigName = System.getProperty(SYSTEM_PROPERTY_SEATA_CONFIG_NAME);
If (seataConfigName == null) {
seataConfigName = System.getenv(ENV_SEATA_CONFIG_NAME);
}
if (seataConfigName == null) {
seataConfigName = REGISTRY_CONF_PREFIX;
}
String envValue = System.getProperty(ENV_PROPERTY_KEY);
If (envValue == null) {
envValue = System.getenv(ENV_SYSTEM_KEY);
}

// Read the configuration from the registry.Conf file to build the base configuration object
Configuration configuration = (envValue == null) ? new FileConfiguration(seataConfigName + REGISTRY_CONF_SUFFIX,
false) : new FileConfiguration(seataConfigName + "-" + envValue + REGISTRY_CONF_SUFFIX, false);
Configuration extConfiguration = null;
try {
// ExtConfigurationProvider currently has only one SpringBootConfigurationProvider implementation class
// Used to support the client-side SDK SpringBoot's configuration file approach, this logic can be ignored for the Server side.
extConfiguration = EnhancedServiceLoader.load(ExtConfigurationProvider.class).provide(configuration);
if (LOGGER.isInfoEnabled()) {
LOGGER.info("load Configuration:{}", extConfiguration == null ?
: extConfiguration.getClass().getSimpleName());
}
} catch (EnhancedServiceNotFoundException ignore) {

} catch (Exception e) {
LOGGER.error("failed to load extConfiguration:{}", e.getMessage(), e);
}
CURRENT_FILE_INSTANCE = extConfiguration == null ? Configuration : extConfiguration;
}

The static block in ConfigurationFactory reads configuration information from registry.conf. The conf configuration file is mandatory, the registry.conf configuration file specifies the source for other detailed configurations, the current configuration source supports file, zk, apollo, nacos, etcd3, etc. So file.conf is not required, only when the configuration source is set to the file type will read the contents of the file.conf file.

Next buildConfiguration in ConfigurationFactory is to load more configuration items based on the configuration source set in registry.conf.

private static Configuration buildConfiguration() {
ConfigType configType;
String configTypeName;
try {
// Read the config.type field from the registry.conf configuration file and parse it into the ConfigType enumeration.
configTypeName = CURRENT_FILE_INSTANCE.getConfig(
ConfigurationKeys.FILE_ROOT_CONFIG + ConfigurationKeys.FILE_CONFIG_SPLIT_CHAR
+ ConfigurationKeys.FILE_ROOT_TYPE);

if (StringUtils.isBlank(configTypeName)) {
throw new NotSupportYetException("Configuration type cannot be blank");
}

configType = ConfigType.getType(configTypeName);
} catch (Exception e) {
throw e;
}
Configuration extConfiguration = null;
Configuration Configuration;
If (ConfigType.File == configType) {
// If the configuration file is of type file, read the config.file.name configuration entry from registry.conf, // i.e. the path to the config file of type file, example config.file.name configuration entry.
// i.e. the path to the file type configuration file, default is file.conf in the example.
String pathDataId = String.join(ConfigurationKeys.FILE_CONFIG_SPLIT_CHAR.File),
ConfigurationKeys.FILE_ROOT_CONFIG, FILE_TYPE, NAME_KEY);
String name = CURRENT_FILE_INSTANCE.getConfig(pathDataId);

// Build the FileConfiguration object based on the path to the file configuration file
Configuration file = new FileConfiguration(name);
try {
// Additional extensions to the configuration, also available only to the client SpringBoot SDK.
extConfiguration = EnhancedServiceLoader.load(ExtConfigurationProvider.class).provide(configuration);
if (LOGGER.isInfoEnabled()) {
LOGGER.info("load Configuration:{}", extConfiguration == null
? configuration.getClass().getSimpleName() : extConfiguration.getClass().getSimpleName());
}
} catch (EnhancedServiceNotFoundException ignore) {

} catch (Exception e) {
LOGGER.error("failed to load extConfiguration:{}", e.getMessage(), e);
}
} else {
// If the configuration file is of a type other than file, e.g. nacos, zk, etc., // then generate it via SPI.
// then generate the corresponding ConfigurationProvider object by way of SPI
ConfigurationProvider = EnhancedServiceLoader
.load(ConfigurationProvider.class, Objects.requireNonNull(configurationType).name()).provide();
}
try {
// ConfigurationCache is a one-time proxy memory cache of the configuration to improve the performance of fetching the configuration.
ConfigurationCache;
if (null ! = extConfiguration) {
configurationCache = ConfigurationCache.getInstance().proxy(extConfiguration);
} else {
configurationCache = ConfigurationCache.getInstance().proxy(configuration);
}
If (null ! = configurationCache) {
extConfiguration = configurationCache;
}
} catch (EnhancedServiceNotFoundException ignore) {

} catch (Exception e) {
LOGGER.error("failed to load configurationCacheProvider:{}", e.getMessage(), e);
}
return null == extConfiguration ? configuration : extConfiguration;
}

3. Initialisation of UUIDGenerator

The UUIDGenertor initialisation receives a serverNode parameter, the UUIDGenertor currently uses the snowflake algorithm to generate the unique Id, this serverNode is used to ensure that the unique ids generated by multiple seata-server instances are not duplicated.

public class UUIDGenerator {

/**
* Generate uuid long.
*
* @return the long
*/
public static long generateUUID() {
return IdWorker.getInstance().nextId();
}

/**
* Init.
* * @param serverNode the server node id.
* @param serverNode the server node id
*/
public static void init(Long serverNode) {
IdWorker.init(serverNode); }
}
}

UUIDGenerator is a wrapper around IdWorker, the core implementation logic for the unique id is in the IdWoker class, and IdWorker is a snowflake algorithm implementation. The IdWorker in this case is again a single instance

public class IdWorker
/**
* Constructor
* @param workerId is the ServerNode mentioned above, in the range of
* @param workerId is the ServerNode mentioned above, with a value in the range of 0-1023, i.e., 10 digits in the 64-bit UUID.
*/
public IdWorker(long workerId) {
if (workerId > maxWorkerId || workerId < 0) {
throw new IllegalArgumentException(
String.format("Worker Id can't be greater than %d or less than 0", maxWorkerId));
}
this.workerId = workerId;
}

/**
* Get the next ID (the method is thread-safe)
} /** * Get the next ID (the method is thread-safe).
* @return SnowflakeId
*/
public long nextId() {
public long nextId() { long timestamp = timeGen(); if (timestamp < lastTimestamp) {

if (timestamp < lastTimestamp) {
throw new RuntimeException(String.format(
"clock moved backwards. Refusing to generate id for %d milliseconds", lastTimestamp - timestamp)); }
}

synchronized (this) {
if (lastTimestamp == timestamp) {
sequence = (sequence + 1) & sequenceMask; if (sequence == 0) { sequence == 0)
if (sequence == 0) {
timestamp = tilNextMillis(lastTimestamp);
}
} else {
sequence = 0L; }
}
lastTimestamp = timestamp; } else { sequence = 0L; }
}
// Snowflake algorithm 64-bit unique id composition: first 0 + 41-bit timestamp + 10-bit workerId + 12-bit incremental serialisation (self-incrementing within the same timestamp)
return ((timestamp - twepoch) << timestampLeftShift) | (workerId << workerIdShift) | sequence;
}

4. SessionHolder initialisation

SessionHolder is responsible for session persistence, a session object corresponds to a transaction, there are two kinds of transaction: GlobalSession and BranchSession. SessionHolder supports two types of persistence: file and db, of which db supports cluster mode and is recommended to use db. The four most important fields in SessionHolder are as follows:

// ROOT_SESSION_MANAGER is used to get all the Setssion, as well as Session creation, update, deletion, and so on.
private static SessionManager ROOT_SESSION_MANAGER;
// Used to get and update all asynchronous commits.
private static SessionManager ASYNC_COMMITTING_SESSION_MANAGER; // Used to get and update all sessions that need to be commited asynchronously.
// Get and update all sessions that need to retry commits.
private static SessionManager RETRY_COMMITTING_SESSION_MANAGER; // Used to fetch and update all sessions that need to retry commits.
// Used to retrieve and update all sessions that need to retry a rollback.
private static SessionManager RETRY_ROLLBACKING_SESSION_MANAGER; // for getting and updating all sessions that need to retry rollbacks.

SessionHolder init method

private static SessionManager RETRY_ROLLBACKING_SESSION_MANAGER
public static void init(String mode) throws IOException {
if (StringUtils.isBlank(mode)) {
mode = CONFIG.getConfig(ConfigurationKeys.STORE_MODE);
}
StoreMode storeMode = StoreMode.get(mode);
if (StoreMode.DB.equals(storeMode)) {
// The SPI method of loading the SessionManager is used here again.
// In fact, the four SessionManager instances obtained below are all different instances of the same class, DataBaseSessionManager.
The four instances of SessionManager are all different instances of the same class DataBaseSessionManager, // just passing different parameters to the DataBaseSessionManager constructor.
ROOT_SESSION_MANAGER = EnhancedServiceLoader.load(SessionManager.class, StoreMode.DB.getName());
ASYNC_COMMITTING_SESSION_MANAGER = EnhancedServiceLoader.load(SessionManager.class, StoreMode.DB.getName(),
new Object[] {ASYNC_COMMITTING_SESSION_MANAGER_NAME});
RETRY_COMMITTING_SESSION_MANAGER = EnhancedServiceLoader.load(SessionManager.class, StoreMode.DB.getName(),
new Object[] {RETRY_COMMITTING_SESSION_MANAGER_NAME});
RETRY_ROLLBACKING_SESSION_MANAGER = EnhancedServiceLoader.load(SessionManager.class, StoreMode.DB.getName(),
new Object[] {RETRY_ROLLBACKING_SESSION_MANAGER_NAME}); } else if (StoreMode.DB.getName()); }
} else if (StoreMode.FILE.equals(storeMode)) {
//file mode can be left alone for now
...
} else {
throw new IllegalArgumentException("unknown store mode:" + mode);
}
// The reload method can be ignored for db mode
reload(); }
}

The four SessionManagers in the SessionHolder are all instances of the class DataBaseSessionManager, but they pass different parameters to the constructor, so take a look at the definition of DataBaseSessionManager:

public DataBaseSessionManager(String name) {
super();
this.taskName = name.
}

// Determine the list of transactions returned by allSessions based on the instance's taskName, // if taskName equals ASYNC_COMMITMENT.
// If taskName is equal to ASYNC_COMMITTING_SESSION_MANAGER_NAME, then all transactions with status Async_COMMITTING_SESSION_MANAGER_NAME are returned.
// All transactions with a status of AsyncCommitting are returned.
public Collection<GlobalSession> allSessions() {
// get by taskName
if (SessionHolder.ASYNC_COMMITTING_SESSION_MANAGER_NAME.equalsIgnoreCase(taskName)) {
return findGlobalSessions(new SessionCondition(GlobalStatus.AsyncCommitting));
} else if (SessionHolder.RETRY_COMMITTING_SESSION_MANAGER_NAME.equalsIgnoreCase(taskName)) {
return findGlobalSessions(new SessionCondition(new GlobalStatus[] {GlobalStatus.CommitRetrying}));
} else if (SessionHolder.RETRY_ROLLBACKING_SESSION_MANAGER_NAME.equalsIgnoreCase(taskName)) {
return findGlobalSessions(new SessionCondition(new GlobalStatus[] {GlobalStatus.RollbackRetrying,
GlobalStatus.Rollbacking, GlobalStatus.TimeoutRollbacking, GlobalStatus.TimeoutRollbackRetrying}));
} else {
// A taskName of null corresponds to ROOT_SESSION_MANAGER.
return findGlobalSessions(new SessionCondition(new GlobalStatus[] {
GlobalStatus.UnKnown, GlobalStatus.Begin,
GlobalStatus.Committing, GlobalStatus.CommitRetrying, GlobalStatus.Rollbacking,
GlobalStatus.RollbackRetrying,
GlobalStatus.TimeoutRollbacking,
GlobalStatus.TimeoutRollbackRetrying,
GlobalStatus.AsyncCommitting}));
}
}

5. Initialise DefaultCoordinator

The DefaultCoordinator is the core of the transaction coordinator, e.g., opening, committing, and rolling back global transactions, registering, committing, and rolling back branch transactions are all coordinated by the DefaultCoordinator.The DefaultCoordinato communicate with remote TMs and RMs through the RpcServer to achieve branch transactions such as commit and rollback. DefaultCoordinato communicates with remote TMs and RMs through the RpcServer to achieve branch transactions.

public DefaultCoordinator(ServerMessageSender messageSender) {
// The implementation class for the messageSender interface is the RpcServer mentioned above.
this.messageSender = messageSender; // The interface messageSender is implemented in the RpcServer class mentioned above.

// DefaultCore encapsulates the implementation classes for AT, TCC, Saga, and other distributed transaction patterns.
this.core = new DefaultCore(messageSender); }
}

// The init method initialises five timers, which are mainly used for the retry mechanism of distributed transactions.
// Because the instability of distributed environments can cause transactions to be in an intermediate state.
// because the instability of a distributed environment can cause transactions to be in an intermediate state, // so the ultimate consistency of a transaction is achieved through a constant retry mechanism.
// The following timers, except for undoLogDelete, are executed once every 1 second by default.
public void init() {
// Handling transactions that are in a rollback state that can be retried
retryRollbacking.scheduleAtFixedRate(() -> {
handleRetryRollbacking.scheduleAtFixedRate(() -> {
handleRetryRollbacking(); }
} catch (Exception e) {
LOGGER.info("Exception retry rollbacking ... ", e);
}
}, 0, ROLLBACKING_RETRY_PERIOD, TimeUnit.MILLISECONDS);

// Handle state-retryable transactions that can retry committing in the second stage
retryCommitting.scheduleAtFixedRate(() -> {
handleRetryCommitting.scheduleAtFixedRate(() -> {
handleRetryCommitting(); }
} catch (Exception e) {
LOGGER.info("Exception retry committing ... ", e);
}
}, 0, COMMITTING_RETRY_PERIOD, TimeUnit.MILLISECONDS);

// Handle asynchronous committing transactions
asyncCommitting.scheduleAtFixedRate(() -> {
try {
handleAsyncCommitting(); } catch (Exception e) { asyncCommitting.
} catch (Exception e) {
LOGGER.info("Exception async committing ... ", e);
}
}, 0, ASYNC_COMMITTING_RETRY_PERIOD, TimeUnit.MILLISECONDS);

// Checking for a transaction whose first phase has timed out, setting the transaction state to TimeoutRollbacking.
// the transaction will be rolled back by another timed task
timeoutCheck.scheduleAtFixedRate(() -> {
timeoutCheck(); } catch (Exception e) { timeoutCheck.scheduleAtFixedRate()
} catch (Exception e) {
LOGGER.info("Exception timeout checking ... ", e);
}
}, 0, TIMEOUT_RETRY_PERIOD, TimeUnit.MILLISECONDS); }

// Call RM to delete the unlog based on the number of days the unlog has been saved
undoLogDelete.scheduleAtFixedRate(() -> {
try {
undoLogDelete(); }
} catch (Exception e) {
LOGGER.info("Exception undoLog deleting ... ", e);
}
}, UNDO_LOG_DELAY_DELETE_PERIOD, UNDO_LOG_DELETE_PERIOD, TimeUnit.MILLISECONDS); }
}

6. Initialising NettyRemotingServer

NettyRemotingServer is a simplified version of Rpc server based on Netty implementation, NettyRemotingServer initialisation does two main things:

  1. registerProcessor: registers the Processor that communicates with the Client.
  2. super.init(): the super.init() method is responsible for initialising Netty and registering the IP port of the current instance with the registry
public void init() {
// registry processor
registerProcessor();
if (initialised.compareAndSet(false, true)) {
super.init(); }
}
}

private void registerProcessor() {
// 1. Register the core ServerOnRequestProcessor, i.e. the Processor associated with the transaction.
// e.g. global transaction start, commit, branch transaction registration, feedback on current state, etc.
// ServerOnRequestProcessor's constructor passes in the example returned by getHandler(), which handler
// is the aforementioned DefaultCoordinator, which is the core processing class for distributed transactions.
ServerOnRequestProcessor onRequestProcessor =
new ServerOnRequestProcessor(this, getHandler());
super.registerProcessor(MessageType.TYPE_BRANCH_REGISTER, onRequestProcessor, messageExecutor);
super.registerProcessor(MessageType.TYPE_BRANCH_STATUS_REPORT, onRequestProcessor, messageExecutor);
super.registerProcessor(MessageType.TYPE_GLOBAL_BEGIN, onRequestProcessor, messageExecutor);
super.registerProcessor(MessageType.TYPE_GLOBAL_COMMIT, onRequestProcessor, messageExecutor);
super.registerProcessor(MessageType.TYPE_GLOBAL_LOCK_QUERY, onRequestProcessor, messageExecutor);
super.registerProcessor(MessageType.TYPE_GLOBAL_REPORT, onRequestProcessor, messageExecutor);
super.registerProcessor(MessageType.TYPE_GLOBAL_ROLLBACK, onRequestProcessor, messageExecutor);
super.registerProcessor(MessageType.TYPE_GLOBAL_STATUS, onRequestProcessor, messageExecutor);
super.registerProcessor(MessageType.TYPE_SEATA_MERGE, onRequestProcessor, messageExecutor);
// 2. Register the ResponseProcessor, which is used to process the message that the Client replies to when the Server initiates a request.
// Client replies with a response, e.g., if Server sends a request to Client to commit or roll back a branch transaction, // Client returns a commit/rollback message.
// The Client returns the commit/rollback result.
ServerOnResponseProcessor onResponseProcessor =
new ServerOnResponseProcessor(getHandler(), getFutures()); super.registerProcessor(Message); }
super.registerProcessor(MessageType.TYPE_BRANCH_COMMIT_RESULT, onResponseProcessor, messageExecutor);
super.registerProcessor(MessageType.TYPE_BRANCH_ROLLBACK_RESULT, onResponseProcessor, messageExecutor); // 3.

// 3. The Processor on the Client side that initiates the RM registration request.
RegRmProcessor regRmProcessor = new RegRmProcessor(this); super.registerProcessor(MessageProcessor, messageExecutor); }
super.registerProcessor(MessageType.TYPE_REG_RM, regRmProcessor, messageExecutor); // 4.

// 4. The Processor that will be used when the Client initiates the TM registration request.
RegTmProcessor regTmProcessor = new RegTmProcessor(this);
super.registerProcessor(MessageType.TYPE_REG_CLT, regTmProcessor, null); // 5.

// 5. The Processor that the Client sends a heartbeat request to.
ServerHeartbeatProcessor heartbeatMessageProcessor = new ServerHeartbeatProcessor(this); super.registerProcessor(MessageType.TYPE_REG_CLT, null); }
super.registerProcessor(MessageType.TYPE_HEARTBEAT_MSG, heartbeatMessageProcessor, null);
}

In NettyRemotingServer there is a call to the init method of the base class AbstractNettyRemotingServer with the following code:

public void init() {
// The super.init() method starts a timed task that cleans up timed-out Rpc requests once every 3S. super.init(); // Configure the Netty Server side to start executing a timed task that cleans up timed-out Rpc requests once every 3S.
super.init(); // Configure the Netty Server side to start a timed task that cleans up timed out Rpc requests, 3S once.
// Configure the Netty Server side to start listening on a port.
serverBootstrap.start(); // Configure the Netty server side to start listening on the port.
}

// serverBootstrap.start(); // Configure the server side to start listening on the port.
public void start() {
// General configuration of the Netty server side, where two ChannelHandlers are added: // ProtocolV1Decoder, ProtocolV1Decoder, ProtocolV1Decoder.
// ProtocolV1Decoder, ProtocolV1Encoder, // corresponding to Seata custom RFIDs, respectively.
// Decoder and Encoder, // corresponding to Seata's custom RPC protocols, respectively.
this.serverBootstrap.group(this.eventLoopGroupBoss, this.eventLoopGroupWorker)
.channel(NettyServerConfig.SERVER_CHANNEL_CLAZZ)
.option(ChannelOption.SO_BACKLOG, nettyServerConfig.getSoBackLogSize())
.option(ChannelOption.SO_REUSEADDR, true)
.childOption(ChannelOption.SO_KEEPALIVE, true)
.childOption(ChannelOption.TCP_NODELAY, true)
.childOption(ChannelOption.SO_SNDBUF, nettyServerConfig.getServerSocketSendBufSize())
.childOption(ChannelOption.SO_RCVBUF, nettyServerConfig.getServerSocketResvBufSize())
.childOption(ChannelOption.WRITE_BUFFER_WATER_MARK,
new WriteBufferWaterMark(nettyServerConfig.getWriteBufferLowWaterMark(),
nettyServerConfig.getWriteBufferHighWaterMark()))
.localAddress(new InetSocketAddress(listenPort))
.childHandler(new ChannelInitializer<SocketChannel>() {
@Override
public void initChannel(SocketChannel ch) {
ch.pipeline().addLast(new IdleStateHandler(nettyServerConfig.getChannelMaxReadIdleSeconds(), 0, 0))
.addLast(new ProtocolV1Decoder())
.addLast(new ProtocolV1Encoder()); if (channelHandlers !) .
if (channelHandlers ! = null) {
addChannelPipelineLast(ch, channelHandlers); } if (channelHandlers ! = null)
}

}
});

try {
// Start listening on the configured port
ChannelFuture future = this.serverBootstrap.bind(listenPort).sync(); {}" Start listening on the configured port.
LOGGER.info("Server started, listen port: {}", listenPort); // Connect the current server to a new port after Netty starts successfully.
// After a successful Netty startup register the current instance with the Registry.Conf configuration file's registry
RegistryFactory.getInstance().register(new InetSocketAddress(XID.getIpAddress(), XID.getPort()); // After a successful startup register the current instance with the Registry. Conf configuration file.
Initialisation.set(true); future.channel.config()
future.channel().closeFuture().sync(); } catch (Exception exx).
} catch (Exception exx) {
Throw a new runtime exception (exx); }
}
}

· 15 min read

Author profile: Xuan Yi, GitHub ID: sharajava, responsible for the GTS development team of Alibaba Middleware, initiator of the SEATA open source project, worked for many years at Oracle Beijing R&D Center, and was engaged in WebLogic core development. He has long been focused on middleware, especially technical practices in the field of distributed transactions.

The 1.2.0 version of Seata has released a new transaction mode: XA mode, which supports the XA protocol.

Here, we will interpret this new feature in depth from three aspects:

  • What: What is XA mode?
  • Why: Why support XA?
  • How: How is XA mode implemented and how to use it?

1. What is XA mode?

There are two basic preliminary concepts here:

  1. What is XA?
  2. What is the so-called transaction mode defined by Seata?

Based on these two points, understanding XA mode becomes quite natural.

1.1 What is XA?

The XA specification is a standard for distributed transaction processing (DTP) defined by the X/Open organization.

The XA specification describes the interface between the global transaction manager(TM) and the local resource manager(RM). The purpose of the XA specification is to allow multiple resources (such as databases, application servers, message queues, etc.) to access the same transaction, thus maintaining ACID properties across applications.

The XA specification uses the Two-Phase Commit (2PC) to ensure that all resources are committed or rolled back at the same time for any specific transaction.

The XA specification was proposed in the early 1990s. Currently, almost all mainstream databases support the XA specification.

1.2 What is Seata's transaction mode?

Seata defines the framework for global transactions.

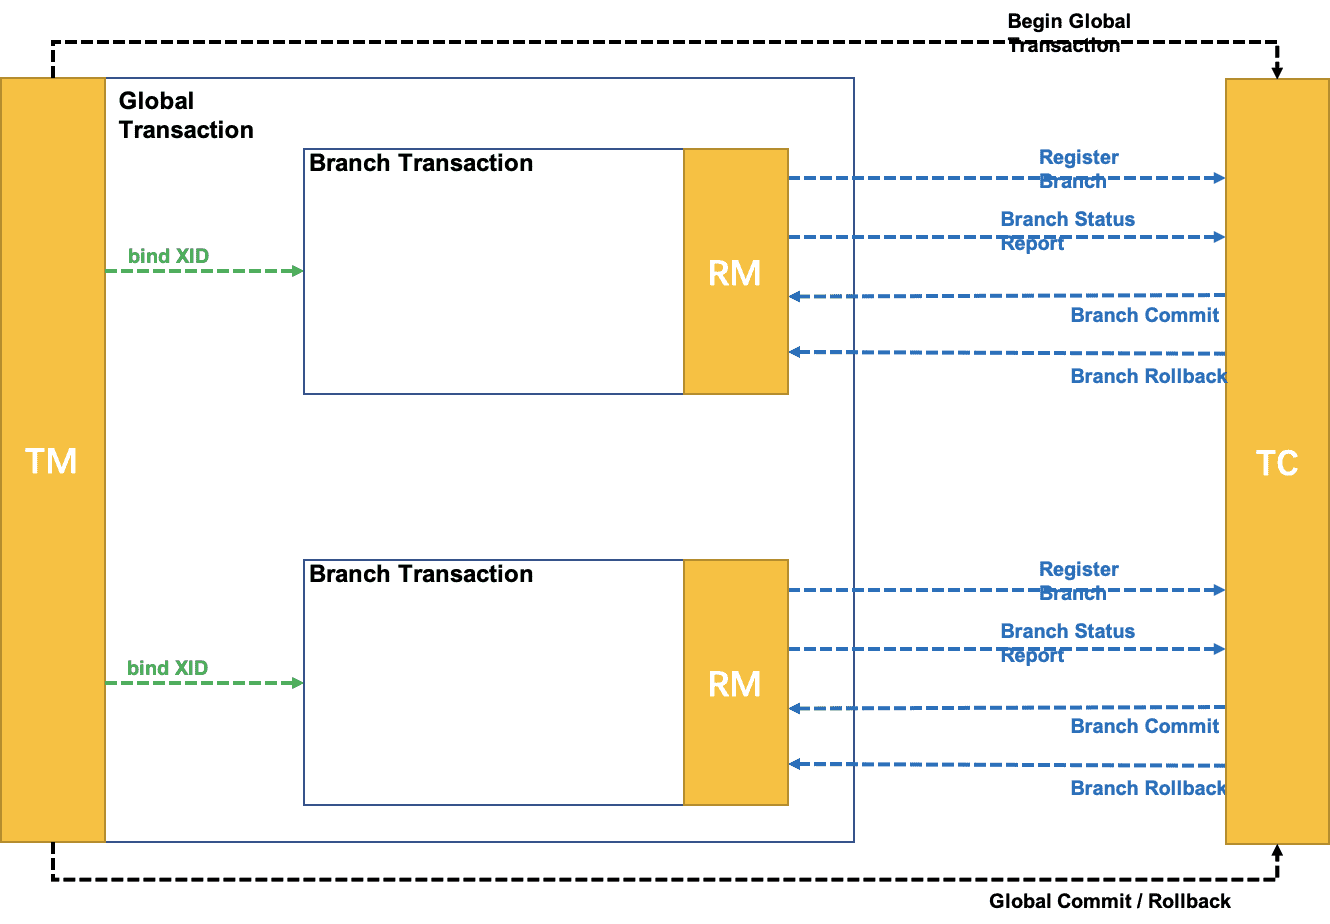
A global transaction is defined as the overall coordination of several branch transactions:

  1. The Transaction Manager (TM) requests the Transaction Coordinator (TC) to initiate (Begin), commit (Commit), or rollback (Rollback) the global transaction.
  2. The TM binds the XID representing the global transaction to the branch transaction.
  3. The Resource Manager (RM) registers with the TC, associating the branch transaction with the global transaction represented by XID.
  4. The RM reports the execution result of the branch transaction to the TC. (optional)
  5. The TC sends a branch commit or branch rollback command to the RM.
seata-mod

Seata's global transaction processing process is divided into two phases:

  • Execution phase: Execute branch transactions and ensure that the execution results are rollbackable and durable.
  • Completion phase: Based on the resolution of the execution phase, the application sends a request for global commit or rollback to the TC through the TM, and the TC commands the RM to drive the branch transaction to commit or rollback.

Seata's so-called transaction mode refers to the behavior mode of branch transactions running under the Seata global transaction framework. More precisely, it should be called the branch transaction mode.

The difference between different transaction modes lies in the different ways branch transactions achieve the goals of the two phases of the global transaction. That is, answering the following two questions:

  • Execution phase: How to execute and ensure that the execution results are rollbackable and durable.
  • Completion phase: After receiving the command from the TC, how to submit or rollback the branch transaction?

Taking our Seata AT mode and TCC mode as examples:

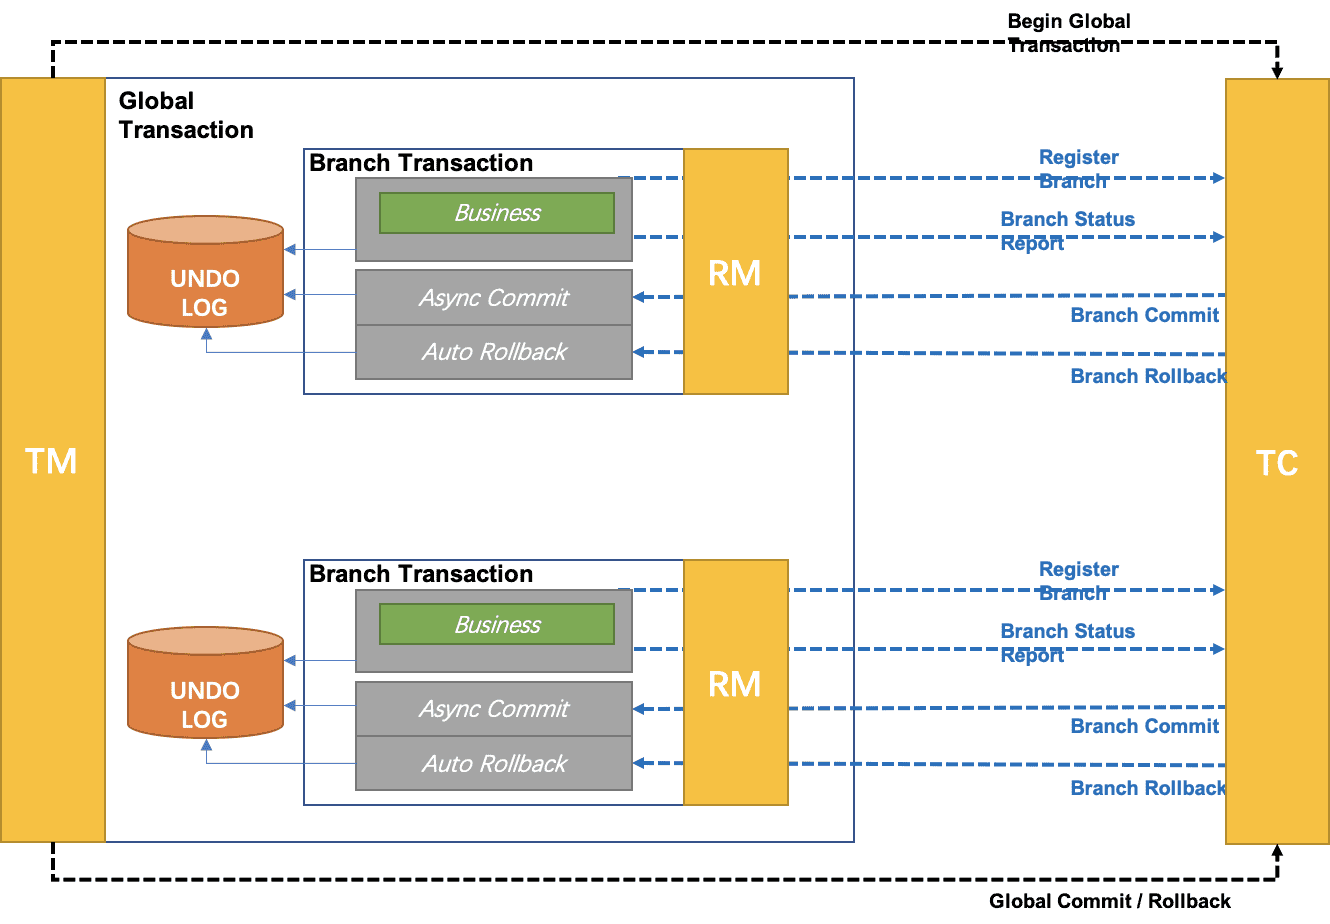
AT mode

at-mod
  • Execution phase:

    • Rollbackable: Record rollback logs according to the SQL parsing result
    • Durable: Rollback logs and business SQL are committed to the database in the same local transaction
  • Completion phase:

    • Branch commit: Asynchronously delete rollback log records
    • Branch rollback: Compensate and update according to the rollback log

TCC mode

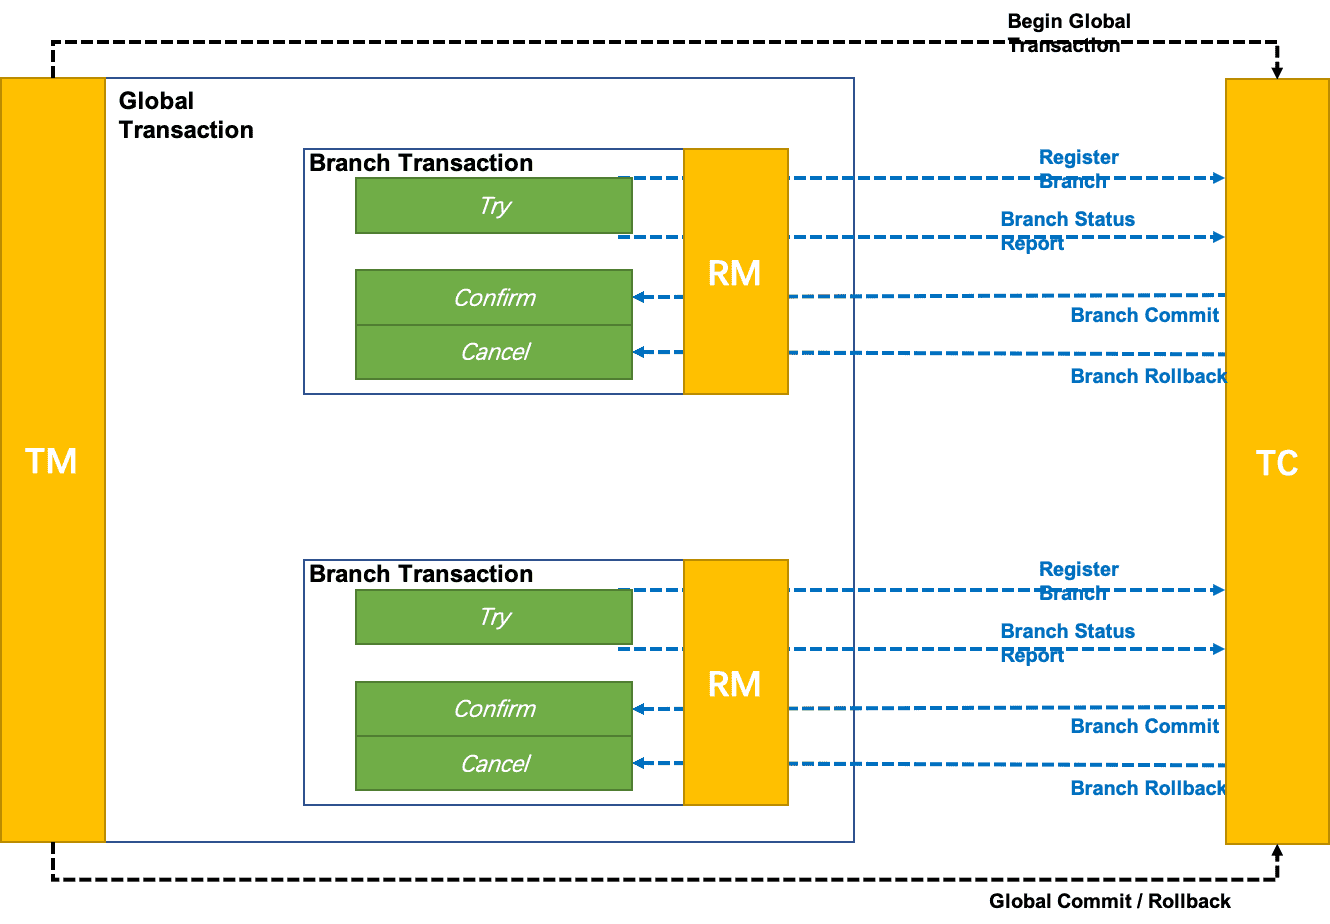
tcc-mod
  • Execution Phase:

    • Call the Try method defined by the business (guaranteed rollback and persistence entirely by the business layer)
  • Completion Phase:

    • Branch Commit: Call the Confirm method defined for each transaction branch
    • Branch Rollback: Call the Cancel method defined for each transaction branch

1.3 What is XA mode in Seata?

XA mode:

Within the distributed transaction framework defined by Seata, it is a transaction mode that uses XA protocol mechanisms to manage branch transactions with the support of transaction resources (databases, message services, etc.) for the XA protocol.

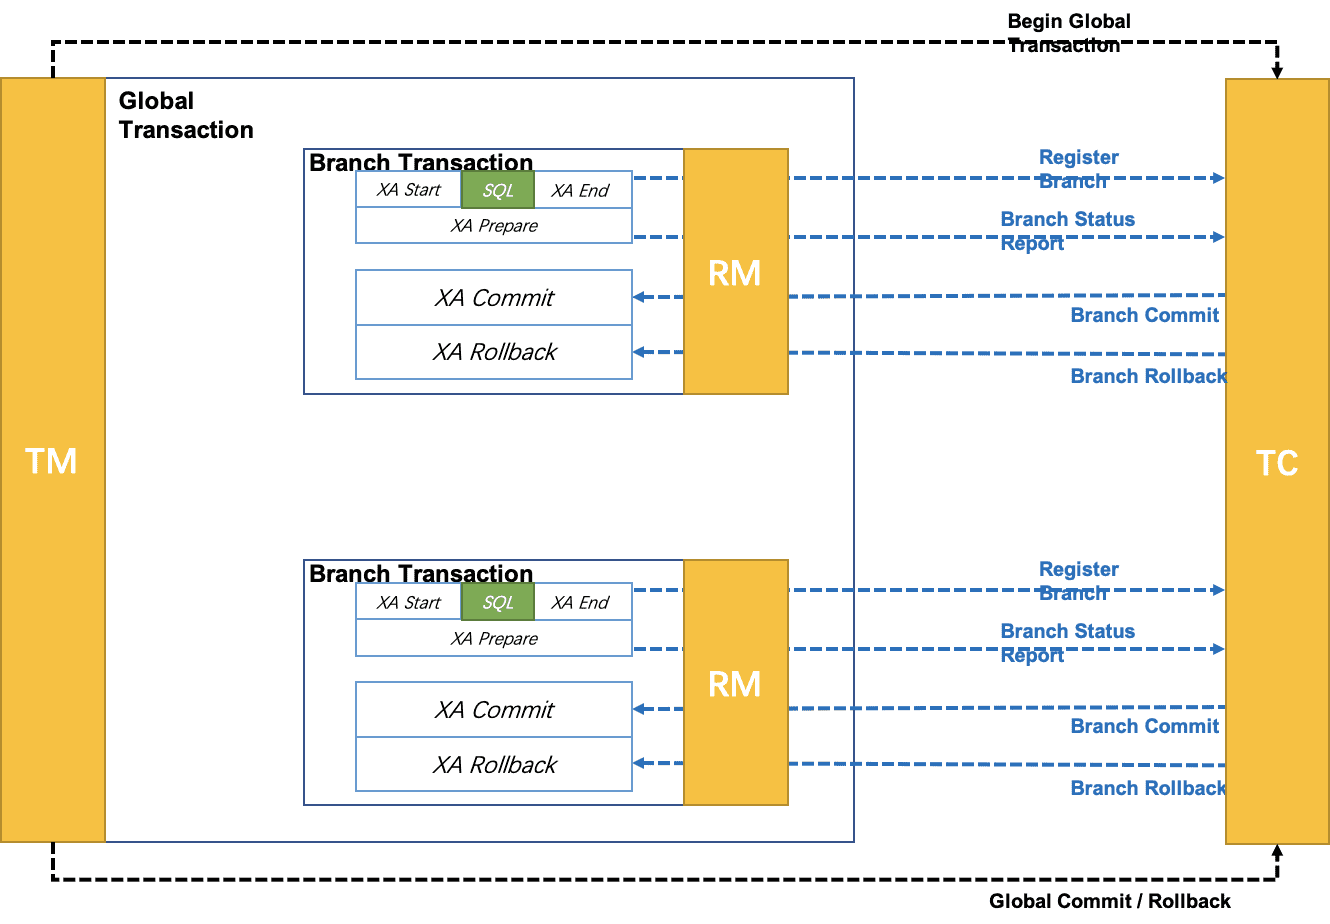
xa-mod
  • Execution Phase:

    • Rollback: Business SQL operations are performed in an XA branch, and the support of resources for the XA protocol ensures rollback
    • Persistence: After the XA branch is completed, XA prepare is executed, and similarly, the support of resources for the XA protocol ensures persistence (i.e., any unexpected occurrences will not cause situations where rollback is not possible)
  • Completion Phase:

    • Branch Commit: Perform commit for XA branch
    • Branch Rollback: Perform rollback for XA branch

2. Why support XA?

Why add XA mode in Seata? What is the significance of supporting XA?

2.1 Problems with Compensatory Transaction Mode

Essentially, the 3 major transaction modes that Seata already supports: AT, TCC, and Saga, are all compensatory in nature.

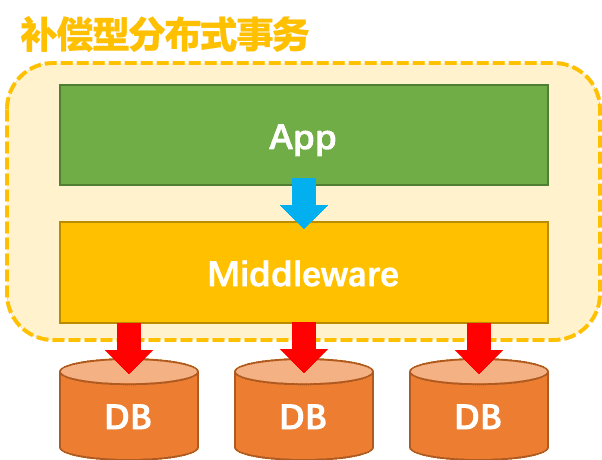
Compensatory transaction processing mechanisms are built on top of transaction resources (either in the middleware layer or in the application layer), and the transaction resources themselves are unaware of distributed transactions.

img

The fundamental problem with transaction resources being unaware of distributed transactions is the inability to achieve true global consistency.

For example, in a compensatory transaction processing process, a stock record is reduced from 100 to 50. At this point, the warehouse administrator connects to the database and sees the current quantity as 50. Later, the transaction is rolled back due to an unexpected occurrence, and the stock is compensated back to 100. Clearly, the warehouse administrator's query finding 50 is dirty data.

It can be seen that because compensatory distributed transaction mechanisms do not require the mechanism of transaction resources (such as a database), they cannot guarantee data consistency from a global perspective outside the transaction framework.

2.2 Value of XA

Unlike compensatory transaction modes, the XA protocol requires transaction resources to provide support for standards and protocols.

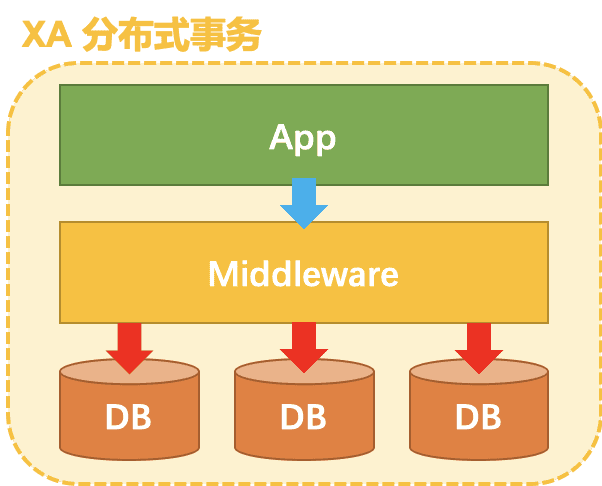
nct

Because transaction resources are aware of and participate in the distributed transaction processing process, they (such as databases) can guarantee effective isolation of data from any perspective and satisfy global data consistency.

For example, in the scenario of stock updates mentioned in the previous section, during the XA transaction processing process, the intermediate state of the database holding 50 is guaranteed by the database itself and will not be seen in the warehouse administrator's query statistics. (Of course, the isolation level needs to be READ_COMMITTED or higher.)

In addition to the fundamental value of global consistency, supporting XA also has the following benefits:

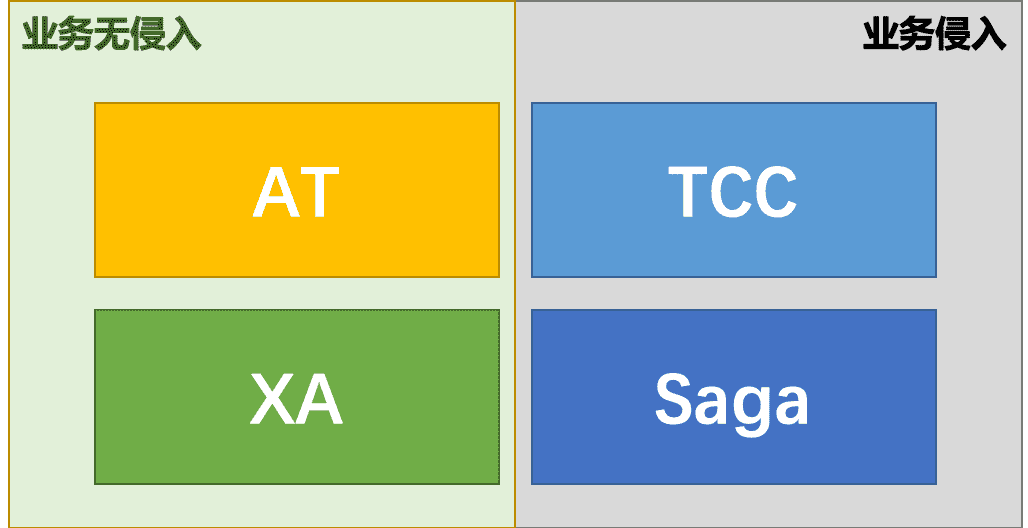
  1. Non-invasive business: Like AT, XA mode will be non-invasive for businesses, without bringing additional burden to application design and development.
  2. Wide support for databases: XA protocol is widely supported by mainstream relational databases and can be used without additional adaptation.
  3. Easy multi-language support: Because it does not involve SQL parsing, the XA mode has lower requirements for Seata's RM, making it easier for different language development SDKs compared to the AT mode.
  4. Migration of traditional XA-based applications: Traditional applications based on the XA protocol can be smoothly migrated to the Seata platform using the XA mode.

2.3 Widely Questioned Issues of XA

There is no distributed transaction mechanism that can perfectly adapt to all scenarios and meet all requirements.

The XA specification was proposed as early as the early 1990s to solve the problems in the field of distributed transaction processing.

Now, whether it's the AT mode, TCC mode, or the Saga mode, the essence of these modes' proposals stems from the inability of the XA specification to meet certain scenario requirements.

The distributed transaction processing mechanism defined by the XA specification has some widely questioned issues. What is our thinking regarding these issues?

  1. Data Locking: Data is locked throughout the entire transaction processing until it is finished, and reads and writes are constrained according to the definition of isolation levels.

Thinking:

Data locking is the cost to obtain higher isolation and global consistency.

In compensatory transaction processing mechanisms, the completion of branch (local) transactions is done during the execution stage, and data is not locked at the resource level. However, this is done at the cost of sacrificing isolation.

Additionally, the AT mode uses global locks to ensure basic write isolation, effectively locking data, but the lock is managed centrally on the TC side, with high unlock efficiency and no blocking issues.

  1. Protocol Blocking: After XA prepare, the branch transaction enters a blocking stage and must wait for XA commit or XA rollback.

Thinking:

The blocking mechanism of the protocol itself is not the problem. The key issue is the combination of protocol blocking and data locking.

If a resource participating in the global transaction is "offline" (does not receive commands to end branch transactions), the data it locks will remain locked. This may even lead to deadlocks.

This is the core pain point of the XA protocol and is the key problem that Seata aims to solve by introducing the XA mode.

The basic idea is twofold: avoiding "loss of connection" and adding a "self-release" mechanism. (This involves a lot of technical details, which will not be discussed at the moment. They will be specifically discussed in the subsequent evolution of the XA mode.)

  1. Poor Performance: Performance loss mainly comes from two aspects: on one hand, the transaction coordination process increases the RT of individual transactions; on the other hand, concurrent transaction data lock conflicts reduce throughput.

Thinking:

Compared to running scenarios without distributed transaction support, performance will certainly decline, there is no doubt about that.

Essentially, the transaction mechanism (whether local or distributed) sacrifices some performance to achieve a simple programming model.

Compared to the AT mode, which is also non-invasive for businesses:

Firstly, because XA mode also runs under Seata's defined distributed transaction framework, it does not generate additional transaction coordination communication overhead.

Secondly, in concurrent transactions, if data has hotspots and lock conflicts occur, this situation also exists in the AT mode (which defaults to using a global lock).

Therefore, in the two main aspects affecting performance, the XA mode does not have a significantly obvious disadvantage compared to the AT mode.

The performance advantage of the AT mode mainly lies in: centralized management of global data locks, where the release of locks does not require RM involvement and is very fast; in addition, the asynchronous completion of the global commit stage.

3. How Does XA Mode Work and How to Use It?

3.1 Design of XA Mode

3.1.1 Design Objectives

The basic design objectives of XA mode mainly focus on two main aspects:

  1. From the perspective of scenarios, it meets the requirement of global consistency.
  2. From the perspective of applications, it maintains the non-invasive nature consistent with the AT mode.
  3. From the perspective of mechanisms, it adapts to the characteristics of distributed microservice architecture.

Overall idea:

  1. Same as the AT mode: Construct branch transactions from local transactions in the application program.
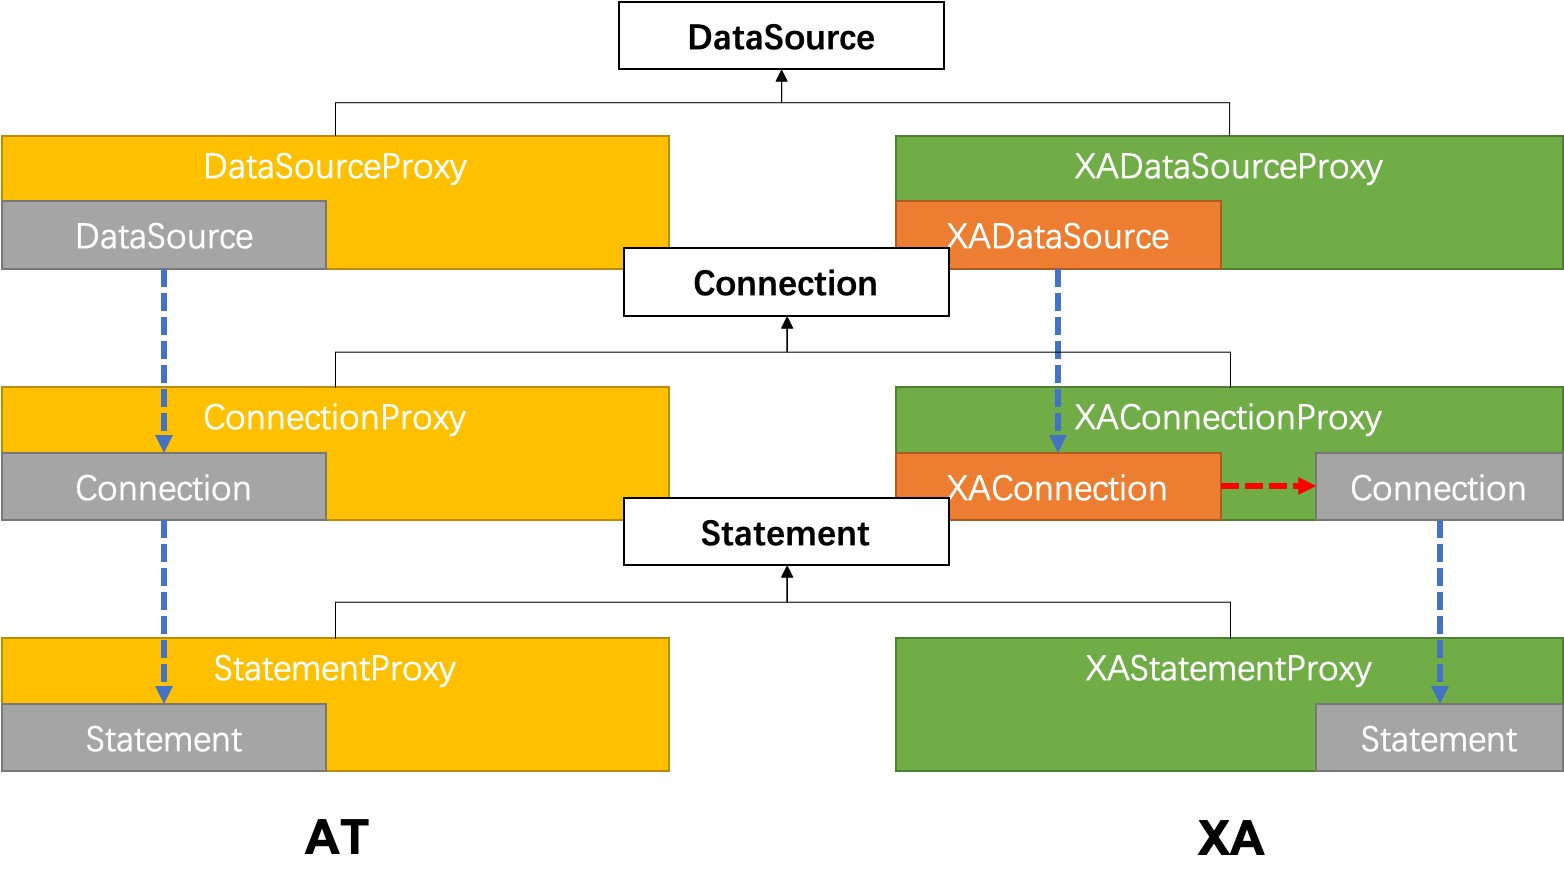
  2. Through data source proxy, wrap the interaction mechanism of the XA protocol at the framework level outside the scope of local transactions in the application program, making the XA programming model transparent.
  3. Split the 2PC of XA and perform XA prepare at the end of the execution stage of branch transactions, seamlessly integrating the XA protocol into Seata's transaction framework, reducing one round of RPC interaction.

3.1.2 Core Design

1. Overall Operating Mechanism

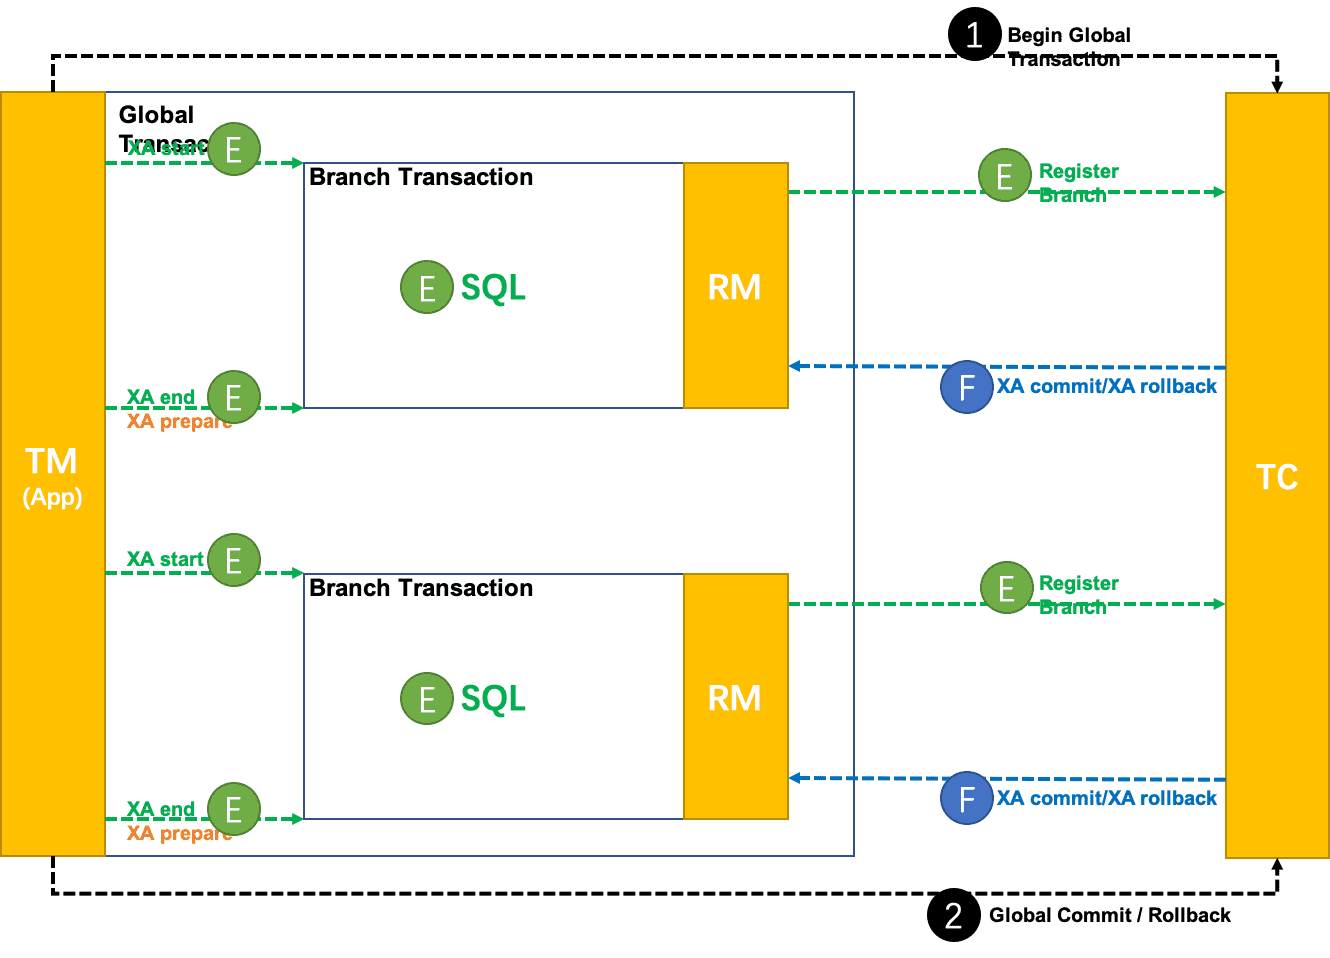
XA mode runs within the transaction framework defined by Seata:

xa-fw
  • Execution phase (Execute):

    • XA start/XA end/XA prepare + SQL + Branch registration
  • Completion phase (Finish):

    • XA commit/XA rollback

2. Data Source Proxy

XA mode requires XAConnection.

There are two ways to obtain XAConnection:

  • Method 1: Requires developers to configure XADataSource
  • Method 2: Creation based on the developer's normal DataSource

The first method adds cognitive burden to developers, as they need to learn and use XA data sources specifically for XA mode, which contradicts the design goal of transparent XA programming model.

The second method is more user-friendly, similar to the AT mode, where developers do not need to worry about any XA-related issues and can maintain a local programming model.

We prioritize the implementation of the second method: the data source proxy creates the corresponding XAConnection based on the normal JDBC connection obtained from the normal data source.

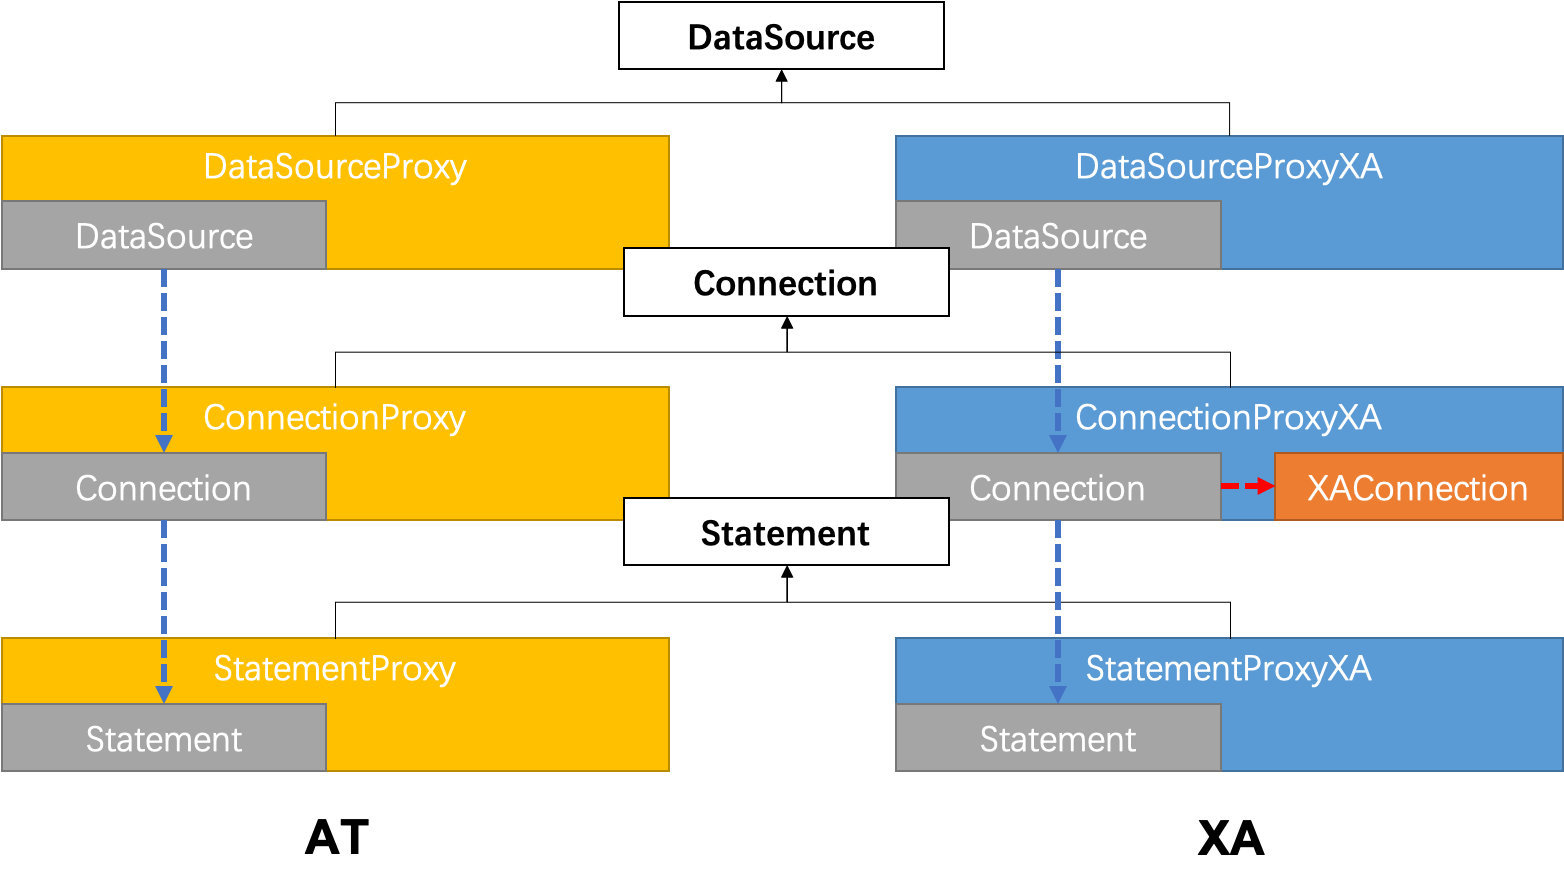
Comparison with the data source proxy mechanism of the AT mode:

img

However, the second method has limitations: it cannot guarantee compatibility correctness.

In fact, this method is what database drivers should do. Different vendors and different versions of database driver implementation mechanisms are vendor-specific, and we can only guarantee correctness on fully tested driver versions, as differences in the driver versions used by developers can lead to the failure of the mechanism.

This is particularly evident in Oracle. See Druid issue: https://github.com/alibaba/druid/issues/3707

Taking everything into account, the data source proxy design for XA mode needs to support the first method: proxy based on XA data source.

Comparison with the data source proxy mechanism of the AT mode:

img

3. Branch Registration

XA start requires the Xid parameter.

This Xid needs to be associated with the XID and BranchId of the Seata global transaction, so that the TC can drive the XA branch to commit or rollback.

Currently, the BranchId in Seata is generated uniformly by the TC during the branch registration process, so the timing of the XA mode branch registration needs to be before XA start.

A possible optimization in the future:

Delay branch registration as much as possible. Similar to the AT mode, register the branch before the local transaction commit to avoid meaningless branch registration in case of branch execution failure.

This optimization direction requires a change in the BranchId generation mechanism to cooperate. BranchId will not be generated through the branch registration process, but will be generated and then used to register the branch.

4. Summary

Here, only a few important core designs of the XA mode are explained to illustrate its basic operation mechanism.

In addition, important aspects such as connection maintenance and exception handling are also important and can be further understood from the project code.

More information and exchange will be written and shared with everyone in the future.

3.1.3 Evolution Plan

The overall evolution plan of the XA mode is as follows:

  1. Step 1 (already completed): The first version (1.2.0) runs the prototype mechanism of the XA mode. Ensure only addition, no modification, and no new issues introduced to other modes.
  2. Step 2 (planned to be completed in May): Necessary integration and refactoring with the AT mode.
  3. Step 3 (planned to be completed in July): Refine the exception handling mechanism and polish for production readiness.
  4. Step 4 (planned to be completed in August): Performance optimization.
  5. Step 5 (planned to be completed in 2020): Integrate with Seata project's ongoing design for cloud-native Transaction Mesh to create cloud-native capabilities.

3.2 Usage of XA Mode

From a programming model perspective, XA mode is exactly the same as the AT mode.

You can refer to the Seata official website sample: seata-xa

The example scenario is the classic Seata example, involving the product ordering business of three microservices: inventory, orders, and accounts.

In the example, the upper programming model is the same as the AT mode. By simply modifying the data source proxy, you can switch between XA mode and AT mode.

@Bean("dataSource")
public DataSource dataSource(DruidDataSource druidDataSource) {
// DataSourceProxy for AT mode
// return new DataSourceProxy(druidDataSource);

// DataSourceProxyXA for XA mode
return new DataSourceProxyXA(druidDataSource);
}

4. Summary

At the current stage of technological development, there is no distributed transaction processing mechanism that can perfectly meet all scenarios' requirements.

Consistency, reliability, ease of use, performance, and many other aspects of system design constraints require different transaction processing mechanisms to meet them.

The core value of the Seata project is to build a standardized platform that comprehensively addresses the distributed transaction problem.

Based on Seata, the upper application architecture can flexibly choose the appropriate distributed transaction solution according to the actual scenario's needs.

img

The addition of XA mode fills the gap in Seata in the global consistency scenario, forming a landscape of four major transaction modes: AT, TCC, Saga, and XA, which can basically meet all scenarios' demands for distributed transaction processing.

Of course, both XA mode and the Seata project itself are not yet perfect, and there are many areas that need improvement and enhancement. We warmly welcome everyone to participate in the project's development and contribute to building a standardized distributed transaction platform together.

· 11 min read

Seata is an open source Ali open source **distributed transaction **solution , is committed to providing high-performance and easy-to-use distributed transaction services .

1.1 Four transaction patterns

Seata aims to create a one-stop solution for distributed transactions, and will eventually provide four transaction modes:

  • AT mode: See the "Seata AT mode" document.
  • TCC mode: see the Seata TCC mode document (/docs/dev/mode/tcc-mode/).
  • Saga mode: see the document "SEATA Saga mode".
  • XA mode: under development...

Currently used popularity situation is: AT > TCC > Saga. therefore, when we learn Seata, we can spend more energy on AT mode, it is best to understand the principle behind the implementation, after all, distributed transaction involves the correctness of the data, the problem needs to be quickly troubleshooting to locate and solve.

Friendly note: specific popularity, friends can choose to look at Wanted: who's using Seata each company registered use.

1.2 Three roles

There are three roles in the architecture of Seata:

! Three Roles

  • TC (Transaction Coordinator) - Transaction Coordinator: maintains the state of global and branch transactions, drives global transactions commit or rollback.
  • TM (Transaction Manager) - Transaction Manager: defines the scope of a global transaction, starts the global transaction, commits or rolls back the global transaction.
  • RM (Resource Manager) - Resource Manager: manages the resources processed by the Branch Transaction, talks to the TC to register the branch transaction and report on the status of the branch transaction, and drives the Branch Transaction to commit or rollback.

The TC is a separately deployed Server server and the TM and RM are Client clients embedded in the application.

In Seata, the Lifecycle of a distributed transaction is as follows:

! Architecture diagram

Friendly reminder: look at the red ticks added by the carrots.

  • The TM requests the TC to open a global transaction. the TC generates a XID as the number of this global transaction.

XID, which is propagated through the microservice's invocation chain, is guaranteed to associate multiple microservice sub-transactions together.

  • RM requests the TC to register the local transaction as a branch transaction of the global transaction to be associated via the XID of the global transaction.
  • The TM requests the TC to tell the XID whether the corresponding global transaction is to be committed or rolled back.
  • TC drives RMs to commit or rollback their own local transactions corresponding to XID.

1.3 Framework Support

Seata currently provides support for the major microservices frameworks:

  • Dubbo

Integration via seata-dubbo

  • SOFA-RPC

integrated via seata-sofa-rpc

  • Motan

Integrated via seata-motan

  • gRPC

integrated via seata-grpc

  • Apache HttpClient

integrated via seata-http

Seata also provides a Starter library for easy integration into Java projects:

Because Seata is based on the DataSource data source for proxy to extend, it naturally provides very good support for mainstream ORM frameworks:

  • MyBatis, MyBatis-Plus
  • JPA, Hibernate

1.4 Case Scenarios

From the registration of Wanted: who's using Seata, Seata has started to land in many teams in China, including many large companies such as DDT and Rhyme. This can be summarised in the figure below:

! summary chart

In addition, in the awesome-seata warehouse, carrots carrots see the drop and so on the company's landing when the technology to share, or very real and reliable. As shown in the picture below:! awesome-seata 滴滴

In terms of the case, Seata is probably the most reliable distributed transaction solution known to date, or at least it is a very good choice to invest in it technically.

2. Deploying a Standalone TC Server

In this subsection, we will learn to deploy a standalone Seata TC Server, which is commonly used for learning or testing purposes, and is not recommended to be deployed in a production environment.

Because TC needs to record global and branch transactions, it needs corresponding storage. Currently, TC has two storage modes ( store.mode):

  • file mode: suitable for standalone mode, global transaction session information is read/written in memory and persisted to local file root.data, with high performance.
  • db mode: suitable for cluster mode, global transaction session information is shared via db, relatively low performance.

Obviously, we will adopt the file mode, and finally we deploy the standalone TC Server as shown below: ! Standalone TC Server

After so much beeping, we start to formally deploy the standalone TC Server, here carrots carrots use macOS system, and Linux, Windows is similar to the friend of the brain to translate.

2.1 Download Seata Package

Open the Seata download page, and select the version of Seata you want. Here, we choose v1.1.0, the latest version.

# Create the directory
$ mkdir -p /Users/yunai/Seata
$ cd /Users/yunai/Seata

# Download
$ wget https://github.com/apache/incubator-seata/releases/download/v1.1.0/seata-server-1.1.0.tar.gz

# Extract
$ tar -zxvf seata-server-1.1.0.tar.gz

# View directory
$ cd seata
$ ls -ls
24 -rw-r--r-- 1 yunai staff 11365 May 13 2019 LICENSE
0 drwxr-xr-x 4 yunai staff 128 Apr 2 07:46 bin # Executing scripts
0 drwxr-xr-x 9 yunai staff 288 Feb 19 23:49 conf # configuration file
0 drwxr-xr-x 138 yunai staff 4416 Apr 2 07:46 lib # seata-*.jar + dependency library

2.2 Starting TC Server

Execute the nohup sh bin/seata-server.sh & command to start TC Server in the background. In the nohup.out file, we see the following log, which indicates that the startup was successful:

# Using File Storage
2020-04-02 08:36:01.302 INFO [main]io.seata.common.loader.EnhancedServiceLoader.loadFile:247 -load TransactionStoreManager[FILE] extension by class[io.seata.server.store.file.FileTransactionStoreManager]
2020-04-02 08:36:01.302 INFO [main]io.seata.common.loader.EnhancedServiceLoader.loadFile:247 -load SessionManager[FILE] extension by class [io.seata.server.session.file.FileBasedSessionManager]
# Started successfully
2020-04-02 08:36:01.597 INFO [main]io.seata.core.rpc.netty.RpcServerBootstrap.start:155 -Server started ...
  • In the default configuration, Seata TC Server starts on the 8091 endpoint.

Since we are using file mode, we can see the local file root.data for persistence. The command to do this is as follows:

$ ls -ls sessionStore/
total 0
0 -rw-r--r-- 1 yunai staff 0 Apr 2 08:36 root.data

As a follow-up, you can read the "4. Getting Started with Java Applications" subsection to get started with distributed transactions using Seata.

3. Deploying a Clustered TC Server

In this subsection, we will learn to deploy Cluster Seata TC Server to achieve high availability, a must for production environments. In clustering, multiple Seata TC Servers share global transaction session information through the db database.

At the same time, each Seata TC Server can register itself to the registry so that applications can get them from the registry. Eventually we deploy the Clustered TC Server as shown below: ! Cluster TC Server

Seata TC Server provides integration with all major registries, as shown in the discovery directory. Considering the increasing popularity of using Nacos as a registry in China, we will use it here.

Friendly note: If you don't know anything about Nacos, you can refer to the "Nacos Installation and Deployment" article.

After beeping so much, we start to deploy standalone TC Server formally, here carrots carrots use macOS system, and Linux, Windows is similar to the friend of the brain to translate.

3.1 Downloading the Seata package

Open the Seata download page (https://github.com/apache/incubator-seata/releases), and select the version of Seata you want. Here, we choose v1.1.0, the latest version.

# Create the directory
$ mkdir -p /Users/yunai/Seata
$ cd /Users/yunai/Seata

# Download
$ wget https://github.com/apache/incubator-seata/releases/download/v1.1.0/seata-server-1.1.0.tar.gz

# Extract
$ tar -zxvf seata-server-1.1.0.tar.gz

# View directory
$ cd seata
$ ls -ls
24 -rw-r--r-- 1 yunai staff 11365 May 13 2019 LICENSE
0 drwxr-xr-x 4 yunai staff 128 Apr 2 07:46 bin # Executing scripts
0 drwxr-xr-x 9 yunai staff 288 Feb 19 23:49 conf # configuration file
0 drwxr-xr-x 138 yunai staff 4416 Apr 2 07:46 lib # seata-*.jar + dependency library

3.2 Initialising the database

① Use the mysql.sql script to initialise the db database of Seata TC Server. The contents of the script are as follows:

-- -------------------------------- The script used when storeMode is 'db' --------------------------------
-- the table to store GlobalSession data
CREATE TABLE IF NOT EXISTS `global_table`
(
`xid` VARCHAR(128) NOT NULL,
`transaction_id` BIGINT, `status` TINYL
`status` TINYINT NOT NULL,
`application_id` VARCHAR(32), `transaction_service
`transaction_service_group` VARCHAR(32),
`transaction_name` VARCHAR(128),
`timeout` INT,
`begin_time` BIGINT,
`application_data` VARCHAR(2000), `gmt_create
`gmt_create` DATETIME,
`gmt_modified` DATETIME,
PRIMARY KEY (`xid`),
KEY `idx_gmt_modified_status` (`gmt_modified`, `status`),
KEY `idx_transaction_id` (`transaction_id`)
) ENGINE = InnoDB
DEFAULT CHARSET = utf8.

-- the table to store BranchSession data
CREATE TABLE IF NOT EXISTS `branch_table`
(
`branch_id` BIGINT NOT NULL, `xid` VARCHARGE
`xid` VARCHAR(128) NOT NULL,
`transaction_id` BIGINT,
`resource_group_id` VARCHAR(32), `resource_id` VARCHAR(32), `transaction_id` BIGINT
`resource_id` VARCHAR(256),
`branch_type` VARCHAR(8), `status` TINYINT
`status` TINYINT,
`client_id` VARCHAR(64), `application_data` TINYINT, `client_id` VARCHAR(64), `application_data` TINYINT
`application_data` VARCHAR(2000), `gmt_create
`gmt_create` DATETIME(6),
`gmt_modified` DATETIME(6),
PRIMARY KEY (`branch_id`), `branch_id`, `idx_x
KEY `idx_xid` (`xid`)
) ENGINE = InnoDB
DEFAULT CHARSET = utf8; -- the table to store lock data.

-- the table to store lock data
CREATE TABLE IF NOT EXISTS `lock_table`
(
`row_key` VARCHAR(128) NOT NULL, `xid` VARCHAR(128) NOT NULL, -- the table to store lock data
`xid` VARCHAR(96),
`transaction_id` BIGINT, `branch_id` BIGINT, `branch_id` BIGINT
`branch_id` BIGINT NOT NULL,
`resource_id` VARCHAR(256),
`table_name` VARCHAR(32),
`pk` VARCHAR(36), `gmt_create` VARCHAR(256), `gmt_create
`gmt_create` DATETIME, `gmt_modify` VARCHAR(256), `pk` VARCHAR(36), `gmt_create` DATETIME
`gmt_modified` DATETIME,
PRIMARY KEY (`row_key`),
KEY `idx_branch_id` (`branch_id`)
) ENGINE = InnoDB
DEFAULT CHARSET = utf8.

In MySQL, create seata database and execute the script under it. The final result is as follows: ! seata Database - MySQL 5.X

② Modify the conf/file configuration file to use the db database to share the global transaction session information of Seata TC Server. As shown in the following figure: ! conf/file configuration file

③ MySQL8 support

If your friend is using MySQL version 8.X, you need to see this step. Otherwise, you can just skip it.

Firstly, you need to download the MySQL 8.X JDBC driver, the command line operation is as follows:

$ cd lib
$ wget https://repo1.maven.org/maven2/mysql/mysql-connector-java/8.0.19/mysql-connector-java-8.0.19.jar

Then, modify the conf/file configuration file to use the MySQL 8.X JDBC driver. As shown below: ! seata database - MySQL 8.X

3.3 Setting up to use the Nacos Registry

Modify the conf/registry.conf configuration file to set up the Nacos registry. As shown in the following figure: ! conf/registry.conf configuration file

3.4 Starting TC Server

① Execute nohup sh bin/seata-server.sh -p 18091 -n 1 & command to start the first TC Server in the background.

  • -p: Port on which Seata TC Server listens.
  • -n: Server node. In case of multiple TC Servers, it is necessary to differentiate the respective nodes for generating transactionId transaction numbers for different zones to avoid conflicts.

In the nohup.out file, we see the following log, indicating a successful startup:

# Using DB Stores
2020-04-05 16:54:12.793 INFO [main]io.seata.common.loader.EnhancedServiceLoader.loadFile:247 -load DataSourceGenerator[dbcp] extension by class[io.seata.server.store.db.DbcpDataSourceGenerator]
Loading class `com.mysql.jdbc.Driver'. This is deprecated. The new driver class is `com.mysql.cj.jdbc.Driver'. The driver is automatically registered via the SPI and manual loading of the driver class is generally unnecessary.
2020-04-05 16:54:13.442 INFO [main]io.seata.common.loader.EnhancedServiceLoader.loadFile:247 -load LogStore[DB] extension by class[io. seata.core.store.db.LogStoreDataBaseDAO]
2020-04-05 16:54:13.442 INFO [main]io.seata.common.loader.EnhancedServiceLoader.loadFile:247 -load TransactionStoreManager[DB] extension by class[io.seata.server.store.db.DatabaseTransactionStoreManager]
2020-04-05 16:54:13.442 INFO [main]io.seata.common.loader.EnhancedServiceLoader.loadFile:247 -load SessionManager[DB] extension by class[ io.seata.server.session.db.DataBaseSessionManager]
# Started successfully
2020-04-05 16:54:13.779 INFO [main]io.seata.core.rpc.netty.RpcServerBootstrap.start:155 -Server started ...
# Using the Nacos Registry
2020-04-05 16:54:13.788 INFO [main]io.seata.common.loader.EnhancedServiceLoader.loadFile:247 -load RegistryProvider[Nacos] extension by class[io.seata.discovery.registry.nacos.NacosRegistryProvider]

② Execute the nohup sh bin/seata-server.sh -p 28091 -n 2 & command to start the second TC Server in the background.

③ Open the Nacos Registry console and we can see that there are two Seata TC Server examples. As shown in the following figure: ! Nacos console

4. Accessing Java Applications

4.1 AT mode

① Spring Boot.

  1. "2. AT Mode + Multiple Data Sources" subsection of "Getting Started with Taro Road Spring Boot Distributed Transaction Seata" implements distributed transactions for a single Spring Boot project under multiple data sources.

! Overall diagram

  1. "AT Pattern + HttpClient Remote Call" subsection of "Getting Started with Taro Road Spring Boot Distributed Transaction Seata", to implement distributed transactions for multiple Spring Boot projects.

! Overall diagram

② Dubbo

Subsection "2. AT Patterns" of "Getting Started with Dubbo Distributed Transaction Seata" implements distributed transactions under multiple Dubbo services.

! Overall Diagram

③ Spring Cloud

The "3. AT Patterns + Feign" subsection of "Getting Started with Alibaba Distributed Transaction Seata for Taro Road Spring Cloud" implements multiple Spring Cloud services.

! Overall diagram

4.2 TCC Pattern

4.3 Saga mode

4.4 XA mode

Seata is under development...

· 7 min read

To make Seata highly available using a configuration centre and database, take Nacos and MySQL as an example and deploy the [cloud-seata-nacos](https://github.com/helloworlde/spring-cloud-alibaba-component/blob/ master/cloud-seata-nacos/) application to a Kubernetes cluster.

The application uses Nacos as the configuration and registration centre, and has three services: order-service, pay-service, and storage-service. The order-service provides an interface for placing an order, and when the balance and inventory are sufficient, the order succeeds and a transaction is submitted; when they are insufficient, an exception is thrown, the order fails, and the transaction is rolled back. Rollback transaction

Preparation

You need to prepare available registry, configuration centre Nacos and MySQL, usually, the registry, configuration centre and database are already available and do not need special configuration, in this practice, for simplicity, only deploy a stand-alone registry, configuration centre and database, assuming they are reliable

  • Deploying Nacos

Deploy Nacos on a server with port 8848 open for seata-server registration at 192.168.199.2.

docker run --name nacos -p 8848:8848 -e MODE=standalone nacos/nacos-server
  • Deploying MySQL

Deploy a MySQL database to hold transaction data at 192.168.199.2.

docker run --name mysql -p 30060:3306-e MYSQL_ROOT_PASSWORD=123456 -d mysql:5.7.17

Deploying seata-server

  • Create the tables needed for seata-server.

Refer to script/server/db for the exact SQL, here we are using MySQL's script and the database name is seata.

You also need to create the undo_log table, see script/client/at/db/.

  • Modify the seata-server configuration

Add the following configuration to the Nacos Configuration Centre, as described in script/config-center

service.vgroupMapping.my_test_tx_group=default
store.mode=db
store.db.datasource=druid
store.db.dbType=mysql
store.db.driverClassName=com.mysql.jdbc.
store.db.url=jdbc:mysql://192.168.199.2:30060/seata?useUnicode=true
store.db.user=root
store.db.password=123456

Deploying seata-server to Kubernetes

  • seata-server.yaml

You need to change the ConfigMap's Registry and Configuration Centre addresses to the appropriate addresses

apiVersion: v1
kind: Service
metadata: name: seata-ha-server.yaml
name: seata-ha-server
namespace: default
labels: app.kubernetes.io/name: seata-ha-server
app.kubernetes.io/name: seata-ha-server
spec.
type: ClusterIP
spec: type: ClusterIP
- port: 8091
protocol: TCP
name: http
selector: app.kubernetes.io/name: seata-ha-server
app.kubernetes.io/name: seata-ha-server

---apiVersion: apps/v1

apiVersion: apps/v1
kind: StatefulSet
metadata.
name: seata-ha-server
namespace: default
labels: app.kubernetes.io/name: seata-ha-server
app.kubernetes.io/name: seata-ha-server
spec: serviceName: seata-ha-server
serviceName: seata-ha-server
replicas: 3
selector: seata-ha-server
matchLabels.
app.kubernetes.io/name: seata-ha-server
template: seata-ha-server
metadata.
labels: app.kubernetes.io/name: seata-ha-server
app.kubernetes.io/name: seata-ha-server
spec.
containers: name: seata-ha-server
- name: seata-ha-server
image: docker.io/seataio/seata-server:latest
imagePullPolicy: IfNotPresent
env: name: SEATA_CONFIG
- name: SEATA_CONFIG_NAME
value: file:/root/seata-config/registry
ports: name: http
- name: http
containerPort: 8091
protocol: TCP
volumeMounts: name: seata-config
- name: seata-config
mountPath: /root/seata-config
volumes: name: seata-config mountPath: /root/seata-config
- name: seata-config
configMap: name: seata-ha-server-config
name: seata-ha-server-config


---apiVersion: v1
apiVersion: v1
kind: ConfigMap
apiVersion: v1 kind: ConfigMap
name: seata-ha-server-config
data: name: seata-ha-server-config
registry.conf: |
registry {
type = "nacos"
nacos {
application = "seata-server"
serverAddr = "192.168.199.2"
}
}
config {
type = "nacos"
nacos {
serverAddr = "192.168.199.2"
group = "SEATA_GROUP"
}
}
  • Deployment
kubectl apply -f seata-server.yaml

When the deployment is complete, there will be three pods

kubectl get pod | grep seata-ha-server

seata-ha-server-645844b8b6-9qh5j 1/1 Running 0 3m14s
seata-ha-server-645844b8b6-pzczs 1/1 Running 0 3m14s
seata-ha-server-645844b8b6-wkpw8 1/1 Running 0 3m14s

After the startup is complete, you can find three instances of seata-server in the Nacos service list, so you have completed the highly available deployment of seata-server.

  • Viewing the service logs
kubelet logs -f seata-ha-server-645844b8b6-9qh5j
[0.012s][info ][gc] Using Serial
2020-04-15 00:55:09.880 INFO [main]io.seata.server.ParameterParser.init:90 -The server is running in container.
2020-04-15 00:55:10.013 INFO [main]io.seata.config.FileConfiguration.<init>:110 -The configuration file used is file:/root/seata- config/registry.conf
2020-04-15 00:55:12.426 INFO [main]com.alibaba.druid.pool.DruidDataSource.init:947 -{dataSource-1} inited
2020-04-15 00:55:13.127 INFO [main]io.seata.core.rpc.netty.RpcServerBootstrap.start:155 -Server started

where {dataSource-1} indicates that the database is used and initialised properly

  • Looking at the registry, there are three instances of the seata-serve service at this point

! seata-ha-nacos-list.png

Deploying the business service

  • Create business tables and initialise data

You can refer to [cloud-seata-nacos/README.md](https://github.com/helloworlde/spring-cloud-alibaba-component/blob/master/cloud-seata- nacos/README.md).

  • Adding Nacos Configuration

Under the public namespace, create the configurations with data-id order-service.properties, pay-service.properties, storage-service.properties, with the same content. password

# MySQL
spring.datasource.url=jdbc:mysql://192.168.199.2:30060/seata?useUnicode=true&characterEncoding=utf8&allowMultiQueries=true &useSSL=false
spring.datasource.username=root
spring.datasource.password=123456
spring.datasource.driver-class-name=com.mysql.cj.jdbc.
# Seata
spring.cloud.alibaba.seata.tx-service-group=my_test_tx_group
  • Deploying the Service

Deploy the service via the application.yaml configuration file, and note that you need to change the NACOS_ADDR of the ConfigMap to your Nacos address.

apiVersion: v1
kind: Service
metadata: namespace: default
namespace: default
name: seata-ha-service
labels: app.kubernetes.io/name: seata-ha-service
app.kubernetes.io/name: seata-ha-service
spec.
type: NodePort
spec: type: NodePort
- nodePort: 30081
nodePort: 30081
protocol: TCP
name: http
selector: app.kubernetes.io/name: seata-ha-service
app.kubernetes.io/name: seata-ha-service

---
apiVersion: v1
kind: ConfigMap
metadata: name: seata-ha-service-config
name: seata-ha-service-config
data: NACOS_ADDR: 192.168.199.2:8848
NACOS_ADDR: 192.168.199.2:8848

---apiVersion: v1
apiVersion: v1
kind: ServiceAccount
metadata: name: seata-ha-account
name: seata-ha-account
namespace: default

---apiVersion: rbac.authorisation.k8s.io/v1beta1
apiVersion: rbac.authorisation.k8s.io/v1beta1
kind: ClusterRoleBinding
metadata: name: seata-ha-account
name: seata-ha-account
roleRef.
apiGroup: rbac.authorisation.k8s.io/v1beta1 kind: ClusterRoleBinding
roleRef: apiGroup: rbac.authorisation.k8s.io
name: cluster-admin
subjects.
- kind: ServiceAccount
name: seata-ha-account
namespace: default

---
apiVersion: apps/v1
kind: Deployment
namespace: default --- --- apiVersion: apps/v1 kind: Deployment
namespace: default
name: seata-ha-service
labels: app.kubernetes.io/name: seata-ha-service
app.kubernetes.io/name: seata-ha-service
spec: replicas: 1
replicas: 1
selector.
matchLabels: app.kubernetes.io/name: seata-ha-service
app.kubernetes.io/name: seata-ha-service
template: seata-ha-service
metadata: seata-ha-service template.
labels: app.kubernetes.io/name: seata-ha-service
app.kubernetes.io/name: seata-ha-service
spec: serviceAccountName: seata-ha-service
serviceAccountName: seata-ha-account
containers: name: seata-ha-order
- name: seata-ha-order-service
image: "registry.cn-qingdao.aliyuncs.com/hellowoodes/seata-ha-order-service:1.1"
imagePullPolicy: IfNotPresent
- name: NACOS_ADDR
valueFrom.
configMapKeyRef.
key: NACOS_ADDR
name: seata-ha-service-config
- name: http
containerPort: 8081
protocol: TCP
- name: seata-ha-pay-service
image: "registry.cn-qingdao.aliyuncs.com/hellowoodes/seata-ha-pay-service:1.1"
imagePullPolicy: IfNotPresent
env.
- name: NACOS_ADDR
valueFrom.
configMapKeyRef.
key: NACOS_ADDR
name: seata-ha-service-config
- name: http
containerPort: 8082
protocol: TCP
- name: seata-ha-storage-service
image: "registry.cn-qingdao.aliyuncs.com/hellowoodes/seata-ha-storage-service:1.1"
imagePullPolicy: IfNotPresent
env.
- name: NACOS_ADDR
valueFrom.
NACOS_ADDR valueFrom: NACOS_ADDR valueFrom: NACOS_ADDR valueFrom.
key: NACOS_ADDR
name: seata-ha-service-config
- name: http
containerPort: 8083
protocol: TCP

Deploy the application to the cluster with the following command

kubectl apply -f application.yaml

Then look at the pods that were created, there are three pods under the seata-ha-service service

kubectl get pod | grep seata-ha-service

seata-ha-service-7dbdc6894b-5r8q4 3/3 Running 0 12m

Once the application is up and running, in the Nacos service list, there will be the corresponding service

! seata-ha-service-list.png

At this point, if you look at the service's logs, you will see that the service has registered with each of the TC's

kubectl logs -f seata-ha-service-7dbdc6894b-5r8q4 seata-ha-order-service

! seata-ha-service-register.png

Looking at any TC log, you'll see that each service is registered with the TC

kubelet logs -f seata-ha-server-645844b8b6-9qh5j

! seata-ha-tc-register.png

Test

Test Success Scenario

Call the order interface, set the price to 1, because the initial balance is 10, and the order is placed successfully.

curl -X POST \
http://192.168.199.2:30081/order/placeOrder \
-H 'Content-Type: application/json' \
-d '{
"userId": 1,
"productId": 1,
"price": 1
}'

At this point the return result is:

{"success":true, "message":null, "data":null}

Checking the TC logs, the transaction was successfully committed:

! seata-ha-commit-tc-success.png

View the order-service service log ! seata-ha-commit-success.png

Test failure scenario

If you set the price to 100 and the balance is not enough, the order fails and throws an exception, and the transaction is rolled back.

curl -X POST \
http://192.168.199.2:30081/order/placeOrder \
-H 'Content-Type: application/json' \
-d '{
"userId": 1,
"productId": 1,
"price": 100
}'

View the logs for TC: ! seata-ha-commit-tc-rollback.png

View the logs of the service : ! seata-ha-commit-service-rollback.png

Multiple calls to view the service logs reveal that transaction registration is randomly initiated to one of the T Cs, and when capacity is expanded or scaled down, the corresponding TC participates or withdraws, proving that the high availability deployment is in effect.

· 6 min read

1. Introduction

According to the classification defined by experts, configurations can be categorized into three types: environment configuration, descriptive configuration, and extension configuration.

  • Environment configuration: Typically consists of discrete simple values like parameters for component startup, often in key-value pair format.
  • Descriptive configuration: Pertains to business logic, such as transaction initiators and participants, and is usually embedded within the lifecycle management of the business. Descriptive configuration contains more information, sometimes with hierarchical relationships.
  • Extension configuration: Products need to discover third-party implementations, requiring high aggregation of configurations. Examples include various configuration centers and registration centers. The common practice is to place the fully qualified class name files under the META-INF/services directory of the JAR file, with each line representing an implementation class name.

2. Environment Configuration

When the Seata server is loaded, it uses resources/registry.conf to determine the types of configuration centers and registration centers. Starting from version 1.0, Seata client not only loads configurations using the conf file but also allows configuration through YAML files in Spring Boot using seata.config.{type} for choosing the configuration center, similar to selecting the registration center. The source code for loading configurations via YAML is located in the io.seata.spring.boot.autoconfigure.properties.registry package.

If the user of the Seata client places both a conf configuration file under resources and configures via YAML files, the configuration in the YAML file will take precedence. Code example:

CURRENT_FILE_INSTANCE = null == extConfiguration ? configuration : extConfiguration;

Here, extConfiguration is an instance of external configuration provided by the ExtConfigurationProvider#provide() external configuration provider class, while configuration is provided by another configuration provider class, ConfigurationProvider#provide(). These two configuration provider classes are loaded through SPI in the static block of the ConfigurationFactory in the config module.

EnhancedServiceLoader.load(ExtConfigurationProvider.class).provide(configuration);

The selection of configuration center types discussed above is related to determining the configuration environment. Once the type of configuration center to be used is determined, the environment configuration is loaded through the corresponding configuration center. File-based configuration, represented by File, is also considered a type of configuration center.

Both the client and server obtain configuration parameters by using ConfigurationFactory#getInstance() to get an instance of the configuration class, and then retrieve configuration parameters using the instance. The constants defining configuration keys are mainly found in the config file under the core module.

The meanings of some important environment configuration properties are documented on the official website.

During instantiation, the configuration parameters obtained through ConfigurationFactory and injected into constructors require a restart to take effect. However, parameters obtained in real-time using ConfigurationFactory become effective immediately when the configuration changes.

The config module provides the ConfigurationChangeListener#onChangeEvent interface method to modify internal attributes of instances. In this method, dynamic changes to properties are monitored, and if the properties used by the instance are found to have changed from the initial injection, the attributes stored in the instance are modified to align with the configuration center. This enables dynamic configuration updates.

public class GlobalTransactionalInterceptor implements ConfigurationChangeListener {
private volatile boolean disable = ConfigurationFactory.getInstance().getBoolean(ConfigurationKeys.DISABLE_GLOBAL_TRANSACTION,false);
@Override public Object invoke(Param param) {
if(disable){//Transaction business processing}
}
@Override public void onChangeEvent(Param param) {
disable = param;
}}

The code snippet above pertains to the pseudo-code related to the GlobalTransactionalInterceptor and its degradation properties under the Spring module. When the GlobalTransactionalScanner instantiates the interceptor class mentioned above, it registers the interceptor into the list of configuration change listeners. When a configuration change occurs, the listener is invoked:

ConfigurationFactory.getInstance().addConfigListener(ConfigurationKeys.DISABLE_GLOBAL_TRANSACTION,(ConfigurationChangeListener)interceptor);

The term "degradation" refers to the scenario where a particular functionality of a service becomes unavailable. By dynamically configuring properties, this functionality can be turned off to avoid continuous attempts and failures. The interceptor#invoke() method executes Seata transaction-related business only when the disable attribute is set to true.

3. Descriptive Configuration

Descriptive configurations in general frameworks often contain abundant information, sometimes with hierarchical relationships. XML configuration is convenient for describing tree structures due to its strong descriptive capabilities. However, the current trend advocates for eliminating cumbersome prescriptive configurations in favor of using conventions.

In Seata's AT (Automatic Transaction) mode, transaction processing is achieved through proxying data sources, resulting in minimal intrusion on the business logic. Simply identifying which business components need to enable global transactions during Seata startup can be achieved using annotations, thus facilitating descriptive configuration.

@GlobalTransactional(timeoutMills = 300000, name = "busi-doBiz")
public String doBiz(String msg) {}

If using the TCC (Try-Confirm-Cancel) mode, transaction participants also need to annotate their involvement:

@TwoPhaseBusinessAction(name = "tccActionForSpringTest" , commitMethod = "commit", rollbackMethod = "rollback")
public boolean prepare(BusinessActionContext actionContext, int i);
public boolean commit(BusinessActionContext actionContext);
public boolean rollback(BusinessActionContext actionContext);

4. Extension Configuration

Extension configurations typically have high requirements for product aggregation because products need to discover third-party implementations and incorporate them into their internals.

Image Description

Here's an example of a custom configuration center provider class. Place a text file with the same name as the interface under META-INF/services, and the content of the file should be the implementation class of the interface. This follows the standard SPI (Service Provider Interface) approach. Then, modify the configuration file registry.conf to set config.type=test.

However, if you think that by doing so, Seata can recognize it and replace the configuration center, then you are mistaken. When Seata loads the configuration center, it encapsulates the value of the configuration center type specified in the configuration file using the enum ConfigType:

private static Configuration buildConfiguration() {
configTypeName = "test";//The 'config.type' configured in 'registry.conf
configType = ConfigType.getType(configTypeName);//An exception will be thrown if ConfigType cannot be retrieved.
}

If a configuration center type like test is not defined in ConfigType, it will throw an exception. Therefore, merely modifying the configuration file without changing the source code will not enable the use of configuration center provider classes other than those defined in ConfigType.

Currently, in version 1.0, the configuration center types defined in ConfigType include: File, ZK, Nacos, Apollo, Consul, Etcd3, SpringCloudConfig, and Custom. If a user wishes to use a custom configuration center type, they can use the Custom type.

Image Description

One inelegant approach here is to provide an implementation class with a specified name ZK but with a higher priority level (order=3) than the default ZK implementation (which has order=1). This will make ConfigurationFactory use TestConfigurationProvider as the configuration center provider class.

Through the above steps, Seata can be configured to use our own provided code. Modules in Seata such as codec, compressor, discovery, integration, etc., all use the SPI mechanism to load functional classes, adhering to the design philosophy of microkernel + plug-in, treating third parties equally.

5. Seata Source Code Analysis Series

Author: Zhao Runze, Series Address.

· 3 min read

Author: FUNKYE (Chen Jianbin), Principal Engineer at a certain Internet company in Hangzhou.

Preface

  1. Let's start by examining the package structure. Under seata-dubbo and seata-dubbo-alibaba, there is a common class named TransactionPropagationFilter, corresponding to Apache Dubbo and Alibaba Dubbo respectively.

20200101203229

Source Code Analysis

package io.seata.integration.dubbo;

import io.seata.core.context.RootContext;
import org.apache.dubbo.common.Constants;
import org.apache.dubbo.common.extension.Activate;
import org.apache.dubbo.rpc.Filter;
import org.apache.dubbo.rpc.Invocation;
import org.apache.dubbo.rpc.Invoker;
import org.apache.dubbo.rpc.Result;
import org.apache.dubbo.rpc.RpcContext;
import org.apache.dubbo.rpc.RpcException;
import org.slf4j.Logger;
import org.slf4j.LoggerFactory;

@Activate(group = {Constants.PROVIDER, Constants.CONSUMER}, order = 100)
public class TransactionPropagationFilter implements Filter {

private static final Logger LOGGER = LoggerFactory.getLogger(TransactionPropagationFilter.class);

@Override
public Result invoke(Invoker<?> invoker, Invocation invocation) throws RpcException {
// get local XID
String xid = RootContext.getXID();
String xidInterceptorType = RootContext.getXIDInterceptorType();
// get XID from dubbo param
String rpcXid = getRpcXid();
String rpcXidInterceptorType = RpcContext.getContext().getAttachment(RootContext.KEY_XID_INTERCEPTOR_TYPE);
if (LOGGER.isDebugEnabled()) {
LOGGER.debug("xid in RootContext[{}] xid in RpcContext[{}]", xid, rpcXid);
}
boolean bind = false;
if (xid != null) {
//transfer xid
RpcContext.getContext().setAttachment(RootContext.KEY_XID, xid);
RpcContext.getContext().setAttachment(RootContext.KEY_XID_INTERCEPTOR_TYPE, xidInterceptorType);
} else {
if (rpcXid != null) {
//bind XID
RootContext.bind(rpcXid);
RootContext.bindInterceptorType(rpcXidInterceptorType);
bind = true;
if (LOGGER.isDebugEnabled()) {
LOGGER.debug("bind[{}] interceptorType[{}] to RootContext", rpcXid, rpcXidInterceptorType);
}
}
}
try {
return invoker.invoke(invocation);
} finally {
if (bind) {
//remove xid which has finished
String unbindInterceptorType = RootContext.unbindInterceptorType();
String unbindXid = RootContext.unbind();
if (LOGGER.isDebugEnabled()) {
LOGGER.debug("unbind[{}] interceptorType[{}] from RootContext", unbindXid, unbindInterceptorType);
}
// if unbind xid is not current rpc xid
if (!rpcXid.equalsIgnoreCase(unbindXid)) {
LOGGER.warn("xid in change during RPC from {} to {}, xidInterceptorType from {} to {} ", rpcXid, unbindXid, rpcXidInterceptorType, unbindInterceptorType);
if (unbindXid != null) {
// bind xid
RootContext.bind(unbindXid);
RootContext.bindInterceptorType(unbindInterceptorType);
LOGGER.warn("bind [{}] interceptorType[{}] back to RootContext", unbindXid, unbindInterceptorType);
}
}
}
}
}

/**
* get rpc xid
* @return
*/
private String getRpcXid() {
String rpcXid = RpcContext.getContext().getAttachment(RootContext.KEY_XID);
if (rpcXid == null) {
rpcXid = RpcContext.getContext().getAttachment(RootContext.KEY_XID.toLowerCase());
}
return rpcXid;
}

}
  1. Based on the source code, we can deduce the corresponding logic processing.

20200101213336

Key Points

  1. Dubbo @Activate Annotation:
@Documented
@Retention(RetentionPolicy.RUNTIME)
@Target({ElementType.TYPE, ElementType.METHOD})
public @interface Activate {


String[] group() default {};


String[] value() default {};


String[] before() default {};


String[] after() default {};


int order() default 0;
}

It can be analyzed that the @Activate annotation on Seata's Dubbo filter, with parameters @Activate(group = {Constants.PROVIDER, Constants.CONSUMER}, order = 100), indicates that both the Dubbo service provider and consumer will trigger this filter. Therefore, our Seata initiator will initiate an XID transmission. The above flowchart and code have clearly represented this.

  1. Dubbo implicit parameter passing can be achieved through setAttachment and getAttachment on RpcContext for implicit parameter transmission between service consumers and providers.

Fetching: RpcContext.getContext().getAttachment(RootContext.KEY_XID);

Passing: RpcContext.getContext().setAttachment(RootContext.KEY_XID, xid);

Conclusion

For further source code reading, please visit the Seata official website

· 8 min read

一. Introduction

In the analysis of the Spring module, it is noted that Seata's Spring module handles beans involved in distributed transactions. Upon project startup, when the GlobalTransactionalScanner detects references to TCC services (i.e., TCC transaction participants), it dynamically proxies them by weaving in the implementation class of MethodInterceptor under the TCC mode. The initiator of the TCC transaction still uses the @GlobalTransactional annotation to initiate it, and a generic implementation class of MethodInterceptor is woven in.

The implementation class of MethodInterceptor under the TCC mode is referred to as TccActionInterceptor (in the Spring module). This class invokes ActionInterceptorHandler (in the TCC module) to handle the transaction process under the TCC mode.

The primary functions of TCC dynamic proxy are: generating the TCC runtime context, propagating business parameters, and registering branch transaction records.

二. Introduction to TCC Mode

In the Two-Phase Commit (2PC) protocol, the transaction manager coordinates resource management in two phases. The resource manager provides three operations: the prepare operation in the first phase, and the commit operation and rollback operation in the second phase.

public interface TccAction {

@TwoPhaseBusinessAction(name = "tccActionForTest" , commitMethod = "commit", rollbackMethod = "rollback")
public boolean prepare(BusinessActionContext actionContext,
@BusinessActionContextParameter(paramName = "a") int a,
@BusinessActionContextParameter(paramName = "b", index = 0) List b,
@BusinessActionContextParameter(isParamInProperty = true) TccParam tccParam);

public boolean commit(BusinessActionContext actionContext);

public boolean rollback(BusinessActionContext actionContext);
}

This is a participant instance in TCC. Participants need to implement three methods, where the first parameter must be BusinessActionContext, and the return type of the methods is fixed. These methods are exposed as microservices to be invoked by the transaction manager.

  • prepare: Checks and reserves resources. For example, deducting the account balance and increasing the same frozen balance.
  • commit: Uses the reserved resources to complete the actual business operation. For example, reducing the frozen balance to complete the fund deduction business.
  • cancel: Releases the reserved resources. For example, adding back the frozen balance to the account balance.

The BusinessActionContext encapsulates the context environment of the current transaction: xid, branchId, actionName, and parameters annotated with @BusinessActionContextParam.

There are several points to note in participant business:

  1. Ensure business idempotence, supporting duplicate submission and rollback of the same transaction.
  2. Prevent hanging, i.e., the rollback of the second phase occurs before the try phase.
  3. Relax consistency protocols, eventually consistent, so it is read-after-write.

Three. Remoting package analysis

Remoting Package Analysis

All classes in the package serve DefaultRemotingParser. Dubbo, LocalTCC, and SofaRpc are responsible for parsing classes under their respective RPC protocols.

Main methods of DefaultRemotingParser:

  1. Determine if the bean is a remoting bean, code:
    @Override
public boolean isRemoting(Object bean, String beanName) throws FrameworkException {
//判断是否是服务调用方或者是否是服务提供方
return isReference(bean, beanName) || isService(bean, beanName);
}
  1. Remote bean parsing, parses rpc classes into RemotingDesc.

Code:

@Override
public boolean isRemoting(Object bean, String beanName) throws FrameworkException {
//判断是否是服务调用方或者是否是服务提供方
return isReference(bean, beanName) || isService(bean, beanName);
}

Utilize allRemotingParsers to parse remote beans. allRemotingParsers is dynamically loaded in initRemotingParser() by calling EnhancedServiceLoader.loadAll(RemotingParser.class), which implements the SPI loading mechanism for loading subclasses of RemotingParser.

For extension purposes, such as implementing a parser for feign remote calls, simply write the relevant implementation classes of RemotingParser in the SPI configuration. This approach offers great extensibility.

RemotingDesc contains specific information about remote beans required for the transaction process, such as targetBean, interfaceClass, interfaceClassName, protocol, isReference, and so on.

  1. TCC Resource Registration
public RemotingDesc parserRemotingServiceInfo(Object bean, String beanName) {
RemotingDesc remotingBeanDesc = getServiceDesc(bean, beanName);
if (remotingBeanDesc == null) {
return null;
}
remotingServiceMap.put(beanName, remotingBeanDesc);

Class<?> interfaceClass = remotingBeanDesc.getInterfaceClass();
Method[] methods = interfaceClass.getMethods();
if (isService(bean, beanName)) {
try {
//service bean, registry resource
Object targetBean = remotingBeanDesc.getTargetBean();
for (Method m : methods) {
TwoPhaseBusinessAction twoPhaseBusinessAction = m.getAnnotation(TwoPhaseBusinessAction.class);
if (twoPhaseBusinessAction != null) {
TCCResource tccResource = new TCCResource();
tccResource.setActionName(twoPhaseBusinessAction.name());
tccResource.setTargetBean(targetBean);
tccResource.setPrepareMethod(m);
tccResource.setCommitMethodName(twoPhaseBusinessAction.commitMethod());
tccResource.setCommitMethod(ReflectionUtil
.getMethod(interfaceClass, twoPhaseBusinessAction.commitMethod(),
new Class[] {BusinessActionContext.class}));
tccResource.setRollbackMethodName(twoPhaseBusinessAction.rollbackMethod());
tccResource.setRollbackMethod(ReflectionUtil
.getMethod(interfaceClass, twoPhaseBusinessAction.rollbackMethod(),
new Class[] {BusinessActionContext.class}));
//registry tcc resource
DefaultResourceManager.get().registerResource(tccResource);
}
}
} catch (Throwable t) {
throw new FrameworkException(t, "parser remoting service error");
}
}
if (isReference(bean, beanName)) {
//reference bean, TCC proxy
remotingBeanDesc.setReference(true);
}
return remotingBeanDesc;
}

Firstly, determine if it is a transaction participant. If so, obtain the interfaceClass from RemotingDesc, iterate through the methods in the interface, and check if there is a @TwoParserBusinessAction annotation on the method. If found, encapsulate the parameters into TCCResource and register the TCC resource through DefaultResourceManager.

Here, DefaultResourceManager will search for the corresponding resource manager based on the BranchType of the Resource. The resource management class under the TCC mode is in the tcc module.

This RPC parsing class is mainly provided for use by the spring module. parserRemotingServiceInfo() is encapsulated into the TCCBeanParserUtils utility class in the spring module. During project startup, the GlobalTransactionScanner in the spring module parses TCC beans through the utility class. TCCBeanParserUtils calls TCCResourceManager to register resources. If it is a global transaction service provider, it will weave in the TccActionInterceptor proxy. These processes are functionalities of the spring module, where the tcc module provides functional classes for use by the spring module.

Three. TCC Resource Manager

TCCResourceManager is responsible for managing the registration, branching, committing, and rolling back of resources under the TCC mode.

  1. During project startup, when the GlobalTransactionScanner in the spring module detects that a bean is a tcc bean, it caches resources locally and registers them with the server:
    @Override
public void registerResource(Resource resource) {
TCCResource tccResource = (TCCResource)resource;
tccResourceCache.put(tccResource.getResourceId(), tccResource);
super.registerResource(tccResource);
}

The logic for communicating with the server is encapsulated in the parent class AbstractResourceManager. Here, TCCResource is cached based on resourceId. When registering resources in the parent class AbstractResourceManager, resourceGroupId + actionName is used, where actionName is the name specified in the @TwoParseBusinessAction annotation, and resourceGroupId defaults to DEFAULT.

  1. Transaction branch registration is handled in the rm-datasource package under AbstractResourceManager. During registration, the parameter lockKeys is null, which differs from the transaction branch registration under the AT mode.

  2. Committing or rolling back branches:

    @Override
public BranchStatus branchCommit(BranchType branchType, String xid, long branchId, String resourceId,
String applicationData) throws TransactionException {
TCCResource tccResource = (TCCResource)tccResourceCache.get(resourceId);
if (tccResource == null) {
throw new ShouldNeverHappenException("TCC resource is not exist, resourceId:" + resourceId);
}
Object targetTCCBean = tccResource.getTargetBean();
Method commitMethod = tccResource.getCommitMethod();
if (targetTCCBean == null || commitMethod == null) {
throw new ShouldNeverHappenException("TCC resource is not available, resourceId:" + resourceId);
}
try {
boolean result = false;
//BusinessActionContext
BusinessActionContext businessActionContext = getBusinessActionContext(xid, branchId, resourceId,
applicationData);
Object ret = commitMethod.invoke(targetTCCBean, businessActionContext);
if (ret != null) {
if (ret instanceof TwoPhaseResult) {
result = ((TwoPhaseResult)ret).isSuccess();
} else {
result = (boolean)ret;
}
}
return result ? BranchStatus.PhaseTwo_Committed : BranchStatus.PhaseTwo_CommitFailed_Retryable;
} catch (Throwable t) {
LOGGER.error(msg, t);
throw new FrameworkException(t, msg);
}
}

Restore the business context using parameters xid, branchId, resourceId, and applicationData.

Execute the commit method through reflection based on the retrieved context and return the execution result. The rollback method follows a similar approach.

Here, branchCommit() and branchRollback() are provided for AbstractRMHandler, an abstract class for resource processing in the rm module. This handler is a further implementation class of the template method defined in the core module. Unlike registerResource(), which actively registers resources during spring scanning.

Four. Transaction Processing in TCC Mode

The invoke() method of TccActionInterceptor in the spring module is executed when the proxied rpc bean is called. This method first retrieves the global transaction xid passed by the rpc interceptor, and then the transaction process of global transaction participants under TCC mode is still handed over to the ActionInterceptorHandler in the tcc module.

In other words, transaction participants are proxied during project startup. The actual business methods are executed through callbacks in ActionInterceptorHandler.

    public Map<String, Object> proceed(Method method, Object[] arguments, String xid, TwoPhaseBusinessAction businessAction,
Callback<Object> targetCallback) throws Throwable {
Map<String, Object> ret = new HashMap<String, Object>(4);

//TCC name
String actionName = businessAction.name();
BusinessActionContext actionContext = new BusinessActionContext();
actionContext.setXid(xid);
//set action anme
actionContext.setActionName(actionName);

//Creating Branch Record
String branchId = doTccActionLogStore(method, arguments, businessAction, actionContext);
actionContext.setBranchId(branchId);

//set the parameter whose type is BusinessActionContext
Class<?>[] types = method.getParameterTypes();
int argIndex = 0;
for (Class<?> cls : types) {
if (cls.getName().equals(BusinessActionContext.class.getName())) {
arguments[argIndex] = actionContext;
break;
}
argIndex++;
}
//the final parameters of the try method
ret.put(Constants.TCC_METHOD_ARGUMENTS, arguments);
//the final result
ret.put(Constants.TCC_METHOD_RESULT, targetCallback.execute());
return ret;
}

Here are two important operations:

  1. In the doTccActionLogStore() method, two crucial methods are called:
  • fetchActionRequestContext(method, arguments): This method retrieves parameters annotated with @BusinessActionContextParam and inserts them into BusinessActionComtext along with transaction-related parameters in the init method below.
  • DefaultResourceManager.get().branchRegister(BranchType.TCC, actionName, null, xid, applicationContextStr, null): This method performs the registration of transaction branches for transaction participants under TCC mode.
  1. Callback execution of targetCallback.execute(), which executes the specific business logic of the proxied bean, i.e., the prepare() method.

Five. Summary

The tcc module primarily provides the following functionalities:

  1. Defines annotations for two-phase protocols, providing attributes needed for transaction processes under TCC mode.
  2. Provides implementations of ParserRemoting for parsing remoting beans of different RPC frameworks, to be invoked by the spring module.
  3. Provides the TCC ResourceManager for resource registration, transaction branch registration, submission, and rollback under TCC mode.
  4. Provides classes for handling transaction processes under TCC mode, allowing MethodInterceptor proxy classes to delegate the execution of specific mode transaction processes to the tcc module.

Author: Zhao Runze, Series Link.

· One min read

Introduction

Highlights

  • Seata open source project initiator will present "Seata Past, Present and Future" and new features of Seata 1.0.
  • Seata AT, TCC, Saga model explained by Seata core contributors.
  • Seata's Internet Healthcare and DDT's practice analysis.

If you can't make it

Onsite Benefits

  • Speaker's PPT download
  • Tea breaks, Ali dolls, Tmall Genie and other goodies for you to get!

Agenda

Agenda!

· 6 min read

1. Introduction

The core module defines the types and states of transactions, common behaviors, protocols, and message models for communication between clients and servers, as well as exception handling methods, compilation, compression types, configuration information names, environment context, etc. It also encapsulates RPC based on Netty for use by both clients and servers.

Let's analyze the main functional classes of the core module according to the package order:

Image Description

codec: Defines a codec factory class, which provides a method to find the corresponding processing class based on the serialization type. It also provides an interface class Codec with two abstract methods:

<T> byte[] encode(T t);
<T> T decode(byte[] bytes);

1. codec Module

In version 1.0, the codec module has three serialization implementations: SEATA, PROTOBUF, and KRYO.

compressor: Similar to classes under the codec package, there are three classes here: a compression type class, a factory class, and an abstract class for compression and decompression operations. In version 1.0, there is only one compression method: Gzip.

constants: Consists of two classes, ClientTableColumnsName and ServerTableColumnsName, representing the models for transaction tables stored on the client and server sides respectively. It also includes classes defining supported database types and prefixes for configuration information attributes.

context: The environment class RootContext holds a ThreadLocalContextCore to store transaction identification information. For example, TX_XID uniquely identifies a transaction, and TX_LOCK indicates the need for global lock control for local transactions on update/delete/insert/selectForUpdate SQL operations.

event: Utilizes the Guava EventBus event bus for registration and notification, implementing the listener pattern. In the server module's metrics package, MetricsManager registers monitoring events for changes in GlobalStatus, which represents several states of transaction processing in the server module. When the server processes transactions, the callback methods registered for monitoring events are invoked, primarily for statistical purposes.

lock: When the server receives a registerBranch message for branch registration, it acquires a lock. In version 1.0, there are two lock implementations: DataBaseLocker and MemoryLocker, representing database locks and in-memory locks respectively. Database locks are acquired based on the rowKey = resourceId + tableName + pk, while memory locks are based directly on the primary key.

model: BranchStatus, GlobalStatus, and BranchType are used to define transaction types and global/branch states. Additionally, TransactionManager and ResourceManager are abstract classes representing resource managers (RMs) and transaction managers (TMs) respectively. Specific implementations of RMs and TMs are not provided here due to variations in transaction types.

protocol: Defines entity classes used for transmission in the RPC module, representing models for requests and responses under different transaction status scenarios.

store: Defines data models for interacting with databases and the SQL statements used for database interactions.

    public void exceptionHandleTemplate(Callback callback, AbstractTransactionRequest request,
AbstractTransactionResponse response) {
try {
callback.execute(request, response); //执行事务业务的方法
callback.onSuccess(request, response); //设置response返回码
} catch (TransactionException tex) {
LOGGER.error("Catch TransactionException while do RPC, request: {}", request, tex);
callback.onTransactionException(request, response, tex); //设置response返回码并设置msg
} catch (RuntimeException rex) {
LOGGER.error("Catch RuntimeException while do RPC, request: {}", request, rex);
callback.onException(request, response, rex); //设置response返回码并设置msg
}
}

2. Analysis of Exception Handling in the exception Package

This is the UML diagram of AbstractExceptionHandler. Callback and AbstractCallback are internal interfaces and classes of AbstractExceptionHandler. AbstractCallback implements three methods of the Callback interface but leaves the execute() method unimplemented. AbstractExceptionHandler uses AbstractCallback as a parameter for the template method and utilizes its implemented methods. However, the execute() method is left to be implemented by subclasses.

Image Description

From an external perspective, AbstractExceptionHandler defines a template method with exception handling. The template includes four behaviors, three of which are already implemented, and the behavior execution is delegated to subclasses.

3. Analysis of the rpc Package

When it comes to the encapsulation of RPC by Seata, one need not delve into the details. However, it's worth studying how transaction business is handled.

The client-side RPC class is AbstractRpcRemotingClient:

Image Description

The important attributes and methods are depicted in the class diagram. The methods for message sending and initialization are not shown in the diagram. Let's analyze the class diagram in detail:

clientBootstrap: This is a wrapper class for the netty startup class Bootstrap. It holds an instance of Bootstrap and customizes the properties as desired.

clientChannelManager: Manages the correspondence between server addresses and channels using a ConcurrentHashMap<serverAddress,channel> container.

clientMessageListener: Handles messages. Depending on the message type, there are three specific processing methods.

public void onMessage(RpcMessage request, String serverAddress, ClientMessageSender sender) {
Object msg = request.getBody();
if (LOGGER.isInfoEnabled()) {
LOGGER.info("onMessage:" + msg);
}
if (msg instanceof BranchCommitRequest) {
handleBranchCommit(request, serverAddress, (BranchCommitRequest)msg, sender);
} else if (msg instanceof BranchRollbackRequest) {
handleBranchRollback(request, serverAddress, (BranchRollbackRequest)msg, sender);
} else if (msg instanceof UndoLogDeleteRequest) {
handleUndoLogDelete((UndoLogDeleteRequest)msg);
}
}

4. Analysis of the rpc Package (Continued)

Within the message class, the TransactionMessageHandler is responsible for handling messages of different types. Eventually, based on the different transaction types (AT, TCC, SAGE), specific handling classes, as mentioned in the second part, exceptionHandleTemplate(), are invoked.

mergeSendExecutorService: This is a thread pool with only one thread responsible for merging and sending messages from different addresses. In the sendAsyncRequest() method, messages are offered to the queue LinkedBlockingQueue of the thread pool. The thread is then responsible for polling and processing messages.

channelRead(): Handles server-side HeartbeatMessage.PONG heartbeat messages. Additionally, it processes MergeResultMessage, which are response messages for asynchronous messages. It retrieves the corresponding MessageFuture based on the msgId and sets the result of the asynchronous message.

dispatch(): Invokes the clientMessageListener to handle messages sent by the server. Different types of requests have different handling classes.

In summary, when looking at Netty, one should focus on serialization methods and message handling handler classes. Seata's RPC serialization method is processed by finding the Codec implementation class through the factory class, and the handler is the TransactionMessageHandler mentioned earlier.

5. Conclusion

The core module covers a wide range of functionalities, with most classes serving as abstract classes for other modules. Business models are abstracted out, and specific implementations are distributed across different modules. The code in the core module is of high quality, with many classic design patterns such as the template pattern discussed earlier. It is very practical and well-crafted, deserving careful study.

Series Links