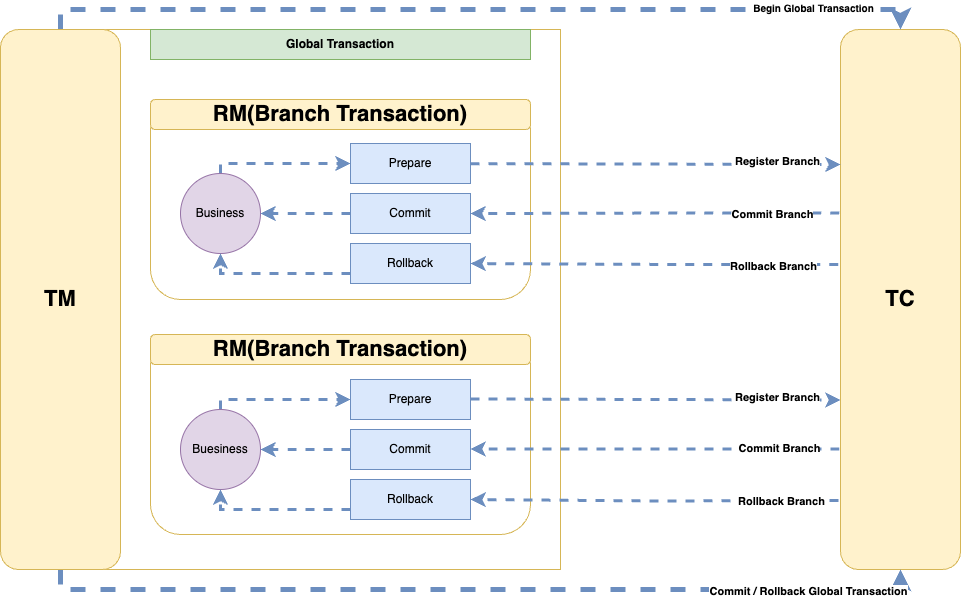
在前几篇文章中,我们详细聊了聊 Seata 的 XA、AT 以及 TCC 模式,它们都是在 Seata 定义的全局框架下的不同的事务模式。
我们知道,在 Seata 中,有三类角色,TC、RM、TM,Seata Server 作为 TC 协调分支事务的提交和回滚,各个资源作为 RM 和 TM,那么这三者之间是如何通信的?
所以,这篇文章就来看看 Seata 底层是如何进行网络通信的。
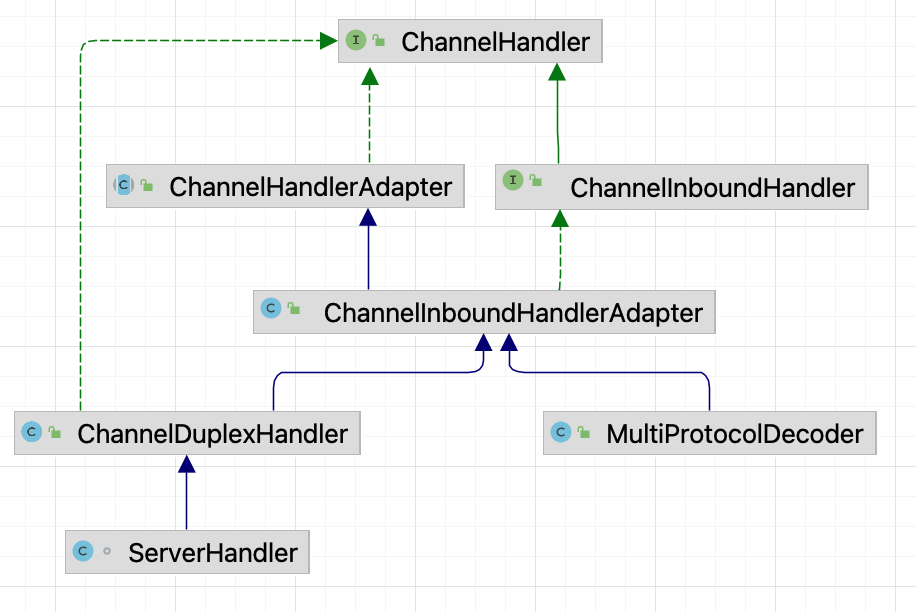
整体类层次结构
我们先着眼大局,看一看 Seata 整个 RPC 的类层次结构。
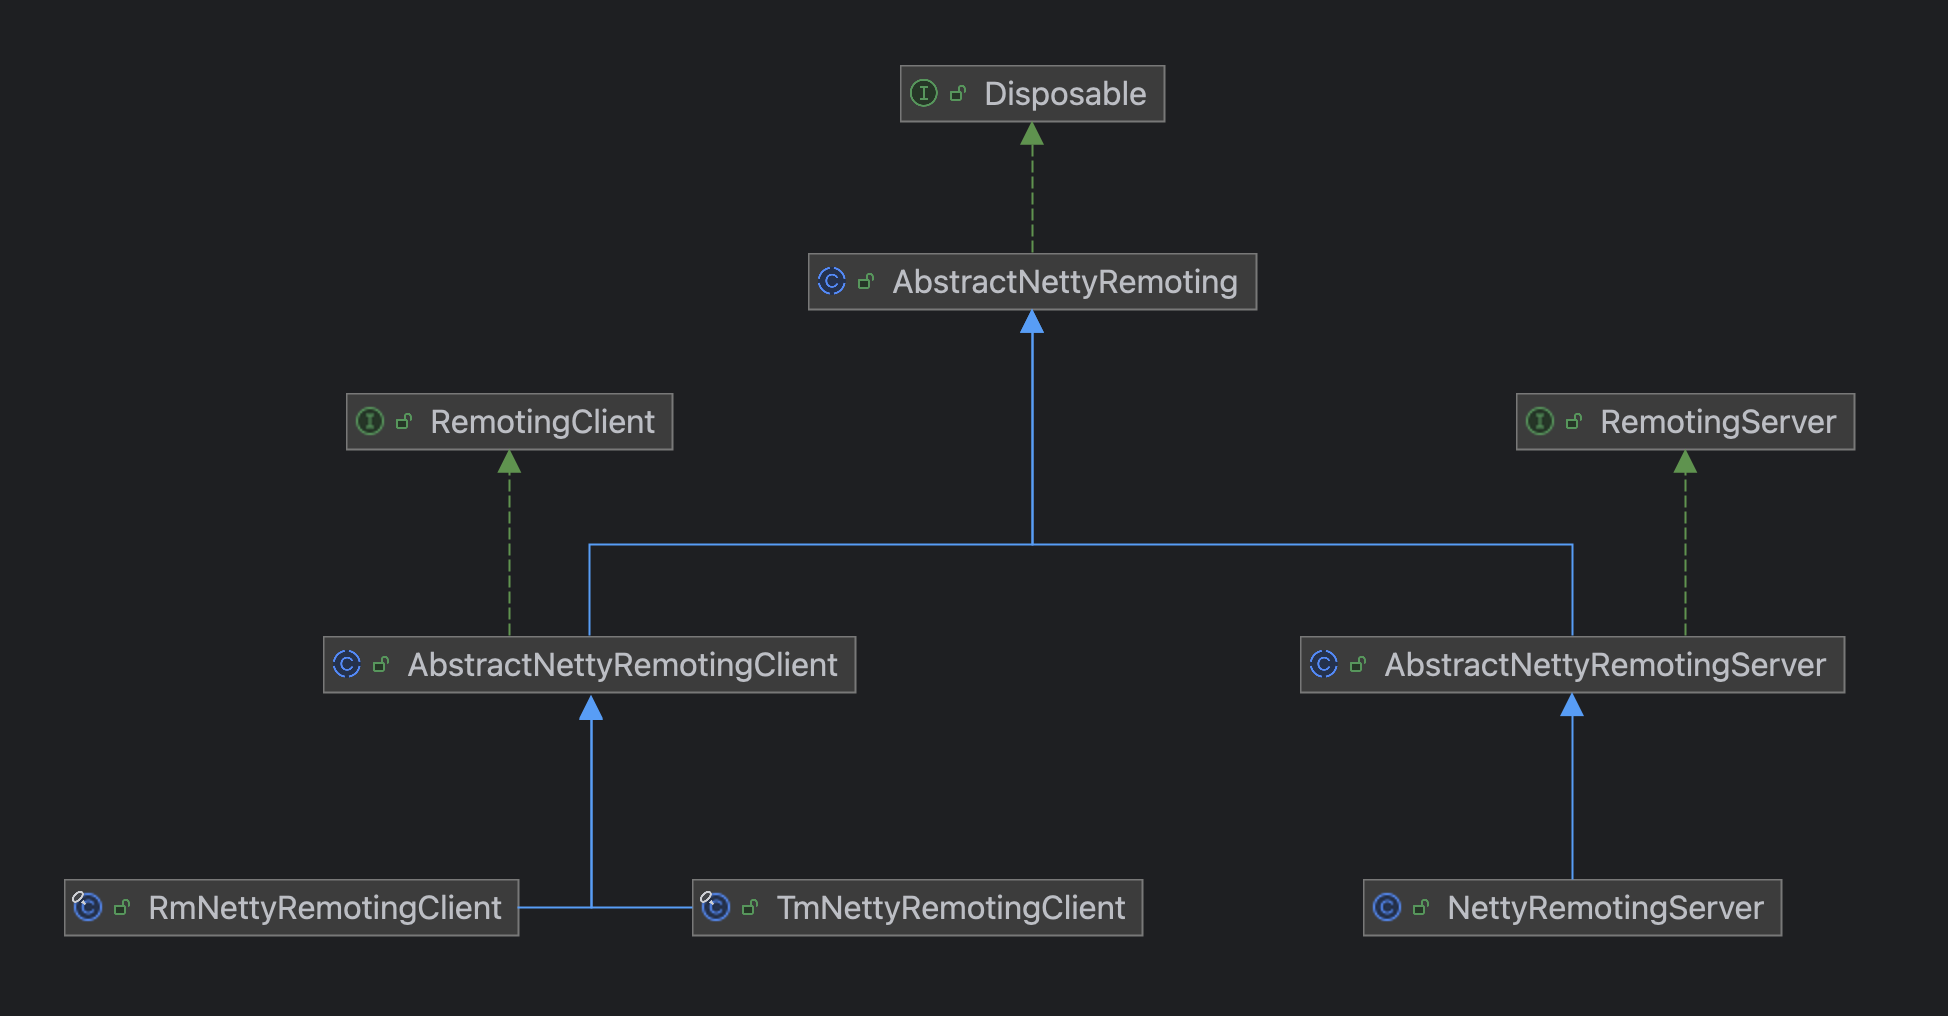
从类结构层次可以看出来,AbstractNettyRemoting 是整个 Seata 网络通信的一个顶层抽象类。
在这个类中主要实现了一些 RPC 的基础通用方法,比如同步调用 sendSync、异步调用 sendAsync 等。
事实上,就网络调用来说,无非就是同步调用和异步调用,像其他的什么请求和响应都只是报文内容的区分。
所以,在 Seata 中,我个人认为还差一个顶层的接口 Remoting,类似于下面这样的:
import io.netty.channel.Channel;
import java.util.concurrent.TimeoutException;
public interface Remoting<Req, Resp> {
Resp sendSync(Channel channel, Req request, long timeout) throws TimeoutException;
void sendAsync(Channel channel, Req request);
}
在 AbstractNettyRemoting 实现了通用的网络调用方法,但是不同角色在这方面还是有一些区分的,比如对于 Server 来说,它的请求调用需要知道向哪个客户端发送,而对于 TM、RM 来说,它们发送请求直接发就行,不需要指定某个特定的 TC 服务,只需要在实现类通过负载均衡算法找到合适的 Server 节点就行。
所以就区分出了 RemotingServer 和 RemotingClient,但是底层还是要依赖 AbstractNettyRemoting 进行网络调用的,所以它们各自有子类实现了 AbstractNettyRemoting。
可以说 Seata 的这种设计在我看来是非常不错的,对于这种 CS 架构的远程通信,可以算一种通用的设计方案。
如何启动 Server 和 Client
聊完了 Seata 底层的类层次,我们再分别以 Server 和 Client 的视角来看它们是如何启动的,以及在启动的时候需要做些什么事情。
Server 是怎么启动的
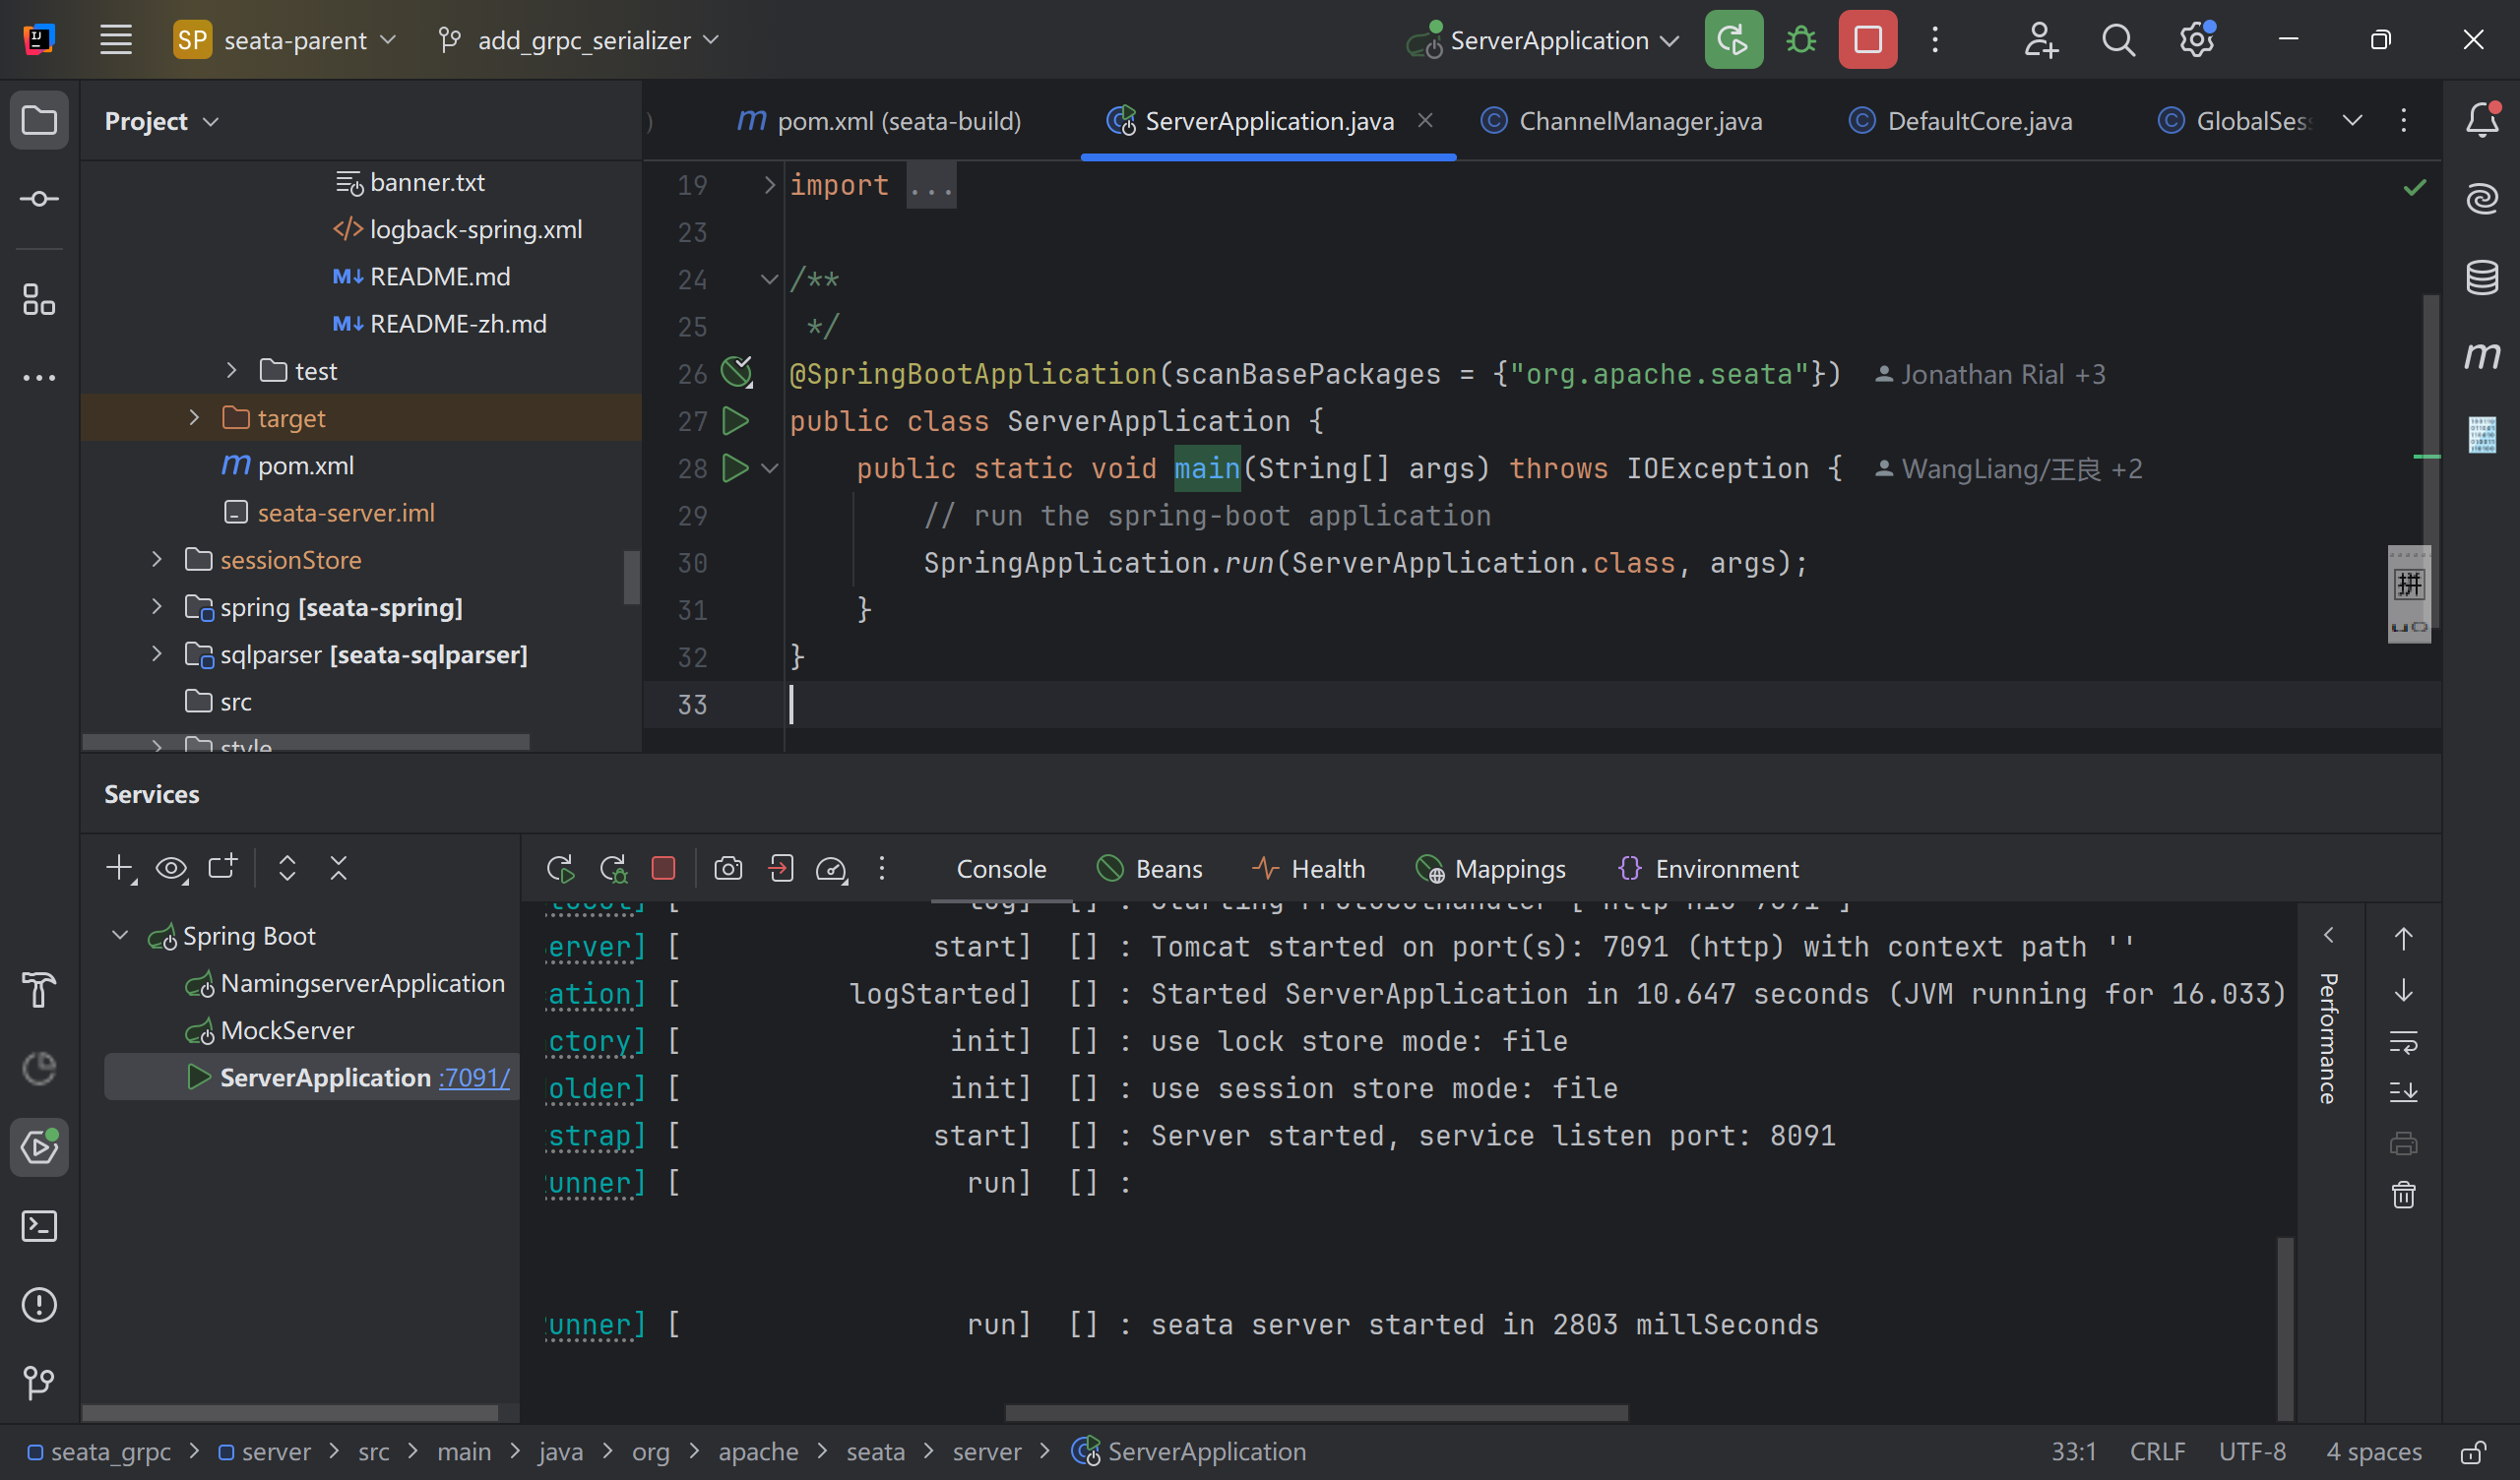
Seata Server 作为一个独立的 SpringBoot 项目,要怎么样才能在 SpringBoot 启动的时候自动做点事呢?
Seata 的做法是实现了 CommandLineRunner 接口,至于这里面的原理就不是本篇文章讨论的内容了。
我们主要关注它的 run 方法:
public void run(String... args) {
try {
long start = System.currentTimeMillis();
seataServer.start(args);
started = true;
long cost = System.currentTimeMillis() - start;
LOGGER.info("\r\n you can visit seata console UI on http://127.0.0.1:{}. \r\n log path: {}.", this.port, this.logPath);
LOGGER.info("seata server started in {} millSeconds", cost);
} catch (Throwable e) {
started = Boolean.FALSE;
LOGGER.error("seata server start error: {} ", e.getMessage(), e);
System.exit(-1);
}
}
这其中核心的逻辑就在 seataServer.start() 方法中:
public void start(String[] args) {
ParameterParser parameterParser = new ParameterParser(args);
MetricsManager.get().init();
ThreadPoolExecutor workingThreads = new ThreadPoolExecutor(NettyServerConfig.getMinServerPoolSize(),
NettyServerConfig.getMaxServerPoolSize(), NettyServerConfig.getKeepAliveTime(), TimeUnit.SECONDS,
new LinkedBlockingQueue<>(NettyServerConfig.getMaxTaskQueueSize()),
new NamedThreadFactory("ServerHandlerThread", NettyServerConfig.getMaxServerPoolSize()), new ThreadPoolExecutor.CallerRunsPolicy());
if (NetUtil.isValidIp(parameterParser.getHost(), false)) {
XID.setIpAddress(parameterParser.getHost());
} else {
String preferredNetworks = ConfigurationFactory.getInstance().getConfig(REGISTRY_PREFERED_NETWORKS);
if (StringUtils.isNotBlank(preferredNetworks)) {
XID.setIpAddress(NetUtil.getLocalIp(preferredNetworks.split(REGEX_SPLIT_CHAR)));
} else {
XID.setIpAddress(NetUtil.getLocalIp());
}
}
NettyRemotingServer nettyRemotingServer = new NettyRemotingServer(workingThreads);
XID.setPort(nettyRemotingServer.getListenPort());
UUIDGenerator.init(parameterParser.getServerNode());
ConfigurableListableBeanFactory beanFactory = ((GenericWebApplicationContext) ObjectHolder.INSTANCE.getObject(OBJECT_KEY_SPRING_APPLICATION_CONTEXT)).getBeanFactory();
DefaultCoordinator coordinator = DefaultCoordinator.getInstance(nettyRemotingServer);
if (coordinator instanceof ApplicationListener) {
beanFactory.registerSingleton(NettyRemotingServer.class.getName(), nettyRemotingServer);
beanFactory.registerSingleton(DefaultCoordinator.class.getName(), coordinator);
((GenericWebApplicationContext) ObjectHolder.INSTANCE.getObject(OBJECT_KEY_SPRING_APPLICATION_CONTEXT)).addApplicationListener((ApplicationListener<?>) coordinator);
}
SessionHolder.init();
LockerManagerFactory.init();
coordinator.init();
nettyRemotingServer.setHandler(coordinator);
serverInstance.serverInstanceInit();
ServerRunner.addDisposable(coordinator);
nettyRemotingServer.init();
}
最后的 nettyRemotingServer.init() 是整个 Seata Server 启动的重要逻辑,主要做了这么几件事:
- 注册一系列处理器
- 初始化一个定时线程池,用于清理过期的 MessageFuture
- 启动 ServerBootStrap 并将 TC 服务注册到注册中心,比如 Nacos
注册处理器
在 Seata 内部,用一个 Pair 对象关联了处理器和线程池,如下:
package org.apache.seata.core.rpc.processor;

public final class Pair<T1, T2> {

    private final T1 first;
    private final T2 second;

    public Pair(T1 first, T2 second) {
        this.first = first;
        this.second = second;
    }

    public T1 getFirst() {
        return first;
    }

    public T2 getSecond() {
        return second;
    }
}
而注册处理器本质就是将报文类型、处理该报文的处理器以及具体执行的线程池关联起来,存到一张哈希表中。
protected final Map<Integer, Pair<RemotingProcessor, ExecutorService>> processorTable = new HashMap<>(32);
private void registerProcessor() {
ServerOnRequestProcessor onRequestProcessor = new ServerOnRequestProcessor(this, getHandler());
ShutdownHook.getInstance().addDisposable(onRequestProcessor);
super.registerProcessor(MessageType.TYPE_BRANCH_REGISTER, onRequestProcessor, messageExecutor);
super.registerProcessor(MessageType.TYPE_BRANCH_STATUS_REPORT, onRequestProcessor, messageExecutor);
super.registerProcessor(MessageType.TYPE_GLOBAL_BEGIN, onRequestProcessor, messageExecutor);
super.registerProcessor(MessageType.TYPE_GLOBAL_COMMIT, onRequestProcessor, messageExecutor);
super.registerProcessor(MessageType.TYPE_GLOBAL_LOCK_QUERY, onRequestProcessor, messageExecutor);
super.registerProcessor(MessageType.TYPE_GLOBAL_REPORT, onRequestProcessor, messageExecutor);
super.registerProcessor(MessageType.TYPE_GLOBAL_ROLLBACK, onRequestProcessor, messageExecutor);
super.registerProcessor(MessageType.TYPE_GLOBAL_STATUS, onRequestProcessor, messageExecutor);
super.registerProcessor(MessageType.TYPE_SEATA_MERGE, onRequestProcessor, messageExecutor);
ServerOnResponseProcessor onResponseProcessor = new ServerOnResponseProcessor(getHandler(), getFutures());
super.registerProcessor(MessageType.TYPE_BRANCH_COMMIT_RESULT, onResponseProcessor, branchResultMessageExecutor);
super.registerProcessor(MessageType.TYPE_BRANCH_ROLLBACK_RESULT, onResponseProcessor, branchResultMessageExecutor);
RegRmProcessor regRmProcessor = new RegRmProcessor(this);
super.registerProcessor(MessageType.TYPE_REG_RM, regRmProcessor, messageExecutor);
RegTmProcessor regTmProcessor = new RegTmProcessor(this);
super.registerProcessor(MessageType.TYPE_REG_CLT, regTmProcessor, null);
ServerHeartbeatProcessor heartbeatMessageProcessor = new ServerHeartbeatProcessor(this);
super.registerProcessor(MessageType.TYPE_HEARTBEAT_MSG, heartbeatMessageProcessor, null);
}
public void registerProcessor(int messageType, RemotingProcessor processor, ExecutorService executor) {
Pair<RemotingProcessor, ExecutorService> pair = new Pair<>(processor, executor);
this.processorTable.put(messageType, pair);
}
你可能会注意到,在注册处理器时,有一些注册时传入的线程池是 null,那么对应的报文会由哪个线程执行呢?
后面我们会提到。
初始化定时线程池
public void init() {
timerExecutor.scheduleAtFixedRate(() -> {
for (Map.Entry<Integer, MessageFuture> entry : futures.entrySet()) {
MessageFuture future = entry.getValue();
if (future.isTimeout()) {
futures.remove(entry.getKey());
RpcMessage rpcMessage = future.getRequestMessage();
future.setResultMessage(new TimeoutException(String.format("msgId: %s, msgType: %s, msg: %s, request timeout",
rpcMessage.getId(), String.valueOf(rpcMessage.getMessageType()), rpcMessage.getBody().toString())));
if (LOGGER.isDebugEnabled()) {
LOGGER.debug("timeout clear future: {}", entry.getValue().getRequestMessage().getBody());
}
}
}
nowMills = System.currentTimeMillis();
}, TIMEOUT_CHECK_INTERVAL, TIMEOUT_CHECK_INTERVAL, TimeUnit.MILLISECONDS);
}
这个没啥好说的,就是初始化了一个定时线程池定时清理那些超时的 MessageFuture,这里 MessageFuture 是 Seata 将异步调用转为同步调用的关键,我们后面也会详细说到。
启动 ServerBootStrap
最后启动 ServerBootStrap,这差不多就是 Netty 的内容了。
public void start() {
int port = getListenPort();
this.serverBootstrap.group(this.eventLoopGroupBoss, this.eventLoopGroupWorker)
.channel(NettyServerConfig.SERVER_CHANNEL_CLAZZ)
.option(ChannelOption.SO_BACKLOG, nettyServerConfig.getSoBackLogSize())
.option(ChannelOption.SO_REUSEADDR, true)
.childOption(ChannelOption.SO_KEEPALIVE, true)
.childOption(ChannelOption.TCP_NODELAY, true)
.childOption(ChannelOption.SO_SNDBUF, nettyServerConfig.getServerSocketSendBufSize())
.childOption(ChannelOption.SO_RCVBUF, nettyServerConfig.getServerSocketResvBufSize())
.childOption(ChannelOption.WRITE_BUFFER_WATER_MARK, new WriteBufferWaterMark(nettyServerConfig.getWriteBufferLowWaterMark(), nettyServerConfig.getWriteBufferHighWaterMark()))
.localAddress(new InetSocketAddress(port))
.childHandler(new ChannelInitializer<SocketChannel>() {
@Override
public void initChannel(SocketChannel ch) {
MultiProtocolDecoder multiProtocolDecoder = new MultiProtocolDecoder(channelHandlers);
ch.pipeline()
.addLast(new IdleStateHandler(nettyServerConfig.getChannelMaxReadIdleSeconds(), 0, 0))
.addLast(multiProtocolDecoder);
}
});
try {
this.serverBootstrap.bind(port).sync();
LOGGER.info("Server started, service listen port: {}", getListenPort());
InetSocketAddress address = new InetSocketAddress(XID.getIpAddress(), XID.getPort());
for (RegistryService<?> registryService : MultiRegistryFactory.getInstances()) {
registryService.register(address);
}
initialized.set(true);
} catch (SocketException se) {
throw new RuntimeException("Server start failed, the listen port: " + getListenPort(), se);
} catch (Exception exx) {
throw new RuntimeException("Server start failed", exx);
}
}
ServerBootstrap 启动时的 childOption 属于网络部分的内容,我们不过多解释。
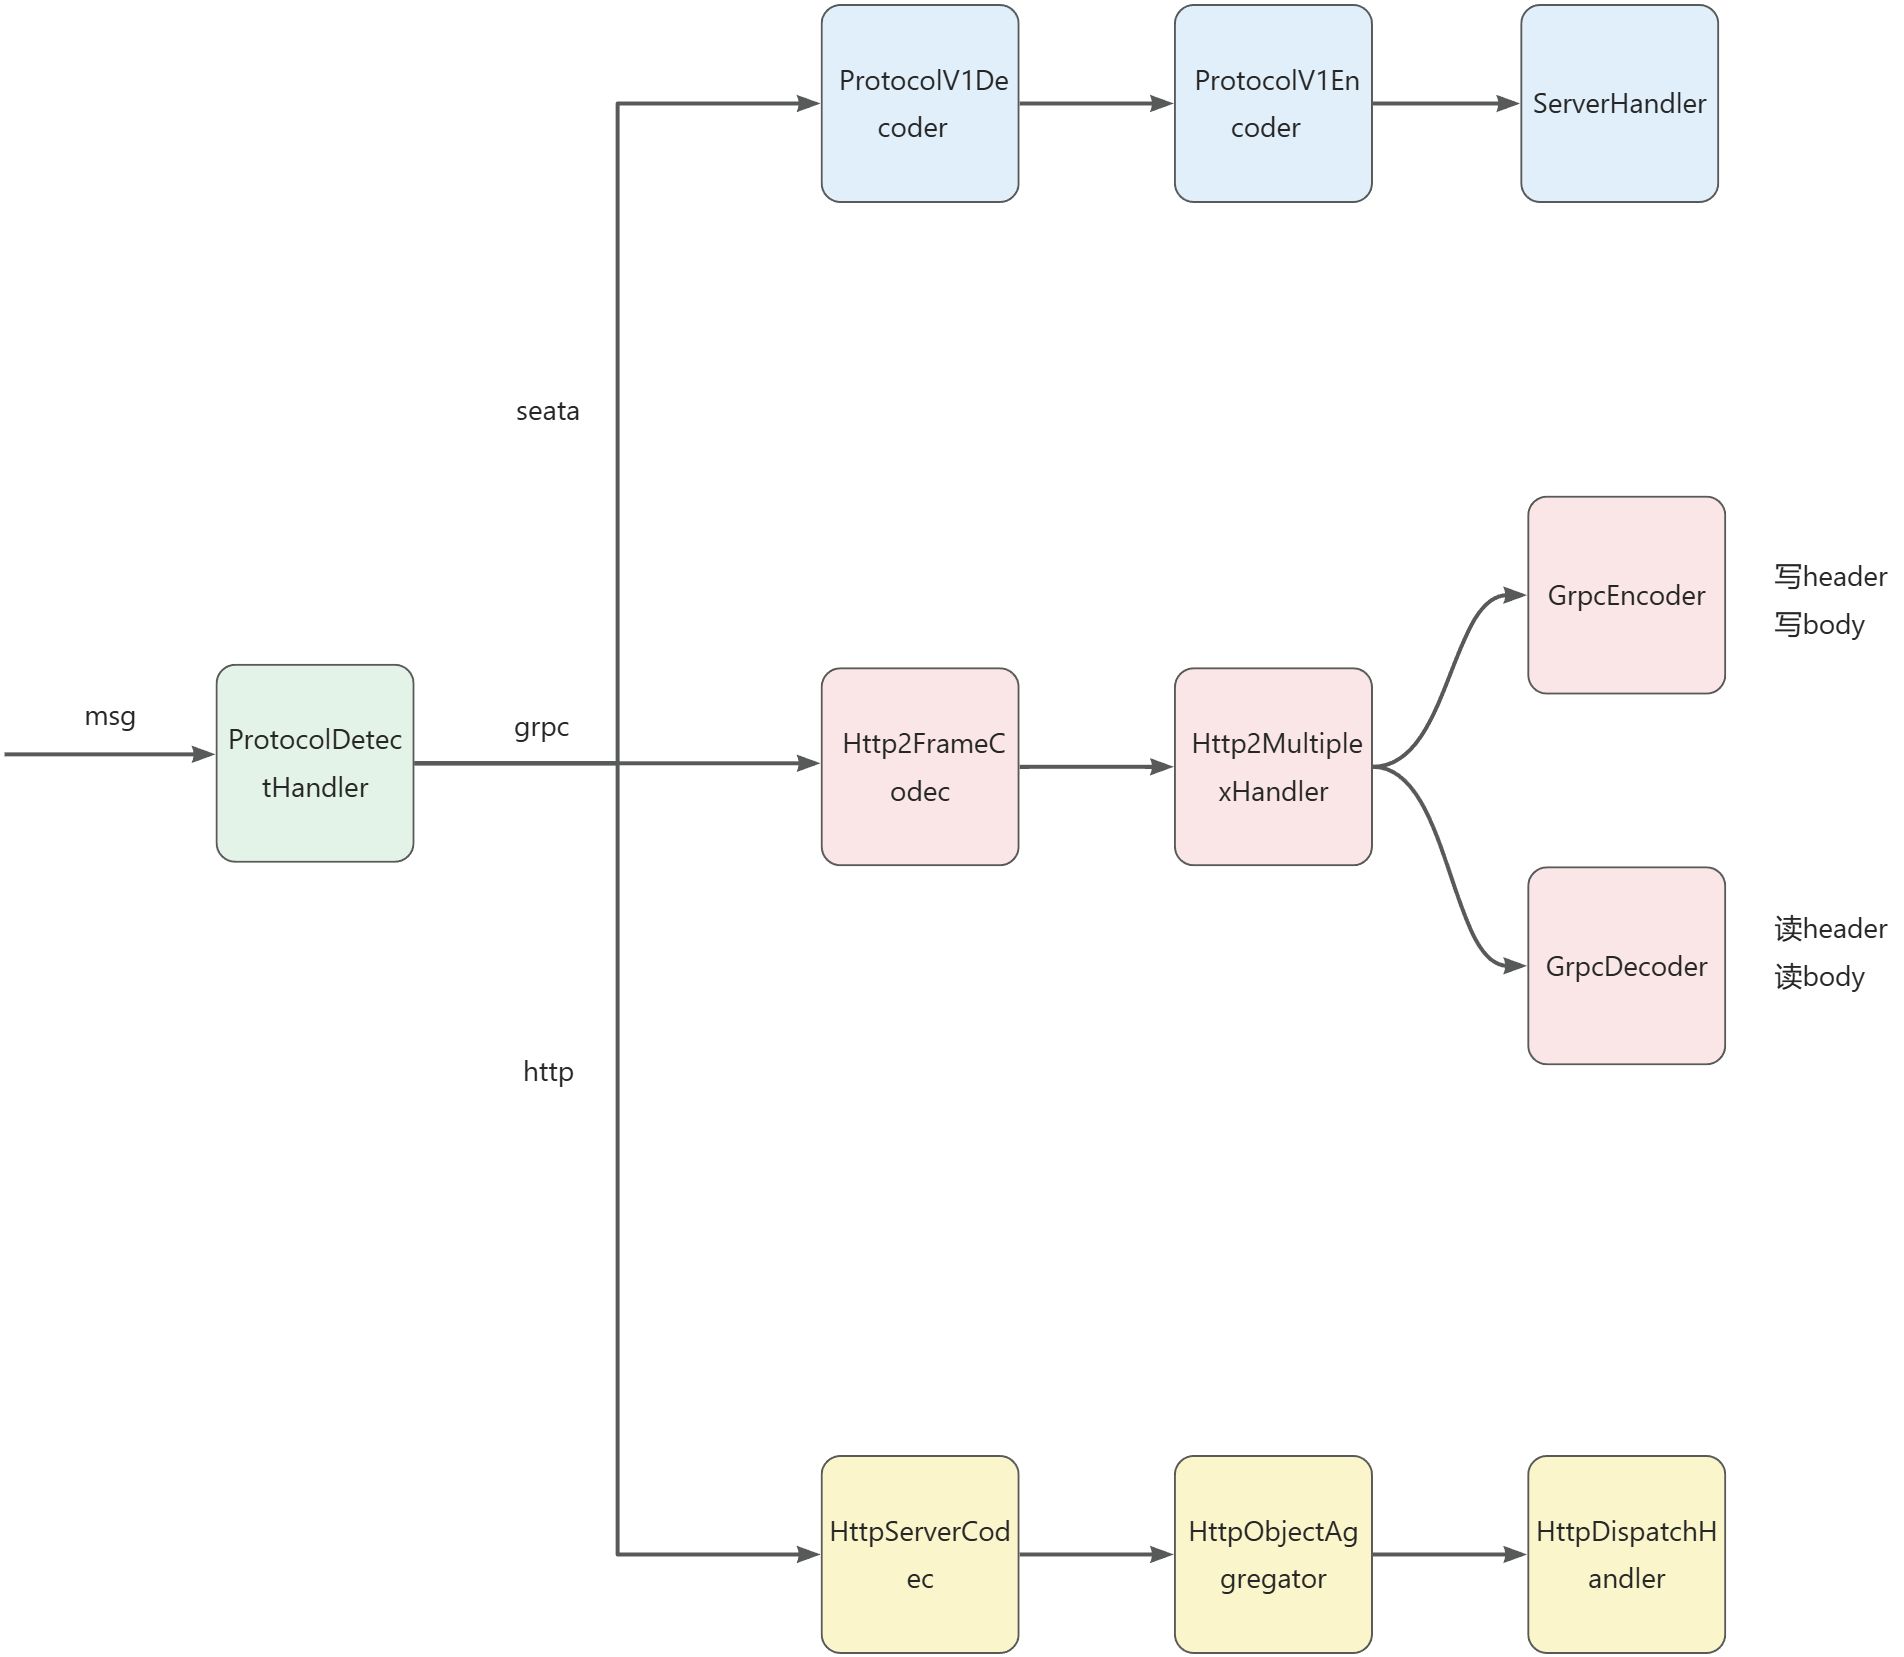
这里你可能有一点疑问,在 pipeline 中仅仅只是添加了一个 MultiProtocolDecoder 解码器,那业务处理器呢?
事实上,MultiProtocolDecoder 的构造参数中的 channelHandlers 就是 ServerHandler,它是在创建 NettyRemotingServer 时就被设置的。
至于为什么要这样做,其实是和 Seata 的多版本协议相关。
当 Seata Server 启动后第一次进行解码时,会将 MultiProtocolDecoder 从 pipeline 中移除,根据版本选择具体的 Encoder 和 Decoder 并添加到 pipeline 中,此时,也会将 ServerHandler 添加到 pipeline。
Client 是怎么启动的
对于 Client 来说,由于我们一般是在 SpringBoot 中使用 Seata,所以我们需要关注的点在 SeataAutoConfiguration 类中。
在这个类里面创建了一个 GlobalTransactionScanner 对象,我们注意到它实现了 InitializingBean,所以将目光转移到 afterPropertiesSet 方法上。
果然在这个方法里面进行了 TM 和 RM 的初始化。
TM 的初始化
对于 TM 来说,初始化的逻辑如下:
public static void init(String applicationId, String transactionServiceGroup, String accessKey, String secretKey) {
TmNettyRemotingClient tmNettyRemotingClient = TmNettyRemotingClient.getInstance(applicationId, transactionServiceGroup, accessKey, secretKey);
tmNettyRemotingClient.init();
}
启动客户端 Bootstrap 的逻辑如下:
@Override
public void start() {
    if (this.defaultEventExecutorGroup == null) {
        this.defaultEventExecutorGroup = new DefaultEventExecutorGroup(nettyClientConfig.getClientWorkerThreads(),
                new NamedThreadFactory(getThreadPrefix(nettyClientConfig.getClientWorkerThreadPrefix()), nettyClientConfig.getClientWorkerThreads()));
    }
    this.bootstrap.group(this.eventLoopGroupWorker)
            .channel(nettyClientConfig.getClientChannelClazz())
            .option(ChannelOption.TCP_NODELAY, true)
            .option(ChannelOption.SO_KEEPALIVE, true)
            .option(ChannelOption.CONNECT_TIMEOUT_MILLIS, nettyClientConfig.getConnectTimeoutMillis())
            .option(ChannelOption.SO_SNDBUF, nettyClientConfig.getClientSocketSndBufSize())
            .option(ChannelOption.SO_RCVBUF, nettyClientConfig.getClientSocketRcvBufSize());
    if (nettyClientConfig.enableNative()) {
        if (PlatformDependent.isOsx()) {
            if (LOGGER.isInfoEnabled()) {
                LOGGER.info("client run on macOS");
            }
        } else {
            bootstrap.option(EpollChannelOption.EPOLL_MODE, EpollMode.EDGE_TRIGGERED)
                    .option(EpollChannelOption.TCP_QUICKACK, true);
        }
    }
    bootstrap.handler(new ChannelInitializer<SocketChannel>() {
        @Override
        public void initChannel(SocketChannel ch) {
            ch.pipeline().addLast(new IdleStateHandler(nettyClientConfig.getChannelMaxReadIdleSeconds(),
                            nettyClientConfig.getChannelMaxWriteIdleSeconds(),
                            nettyClientConfig.getChannelMaxAllIdleSeconds()))
                    .addLast(new ProtocolDecoderV1())
                    .addLast(new ProtocolEncoderV1());
            if (channelHandlers != null) {
                addChannelPipelineLast(ch, channelHandlers);
            }
        }
    });
    if (initialized.compareAndSet(false, true) && LOGGER.isInfoEnabled()) {
        LOGGER.info("NettyClientBootstrap has started");
    }
}
由于客户端的协议版本根据不同的 Seata 版本是可以确定的,所以这里直接添加了 V1 版本的编解码器,这里 channelHandlers 其实就是 ClientHandler,它也是 Netty 中的一个复合处理器。
RM 的初始化
RM 的初始化大致逻辑和 TM 是类似的,这里就不过多介绍了。
如何发送和处理报文
厘清了 Seata Server 和 Client 的大致启动流程之后,我们就可以深入的看一看 Seata 是如何进行报文发送和处理的。
前面我们也说过了,发送请求和处理报文的核心逻辑是在 AbstractNettyRemoting 中,接下来就看一看这个类。
同步和异步
先简单说一说什么是同步和异步。
同步 Synchronous 和异步 Asynchronous,本质上是描述了程序在处理多个事件或者任务时的不同行为模式。
同步是指一个过程必须等待另一个过程完成之后才能继续进行。换句话说,在同步操作中,调用方发出请求后会一直阻塞等待直到接收到响应结果、或者超时才会继续执行后续代码。
相比之下,异步则允许调用者在请求后不必等待响应就可以向下执行,但当请求完成时,会以某种方式将响应通知到调用者(如通过回调函数、Future),异步模型可以提高并发性和效率。
从另一个角度来说,同步调用需要发起调用的线程获取结果,而异步调用则是由异步线程将结果放到某个地方(Future)或者是异步线程去执行事先准备好的调用成功/失败的回调方法(回调函数)。
下面是一个简单的例子,展示了三种调用方式,同步、异步 Future、异步 Callback。
import lombok.Data;
import org.slf4j.Logger;
import org.slf4j.LoggerFactory;
import java.util.concurrent.CompletableFuture;
import java.util.concurrent.ExecutionException;
import java.util.concurrent.TimeUnit;
public class AsyncTest {
private static final Logger LOGGER = LoggerFactory.getLogger(AsyncTest.class);
public static void main(String[] args) throws InterruptedException, ExecutionException {
Result syncResponse = testSync();
LOGGER.info("同步响应结果: {}", syncResponse.getString());
CompletableFuture<Result> result = testAsyncFuture();
testAsyncCallback();
LOGGER.info("主线程继续向下执行~~");
TimeUnit.SECONDS.sleep(1);
LOGGER.info("主线程从异步 Future 中获取结果: {}", result.get().getString());
}
public static void testAsyncCallback() {
new AsyncTask().execute(new AsyncCallback() {
@Override
public void onComplete(Result result) {
try {
TimeUnit.MILLISECONDS.sleep(50);
} catch (InterruptedException e) {
}
LOGGER.info("异步 Callback 获取结果: {}", result.getString());
}
});
}
public static CompletableFuture<Result> testAsyncFuture() {
return CompletableFuture.supplyAsync(() -> {
try {
TimeUnit.MILLISECONDS.sleep(50);
} catch (InterruptedException e) {
}
Result asyncResponse = getResult();
LOGGER.info("异步 Future 获取结果: {}", asyncResponse.getString());
return asyncResponse;
});
}
public static Result testSync() {
return getResult();
}
@Data
static class Result {
private String string;
}
interface AsyncCallback {
void onComplete(Result result);
}
static class AsyncTask {
void execute(AsyncCallback callback) {
new Thread(() -> {
Result asyncRes = getResult();
callback.onComplete(asyncRes);
}).start();
}
}
private static Result getResult() {
Result result = new Result();
result.setString("结果");
return result;
}
}
输出:
22:26:38.788 [main] INFO  org.hein.netty.AsyncTest - 同步响应结果: 结果
22:26:38.849 [main] INFO  org.hein.netty.AsyncTest - 主线程继续向下执行~~
22:26:38.911 [Thread-0] INFO  org.hein.netty.AsyncTest - 异步 Callback 获取结果: 结果
22:26:38.911 [ForkJoinPool.commonPool-worker-1] INFO  org.hein.netty.AsyncTest - 异步 Future 获取结果: 结果
22:26:39.857 [main] INFO  org.hein.netty.AsyncTest - 主线程从异步 Future 中获取结果: 结果
从结果中,至少可以看出三点,
- 一是异步 Future 和异步 Callback 并不会阻塞主线程向下执行。
- 二是异步调用时处理结果的不是主线程。
- 最后,Future 和 Callback 的区别在于 Future 只是由异步线程将结果存储在了一个地方(CompletableFuture#result),但是后续获取结果还是需要主线程(或者其他线程)调用 get 方法,而 Callback 的话,其实就相当于预先设定了结果的处理方式,由异步线程去执行就好了。
当然,CompletableFuture 也是可以作回调的,比如调用 whenComplete 方法。
异步调用
Netty 作为一个高性能的异步 IO 框架,它的设计核心就是异步的,所以基于 Netty 进行异步调用是比较简单的。
protected void sendAsync(Channel channel, RpcMessage rpcMessage) {
    channelWritableCheck(channel, rpcMessage.getBody());
    if (LOGGER.isDebugEnabled()) {
        LOGGER.debug("write message: {}, channel: {}, active? {}, writable? {}, isopen? {}", rpcMessage.getBody(), channel, channel.isActive(), channel.isWritable(), channel.isOpen());
    }
    doBeforeRpcHooks(ChannelUtil.getAddressFromChannel(channel), rpcMessage);
    channel.writeAndFlush(rpcMessage).addListener((ChannelFutureListener) future -> {
        if (!future.isSuccess()) {
            destroyChannel(future.channel());
        }
    });
}
只需要简单调用 channel 的 writeAndFlush 方法即可实现异步调用。
特别要注意的是,writeAndFlush 方法在调用线程是 EventLoop 线程的情况下会变成同步调用。
同步调用
在 Netty 中实现异步调用很简单,要实现同步调用就麻烦一点,需要将异步调用转换为同步调用。
从本质上来说,异步转同步就是让调用线程发起调用后,拿到响应前进入阻塞,拿到响应后再唤醒它,向下执行。
那么 Seata 的处理的核心就是 MessageFuture 类,如下:
package org.apache.seata.core.protocol;

import org.apache.seata.common.exception.ShouldNeverHappenException;

import java.util.concurrent.CompletableFuture;
import java.util.concurrent.ExecutionException;
import java.util.concurrent.TimeUnit;
import java.util.concurrent.TimeoutException;

public class MessageFuture {

    private RpcMessage requestMessage;
    private long timeout;
    private final long start = System.currentTimeMillis();

    private final transient CompletableFuture<Object> origin = new CompletableFuture<>();

    public boolean isTimeout() {
        return System.currentTimeMillis() - start > timeout;
    }

    public Object get(long timeout, TimeUnit unit) throws TimeoutException, InterruptedException {
        Object result;
        try {
            result = origin.get(timeout, unit);
            if (result instanceof TimeoutException) {
                throw (TimeoutException) result;
            }
        } catch (ExecutionException e) {
            throw new ShouldNeverHappenException("Should not get results in a multi-threaded environment", e);
        } catch (TimeoutException e) {
            throw new TimeoutException(String.format("%s, cost: %d ms", e.getMessage(), System.currentTimeMillis() - start));
        }
        if (result instanceof RuntimeException) {
            throw (RuntimeException) result;
        } else if (result instanceof Throwable) {
            throw new RuntimeException((Throwable) result);
        }
        return result;
    }

    public void setResultMessage(Object obj) {
        origin.complete(obj);
    }

    public RpcMessage getRequestMessage() { return requestMessage; }

    public void setRequestMessage(RpcMessage requestMessage) { this.requestMessage = requestMessage;}

    public long getTimeout() { return timeout; }

    public void setTimeout(long timeout) { this.timeout = timeout;}
}
有了这个类之后,同步调用的过程如下,我们以客户端请求、服务端响应为例:
- 首先客户端将请求构建为 MessageFuture,然后将请求 id 和这个 MessageFuture 对象存储到一个哈希表中。
- 接着客户端调用 channel.writeAndFlush 发起异步调用,是的,这里还是异步。
- 异步转同步的核心在于,此时线程需要调用 MessageFuture 对象的 get 方法进入阻塞,当然实际是调用了 CompletableFuture 的 get 方法进入同步阻塞。
- 当服务端处理完毕,它又会发出请求(服务端视角),在客户端来看,这就是响应。
- 当客户端收到响应�之后,由 EventLoop 线程将响应结果设置到 MessageFuture 中,由于一次请求和响应的 id 是相同的,所以可以从上面的哈希表中拿到对应的 MessageFuture 对象。
- 当响应结果被设置之后,上面阻塞的线程就可以恢复运行,这样就实现了同步的效果。
所以,Seata 的解决方案本质上来说就是利用了 CompletableFuture 对象,将它作为一个存储结果的容器。
protected Object sendSync(Channel channel, RpcMessage rpcMessage, long timeoutMillis) throws TimeoutException {
if (timeoutMillis <= 0) {
throw new FrameworkException("timeout should more than 0ms");
}
if (channel == null) {
LOGGER.warn("sendSync nothing, caused by null channel.");
return null;
}
MessageFuture messageFuture = new MessageFuture();
messageFuture.setRequestMessage(rpcMessage);
messageFuture.setTimeout(timeoutMillis);
futures.put(rpcMessage.getId(), messageFuture);
channelWritableCheck(channel, rpcMessage.getBody());
String remoteAddr = ChannelUtil.getAddressFromChannel(channel);
doBeforeRpcHooks(remoteAddr, rpcMessage);
channel.writeAndFlush(rpcMessage).addListener((ChannelFutureListener) future -> {
if (!future.isSuccess()) {
MessageFuture mf = futures.remove(rpcMessage.getId());
if (mf != null) {
mf.setResultMessage(future.cause());
}
destroyChannel(future.channel());
}
});
try {
Object result = messageFuture.get(timeoutMillis, TimeUnit.MILLISECONDS);
doAfterRpcHooks(remoteAddr, rpcMessage, result);
return result;
} catch (Exception exx) {
LOGGER.error("wait response error:{},ip:{},request:{}", exx.getMessage(), channel.remoteAddress(), rpcMessage.getBody());
if (exx instanceof TimeoutException) {
throw (TimeoutException) exx;
} else {
throw new RuntimeException(exx);
}
}
}
报文处理
在 Netty 中,提到报文处理,我们首先应该想到的就是入栈、出栈处理器。
在 Seata Server 端,除了常见的编解码处理器之外,就是 ServerHandler 处理器了,如下:
@ChannelHandler.Sharable
class ServerHandler extends ChannelDuplexHandler {
@Override
public void channelRead(final ChannelHandlerContext ctx, Object msg) throws Exception {
if (msg instanceof RpcMessage) {
processMessage(ctx, (RpcMessage) msg);
} else {
LOGGER.error("rpcMessage type error");
}
}
}
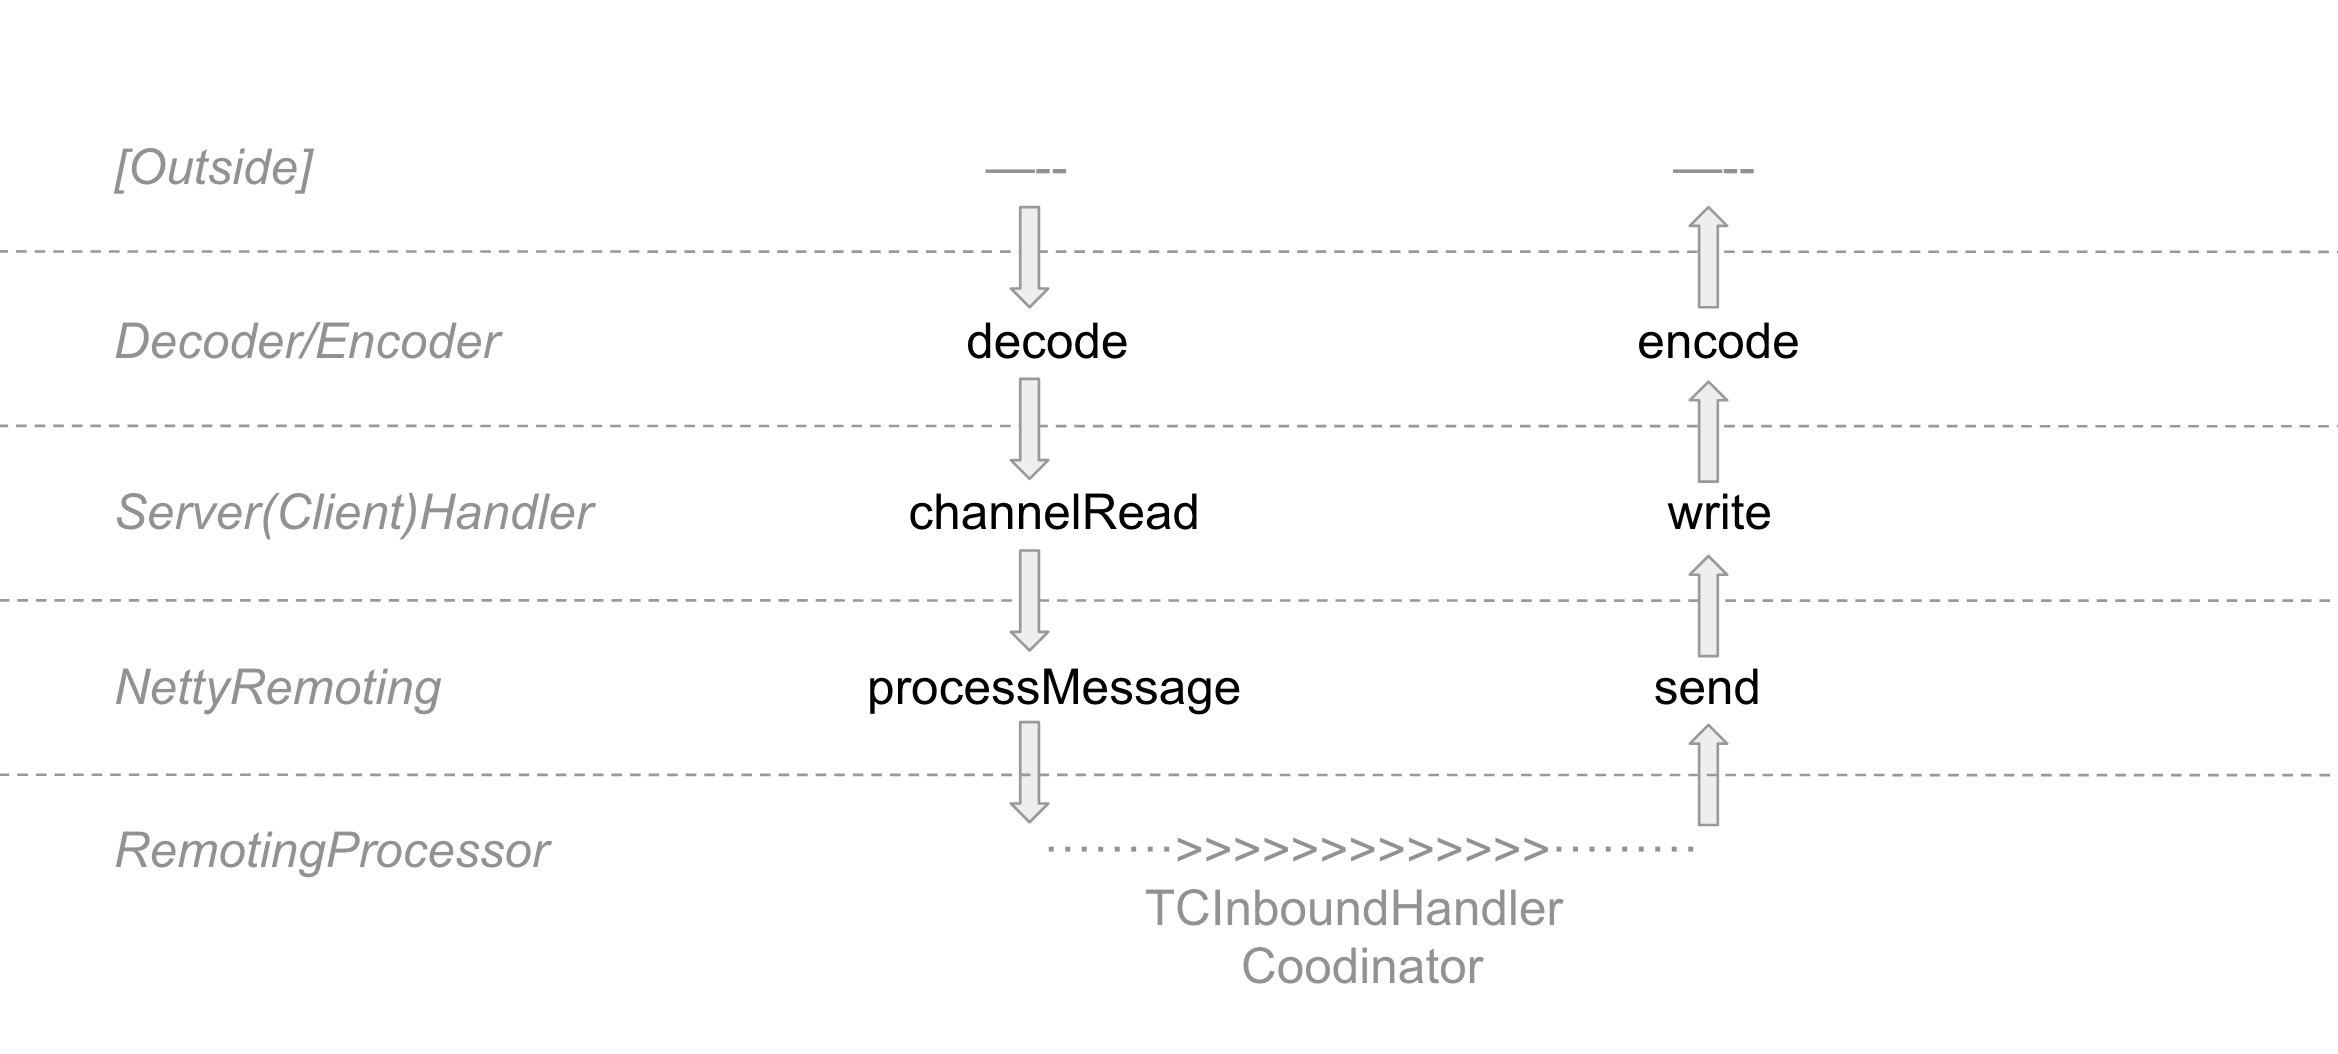
比较有业务含义的就是这个 channelRead 方法,所有发向 Server 的报文在经过解码之后都会来到这个方法。
这里的 processMessage 方法就是 AbstractNettyRemoting 中的业务处理方法,如下:
protected void processMessage(ChannelHandlerContext ctx, RpcMessage rpcMessage) throws Exception {
if (LOGGER.isDebugEnabled()) {
LOGGER.debug("{} msgId: {}, body: {}", this, rpcMessage.getId(), rpcMessage.getBody());
}
Object body = rpcMessage.getBody();
if (body instanceof MessageTypeAware) {
MessageTypeAware messageTypeAware = (MessageTypeAware) body;
final Pair<RemotingProcessor, ExecutorService> pair = this.processorTable.get((int) messageTypeAware.getTypeCode());
if (pair != null) {
if (pair.getSecond() != null) {
try {
pair.getSecond().execute(() -> {
try {
pair.getFirst().process(ctx, rpcMessage);
} catch (Throwable th) {
LOGGER.error(FrameworkErrorCode.NetDispatch.getErrCode(), th.getMessage(), th);
} finally {
MDC.clear();
}
});
} catch (RejectedExecutionException e) {
LOGGER.error(FrameworkErrorCode.ThreadPoolFull.getErrCode(), "thread pool is full, current max pool size is " + messageExecutor.getActiveCount());
if (allowDumpStack) {
String name = ManagementFactory.getRuntimeMXBean().getName();
String pid = name.split("@")[0];
long idx = System.currentTimeMillis();
try {
String jstackFile = idx + ".log";
LOGGER.info("jstack command will dump to {}", jstackFile);
Runtime.getRuntime().exec(String.format("jstack %s > %s", pid, jstackFile));
} catch (IOException exx) {
LOGGER.error(exx.getMessage());
}
allowDumpStack = false;
}
}
} else {
try {
pair.getFirst().process(ctx, rpcMessage);
} catch (Throwable th) {
LOGGER.error(FrameworkErrorCode.NetDispatch.getErrCode(), th.getMessage(), th);
}
}
} else {
LOGGER.error("This message type [{}] has no processor.", messageTypeAware.getTypeCode());
}
} else {
LOGGER.error("This rpcMessage body[{}] is not MessageTypeAware type.", body);
}
}
这个方法的逻辑很简单。
Seata 在 Server 启动的过程中,向 processorTable 注册了一大堆处理器,那么这里就可以根据消息类型 Code 拿到对应的处理器和线程池。
如果有线程池,就在线程池内执行处理器的方法,否则就交给 EventLoop 线程去执行。
当然,对于 Client 而言,也是这样的。
批量发送
在网络程序中,有时候也需要实现批量发送,我们来看 Seata 是怎么做的,这里主要看客户端向服务端发送。
还记得我们上面在 Client 启动的过程中提到过一个线程池 mergeSendExecutorService,如果允许批量发送,那么在 Client 启动的时候就会提交一个 MergedSendRunnable 任务,我们先来看这个任务在干啥?
private class MergedSendRunnable implements Runnable {
@Override
public void run() {
while (true) {
synchronized (mergeLock) {
try {
mergeLock.wait(MAX_MERGE_SEND_MILLS);
} catch (InterruptedException ignore) {
}
}
isSending = true;
basketMap.forEach((address, basket) -> {
if (basket.isEmpty()) {
return;
}
MergedWarpMessage mergeMessage = new MergedWarpMessage();
while (!basket.isEmpty()) {
RpcMessage msg = basket.poll();
mergeMessage.msgs.add((AbstractMessage) msg.getBody());
mergeMessage.msgIds.add(msg.getId());
}
if (mergeMessage.msgIds.size() > 1) {
printMergeMessageLog(mergeMessage);
}
Channel sendChannel = null;
try {
sendChannel = clientChannelManager.acquireChannel(address);
AbstractNettyRemotingClient.this.sendAsyncRequest(sendChannel, mergeMessage);
} catch (FrameworkException e) {
if (e.getErrorCode() == FrameworkErrorCode.ChannelIsNotWritable && sendChannel != null) {
destroyChannel(address, sendChannel);
}
for (Integer msgId : mergeMessage.msgIds) {
MessageFuture messageFuture = futures.remove(msgId);
if (messageFuture != null) {
messageFuture.setResultMessage(new RuntimeException(String.format("%s is unreachable", address), e));
}
}
LOGGER.error("client merge call failed: {}", e.getMessage(), e);
}
});
isSending = false;
}
}
}
那么,与之相关的批量发送代码如下:
public Object sendSyncRequest(Object msg) throws TimeoutException {
String serverAddress = loadBalance(getTransactionServiceGroup(), msg);
long timeoutMillis = this.getRpcRequestTimeout();
RpcMessage rpcMessage = buildRequestMessage(msg, ProtocolConstants.MSGTYPE_RESQUEST_SYNC);
if (this.isEnableClientBatchSendRequest()) {
MessageFuture messageFuture = new MessageFuture();
messageFuture.setRequestMessage(rpcMessage);
messageFuture.setTimeout(timeoutMillis);
futures.put(rpcMessage.getId(), messageFuture);
BlockingQueue<RpcMessage> basket = CollectionUtils.computeIfAbsent(basketMap, serverAddress,
key -> new LinkedBlockingQueue<>());
if (!basket.offer(rpcMessage)) {
LOGGER.error("put message into basketMap offer failed, serverAddress: {}, rpcMessage: {}", serverAddress, rpcMessage);
return null;
}
if (!isSending) {
synchronized (mergeLock) {
mergeLock.notifyAll();
}
}
try {
return messageFuture.get(timeoutMillis, TimeUnit.MILLISECONDS);
} catch (Exception exx) {
LOGGER.error("wait response error: {}, ip: {}, request: {}", exx.getMessage(), serverAddress, rpcMessage.getBody());
if (exx instanceof TimeoutException) {
throw (TimeoutException) exx;
} else {
throw new RuntimeException(exx);
}
}
} else {
Channel channel = clientChannelManager.acquireChannel(serverAddress);
return super.sendSync(channel, rpcMessage, timeoutMillis);
}
}
可以看到,这里面也用到了对象锁的同步-等待机制,那么实现的效果就是:
- 最多隔 1ms 会遍历 basketMap 进行报文发送。
- 在 mergeSendExecutorService 内部的线程阻塞期间(mainLock.wait),如果来了需要发送的报文,那么会唤醒 mainLock 上的线程,继续进行发送。
那 Server 是怎么处理的呢?主要看 MergedWarpMessage 报文的 TypeCode,实际上就是 TYPE_SEATA_MERGE,再看 Server 启动的时候对这个 Code 注册哪个处理器,实际上就是 ServerOnRequestProcessor。
这里其实就向你展示了,如何去找某个报文是怎么处理的,授人以鱼不如授人以渔!
在 ServerOnRequestProcessor 这边,实际上对应了两种处理 MergedWarpMessage 报文的方式:
- MergedWarpMessage 中的所有独立请求全部处理完毕之后,统一发送 MergeResultMessage。
- 由 batchResponseExecutorService 线程池处理发送任务,可以保证两点,一是当有报文结果就响应,即使线程 wait,也会将它 notify,二是至少 1ms 会响应一次,因为 batchResponseExecutorService 中执行的线程最多 wait 1ms。
注意,这两种方式响应的报文类型是不同的,第一种响应的是 MergeResultMessage,第二种是 BatchResultMessage,在 Client 也会有不同的处理。
ServerOnRequestProcessor 中核心处理方法如下:
private void onRequestMessage(ChannelHandlerContext ctx, RpcMessage rpcMessage) {
Object message = rpcMessage.getBody();
RpcContext rpcContext = ChannelManager.getContextFromIdentified(ctx.channel());
if (message instanceof MergedWarpMessage) {
final List<AbstractMessage> msgs = ((MergedWarpMessage) message).msgs;
final List<Integer> msgIds = ((MergedWarpMessage) message).msgIds;
if (NettyServerConfig.isEnableTcServerBatchSendResponse() && StringUtils.isNotBlank(rpcContext.getVersion())
&& Version.isAboveOrEqualVersion150(rpcContext.getVersion())) {
for (int i = 0; i < msgs.size(); i++) {
if (PARALLEL_REQUEST_HANDLE) {
int finalI = i;
CompletableFuture.runAsync(
() -> handleRequestsByMergedWarpMessageBy150(msgs.get(finalI), msgIds.get(finalI), rpcMessage, ctx, rpcContext));
} else {
handleRequestsByMergedWarpMessageBy150(msgs.get(i), msgIds.get(i), rpcMessage, ctx, rpcContext);
}
}
} else {
List<AbstractResultMessage> results = new ArrayList<>();
List<CompletableFuture<AbstractResultMessage>> futures = new ArrayList<>();
for (int i = 0; i < msgs.size(); i++) {
if (PARALLEL_REQUEST_HANDLE) {
int finalI = i;
futures.add(CompletableFuture.supplyAsync(() -> handleRequestsByMergedWarpMessage(msgs.get(finalI), rpcContext)));
} else {
results.add(i, handleRequestsByMergedWarpMessage(msgs.get(i), rpcContext));
}
}
if (CollectionUtils.isNotEmpty(futures)) {
try {
for (CompletableFuture<AbstractResultMessage> future : futures) {
results.add(future.get());
}
} catch (InterruptedException | ExecutionException e) {
LOGGER.error("handle request error: {}", e.getMessage(), e);
}
}
MergeResultMessage resultMessage = new MergeResultMessage();
resultMessage.setMsgs(results.toArray(new AbstractResultMessage[0]));
remotingServer.sendAsyncResponse(rpcMessage, ctx.channel(), resultMessage);
}
} else {
}
}
而 handleRequestsByMergedWarpMessage 和 handleRequestsByMergedWarpMessageBy150 的区别就在于后者会将结果封装为 QueueItem 加入到阻塞队列由 batchResponseExecutorService 中的线程进行实际的发送,而前者仅仅是返回处理的结果。
private AbstractResultMessage handleRequestsByMergedWarpMessage(AbstractMessage subMessage, RpcContext rpcContext) {
AbstractResultMessage resultMessage = transactionMessageHandler.onRequest(subMessage, rpcContext);
return resultMessage;
}
private void handleRequestsByMergedWarpMessageBy150(AbstractMessage msg, int msgId, RpcMessage rpcMessage,
ChannelHandlerContext ctx, RpcContext rpcContext) {
AbstractResultMessage resultMessage = transactionMessageHandler.onRequest(msg, rpcContext);
BlockingQueue<QueueItem> msgQueue = CollectionUtils.computeIfAbsent(basketMap, ctx.channel(), key -> new LinkedBlockingQueue<>());
if (!msgQueue.offer(new QueueItem(resultMessage, msgId, rpcMessage))) {
LOGGER.error("put message into basketMap offer failed, channel: {}, rpcMessage: {}, resultMessage: {}", ctx.channel(), rpcMessage, resultMessage);
}
if (!isResponding) {
synchronized (batchResponseLock) {
batchResponseLock.notifyAll();
}
}
}
再来看 batchResponseExecutorService 线程池是怎么处理批量发送的任务的?
private class BatchResponseRunnable implements Runnable {
@Override
public void run() {
while (true) {
synchronized (batchResponseLock) {
try {
batchResponseLock.wait(MAX_BATCH_RESPONSE_MILLS);
} catch (InterruptedException e) {
LOGGER.error("BatchResponseRunnable Interrupted error", e);
}
}
isResponding = true;
basketMap.forEach((channel, msgQueue) -> {
if (msgQueue.isEmpty()) {
return;
}
Map<ClientRequestRpcInfo, BatchResultMessage> batchResultMessageMap = new HashMap<>();
while (!msgQueue.isEmpty()) {
QueueItem item = msgQueue.poll();
BatchResultMessage batchResultMessage = CollectionUtils.computeIfAbsent(batchResultMessageMap,
new ClientRequestRpcInfo(item.getRpcMessage()),
key -> new BatchResultMessage());
batchResultMessage.getResultMessages().add(item.getResultMessage());
batchResultMessage.getMsgIds().add(item.getMsgId());
}
batchResultMessageMap.forEach((clientRequestRpcInfo, batchResultMessage) ->
remotingServer.sendAsyncResponse(buildRpcMessage(clientRequestRpcInfo), channel, batchResultMessage));
});
isResponding = false;
}
}
}
最后我们来看 Client 这边是怎么处理 Server 的批量响应报文的,根据 Client 注册的处理器,处理批量报文的处理器是 ClientOnResponseProcessor,如下:
public void process(ChannelHandlerContext ctx, RpcMessage rpcMessage) throws Exception {
if (rpcMessage.getBody() instanceof MergeResultMessage) {
MergeResultMessage results = (MergeResultMessage) rpcMessage.getBody();
MergedWarpMessage mergeMessage = (MergedWarpMessage) mergeMsgMap.remove(rpcMessage.getId());
for (int i = 0; i < mergeMessage.msgs.size(); i++) {
int msgId = mergeMessage.msgIds.get(i);
MessageFuture future = futures.remove(msgId);
if (future == null) {
LOGGER.error("msg: {} is not found in futures, result message: {}", msgId, results.getMsgs()[i]);
} else {
future.setResultMessage(results.getMsgs()[i]);
}
}
} else if (rpcMessage.getBody() instanceof BatchResultMessage) {
try {
BatchResultMessage batchResultMessage = (BatchResultMessage) rpcMessage.getBody();
for (int i = 0; i < batchResultMessage.getMsgIds().size(); i++) {
int msgId = batchResultMessage.getMsgIds().get(i);
MessageFuture future = futures.remove(msgId);
if (future == null) {
LOGGER.error("msg: {} is not found in futures, result message: {}", msgId, batchResultMessage.getResultMessages().get(i));
} else {
future.setResultMessage(batchResultMessage.getResultMessages().get(i));
}
}
} finally {
mergeMsgMap.clear();
}
} else {
MessageFuture messageFuture = futures.remove(rpcMessage.getId());
if (messageFuture != null) {
messageFuture.setResultMessage(rpcMessage.getBody());
} else {
if (rpcMessage.getBody() instanceof AbstractResultMessage) {
if (transactionMessageHandler != null) {
transactionMessageHandler.onResponse((AbstractResultMessage) rpcMessage.getBody(), null);
}
}
}
}
}
当然,这里处理的逻辑很简单,就是将结果塞到对应的 MessageFuture 中,那么最开始发送请求的、阻塞的线程就可以拿到结果了,这样一次批量发送和响应就算��处理完毕了。
我们再做一些额外的思考,Seata 的批量发送为什么有两种方式,孰优孰劣?
对于 MergeResultMessage 的这种方式来说,它必须等到所有的报文都处理完毕之后才会发送出去,所以其实它的响应速度受限于处理最长时间的报文,即使其他报文在很短时间内就可以发送出去。
而 BatchResultMessage 这种方式则不然,配合 CompletableFuture 进行并行处理,它就可以实现一有报文处理完毕就发送,而不需要等其他报文的处理,它的响应速度肯定是更快的。
而后面这种方式是 Seata 1.5 版本之后才有的,其实也可以看出来这是一种更好地处理方式。
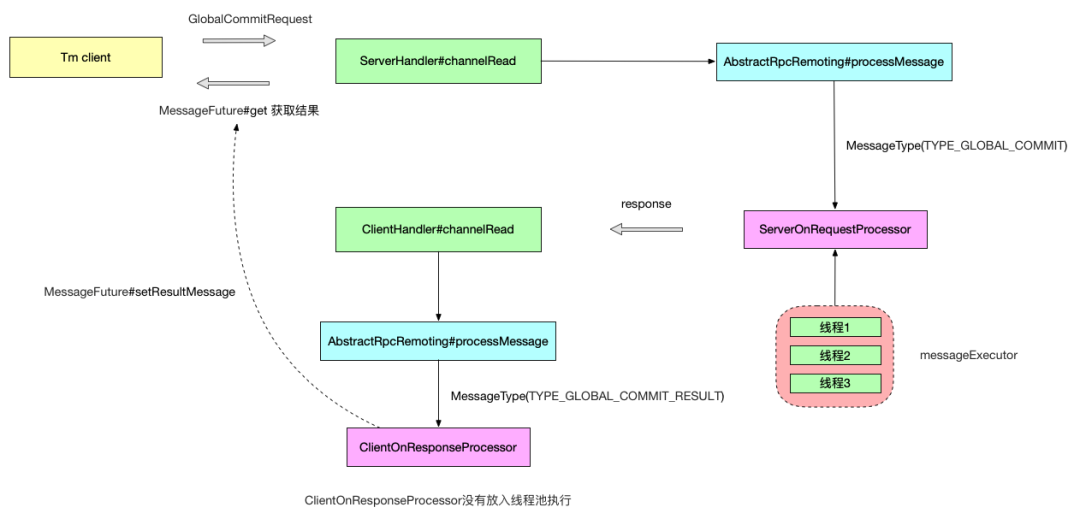
最后,再分享一张 Seata RPC 重构作者的全局事务提交请求的交互流程图:
Seata 如何管理 Channel
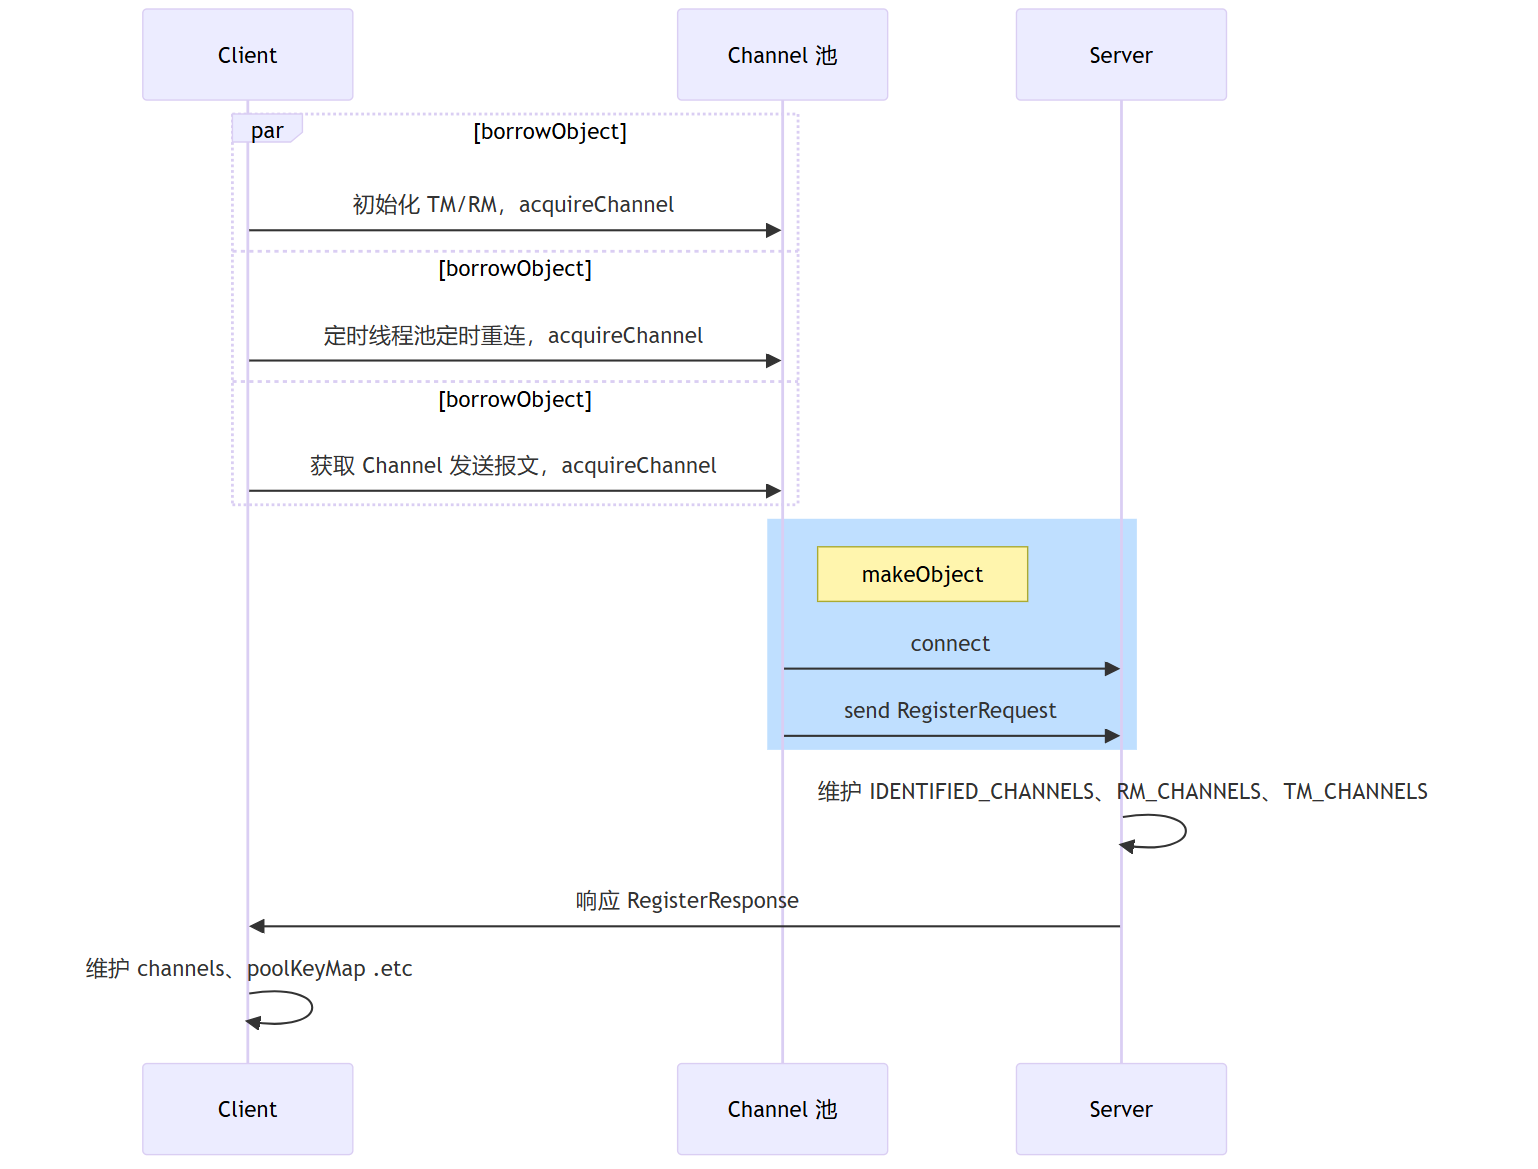
在整个 TC、TM、RM 的网络通信的过程中,Channel 是一个至关重要的通信组件,而要想知道 Seata 是怎么管理 Channel 的,最容易想到的入口就是看 Server 和 Client 发送报文时是从哪里拿到到 Channel 的。
在 AbstractNettyRemotingClient 类的 sendSyncRequest 中,我们可以看到下面的代码:
public Object sendSyncRequest(Object msg) throws TimeoutException {
Channel channel = clientChannelManager.acquireChannel(serverAddress);
return super.sendSync(channel, rpcMessage, timeoutMillis);
}
而在 AbstractNettyRemotingServer 类的 sendSyncRequest 中,我们可以看到下面的代码:
public Object sendSyncRequest(String resourceId, String clientId, Object msg, boolean tryOtherApp) throws TimeoutException {
Channel channel = ChannelManager.getChannel(resourceId, clientId, tryOtherApp);
if (channel == null) {
throw new RuntimeException("rm client is not connected. dbkey:" + resourceId + ",clientId:" + clientId);
}
RpcMessage rpcMessage = buildRequestMessage(msg, ProtocolConstants.MSGTYPE_RESQUEST_SYNC);
return super.sendSync(channel, rpcMessage, NettyServerConfig.getRpcRequestTimeout());
}
所以 Client 主要是通过 NettyClientChannelManager 中获取 Channel,而 Server 则是根据 resourceId 和 clientId 从 ChannelManager 中获取 Channel。
所以下面我们主要研究的就是这两个类,以及相关的一些逻辑。
Client Channel
我们先来看 Client 这边是怎么管理 Channel 的,核心类是 NettyClientChannelManager。
先简单看一下这个类的属性,
private final ConcurrentMap<String, Object> channelLocks = new ConcurrentHashMap<>();
private final ConcurrentMap<String, NettyPoolKey> poolKeyMap = new ConcurrentHashMap<>();
private final ConcurrentMap<String, Channel> channels = new ConcurrentHashMap<>();
private final GenericKeyedObjectPool<NettyPoolKey, Channel> nettyClientKeyPool;
private final Function<String, NettyPoolKey> poolKeyFunction;
对象池的核心类
Seata 使用了 GenericKeyedObjectPool 作为管理 Channel 的对象池。
GenericKeyedObjectPool 作为 Apache Commons Pool 库中的一个实现,它主要用于管理一组对象池,每个对象通过唯一的 Key 进行区分,可以支持多类型的对象池化需求。
在使用 GenericKeyedObjectPool 时,通常还需要配置 KeyedPoolableObjectFactory 工厂,这个工厂定义了如何创建、验证、激活、钝化以及销毁池中的对象。
当 GenericKeyedObjectPool 需要创建对象时会调用 KeyedPoolableObjectFactory 工厂的 makeObject 方法,当需要销毁时会调用 destroyObject 方法进行销毁 ……
如何池化 Channel
被池化的对象就是 Channel,而对应的 Key 是 NettyPoolKey,如下:
public class NettyPoolKey {
private TransactionRole transactionRole;
private String address;
private AbstractMessage message;
}
在 NettyPoolKey 中,维护了三个信息,事务角色(TM、RM、Server),目的 TC Server 地址,以及在 Client 连接 Server 时发送的 RPC 报文。
如何创建这个 NettyPoolKey 呢?在 Seata 中,客户端其实是有两种角色的,TM 和 RM,创建的逻辑肯定是不一样的,所以,Seata 在 AbstractNettyRemotingClient 中抽象了一个方法,它的返回值是一个函数式接口,这个函数式接口就封装了根据 serverAddress 创建 NettyPoolKey 的逻辑。
protected abstract Function<String, NettyPoolKey> getPoolKeyFunction();
比如在 TM 中的实现是:
protected Function<String, NettyPoolKey> getPoolKeyFunction() {
    return severAddress -> {
        RegisterTMRequest message = new RegisterTMRequest(applicationId, transactionServiceGroup, getExtraData());
        return new NettyPoolKey(NettyPoolKey.TransactionRole.TM_ROLE, severAddress, message);
    };
}
而在 RM 中的实现是:
protected Function<String, NettyPoolKey> getPoolKeyFunction() {
    return serverAddress -> {
        String resourceIds = getMergedResourceKeys();
        if (resourceIds != null && LOGGER.isInfoEnabled()) {
            LOGGER.info("RM will register: {}", resourceIds);
        }
        RegisterRMRequest message = new RegisterRMRequest(applicationId, transactionServiceGroup);
        message.setResourceIds(resourceIds);
        return new NettyPoolKey(NettyPoolKey.TransactionRole.RM_ROLE, serverAddress, message);
    };
}
从这里就可以看到,TM 在连接 Server 后发送的报文是 RegisterTMRequest,而 RM 是 RegisterRMRequest。
那这个函数式接口在什么时候被调用呢,后面再看。
我们前面也说到了,一个对象池,会配备对应的对象创建工厂 KeyedPoolableObjectFactory,在 Seata 中,以 NettyPoolableFactory 继承 KeyedPoolableObjectFactory 来实现。
public class NettyPoolableFactory implements KeyedPoolableObjectFactory<NettyPoolKey, Channel> {
@Override
public Channel makeObject(NettyPoolKey key) {
InetSocketAddress address = NetUtil.toInetSocketAddress(key.getAddress());
Channel tmpChannel = clientBootstrap.getNewChannel(address);
long start = System.currentTimeMillis();
Object response;
Channel channelToServer = null;
if (key.getMessage() == null) {
throw new FrameworkException("register msg is null, role:" + key.getTransactionRole().name());
}
try {
response = rpcRemotingClient.sendSyncRequest(tmpChannel, key.getMessage());
if (!isRegisterSuccess(response, key.getTransactionRole())) {
rpcRemotingClient.onRegisterMsgFail(key.getAddress(), tmpChannel, response, key.getMessage());
} else {
channelToServer = tmpChannel;
rpcRemotingClient.onRegisterMsgSuccess(key.getAddress(), tmpChannel, response, key.getMessage());
}
} catch (Exception exx) {
if (tmpChannel != null) {
tmpChannel.close();
}
throw new FrameworkException("register " + key.getTransactionRole().name() + " error, errMsg:" + exx.getMessage());
}
return channelToServer;
}
@Override
public void destroyObject(NettyPoolKey key, Channel channel) throws Exception {
if (channel != null) {
channel.disconnect();
channel.close();
}
}
@Override
public boolean validateObject(NettyPoolKey key, Channel obj) {
if (obj != null && obj.isActive()) {
return true;
}
return false;
}
@Override
public void activateObject(NettyPoolKey key, Channel obj) throws Exception {}
@Override
public void passivateObject(NettyPoolKey key, Channel obj) throws Exception {}
}
�获取 Channel
在整个 Seata 客户端,有三个口径可以获取 Channel,即初始化、定时重连,发送报文时获取 Channel。
private void initConnection() {
boolean failFast =
ConfigurationFactory.getInstance().getBoolean(ConfigurationKeys.ENABLE_TM_CLIENT_CHANNEL_CHECK_FAIL_FAST, DefaultValues.DEFAULT_CLIENT_CHANNEL_CHECK_FAIL_FAST);
getClientChannelManager().initReconnect(transactionServiceGroup, failFast);
}
public void init() {
timerExecutor.scheduleAtFixedRate(() -> {
try {
clientChannelManager.reconnect(getTransactionServiceGroup());
} catch (Exception ex) {
LOGGER.warn("reconnect server failed. {}", ex.getMessage());
}
}, SCHEDULE_DELAY_MILLS, SCHEDULE_INTERVAL_MILLS, TimeUnit.MILLISECONDS);
}
public Object sendSyncRequest(Object msg) throws TimeoutException {
Channel channel = clientChannelManager.acquireChannel(serverAddress);
return super.sendSync(channel, rpcMessage, timeoutMillis);
}
不过,这三个口径最后都会调用到 clientChannelManager 的 acquireChannel 方法获取 Channel。
Channel acquireChannel(String serverAddress) {
Channel channelToServer = channels.get(serverAddress);
if (channelToServer != null) {
channelToServer = getExistAliveChannel(channelToServer, serverAddress);
if (channelToServer != null) {
return channelToServer;
}
}
Object lockObj = CollectionUtils.computeIfAbsent(channelLocks, serverAddress, key -> new Object());
synchronized (lockObj) {
return doConnect(serverAddress);
}
}
private Channel doConnect(String serverAddress) {
Channel channelToServer = channels.get(serverAddress);
if (channelToServer != null && channelToServer.isActive()) {
return channelToServer;
}
Channel channelFromPool;
try {
NettyPoolKey currentPoolKey = poolKeyFunction.apply(serverAddress);
poolKeyMap.put(serverAddress, currentPoolKey);
channelFromPool = nettyClientKeyPool.borrowObject(currentPoolKey);
channels.put(serverAddress, channelFromPool);
} catch (Exception exx) {
LOGGER.error("{} register RM failed.", FrameworkErrorCode.RegisterRM.getErrCode(), exx);
throw new FrameworkException("can not register RM,err:" + exx.getMessage());
}
return channelFromPool;
}
Server Channel
而在 Server 这边,基本上有关 Channe 管理的核心逻辑都在 ChannelManager 中,那 Server 这边的 Channel 是怎么来的呢?还记得在 Client 那边向 Server 发起连接,成功之后还会发送 TM 和 RM 的一个注册请求。
这里先来看看 Server 是怎么处理这些 registerRequest 的。
处理 Client 注册
与之相关的处理器是 RegRmProcessor 和 RegTmProcessor,在这两个处理器中,最核心的逻辑就是调用 ChannelManager 的 registerTMChannel 和 registerRMChannel 方法。
public static void registerTMChannel(RegisterTMRequest request, Channel channel) throws IncompatibleVersionException {
RpcContext rpcContext = buildChannelHolder(NettyPoolKey.TransactionRole.TM_ROLE, request.getVersion(),
request.getApplicationId(),
request.getTransactionServiceGroup(),
null, channel);
rpcContext.holdInIdentifiedChannels(IDENTIFIED_CHANNELS);
String clientIdentified = rpcContext.getApplicationId() + Constants.CLIENT_ID_SPLIT_CHAR + ChannelUtil.getClientIpFromChannel(channel);
ConcurrentMap<Integer, RpcContext> clientIdentifiedMap = CollectionUtils.computeIfAbsent(TM_CHANNELS, clientIdentified, key -> new ConcurrentHashMap<>());
rpcContext.holdInClientChannels(clientIdentifiedMap);
}
public static void registerRMChannel(RegisterRMRequest resourceManagerRequest, Channel channel) throws IncompatibleVersionException {
Set<String> dbkeySet = dbKeytoSet(resourceManagerRequest.getResourceIds());
RpcContext rpcContext;
if (!IDENTIFIED_CHANNELS.containsKey(channel)) {
rpcContext = buildChannelHolder(NettyPoolKey.TransactionRole.RM_ROLE, resourceManagerRequest.getVersion(),
resourceManagerRequest.getApplicationId(), resourceManagerRequest.getTransactionServiceGroup(),
resourceManagerRequest.getResourceIds(), channel);
rpcContext.holdInIdentifiedChannels(IDENTIFIED_CHANNELS);
} else {
rpcContext = IDENTIFIED_CHANNELS.get(channel);
rpcContext.addResources(dbkeySet);
}
if (dbkeySet == null || dbkeySet.isEmpty()) {
return;
}
for (String resourceId : dbkeySet) {
String clientIp;
ConcurrentMap<Integer, RpcContext> portMap = CollectionUtils.computeIfAbsent(RM_CHANNELS, resourceId, key -> new ConcurrentHashMap<>())
.computeIfAbsent(resourceManagerRequest.getApplicationId(), key -> new ConcurrentHashMap<>())
.computeIfAbsent(clientIp = ChannelUtil.getClientIpFromChannel(channel), key -> new ConcurrentHashMap<>());
rpcContext.holdInResourceManagerChannels(resourceId, portMap);
updateChannelsResource(resourceId, clientIp, resourceManagerRequest.getApplicationId());
}
}
这两个方法逻辑很简单,就是基于注册请求和 Channel 的信息构建 RpcContext,维护 Server 内的相关 Map 集合,IDENTIFIED_CHANNELS、RM_CHANNELS、TM_CHANNELS。
但是,说实话,这几个集合实在是嵌套的有点深,不知道能不能优化一下。
private static final ConcurrentMap<Channel, RpcContext> IDENTIFIED_CHANNELS = new ConcurrentHashMap<>();
private static final ConcurrentMap<String, ConcurrentMap<String, ConcurrentMap<String,
ConcurrentMap<Integer, RpcContext>>>> RM_CHANNELS = new ConcurrentHashMap<>();
private static final ConcurrentMap<String, ConcurrentMap<Integer, RpcContext>> TM_CHANNELS = new ConcurrentHashMap<>();
获取 Channel
在 Server 这边,获取 Channel 的逻辑,真的是超长,感兴趣自己看看吧,本质上就是从 map 中拿到一个有效的 Channel。
public static Channel getChannel(String resourceId, String clientId, boolean tryOtherApp) {
Channel resultChannel = null;
String[] clientIdInfo = parseClientId(clientId);
if (clientIdInfo == null || clientIdInfo.length != 3) {
throw new FrameworkException("Invalid Client ID: " + clientId);
}
if (StringUtils.isBlank(resourceId)) {
if (LOGGER.isInfoEnabled()) {
LOGGER.info("No channel is available, resourceId is null or empty");
}
return null;
}
String targetApplicationId = clientIdInfo[0];
String targetIP = clientIdInfo[1];
int targetPort = Integer.parseInt(clientIdInfo[2]);
ConcurrentMap<String, ConcurrentMap<String, ConcurrentMap<Integer, RpcContext>>> applicationIdMap = RM_CHANNELS.get(resourceId);
if (targetApplicationId == null || applicationIdMap == null || applicationIdMap.isEmpty()) {
if (LOGGER.isInfoEnabled()) {
LOGGER.info("No channel is available for resource[{}]", resourceId);
}
return null;
}
ConcurrentMap<String, ConcurrentMap<Integer, RpcContext>> ipMap = applicationIdMap.get(targetApplicationId);
if (ipMap != null && !ipMap.isEmpty()) {
ConcurrentMap<Integer, RpcContext> portMapOnTargetIP = ipMap.get(targetIP);
if (portMapOnTargetIP != null && !portMapOnTargetIP.isEmpty()) {
RpcContext exactRpcContext = portMapOnTargetIP.get(targetPort);
if (exactRpcContext != null) {
Channel channel = exactRpcContext.getChannel();
if (channel.isActive()) {
resultChannel = channel;
if (LOGGER.isDebugEnabled()) {
LOGGER.debug("Just got exactly the one {} for {}", channel, clientId);
}
} else {
if (portMapOnTargetIP.remove(targetPort, exactRpcContext)) {
if (LOGGER.isInfoEnabled()) {
LOGGER.info("Removed inactive {}", channel);
}
}
}
}
if (resultChannel == null) {
for (ConcurrentMap.Entry<Integer, RpcContext> portMapOnTargetIPEntry : portMapOnTargetIP.entrySet()) {
Channel channel = portMapOnTargetIPEntry.getValue().getChannel();
if (channel.isActive()) {
resultChannel = channel;
if (LOGGER.isInfoEnabled()) {
LOGGER.info(
"Choose {} on the same IP[{}] as alternative of {}", channel, targetIP, clientId);
}
break;
} else {
if (portMapOnTargetIP.remove(portMapOnTargetIPEntry.getKey(),
portMapOnTargetIPEntry.getValue())) {
if (LOGGER.isInfoEnabled()) {
LOGGER.info("Removed inactive {}", channel);
}
}
}
}
}
}
if (resultChannel == null) {
for (ConcurrentMap.Entry<String, ConcurrentMap<Integer, RpcContext>> ipMapEntry : ipMap.entrySet()) {
if (ipMapEntry.getKey().equals(targetIP)) {
continue;
}
ConcurrentMap<Integer, RpcContext> portMapOnOtherIP = ipMapEntry.getValue();
if (portMapOnOtherIP == null || portMapOnOtherIP.isEmpty()) {
continue;
}
for (ConcurrentMap.Entry<Integer, RpcContext> portMapOnOtherIPEntry : portMapOnOtherIP.entrySet()) {
Channel channel = portMapOnOtherIPEntry.getValue().getChannel();
if (channel.isActive()) {
resultChannel = channel;
if (LOGGER.isInfoEnabled()) {
LOGGER.info("Choose {} on the same application[{}] as alternative of {}", channel, targetApplicationId, clientId);
}
break;
} else {
if (portMapOnOtherIP.remove(portMapOnOtherIPEntry.getKey(), portMapOnOtherIPEntry.getValue())) {
if (LOGGER.isInfoEnabled()) {
LOGGER.info("Removed inactive {}", channel);
}
}
}
}
if (resultChannel != null) {
break;
}
}
}
}
if (resultChannel == null && tryOtherApp) {
resultChannel = tryOtherApp(applicationIdMap, targetApplicationId);
if (resultChannel == null) {
if (LOGGER.isInfoEnabled()) {
LOGGER.info("No channel is available for resource[{}] as alternative of {}", resourceId, clientId);
}
} else {
if (LOGGER.isInfoEnabled()) {
LOGGER.info("Choose {} on the same resource[{}] as alternative of {}", resultChannel, resourceId, clientId);
}
}
}
return resultChannel;
}
private static Channel tryOtherApp(ConcurrentMap<String, ConcurrentMap<String, ConcurrentMap<Integer, RpcContext>>> applicationIdMap, String myApplicationId) {
Channel chosenChannel = null;
for (ConcurrentMap.Entry<String, ConcurrentMap<String, ConcurrentMap<Integer, RpcContext>>> applicationIdMapEntry : applicationIdMap.entrySet()) {
if (!StringUtils.isNullOrEmpty(myApplicationId) && applicationIdMapEntry.getKey().equals(myApplicationId)) {
continue;
}
ConcurrentMap<String, ConcurrentMap<Integer, RpcContext>> targetIPMap = applicationIdMapEntry.getValue();
if (targetIPMap == null || targetIPMap.isEmpty()) {
continue;
}
for (ConcurrentMap.Entry<String, ConcurrentMap<Integer, RpcContext>> targetIPMapEntry : targetIPMap.entrySet()) {
ConcurrentMap<Integer, RpcContext> portMap = targetIPMapEntry.getValue();
if (portMap == null || portMap.isEmpty()) {
continue;
}
for (ConcurrentMap.Entry<Integer, RpcContext> portMapEntry : portMap.entrySet()) {
Channel channel = portMapEntry.getValue().getChannel();
if (channel.isActive()) {
chosenChannel = channel;
break;
} else {
if (portMap.remove(portMapEntry.getKey(), portMapEntry.getValue())) {
if (LOGGER.isInfoEnabled()) {
LOGGER.info("Removed inactive {}", channel);
}
}
}
}
if (chosenChannel != null) {
break;
}
}
if (chosenChannel != null) {
break;
}
}
return chosenChannel;
}
一图总结
最后,再以一个时序图来总结一下 Channel 的管理过程。
Seata 如何设计协议
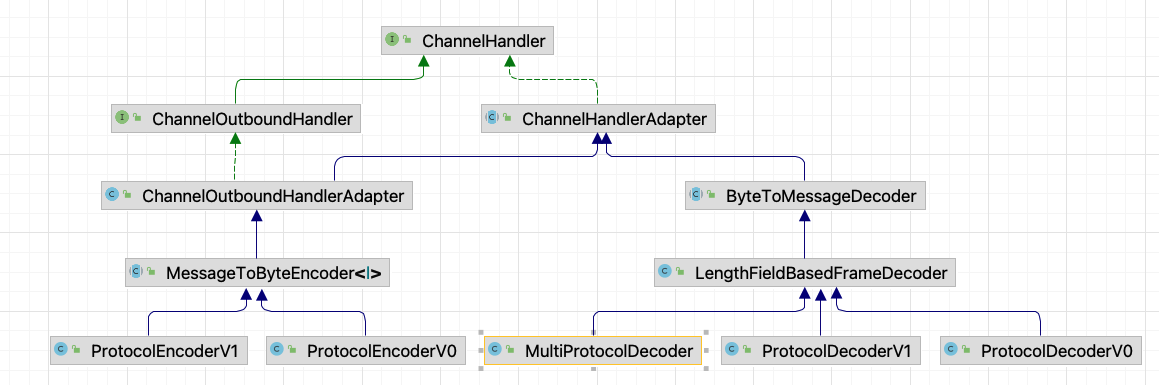
对于一个网络程序而言,通信协议是必不可少的,Seata 也不例外,这里我们就看看 Seata V1 版本的协议是如何实现的。
与之相关类主要有 ProtocolEncoderV1、ProtocolDecoderV1。
当然,我们前面也知道 Seata Server 启动时加入的处理器其实是 MultiProtocolDecoder,在这个类的 decode 方法中,如下:
protected Object decode(ChannelHandlerContext ctx, ByteBuf in) throws Exception {
ByteBuf frame;
Object decoded;
byte version;
try {
if (isV0(in)) {
decoded = in;
version = ProtocolConstants.VERSION_0;
} else {
decoded = super.decode(ctx, in);
version = decideVersion(decoded);
}
if (decoded instanceof ByteBuf) {
frame = (ByteBuf) decoded;
ProtocolDecoder decoder = protocolDecoderMap.get(version);
ProtocolEncoder encoder = protocolEncoderMap.get(version);
try {
if (decoder == null || encoder == null) {
throw new UnsupportedOperationException("Unsupported version: " + version);
}
return decoder.decodeFrame(frame);
} finally {
if (version != ProtocolConstants.VERSION_0) {
frame.release();
}
ctx.pipeline().addLast((ChannelHandler) decoder);
ctx.pipeline().addLast((ChannelHandler) encoder);
if (channelHandlers != null) {
ctx.pipeline().addLast(channelHandlers);
}
ctx.pipeline().remove(this);
}
}
} catch (Exception exx) {
LOGGER.error("Decode frame error, cause: {}", exx.getMessage());
throw new DecodeException(exx);
}
return decoded;
}
所以,这里选择好与 version 对应的编解码器,然后加入到 pipeline 中,就会将 MultiProtocolDecoder 移除。
V1 版本协议
Seata 的协议设计是比较周全并且通用的,也是主流的解决粘包半包问题的解决方案,即消息长度 + 消息内容。
协议的格式如下:
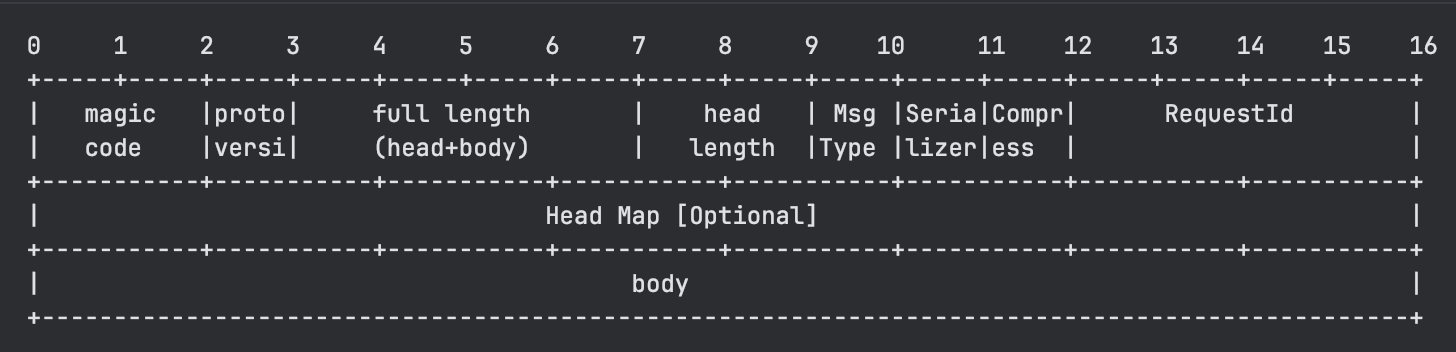
可以看到,包括魔数、协议版本号、长��度域、头长度、报文类型、序列化算法、压缩算法、请求 id、可选的 map 扩展以及报文体。
如何进行编解码
Seata 解码器使用了 Netty 内置的 LengthFieldBasedFrameDecoder,不熟悉的可以看看。
不过编解码并不难,所以简单给出代码,不过多解释。
package org.apache.seata.core.rpc.netty.v1;
import io.netty.buffer.ByteBuf;
import io.netty.channel.ChannelHandlerContext;
import io.netty.handler.codec.MessageToByteEncoder;
import org.apache.seata.core.rpc.netty.ProtocolEncoder;
import org.apache.seata.core.serializer.Serializer;
import org.apache.seata.core.compressor.Compressor;
import org.apache.seata.core.compressor.CompressorFactory;
import org.apache.seata.core.protocol.ProtocolConstants;
import org.apache.seata.core.protocol.RpcMessage;
import org.apache.seata.core.serializer.SerializerServiceLoader;
import org.apache.seata.core.serializer.SerializerType;
import org.slf4j.Logger;
import org.slf4j.LoggerFactory;
import java.util.Map;
public class ProtocolEncoderV1 extends MessageToByteEncoder implements ProtocolEncoder {
private static final Logger LOGGER = LoggerFactory.getLogger(ProtocolEncoderV1.class);
public void encode(RpcMessage message, ByteBuf out) {
try {
ProtocolRpcMessageV1 rpcMessage = new ProtocolRpcMessageV1();
rpcMessage.rpcMsgToProtocolMsg(message);
int fullLength = ProtocolConstants.V1_HEAD_LENGTH;
int headLength = ProtocolConstants.V1_HEAD_LENGTH;
byte messageType = rpcMessage.getMessageType();
out.writeBytes(ProtocolConstants.MAGIC_CODE_BYTES);
out.writeByte(ProtocolConstants.VERSION_1);
out.writerIndex(out.writerIndex() + 6);
out.writeByte(messageType);
out.writeByte(rpcMessage.getCodec());
out.writeByte(rpcMessage.getCompressor());
out.writeInt(rpcMessage.getId());
Map<String, String> headMap = rpcMessage.getHeadMap();
if (headMap != null && !headMap.isEmpty()) {
int headMapBytesLength = HeadMapSerializer.getInstance().encode(headMap, out);
headLength += headMapBytesLength;
fullLength += headMapBytesLength;
}
byte[] bodyBytes = null;
if (messageType != ProtocolConstants.MSGTYPE_HEARTBEAT_REQUEST && messageType != ProtocolConstants.MSGTYPE_HEARTBEAT_RESPONSE) {
Serializer serializer = SerializerServiceLoader.load(SerializerType.getByCode(rpcMessage.getCodec()), ProtocolConstants.VERSION_1);
bodyBytes = serializer.serialize(rpcMessage.getBody());
Compressor compressor = CompressorFactory.getCompressor(rpcMessage.getCompressor());
bodyBytes = compressor.compress(bodyBytes);
fullLength += bodyBytes.length;
}
if (bodyBytes != null) {
out.writeBytes(bodyBytes);
}
int writeIndex = out.writerIndex();
out.writerIndex(writeIndex - fullLength + 3);
out.writeInt(fullLength);
out.writeShort(headLength);
out.writerIndex(writeIndex);
} catch (Throwable e) {
LOGGER.error("Encode request error!", e);
throw e;
}
}
@Override
protected void encode(ChannelHandlerContext ctx, Object msg, ByteBuf out) throws Exception {
try {
if (msg instanceof RpcMessage) {
this.encode((RpcMessage) msg, out);
} else {
throw new UnsupportedOperationException("Not support this class:" + msg.getClass());
}
} catch (Throwable e) {
LOGGER.error("Encode request error!", e);
}
}
}
package org.apache.seata.core.rpc.netty.v1;
import java.util.List;
import java.util.Map;
import io.netty.buffer.ByteBuf;
import io.netty.channel.ChannelHandlerContext;
import io.netty.handler.codec.LengthFieldBasedFrameDecoder;
import org.apache.seata.core.compressor.Compressor;
import org.apache.seata.core.compressor.CompressorFactory;
import org.apache.seata.core.exception.DecodeException;
import org.apache.seata.core.protocol.HeartbeatMessage;
import org.apache.seata.core.protocol.ProtocolConstants;
import org.apache.seata.core.protocol.RpcMessage;
import org.apache.seata.core.rpc.netty.ProtocolDecoder;
import org.apache.seata.core.serializer.Serializer;
import org.apache.seata.core.serializer.SerializerServiceLoader;
import org.apache.seata.core.serializer.SerializerType;
import org.slf4j.Logger;
import org.slf4j.LoggerFactory;
public class ProtocolDecoderV1 extends LengthFieldBasedFrameDecoder implements ProtocolDecoder {
private static final Logger LOGGER = LoggerFactory.getLogger(ProtocolDecoderV1.class);
private final List<SerializerType> supportDeSerializerTypes;
public ProtocolDecoderV1() {
super(ProtocolConstants.MAX_FRAME_LENGTH, 3, 4, -7, 0);
supportDeSerializerTypes = SerializerServiceLoader.getSupportedSerializers();
if (supportDeSerializerTypes.isEmpty()) {
throw new IllegalArgumentException("No serializer found");
}
}
@Override
public RpcMessage decodeFrame(ByteBuf frame) {
byte b0 = frame.readByte();
byte b1 = frame.readByte();
if (ProtocolConstants.MAGIC_CODE_BYTES[0] != b0 || ProtocolConstants.MAGIC_CODE_BYTES[1] != b1) {
throw new IllegalArgumentException("Unknown magic code: " + b0 + ", " + b1);
}
byte version = frame.readByte();
int fullLength = frame.readInt();
short headLength = frame.readShort();
byte messageType = frame.readByte();
byte codecType = frame.readByte();
byte compressorType = frame.readByte();
int requestId = frame.readInt();
ProtocolRpcMessageV1 rpcMessage = new ProtocolRpcMessageV1();
rpcMessage.setCodec(codecType);
rpcMessage.setId(requestId);
rpcMessage.setCompressor(compressorType);
rpcMessage.setMessageType(messageType);
int headMapLength = headLength - ProtocolConstants.V1_HEAD_LENGTH;
if (headMapLength > 0) {
Map<String, String> map = HeadMapSerializer.getInstance().decode(frame, headMapLength);
rpcMessage.getHeadMap().putAll(map);
}
if (messageType == ProtocolConstants.MSGTYPE_HEARTBEAT_REQUEST) {
rpcMessage.setBody(HeartbeatMessage.PING);
} else if (messageType == ProtocolConstants.MSGTYPE_HEARTBEAT_RESPONSE) {
rpcMessage.setBody(HeartbeatMessage.PONG);
} else {
int bodyLength = fullLength - headLength;
if (bodyLength > 0) {
byte[] bs = new byte[bodyLength];
frame.readBytes(bs);
Compressor compressor = CompressorFactory.getCompressor(compressorType);
bs = compressor.decompress(bs);
SerializerType protocolType = SerializerType.getByCode(rpcMessage.getCodec());
if (this.supportDeSerializerTypes.contains(protocolType)) {
Serializer serializer = SerializerServiceLoader.load(protocolType, ProtocolConstants.VERSION_1);
rpcMessage.setBody(serializer.deserialize(bs));
} else {
throw new IllegalArgumentException("SerializerType not match");
}
}
}
return rpcMessage.protocolMsgToRpcMsg();
}
@Override
protected Object decode(ChannelHandlerContext ctx, ByteBuf in) throws Exception {
Object decoded;
try {
decoded = super.decode(ctx, in);
if (decoded instanceof ByteBuf) {
ByteBuf frame = (ByteBuf) decoded;
try {
return decodeFrame(frame);
} finally {
frame.release();
}
}
} catch (Exception exx) {
LOGGER.error("Decode frame error, cause: {}", exx.getMessage());
throw new DecodeException(exx);
}
return decoded;
}
}
就目前看来,Seata 的网络通信实现的是比较容易看懂的,不过,这篇文章的分析也仅仅只是浮于表面,对深层次的更加重要的代码健壮性、异常处理、优雅关闭等问题都没有聊到,看后面有新的理解再分析分析。
原文链接


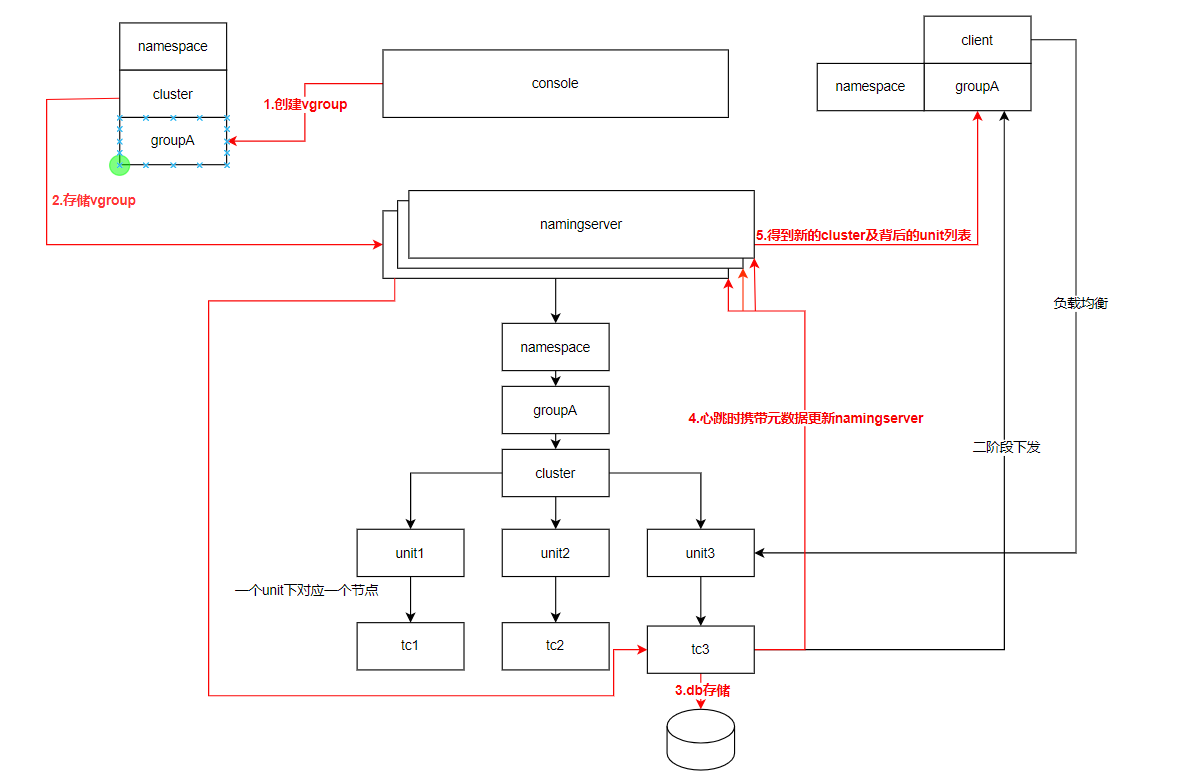
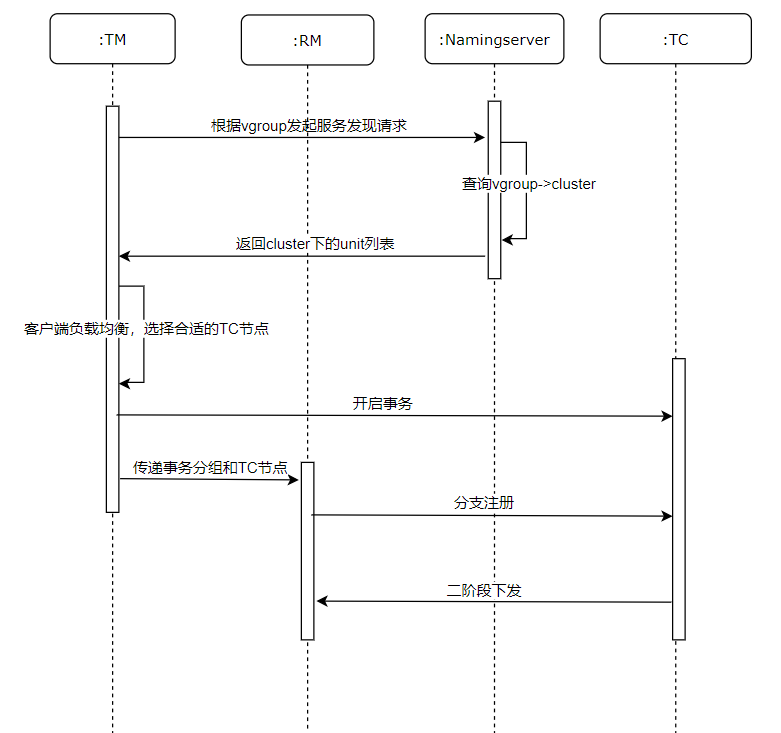 事务处理流程与namingserver的交互的流程如下:


 博客,仅次于官方文档的材料,一般是开发者或者是深度用户编写的,和文档不同的点在于博客可能会更深入到某个专项上去介绍,比如一些项目的理论模型、项目结构、某个模块的源码分析等等。
 公众号,和博客类似,一般是偏技术性的文章,公众号还有个优点是可以订阅推送,利用碎片时间阅读一些技术。
 此外,开源社区的一些在线分享或线下 Meetup 公开的幻灯片也是非常有意义的文本资料。
 除了官方资料之外,还有许多第三方资料可供学习,比如可以通过用户分享的 use cases 了解项目的具体实施和实践;通过第三方社区的集成文档了解项目的生态;还有就是通过第三方的视频教程来学习。但在所有这些资料中,我认为官方文档和博客是最有帮助的。
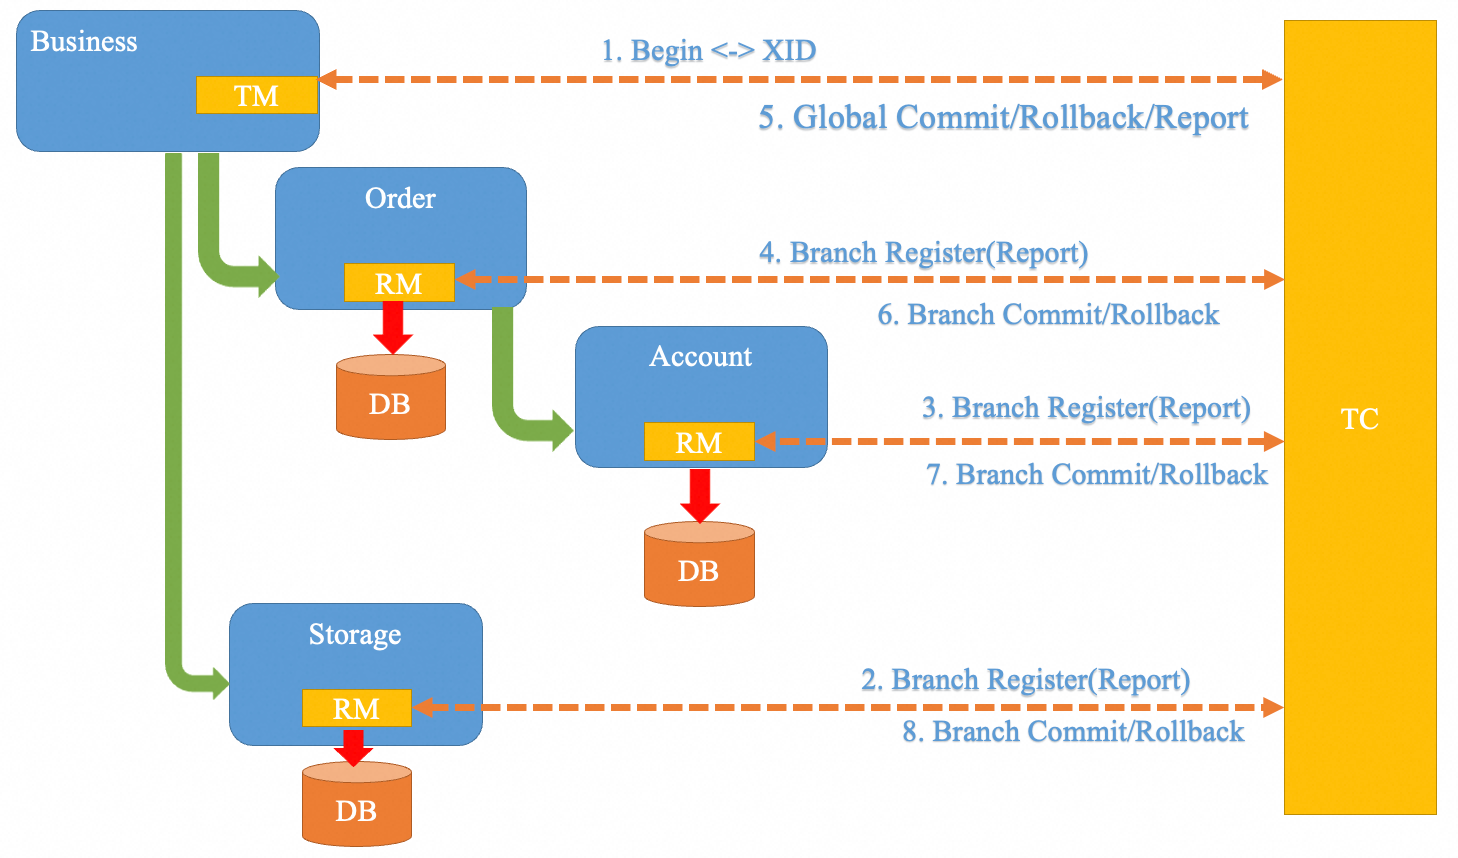 脑海里刻下了这些模型的印象,对源码的主干提取就相对得心应手了一些。比如 Seata TC 事务协调者,作为 Server 端,是一个独立于业务部署的单独应用。那为了分析源码,就可以直接在本地把 server 起起来,通过启动类开始追踪。可以分析到一些初始化的逻辑比如服务注册、全局锁的初始化等等。还有可以通过 RPC 的调用来追踪到交互逻辑的代码,比如 TC 是如何对全局事务和分支事务进行持久化,如何驱动全局事务提交或者回滚的。
然而内嵌客户端的框架代码,没有一个启动类入口可以入手分析。那其实可以从一个 sample 入手,找到其对框架代码的引用从而进行阅读。比如 Seata 一个很重要的注解是
脑海里刻下了这些模型的印象,对源码的主干提取就相对得心应手了一些。比如 Seata TC 事务协调者,作为 Server 端,是一个独立于业务部署的单独应用。那为了分析源码,就可以直接在本地把 server 起起来,通过启动类开始追踪。可以分析到一些初始化的逻辑比如服务注册、全局锁的初始化等等。还有可以通过 RPC 的调用来追踪到交互逻辑的代码,比如 TC 是如何对全局事务和分支事务进行持久化,如何驱动全局事务提交或者回滚的。
然而内嵌客户端的框架代码,没有一个启动类入口可以入手分析。那其实可以从一个 sample 入手,找到其对框架代码的引用从而进行阅读。比如 Seata 一个很重要的注解是 
