【分布式事务Seata源码解读二】Client端启动流程
本文从源码的角度分析一下AT模式下Client端启动流程,所谓的Client端,即业务应用方。分布式事务分为三个模块:TC、TM、RM。其中TC位于seata-server端,而TM、RM通过SDK的方式运行在client端。
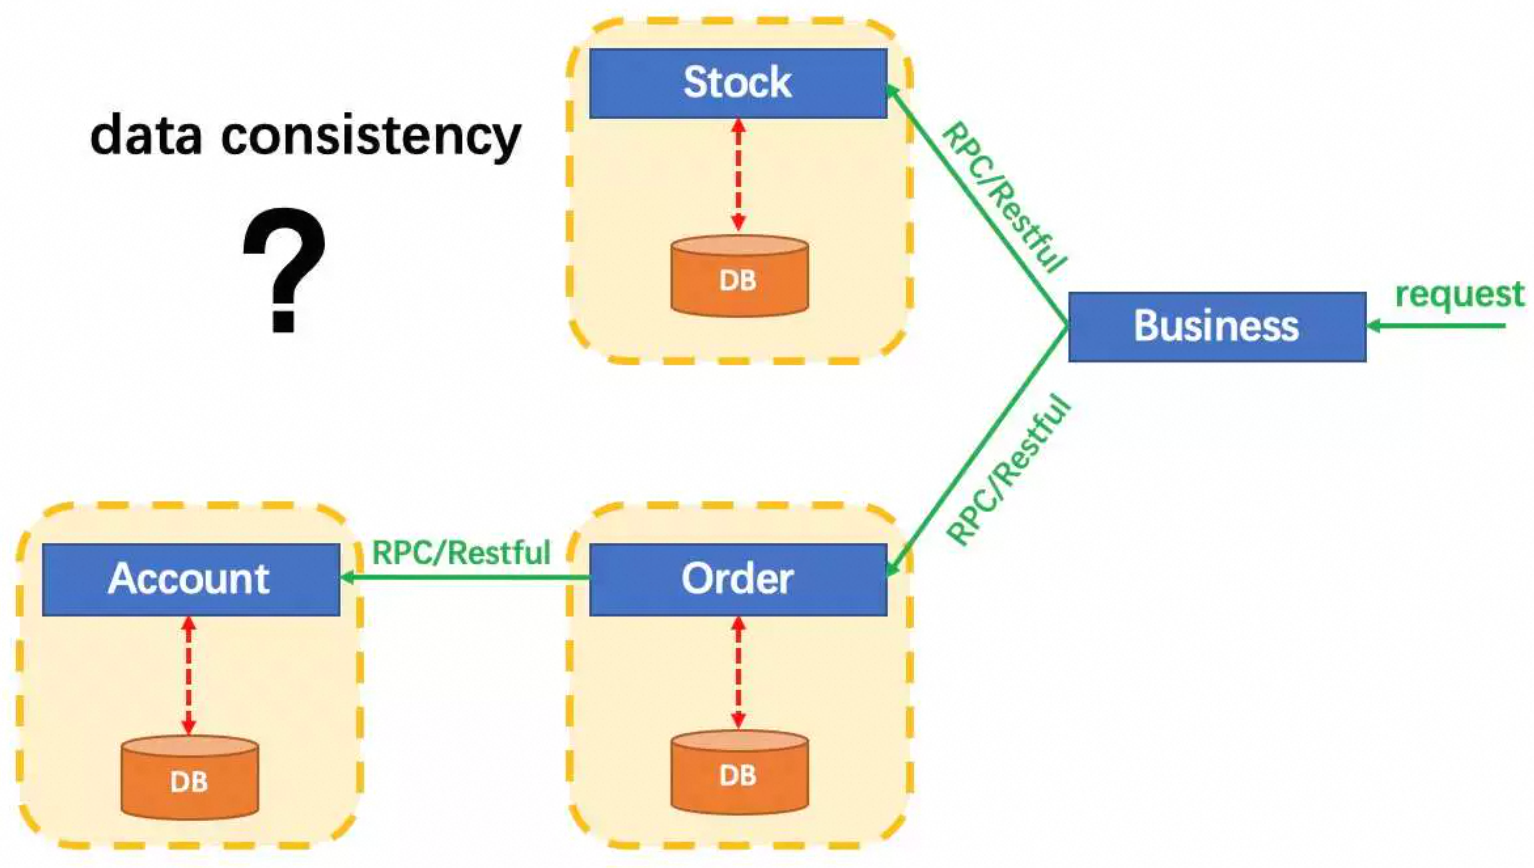
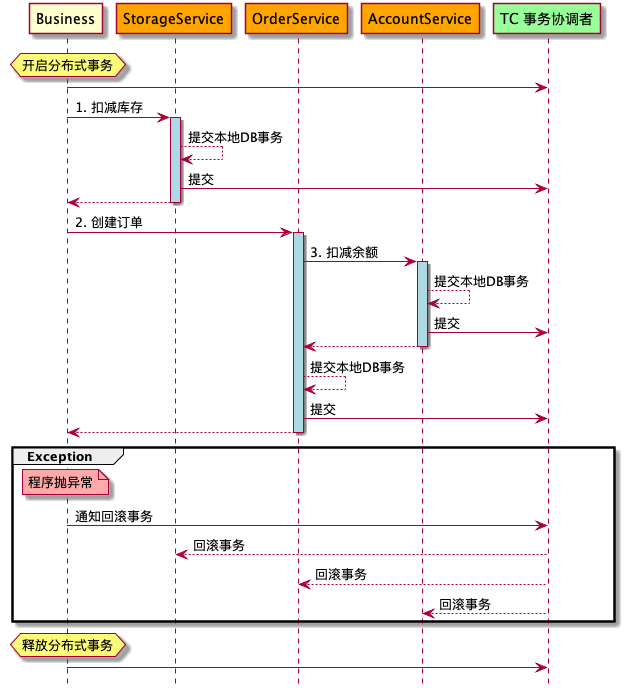
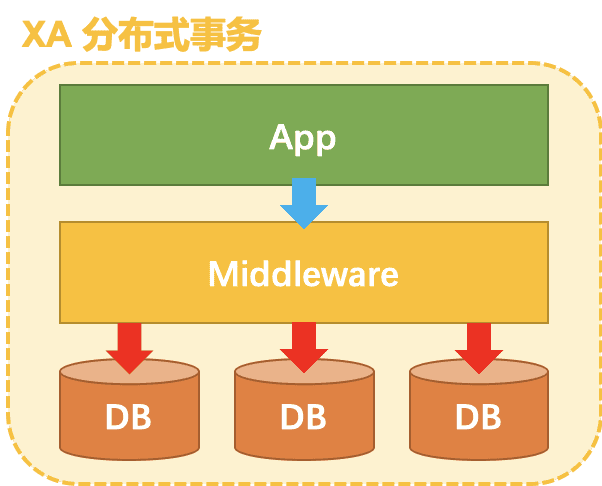
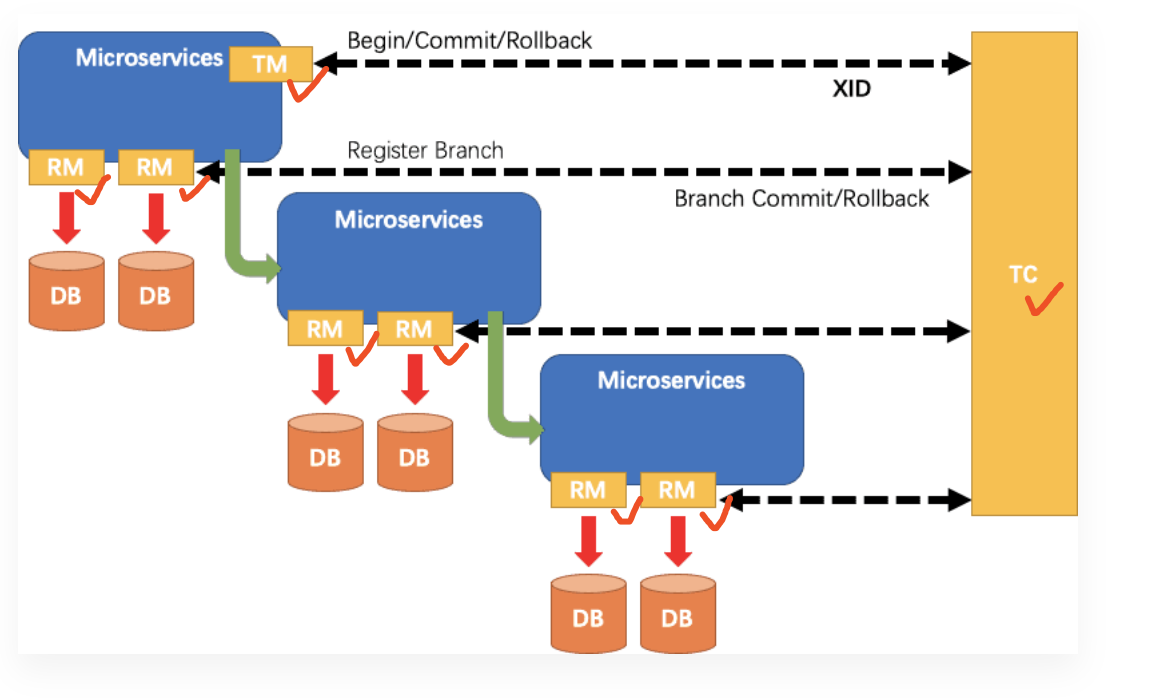
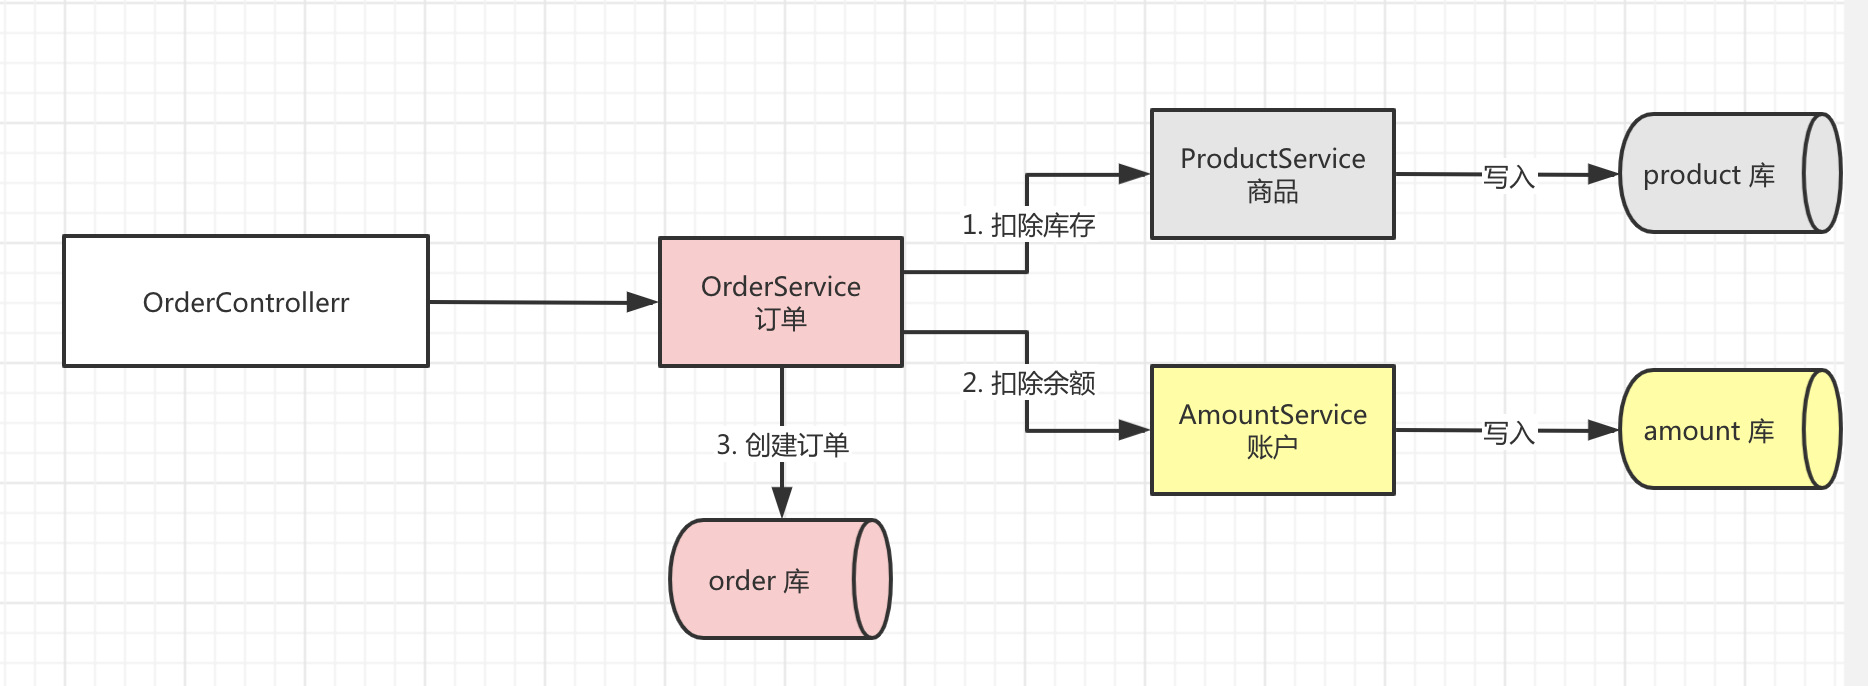
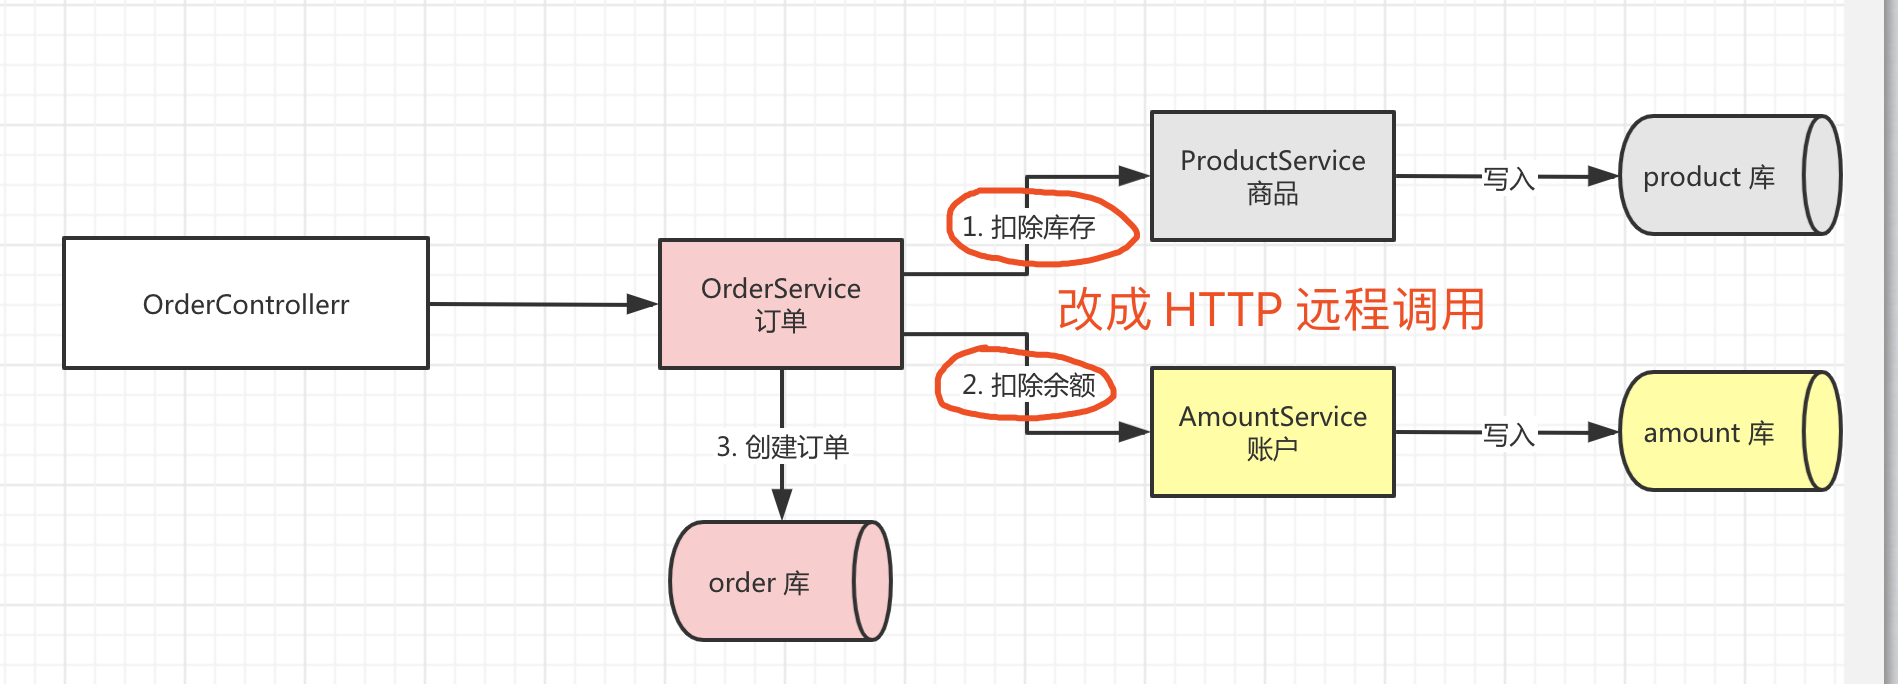
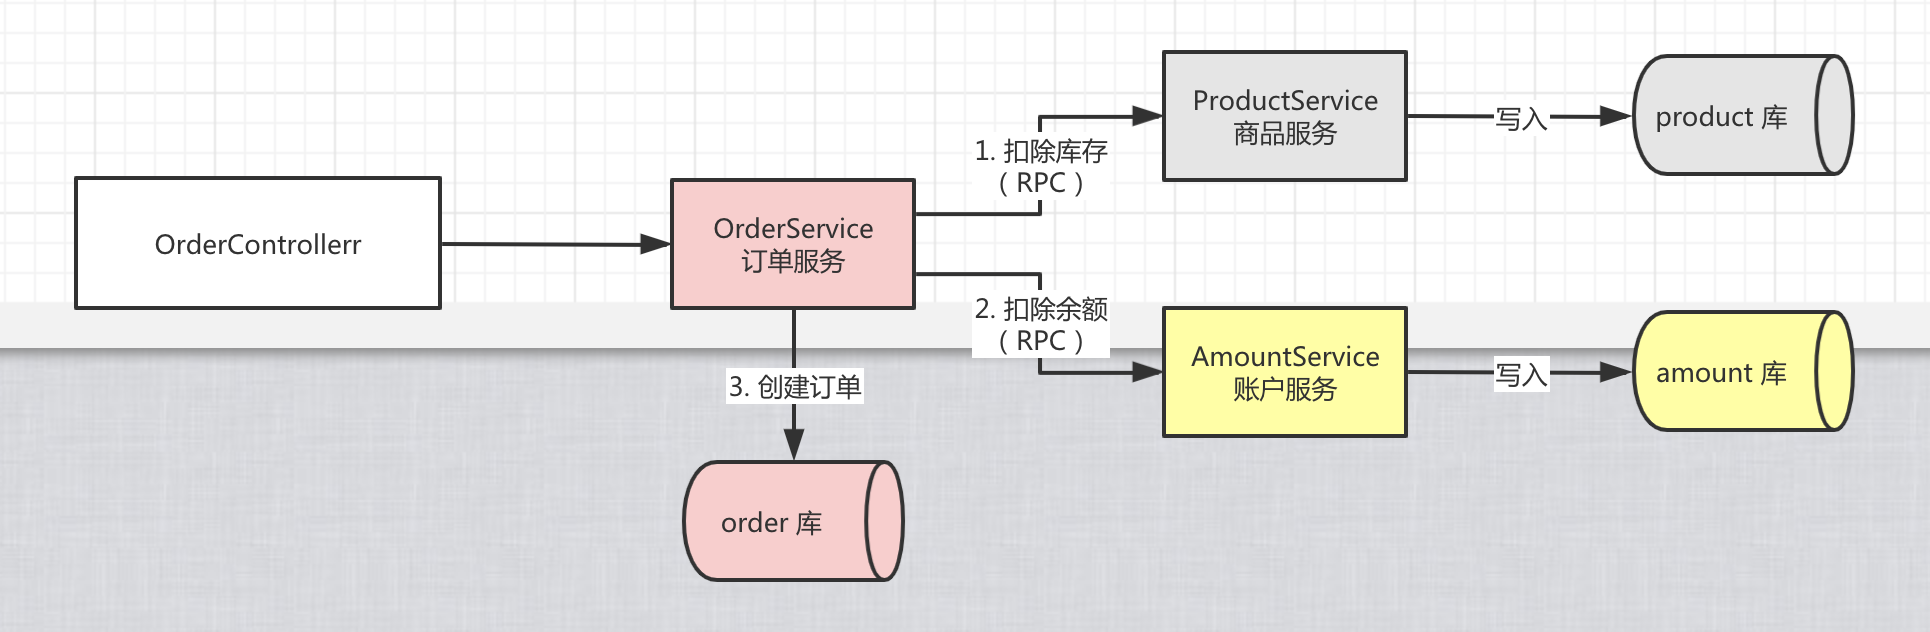
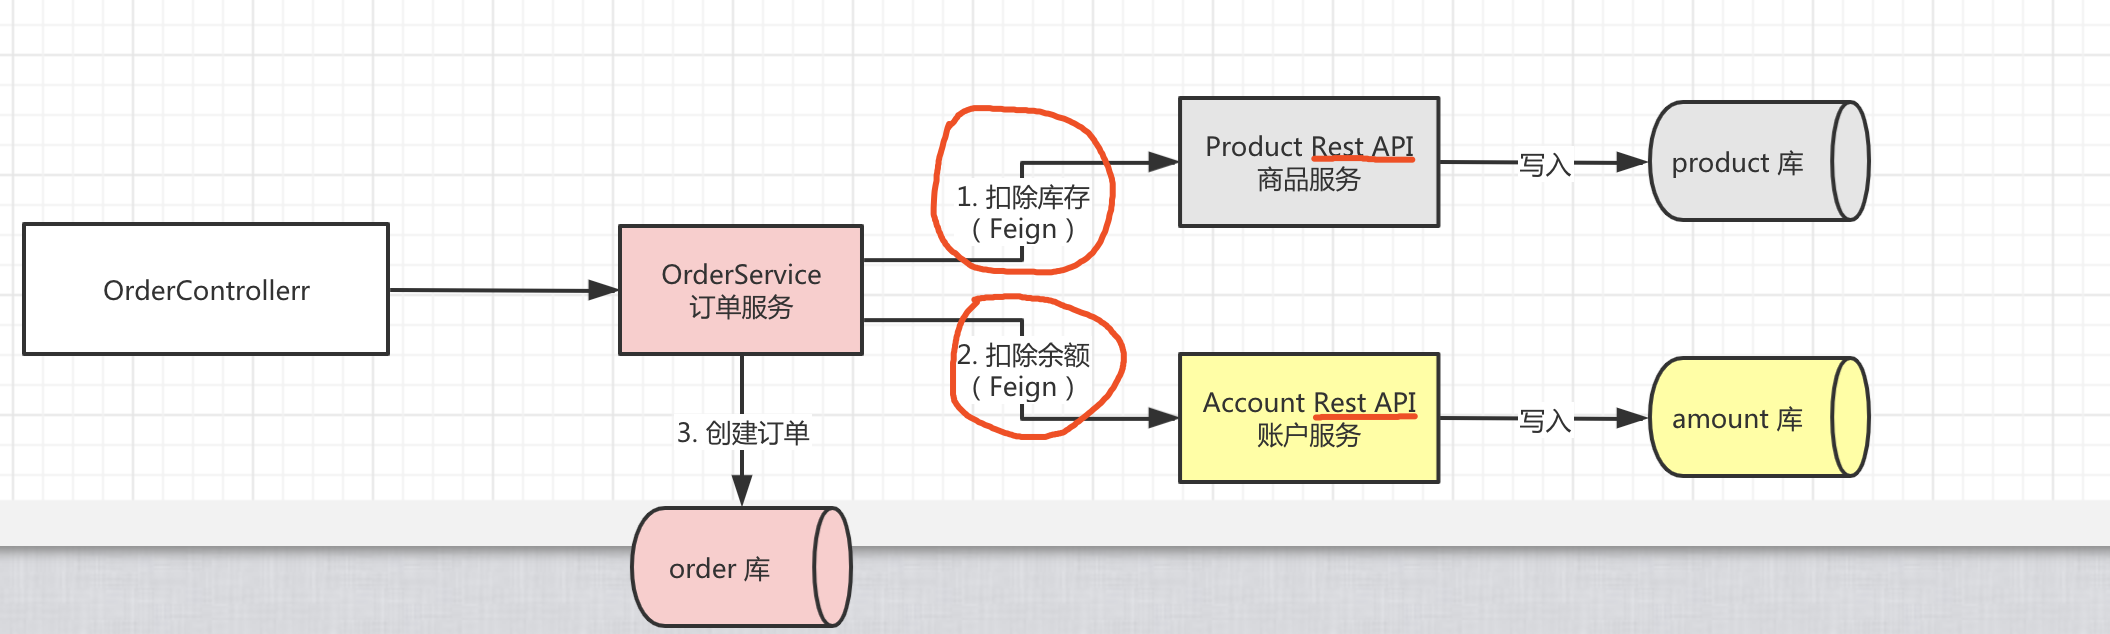
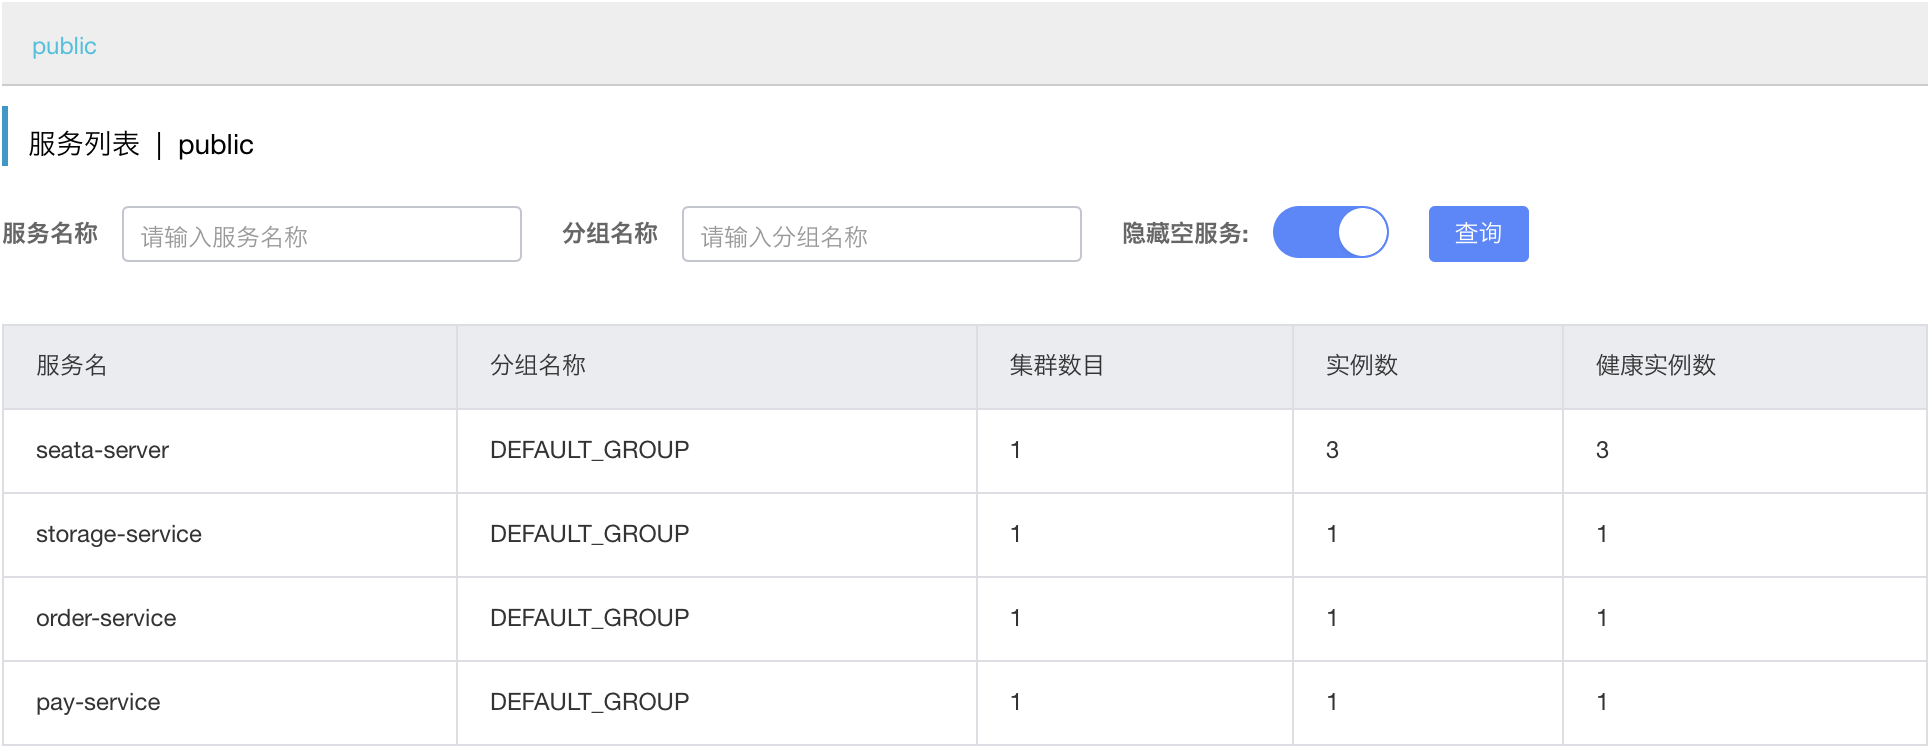
下图展示了Seata官方Demo的一个分布式事务场景,分为如下几个微服务,共同实现了一个下订单、扣库存、扣余额的分布式事务。
- BusinessService: 业务服务,下单服务的入口
- StorageService: 库存微服务,用于扣减商品库存
- OrderService: 订单微服务,创建订单
- AccountService: 账户微服务,扣减用户账户的余额
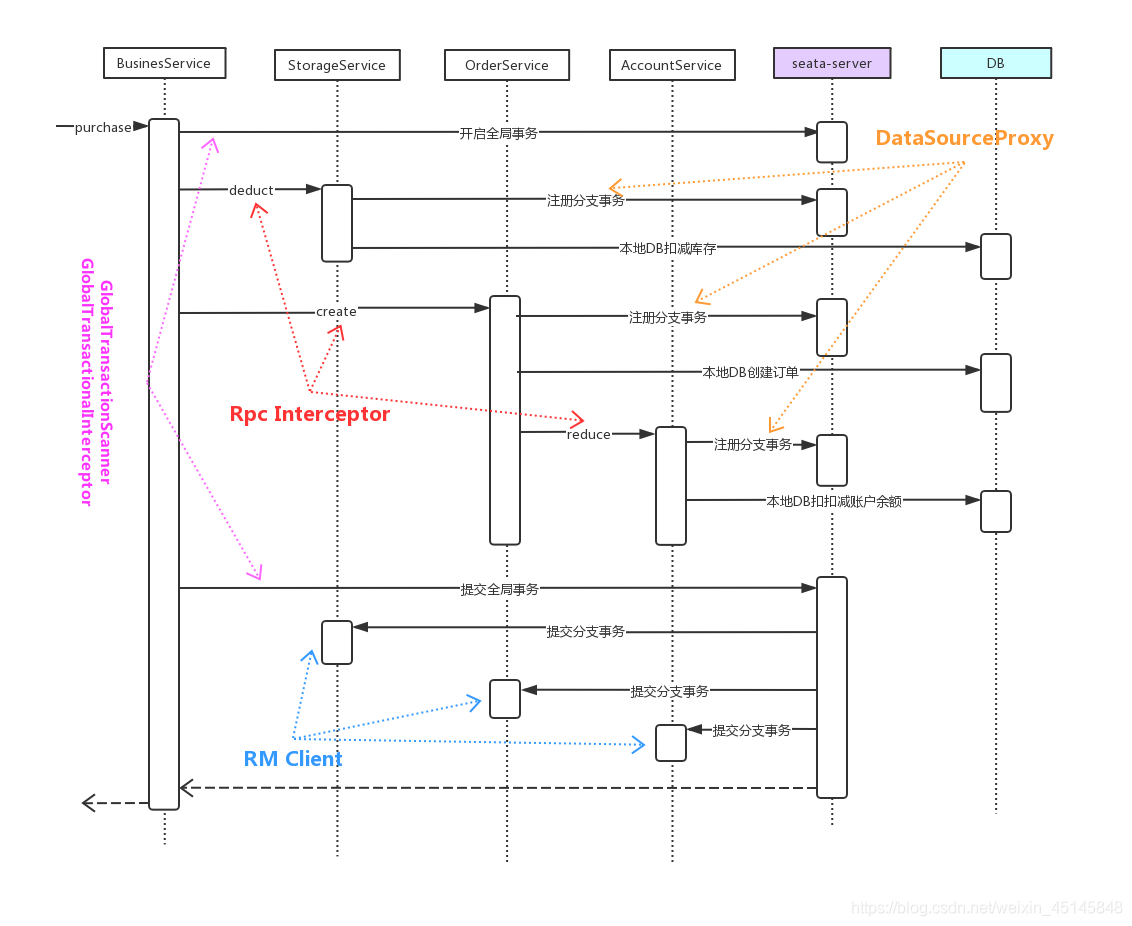
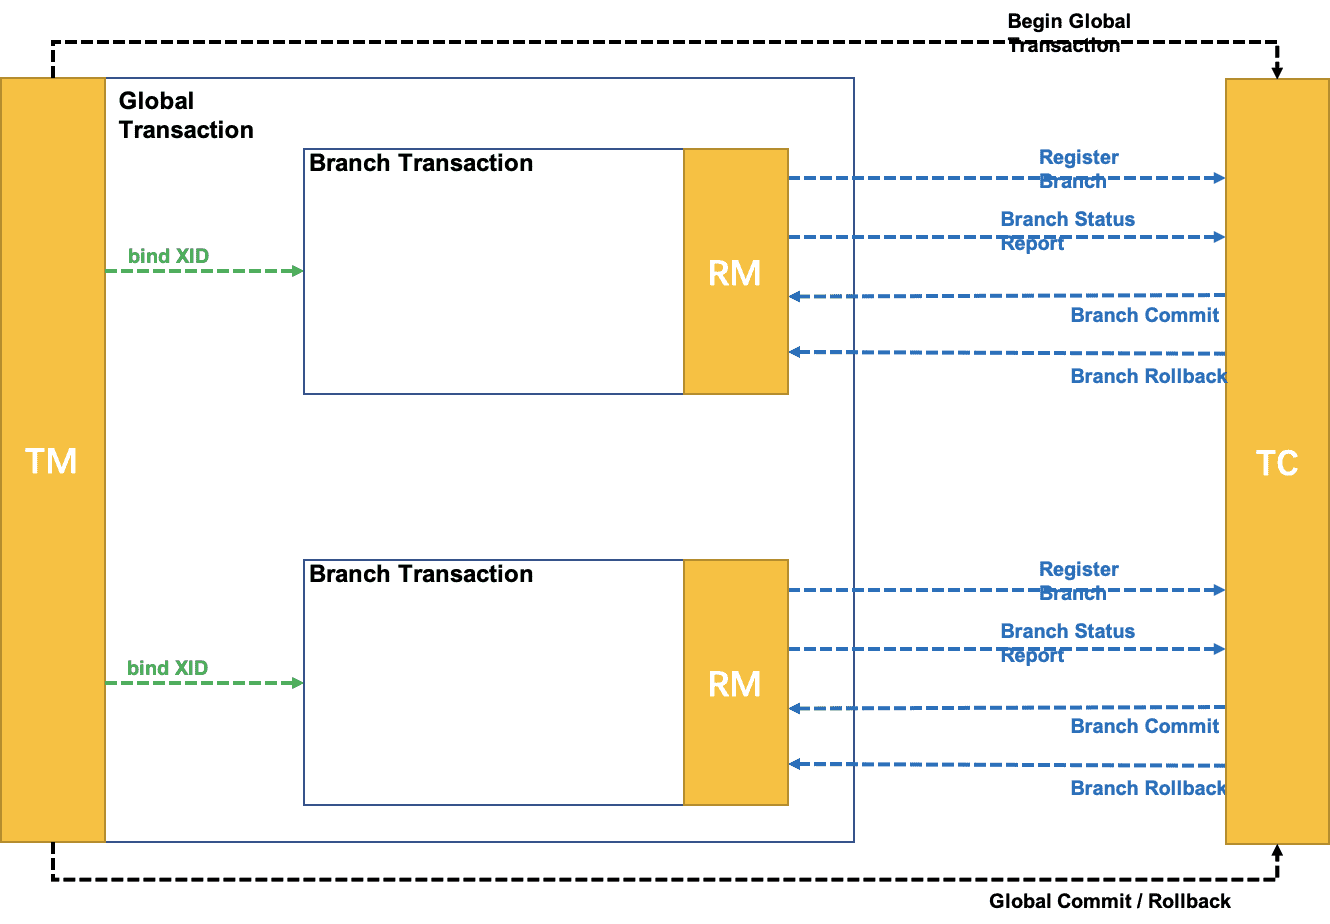
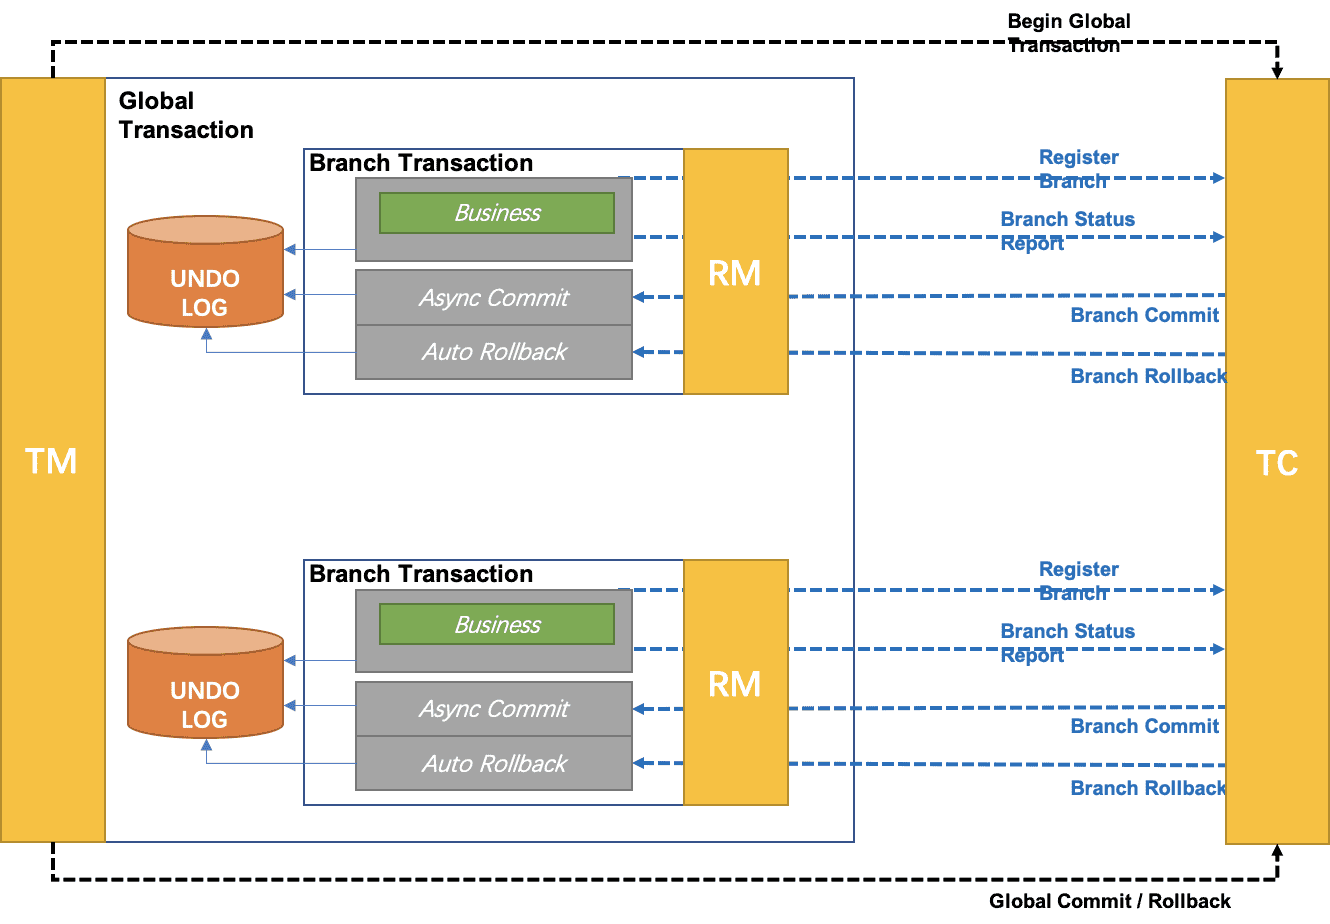
从上图也可以看出,在AT模式下Seata Client端主要通过如下三个模块来实现分布式事务:
- GlobalTransactionScanner: GlobalTransactionScanner负责初始TM、RM模块,并为添加分布式事务注解的方法添加拦截器,拦截器负责全局事务的开启、提交或回滚
- DatasourceProxy: DatasourceProxy为DataSource添加拦截,拦截器会拦截所有SQL执行,并作为RM事务参与方的角色参与分布式事务执行。
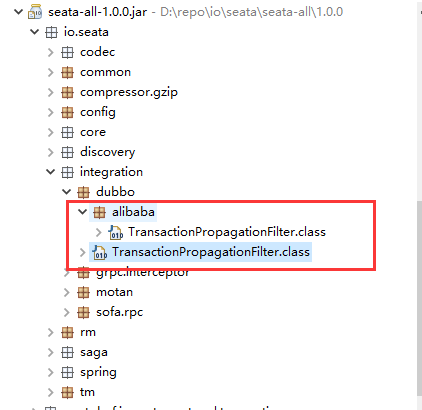
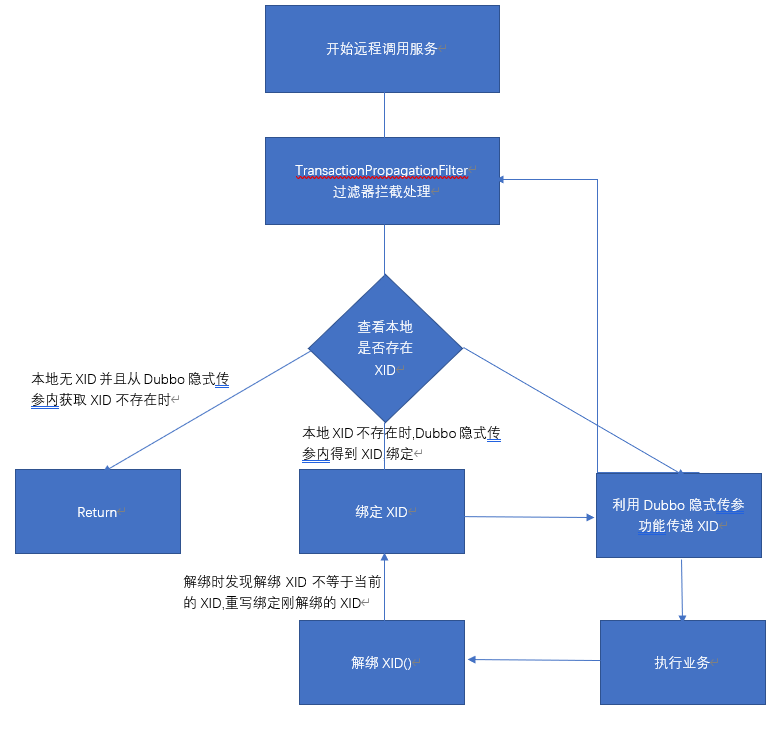
- Rpc Interceptor: 在上一篇分布式事务Seata源码解读一中有提到分布式事务的几个核心要点,其中有一个是分布式事务的跨服务实例传播。Rpc Interceptor的职责就是负责在多个微服务之间传播事务。
seata-spring-boot-starter
引用seata分布式事务SDK有两种方式,依赖seata-all或者seata-spring-boot-starter,推荐使用seata-spring-boot-starter,因为该starter已经自动注入了上面提到的三个模块,用户只要添加相应的配置,在业务代码添加全局分布式事务注解即可。下面从seata-spring-boot-starter项目中的代码入手:
如下图所示是seata-spring-boot-starter的项目结构:
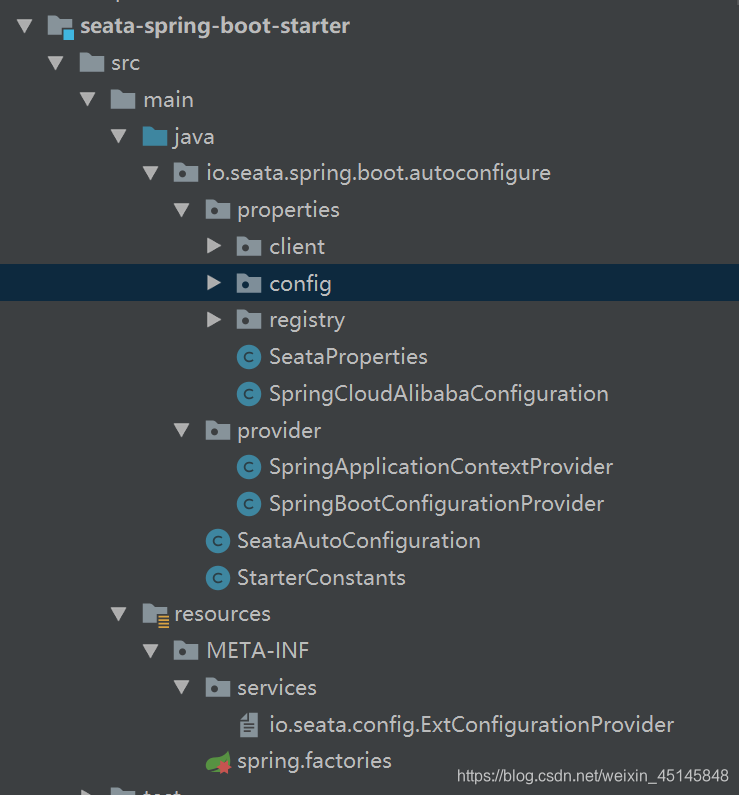 主要分为以下几个模块:
- properties: properties目录下都是Springboot 适配seata的相关配置类,即可以通过SpringBoot的配置方式来Seata的相关参数
- provider: provider目录下的类负责把Springboot、SpringCloud的配置适配到Seata配置中
- resources: resources目录下主要有两个文件,spring.factories用于注册Springboot的自动装配类,ExtConfigurationProvider用于注册SpringbootConfigurationProvider类,该Provider类负责把SpringBoot的相关配置类适配到Seata中。
对于springboot-starter项目,我们先查看resources/META-INF/spring.factories文件:
# Auto Configure
org.springframework.boot.autoconfigure.EnableAutoConfiguration=
io.seata.spring.boot.autoconfigure.SeataAutoConfiguration
可以看到在spring.factories中配置了自动装配类:SeataAutoConfiguration,在该装配类中主要注入了GlobalTransactionScanner和seataAutoDataSourceProxyCreator两个实例。代码如下:
@ComponentScan(basePackages = "io.seata.spring.boot.autoconfigure.properties")
@ConditionalOnProperty(prefix = StarterConstants.SEATA_PREFIX, name = "enabled",
        havingValue = "true",
        matchIfMissing = true)
@Configuration
@EnableConfigurationProperties({SeataProperties.class})
public class SeataAutoConfiguration {

  ...

  // GlobalTransactionScanner负责为添加GlobalTransaction注解的方法添加拦截器,
  // 并且负责初始化RM、TM
  @Bean
  @DependsOn({BEAN_NAME_SPRING_APPLICATION_CONTEXT_PROVIDER, BEAN_NAME_FAILURE_HANDLER})
  @ConditionalOnMissingBean(GlobalTransactionScanner.class)
  public GlobalTransactionScanner globalTransactionScanner(SeataProperties seataProperties,
                                                           FailureHandler failureHandler) {
    if (LOGGER.isInfoEnabled()) {
      LOGGER.info("Automatically configure Seata");
    }
    return new GlobalTransactionScanner(seataProperties.getApplicationId(),
            seataProperties.getTxServiceGroup(),
            failureHandler);
  }

  // SeataAutoDataSourceProxyCreator负责为Spring中的所有DataSource生成代理对象,
  // 从而实现拦截所有SQL的执行
  @Bean(BEAN_NAME_SEATA_AUTO_DATA_SOURCE_PROXY_CREATOR)
  @ConditionalOnProperty(prefix = StarterConstants.SEATA_PREFIX, name = {
          "enableAutoDataSourceProxy", "enable-auto" +
          "-data-source-proxy"}, havingValue = "true", matchIfMissing = true)
  @ConditionalOnMissingBean(SeataAutoDataSourceProxyCreator.class)
  public SeataAutoDataSourceProxyCreator seataAutoDataSourceProxyCreator(SeataProperties seataProperties) {
    return new SeataAutoDataSourceProxyCreator(seataProperties.isUseJdkProxy(),
            seataProperties.getExcludesForAutoProxying());
  }
}
GlobalTransactionScanner
GlobalTransactionScanner继承于AutoProxyCreator,AutoProxyCreator是Spring中实现AOP的一种方式,可以拦截Spring中的所有实例,判断是否需要进行代理。下面列出了GlobalTransactionScanner中一些比较重要的字段和拦截代理的核心方法:
public class GlobalTransactionScanner extends AbstractAutoProxyCreator
        implements InitializingBean, ApplicationContextAware,
        DisposableBean {
  ...
  // interceptor字段是对应一个代理对象的拦截器,
  // 可以认为是一个临时变量,有效期是一个被代理对象
  private MethodInterceptor interceptor;

  // globalTransactionalInterceptor是通用的Interceptor,
  // 非TCC事务方式的都使用该Interceptor
  private MethodInterceptor globalTransactionalInterceptor;

  // PROXYED_SET存储已经代理过的实例,防止重复处理
  private static final Set<String> PROXYED_SET = new HashSet<>();

  // applicationId是一个服务的唯一标识,
  // 对应springcloud项目中的spring.application.name
  private final String applicationId;
  // 事务的分组标识,参考文章wiki:https://seata.apache.org/zh-cn/docs/user/txgroup/transaction-group/
  private final String txServiceGroup;

  ...

  // 判断是否需要代理目标对象,如果需要代理,则生成拦截器赋值到类变量interceptor中
  @Override
  protected Object wrapIfNecessary(Object bean, String beanName, Object cacheKey) {
  	// 判断是否禁用分布式事务
    if (disableGlobalTransaction) {
      return bean;
    }
    try {
      synchronized (PROXYED_SET) {
        if (PROXYED_SET.contains(beanName)) {
          return bean;
        }

        // 每次处理一个被代理对象时先把interceptor置为null,所以interceptor的
        // 生命周期是一个被代理对象,由于是在另外一个方法getAdvicesAndAdvisorsForBean
        // 中使用interceptor,所以该interceptor要定义为一个类变量
        interceptor = null;

        // 判断是否是TCC事务模式,判断的主要依据是方法上是否有TwoPhaseBusinessAction注解
        if (TCCBeanParserUtils.isTccAutoProxy(bean, beanName,
                applicationContext)) {
          // 创建一个TCC事务的拦截器
          interceptor =
                  new TccActionInterceptor(TCCBeanParserUtils.getRemotingDesc(beanName));
        } else {
          // 获取待处理对象的class类型
          Class<?> serviceInterface = SpringProxyUtils.findTargetClass(bean);
          // 获取待处理对象继承的所有接口
          Class<?>[] interfacesIfJdk = SpringProxyUtils.findInterfaces(bean);

          // 如果待处理对象的class或者继承的接口上有GlobalTransactional注解,
          // 或者待处理对象的class的任一个方法上有GlobalTransactional或者
          // GlobalLock注解则返回true,即需要被代理
          if (!existsAnnotation(new Class[]{serviceInterface})
                  && !existsAnnotation(interfacesIfJdk)) {
            return bean;
          }

          // 如果interceptor为null,即不是TCC模式,
          // 则使用globalTransactionalInterceptor作为拦截器
          if (interceptor == null) {
            // globalTransactionalInterceptor只会被创建一次
            if (globalTransactionalInterceptor == null) {
              globalTransactionalInterceptor =
                      new GlobalTransactionalInterceptor(failureHandlerHook);
              ConfigurationCache.addConfigListener(
                      ConfigurationKeys.DISABLE_GLOBAL_TRANSACTION,
                      (ConfigurationChangeListener) globalTransactionalInterceptor);
            }
            interceptor = globalTransactionalInterceptor;
          }
        }

        if (!AopUtils.isAopProxy(bean)) {
          // 如果bean本身不是Proxy对象,则直接调用父类的wrapIfNecessary生成代理对象即可
          // 在父类中会调用getAdvicesAndAdvisorsForBean获取到上面定义的interceptor
          bean = super.wrapIfNecessary(bean, beanName, cacheKey);
        } else {
          // 如果该bean已经是代理对象了,则直接在代理对象的拦截调用链AdvisedSupport
          // 上直接添加新的interceptor即可。
          AdvisedSupport advised = SpringProxyUtils.getAdvisedSupport(bean);
          Advisor[] advisor = buildAdvisors(beanName,
                  getAdvicesAndAdvisorsForBean(null, null, null));
          for (Advisor avr : advisor) {
            advised.addAdvisor(0, avr);
          }
        }
        // 标识该beanName已经处理过了
        PROXYED_SET.add(beanName);
        return bean;
      }
    } catch (Exception exx) {
      throw new RuntimeException(exx);
    }
  }

  // 返回wrapIfNecessary方法中计算出的interceptor对象
  @Override
  protected Object[] getAdvicesAndAdvisorsForBean(Class beanClass, String beanName,
                                                  TargetSource customTargetSource)
          throws BeansException {
    return new Object[]{interceptor};
  }
}
上面介绍了GlobalTransactionScanner是如何通过注解拦截全局事务的,具体拦截器实现为TccActionInterceptor和GlobalTransactionalInterceptor,对于AT模式来说我们主要关心GlobalTransactionalInterceptor,在后续的文章中会介绍GlobalTransactionalInterceptor的具体实现。
另外GloabalTransactionScanner还负责TM、RM的初始化工作,是在initClient方法中实现的:
private void initClient() {
    ...

    //初始化TM
    TMClient.init(applicationId, txServiceGroup);
    ...

    //初始化RM
    RMClient.init(applicationId, txServiceGroup);
	...

    // 注册Spring shutdown的回调,用来释放资源
    registerSpringShutdownHook();

 }
TMClient、RMClient都是Seata基于Netty实现的Rpc框架的客户端类,只是业务逻辑不同,由于TMClient相对来说更简单一些,我们以RMClient为例看一下源码:
public class RMClient {
  // RMClient的init是一个static方法,创建了一个RmNettyRemotingClient实例,并调用init方法
  public static void init(String applicationId, String transactionServiceGroup) {
    RmNettyRemotingClient rmNettyRemotingClient =
            RmNettyRemotingClient.getInstance(applicationId, transactionServiceGroup);
    rmNettyRemotingClient.setResourceManager(DefaultResourceManager.get());
    rmNettyRemotingClient.setTransactionMessageHandler(DefaultRMHandler.get());
    rmNettyRemotingClient.init();
  }
}
RmNettyRemotingClient的实现如下:
@Sharable
public final class RmNettyRemotingClient extends AbstractNettyRemotingClient {
// ResourceManager负责处理事务参与方,支持AT、TCC、Saga三种模式
private ResourceManager resourceManager;
// RmNettyRemotingClient单例
private static volatile RmNettyRemotingClient instance;
private final AtomicBoolean initialized = new AtomicBoolean(false);
// 微服务的唯一标识
private String applicationId;
// 分布式事务分组名称
private String transactionServiceGroup;
// RMClient中init方法会调用该init方法
public void init() {
// 注册Seata自定义Rpc的Processor
registerProcessor();
if (initialized.compareAndSet(false, true)) {
// 调用父类的init方法,在父类中负责Netty的初始化,与Seata-Server建立连接
super.init();
}
}
// 注册Seata自定义Rpc的Processor
private void registerProcessor() {
// 1.注册Seata-Server发起branchCommit的处理Processor
RmBranchCommitProcessor rmBranchCommitProcessor =
new RmBranchCommitProcessor(getTransactionMessageHandler(), this);
super.registerProcessor(MessageType.TYPE_BRANCH_COMMIT, rmBranchCommitProcessor,
messageExecutor);
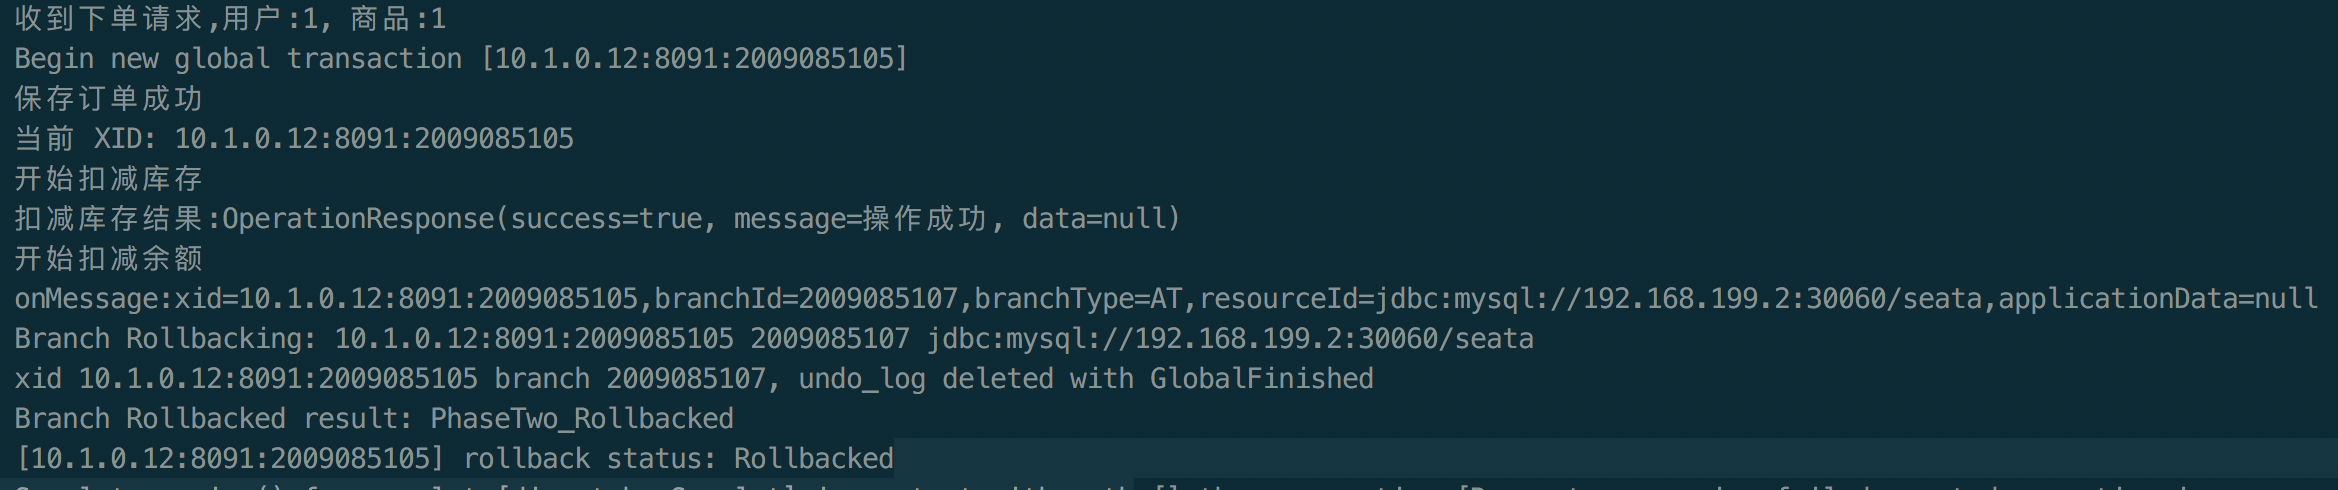
// 2.注册Seata-Server发起branchRollback的处理Processor
RmBranchRollbackProcessor rmBranchRollbackProcessor =
new RmBranchRollbackProcessor(getTransactionMessageHandler(), this);
super.registerProcessor(MessageType.TYPE_BRANCH_ROLLBACK, rmBranchRollbackProcessor
, messageExecutor);
// 3.注册Seata-Server发起删除undoLog的处理Processor
RmUndoLogProcessor rmUndoLogProcessor =
new RmUndoLogProcessor(getTransactionMessageHandler());
super.registerProcessor(MessageType.TYPE_RM_DELETE_UNDOLOG, rmUndoLogProcessor,
messageExecutor);
// 4.注册Seata-Server返回Response的处理Processor,ClientOnResponseProcessor
// 用于处理由Client主动发起Request,Seata-Server返回的Response。
// ClientOnResponseProcessor负责把Client发送的Request和Seata-Server
// 返回的Response对应起来,从而实现Rpc
ClientOnResponseProcessor onResponseProcessor =
new ClientOnResponseProcessor(mergeMsgMap, super.getFutures(),
getTransactionMessageHandler());
super.registerProcessor(MessageType.TYPE_SEATA_MERGE_RESULT, onResponseProcessor,
null);
super.registerProcessor(MessageType.TYPE_BRANCH_REGISTER_RESULT,
onResponseProcessor, null);
super.registerProcessor(MessageType.TYPE_BRANCH_STATUS_REPORT_RESULT,
onResponseProcessor, null);
super.registerProcessor(MessageType.TYPE_GLOBAL_LOCK_QUERY_RESULT,
onResponseProcessor, null);
super.registerProcessor(MessageType.TYPE_REG_RM_RESULT, onResponseProcessor, null);
// 5. 处理Seata-Server返回的Pong消息
ClientHeartbeatProcessor clientHeartbeatProcessor = new ClientHeartbeatProcessor();
super.registerProcessor(MessageType.TYPE_HEARTBEAT_MSG, clientHeartbeatProcessor,
null);
}
}
上面的逻辑看起来比较�复杂,相关类也比较多,如:各种Processor、各种MessageType、TransactionMessageHandler、ResourceManager。其实本质上就是Rpc调用,分为Rm主动调用和Seata主动调用。
- Rm主动调用方法: 如:注册分支、汇报分支状态、申请全局锁等。Rm主动调用的方法都需要在ClientOnResponseProcessor中处理Seata-Server返回的Response
- Seata-Server主动调用方法: 如:提交分支事务、回滚分支事务、删除undolog日志。Seata-Server主动调用的方法,Client端分别对应不同的Processor来处理,并且处理结束后要返回给Seata-Server处理结果Response。而事务提交、回滚的核心实现逻辑都在TransactionMessageHandler、ResourceManager中。
关于TransactionMessageHandler、ResourceManager的具体实现也会在后续的章节中详细描述。
下一篇会介绍一下SeataAutoDataSourceProxyCreator、Rpc Interceptor是如何初始化以及拦截的。


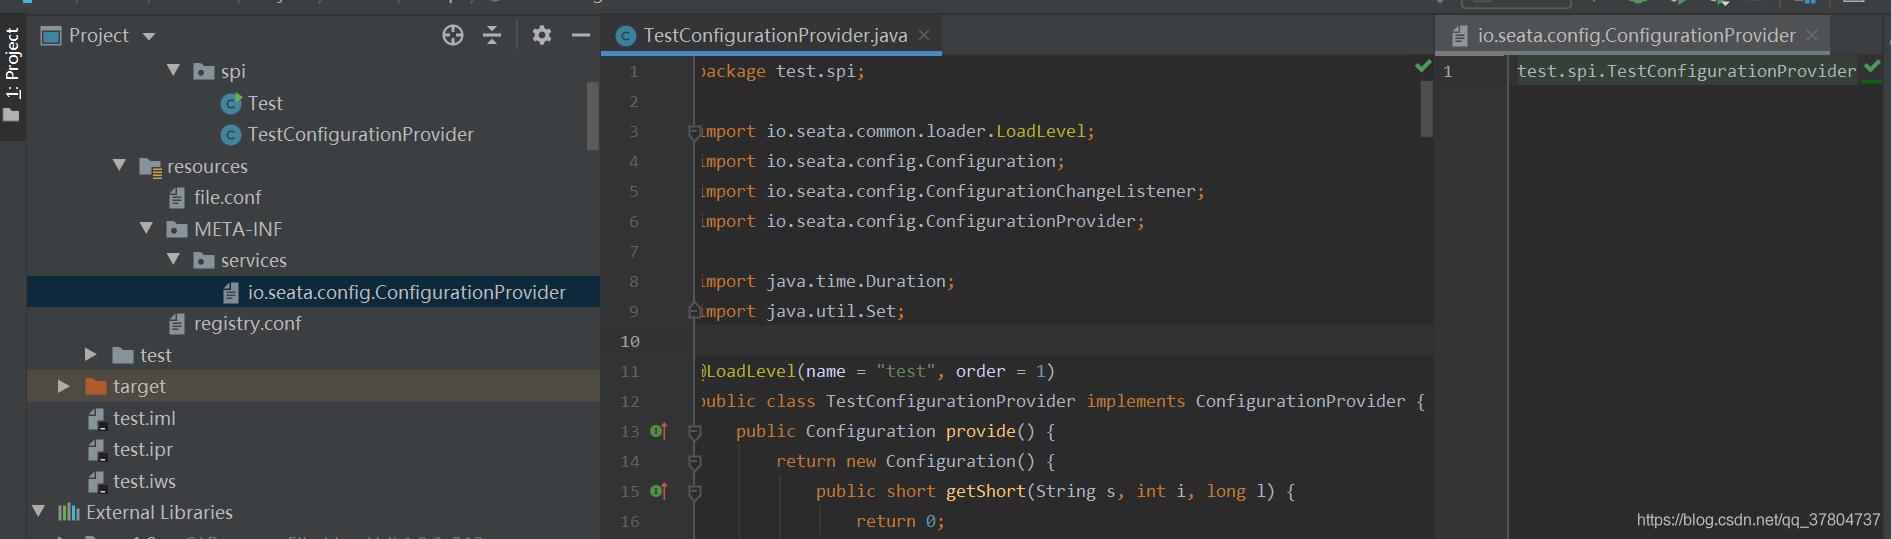 这是一个自定义配置中心提供类的例子,在 META-INF/services 下放置一个接口同名的文本文件,文件的内容为接口的实现类。这是标准的 spi 方式。然后修改配置文件 registry.conf 中的 config.type=test 。
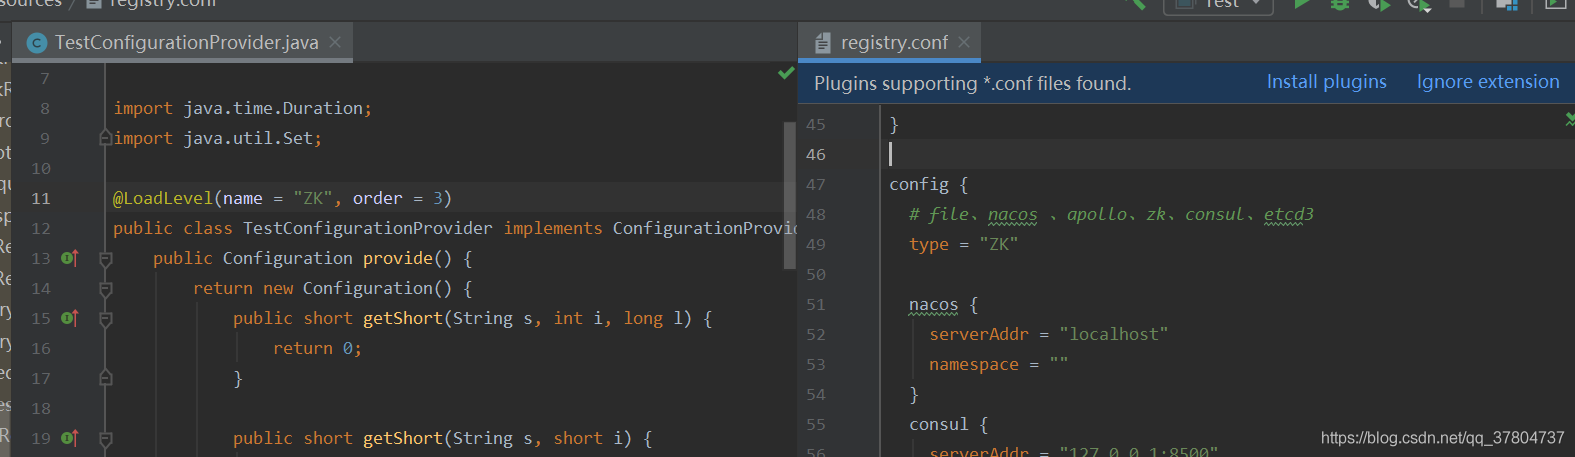 这里可以使用不优雅的方式,即提供一个指定名称 ZK 但是级别 order=3 更高的实现类(ZK 默认 order=1),就可以让 ConfigurationFactory 使用 TestConfigurationProvider 作为配置中心提供类。